Baking 烘焙
Introduction 引言
Baking allows the rendering of AOVs onto texture maps using a specific UV channel. This can be useful in a variety of scenarios. One of these is "light mapping" where the user renders the diffuse lighting received by a particular object onto a texture and then re-uses the texture during animation rendering instead of having to compute the (potentially slow) diffuse lighting on each frame.
Baking Pros
烘烤允许使用特定的 UV 通道将 aov 渲染到纹理贴图上。这在各种情况下都很有用。其中之一是“光线映射”,用户将特定对象接收到的漫射光线映射到纹理上,然后在动画渲染期间重复使用纹理,而不必计算每帧上的(可能较慢的)漫射光线。烘焙的优点
- Can help increase rendering performance 可以帮助提高渲染性能
- Textures can be tweaked by an external image editing program or script for quality or look reasons. 纹理可以通过外部图像编辑程序或脚本进行调整,以保证质量或外观
Baking Cons
烘焙缺点
- Involves some setup effort 需要一些准备工作
- The quality of the baked results depends on the resolution of the texture. Extremely high resolution textures can take a long time to compute. 烘焙结果的质量取决于纹理的分辨率。极高分辨率的纹理需要很长的计算时间
- When used for light mapping, changes to the lighting due to animated geometry and lights won't be reflected on the baked texture 当用于光线贴图时,由于动画几何体和光线的变化,光线不会反射到烘烤的纹理上
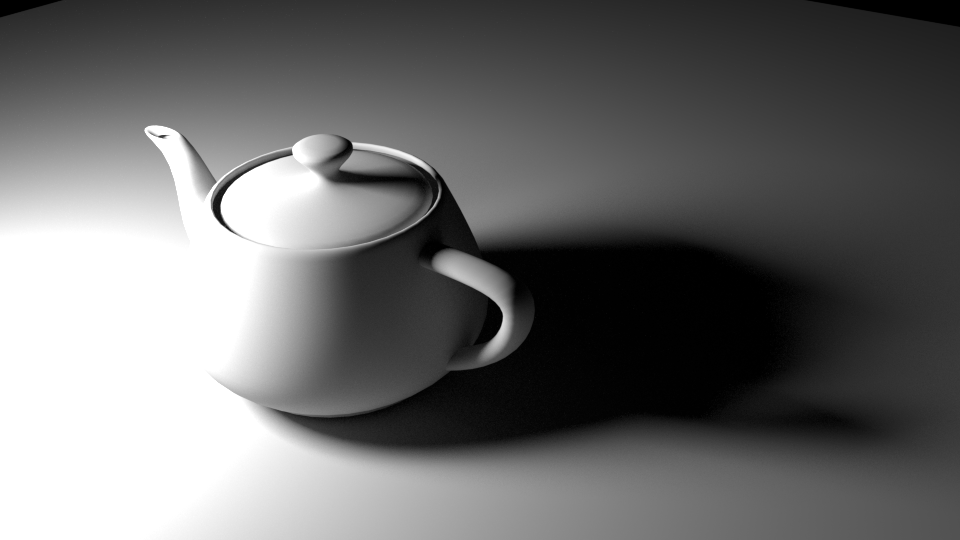
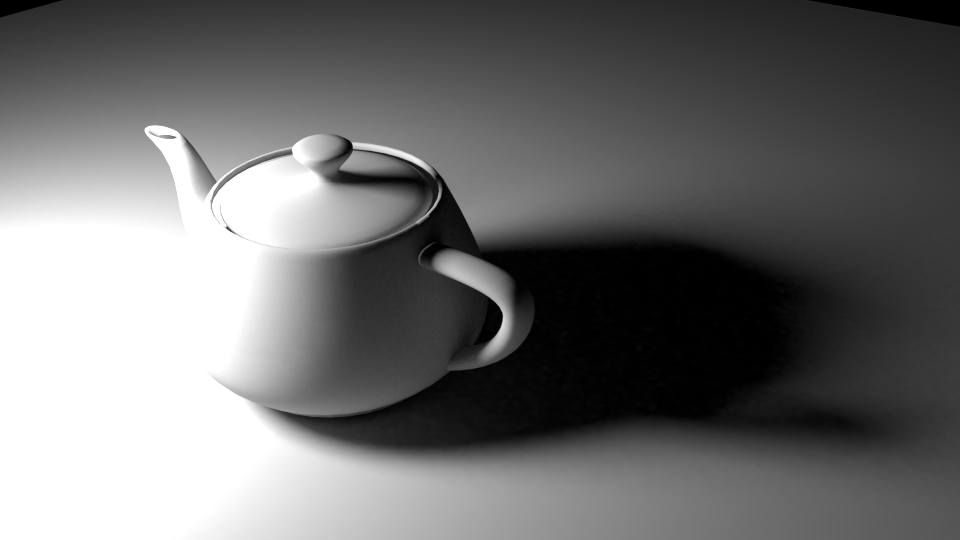
The image below shows a simple light-mapped scene containing a couple of objects. Both the teapot and the floor are using a 512x512 baked TotalDiffuseLightingRaw AOV image.
下面的图片显示了一个简单的光映射场景包含一对对象。茶壶和地板都使用了512x512的烘焙全扩散/亮化 raw AOV 图像。
|
|
|
|
Original scene used to generate the baked lightmap textures. Rendered in 11 seconds. 原始场景用于生成烘焙光影贴图纹理,渲染时间为11秒。 |
Modified shader graphs to use the lightmap textures. Rendered in 2 seconds. 使用光照贴图纹理的修改着色器图形。2秒渲染。 |
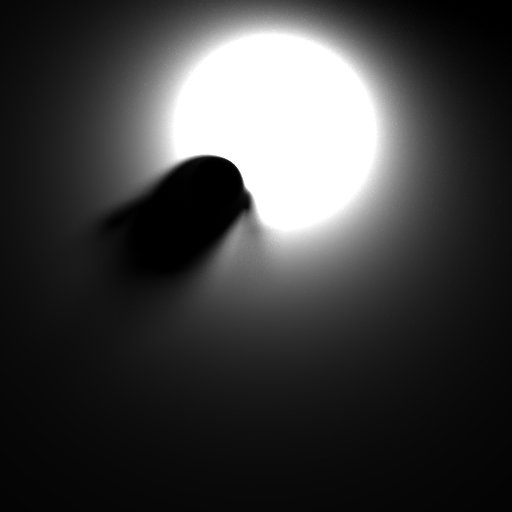
The floor's baked 512x512 image. Please note that the image appears darker because it's shown in linear space.
地板被烘烤成512x512的图像。请注意,图像显示为线性空间,所以颜色较深。
Using Baking
使用烘焙
Generating baked images involves a few main steps:
生成烘焙图片需要几个主要步骤:
- Creating an appropriate unwrapped UV channel that will be used by baking 创建一个适当的展开紫外线通道,将烘烤使用
- Creating and configuring one or more bake sets 创建和配置一个或多个烘焙设置
- Setting up the AOVs 设定分配工作许可证
- Executing the bake 执行烘焙
Redshift requires an appropriate UV channel to perform baking. In most 3d apps, there will be an "automatic UV" or "unwrap UV" option which will generate an appropriate UV layout for baking. Two important requirements for a baking UV channel is that the UVs should fit in the 0->1 UV range and the different parts of the object should not be overlapping in UV space. The unwrapped UVs generated by most 3d apps already satisfy these criteria.
红移需要一个适当的紫外线通道进行烘烤。在大多数3d 应用程序,将有一个“自动紫外线”或“打开紫外线”选项,将产生一个适当的紫外线布局烘烤。烘焙 UV 通道的两个重要要求是 UV 通道适合0-> 1紫外线范围,物体的不同部分不应该在 UV 空间重叠。大多数3 d 应用程序生成的未封装的 uv 已经满足了这些标准。
Creating Bake Sets
制作烘焙套装
Once we have our UV channel, one or more bake sets should be created and configured. Bake sets contain baking settings that can be applied to single object or a group of objects. Each object in the group will get its own baked image. 一旦我们有了我们的 UV 通道,一个或多个烘焙设置应创建和配置。烘焙集包含烘焙设置,可以适用于单一对象或一组对象。组中的每个对象都会得到自己烘焙的图像
Finally, Redshift's AOV settings have to be configured to specify which AOVs we want baked. For example, if we wanted to bake diffuse lightmaps, we should use the "TotalDiffuseLightingRaw" AOV.
最后,Redshift 的 AOV 设置必须配置为指定我们想要烘烤的 AOV。例如,如果我们想要制作漫射光贴图,我们应该使用“ TotalDiffuseLightingRaw”AOV。
AOV Setup for Baking
烘焙用 AOV 设备
Redshift's baking capabilities rely on the AOV system for rendering out the baked images. Setting up the AOVs for baking is identical to setting them up for a render (camera-based) render. 的烘焙能力依赖于 AOV 系统渲染出烘焙图像。设置烘烤的 aov 和设置渲染(基于相机的)渲染是一样的
You can find general information on AOVs 你可以找到有关 aov 的一般资料here 这里 and a short AOV tutorial 和一个简短的 AOV 教程here 这里.
We advise that users set up a separate render pass/layer (depending on their 3d app's capabilities) to configure the AOVs used for baking, as these might differ to the AOVs required by your main render.
我们建议用户设置一个单独的渲染通道/层(取决于他们的3d 应用程序的能力)来配置烘焙所用的 aov,因为这些可能与你的主渲染所需的 aov 不同。
When configuring AOVs for baking, the user has to make a choice regarding the baked image filenames. Since all bake sets rely on the global AOV options (which include filenames), how can this work when the scene contains multiple objects? I.e. how do we prevent the baking of all object in the scene from writing to the same image file?
当为烘焙配置 aov 时,用户必须对烘焙后的图像文件名进行选择。由于所有的烘焙集依赖于全局的 AOV 选项(其中包括文件名) ,如何能够工作时,场景包含多个对象?例如,我们如何防止烘烤场景中的所有物体写入同一个图像文件?
This depends on the 3d app.
这取决于3 d 应用。
Executing Baking
执行烘焙
Limitations
局限性
The baking system currently doesn't work with the following rendering features:
烘焙系统目前不支持以下渲染特性:
- Tessellation and displacement. If the baked geometry is tessellated or displaced, visual artifacts will appear on the baked image. 镶嵌和位移。如果烘焙的几何图形是镶嵌或移位的,视觉人工制品将出现在烘焙的图像上
- Point-based techniques such as point-based subsurface scattering, irradiance cache and the irradiance point cloud don't work in conjunction with baked renders. Photons (and, subsequently, caustics) do work. 基于点的技术,比如基于点的渲染次表面散射、辐照度缓存和辐照度点云,在烘烤渲染中不起作用。光子(以及随后的焦散线)确实起作用
- Projection mapping is not currently supported. 投影映射目前不受支持
- high-res to low-res texture baking is not currently supported. 目前不支持高分辨率到低分辨率的纹理烘焙
Using Baking for Lightmapping
使用光照映射烘烤
Here are a few quick steps to generate baked lightmaps similar to the one shown above:
这里有一些快速的步骤来生成类似于上面所示的烘焙光照图:
- Create a scene like the one shown above, with two objects 创建一个类似上面所示的场景,有两个对象
- Create unwrapped UV channels for both objects. Ensure the UV channels are named consistently. 为两个对象创建未包装的 UV 通道。确保 UV 通道的命名一致
- Select both objects and assign them a bake set on both objects. Ensure the bake set is using the correct UV channel 选择这两个对象,并为它们分配一个烘焙集对这两个对象。确保烘烤设备使用了正确的 UV 通道
- Add a "TotalDiffuseLightingRaw" AOV to your scene 在你的场景中添加一个“ total diffuselightingraw”的 AOV
- Depending on your 3d app, perform the baking filename steps explained above 根据你的3 d 应用,执行上面解释的烘焙文件名步骤
- Execute the bake 执行烘焙
- Then edit the shader graph as follows: 然后按如下方式编辑着色图:
- Remove any diffuse lighting by making the diffuse color black or the diffuse weight zero 通过使漫反射颜色为黑色或者漫反射重量为零来移除任何漫反射照明
- Connect the baked images to the incandescent (or emission) color ports of your shader and set incandescent (or emission) weight to the same value as your original diffuse weight 连接烘烤的图像到白炽灯(或发射)色端口的着色器和设置白炽灯(或发射)重量相同的价值,作为你的原始漫反射重量
- Ensure that, if the image was saved out as an EXR, the gamma in the texture node is set to linear 确保,如果将图像保存为 EXR,则纹理节点中的伽玛值设置为线性
- The above steps essentially replace the 'real' diffuse lighting with baked diffuse lighting 上面的步骤基本上用烘焙漫射照明取代了真正的漫射照明
- If the diffuse port was textured, use a multiplication shader node to multiply the texture with the lightmap before connecting it to the incandescent port (or emission). 如果漫反射端口有纹理,在连接到白炽端口(或发光端口)之前,使用倍增着色器节点将纹理与光照图相乘


赶快留个言打破零评论!~