creatIng volumetrIc fIRE
In this section we will produce a fire simulation and show how to shade using Octane volume medium. You will see practically how both volumes work and what kind of settings are made when shading. We gave you a link below so that you can follow and practice.
创造体积火焰
在本节中,我们将进行火焰模拟,并演示如何使用Octane体积介质进行着色。实际上,您将看到两个卷如何工作以及在着色时进行什么样的设置。我们在下面提供了一个链接,以便您可以跟随和练习。
Download the scene from here
从这里下载场景
IMPORTANT NOTE: The following example uses the TurbulenceFD plugin to simulate fire. However, you can also use other simulation softwares. For example, you can simulate fire in Houdini and export to Octane as VDB file. What matters is the shading settings you'll make in Volume Medium. First you need to make a good simulation. It is difficult to simulate a fire and fire is a very complicated phenomenon. To simulate this you need to advanced solver and options. So do not expect to generate realistic fire using Noise from the Generator.
重要说明:以下示例使用TurbulenceFD插件模拟火焰。但是,您也可以使用其他仿真软件。例如,您可以在Houdini中模拟火焰并将其作为VDB文件导出到Octane。重要的是您将在Volume Medium中进行的阴影设置。首先,您需要进行良好的模拟。很难模拟起火,起火是非常复杂的现象。为了模拟这一点,您需要高级求解器和选项。因此,不要期望使用发生器的噪波来产生逼真的火焰。
MAKING FIRE WITH TURBULENCE FD
In this mini tutorial we will create a volumetric fire effect using TurbulenceFD. First, install TurbulenceFD in your system before opening the scene. Turbulence FD is a Cinema 4D plugin for fluid simulations. It produces realistic and beautiful results. You can buy it by going to Jawset's site. After installing the plugin, open the "fire_01" scene. You will not see any simulations because the fire cache file you see in the picture below is huge (124 GB) , so you have to generate this cache file yourself. Therefore, during the explanation we will show the fire setup then you will only cache. If you know Turbulence FD, you know how to cache it. If you are new to Turbulence FD, there are both commercial and free tutorials on the Web. You can watch and learn. However, free tutorials do not fully explain such a complex simulation software. So, we recommend you buy and learn from a professional tutorial. It's worth it.
用TFD制作火焰
在本迷你教程中,我们将使用TurbulenceFD创建体积火焰效果。首先,在打开场景之前,先在系统中安装TurbulenceFD。 Turbulence FD是用于流体模拟的Cinema 4D插件。它产生逼真的效果。您可以通过Jawset的网站购买它。安装插件后,打开“ fire_01”场景。您不会看到任何模拟,因为您在下图中看到的防火缓存文件很大(124 GB),因此您必须自己生成此缓存文件。因此,在说明过程中,我们将显示启动设置,然后您将仅缓存。如果您知道Turbulence FD,就会知道如何对其进行缓存。如果您不熟悉Turbulence FD,则网上有商业和免费教程。您可以观看和学习。但是,免费教程并未完全解释这种复杂的仿真软件。因此,我们建议您购买并学习专业教程。这很值得。
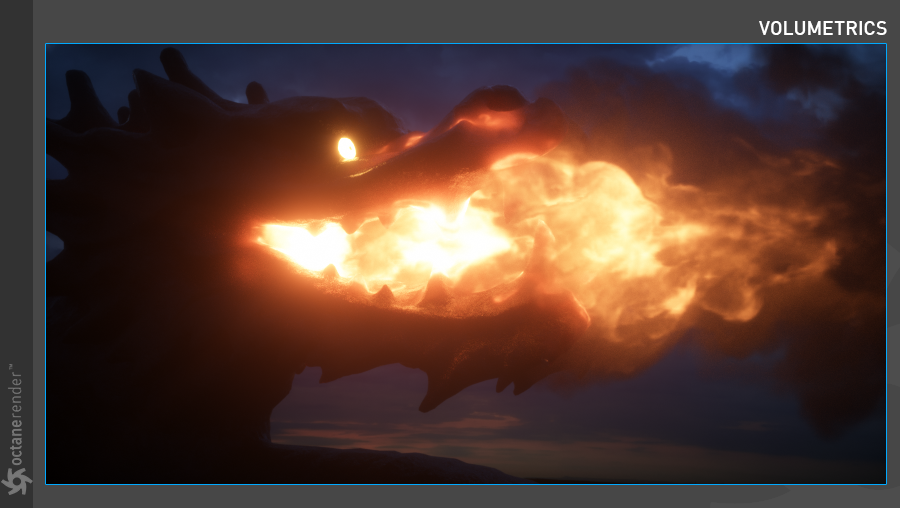
Now we will produce the fire setup you see in the picture below. We will not explain the other cosmetic factors because they are already there. If you're ready, let's start:
现在,我们将生成您在下图中看到的射击设置。我们不会解释其他修饰因素,因为它们已经存在。如果您准备好了,那就开始吧:
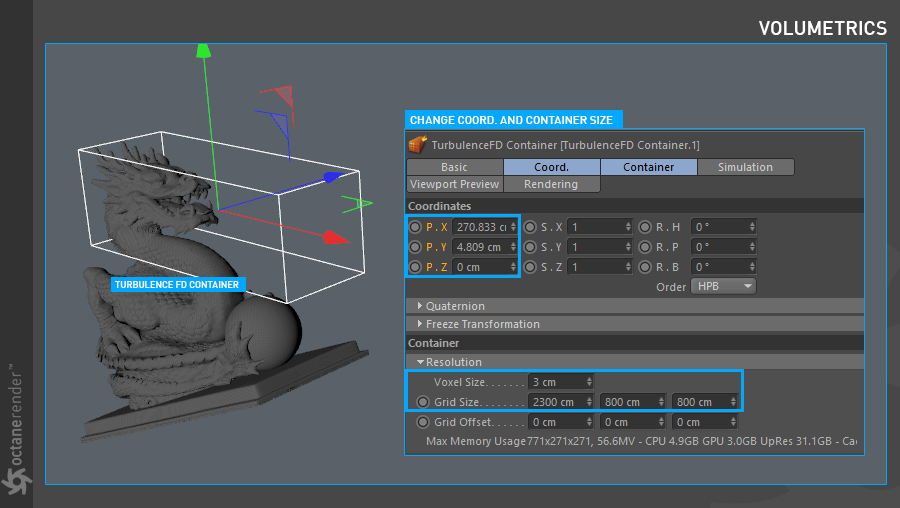
01- Open the "Fire_01" scene. Create a container from Plugins / Turbulence FD and change the location and size as you see in the picture below. So we set the size of the voxel grid and placed it in the head of the Dragon. to fire the dragon's mouth and place it in the head of the dragon. You can increase the Voxel size to 7-8 instead of 3, at least make the TFD run faster for preview simulation until the final cache. Then you can go back to value 3 again. The quality of the simulation increases as you decrease this number. However, you spend a lot of simulation time and huge cache files. You can also crash the software at very low numbers. Be careful.
01-打开“ Fire_01”场景。 从Plugins / Turbulence FD创建一个容器,并更改位置和大小,如下图所示。 因此,我们设置体素网格的大小,并将其放置在龙的头部。 射出龙的嘴并将其放在龙的头部。 您可以将Voxel大小增加到7-8(而不是3),至少可以使TFD更快地运行以进行预览模拟,直到最终缓存为止。 然后,您可以再次返回到值3。 减少此数字可提高仿真质量。 但是,您花费了大量的模拟时间和大量的缓存文件。 您也可以以极低的数量使软件崩溃。 小心。
02- Now let's assign the Emitter object to Turbulence FD, which stands in Dragon's mouth. To do this, select the "Emitter" object from the Object manager, right click on "Turbulence FD tags" and select "Turbulence FD Emitter". Change the parameters as you see in the picture below. We will spread fire from this emitter object. For now, we will not use collision for the Dragon head.
02-现在让我们将发射器对象分配给位于龙口中的湍流FD。 为此,从对象管理器中选择“ Emitter”对象,右键单击“ Turbulence FD标签”,然后选择“ Turbulence FD Emitter”。 更改参数,如下图所示。 我们将从此发射器对象发射火。 目前,我们将不对Dragon使用碰撞。

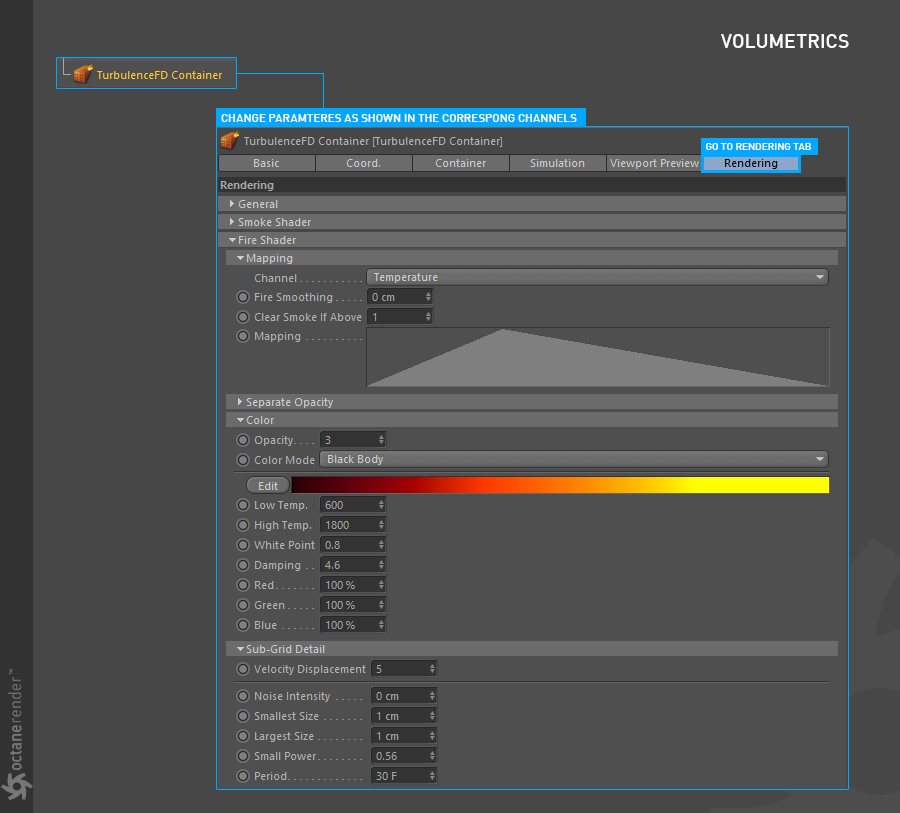
03- Set the Timeline duration to 300 frames and select "TurbulenceFD container" from the object manager. Now that there are a lot of settings here, change the parameters as you see in the pictures below.
03-将时间轴持续时间设置为300帧,然后从对象管理器中选择“ TurbulenceFD容器”。 现在这里有很多设置,如下图所示更改参数。
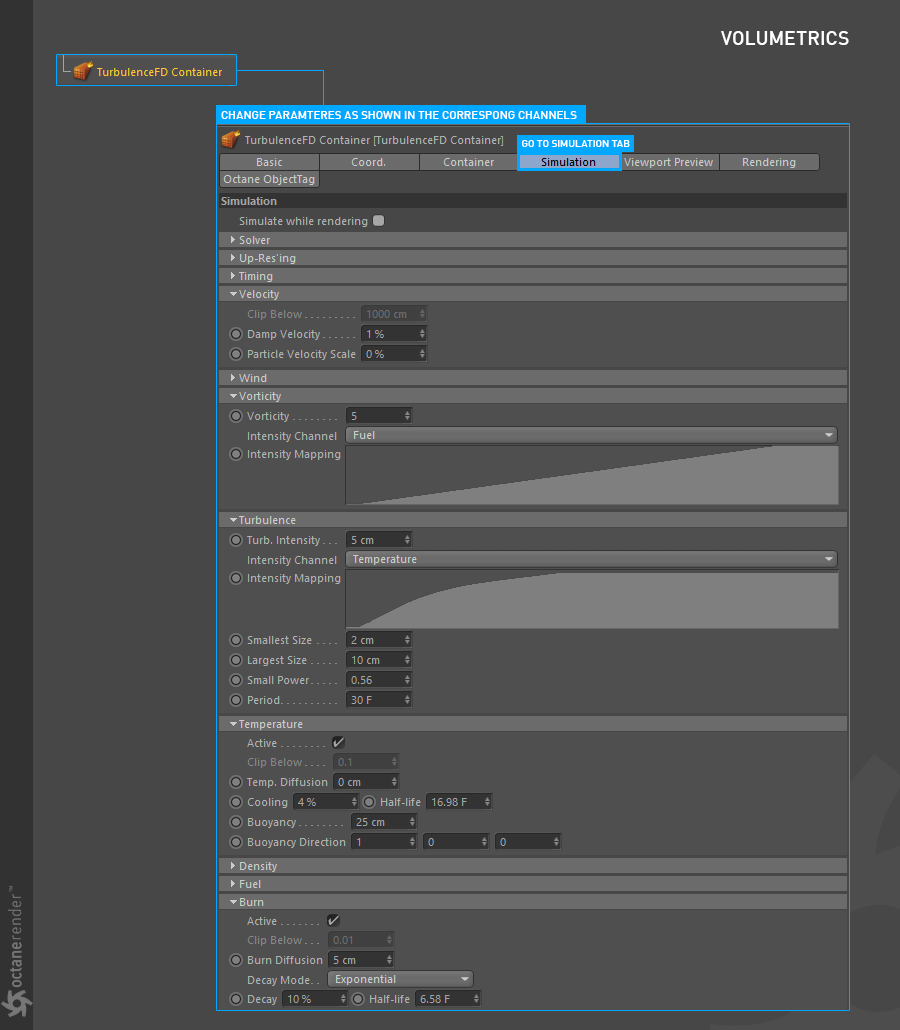
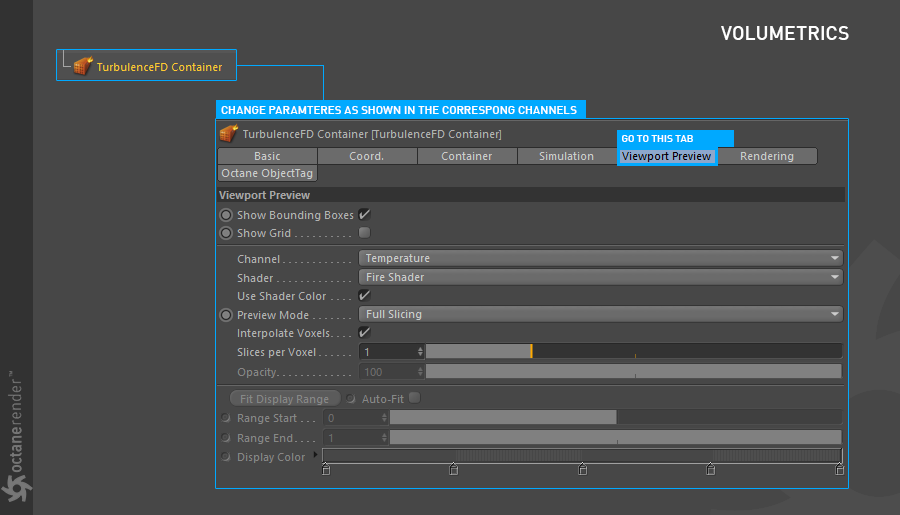
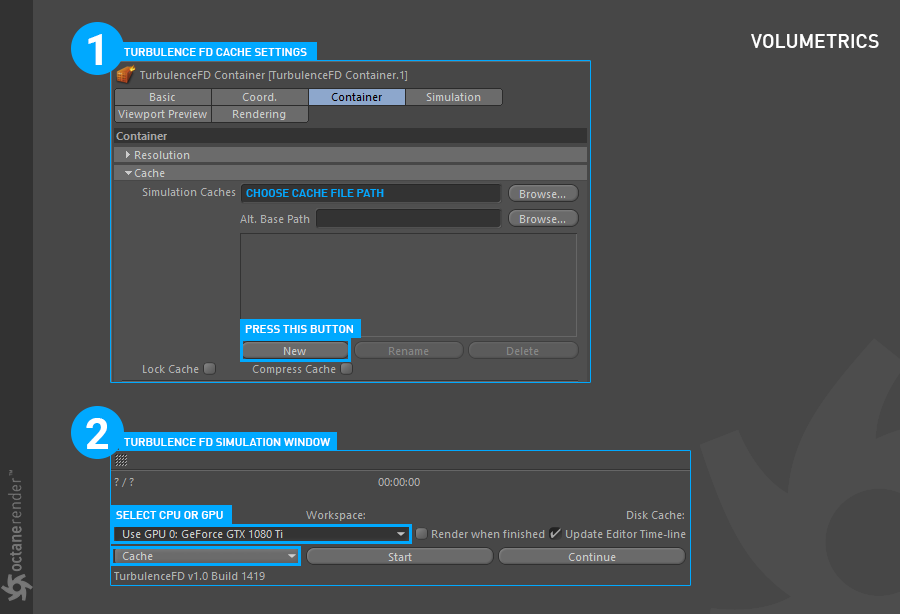
04- Now that we've done these settings, let's look at how the dragon fire from the viewport. To do this, first select TurbulenceFD container from object manager and go to the cache tab from the container tab. From here, press "New" and select a fast hard drive (SSD if possible) to save the cache file. Then go to TurbulenceFD from the plugins menu and select "Simulation Window". If you click the cache button you can see the other options. You can use CPU or GPU for caching. Choose one. After making the settings here, press "start" and wait for it to finish.
04-现在我们已经完成了这些设置,让我们看一下龙是如何从视口发射的。 为此,首先从对象管理器中选择TurbulenceFD容器,然后从容器选项卡转到“缓存”选项卡。 从这里,按“新建”,然后选择快速硬盘驱动器(如果可能,请选择SSD)以保存缓存文件。 然后从插件菜单转到TurbulenceFD,然后选择“模拟窗口”。 如果单击缓存按钮,则可以看到其他选项。 您可以使用CPU或GPU进行缓存。 选一个。 在此处进行设置后,按“开始”并等待其完成。
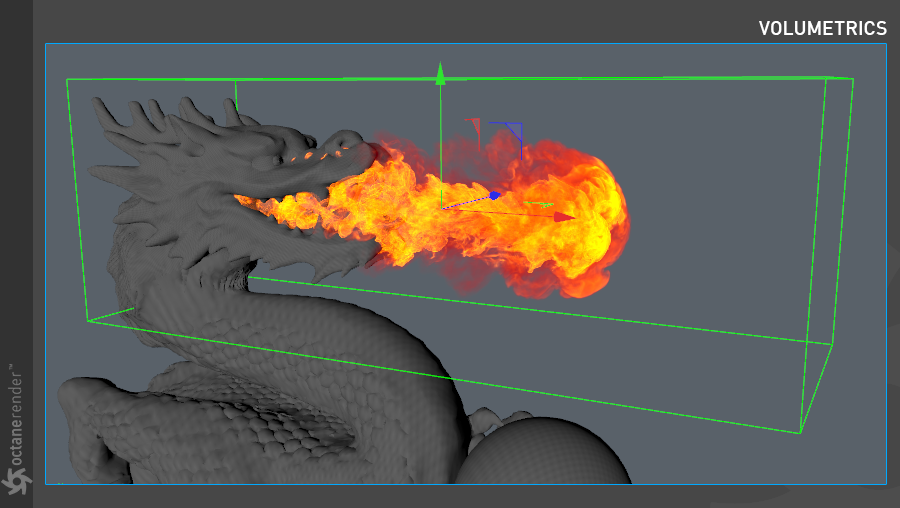
05- Once the simulation is finished, you can easily play it in the viewport. If your settings are correct, the result will look like the picture below.
05-模拟完成后,您可以轻松地在视口中播放它。 如果设置正确,结果将如下图所示。
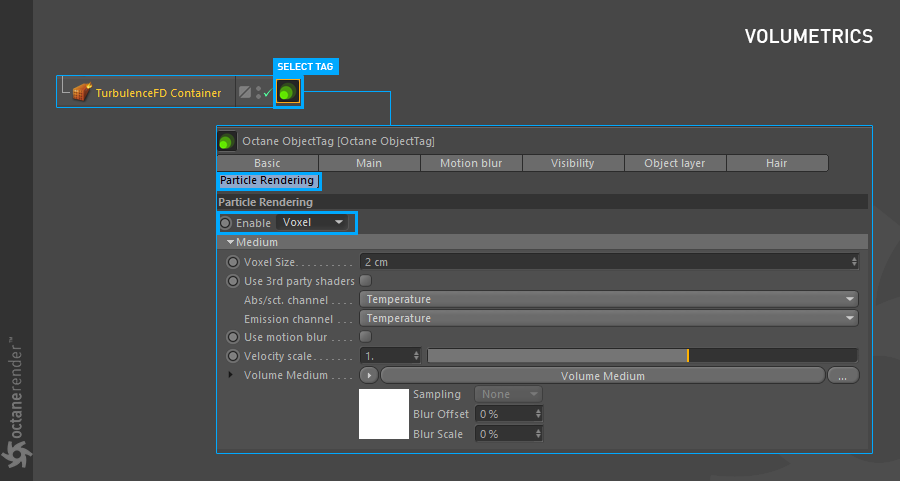
06- Go to the desired frame (eg 265) and select "TurbulenceFD Container" from the object manager. Right click and assign an Octane Object tag. Go to the Particle rendering tab in the Object Tag settings. If it is not active, select "Voxel" from Enable. The "Voxel" option here is written to work only with Turbulence FD. There are a few options here. "Voxel size" is for to set the voxel quality again. "Abs / Sct." channel will be used in the Volume medium, therefore the Absorption and Scatter properties will be used for which channel in the simulation. "Use motion blur" is for simulating blur. But for that you need to cache the velocity channel in Turbulence FD. Without Velocity, motion blur does not work. "Velocity scale" increases motion blur effect.
06-转到所需的框架(例如265),然后从对象管理器中选择“ TurbulenceFD容器”。 右键单击并分配一个Octane Object标签。 转到“对象标签”设置中的“粒子渲染”选项卡。 如果未激活,请从“启用”中选择“体素”。 此处的“体素”选项仅适用于Turbulence FD。 这里有一些选择。 “体素大小”用于再次设置体素质量。 “ Abs / Sct。” 通道将在体积介质中使用,因此吸收和散射属性将用于模拟中的哪个通道。 “使用运动模糊”用于模拟模糊。 但是为此,您需要将速度通道缓存在Turbulence FD中。 没有速度,运动模糊将不起作用。 “速度比例”增加运动模糊效果。
Volume medium is the part we are mainly interested in. From here we will make the Dragon fire shading. Now, set the Voxel size to 2, abs / sct and the emission channels to "temperature".
体积介质是我们主要感兴趣的部分。从这里开始,我们将制作Dragon火阴影。 现在,将Voxel大小设置为2,abs / sct,将发射通道设置为“温度”。
07- Now click on Volume Medium and change the parameters as you see in the pictures below.
07-现在单击“ Volume Medium”,然后更改参数,如下图所示。
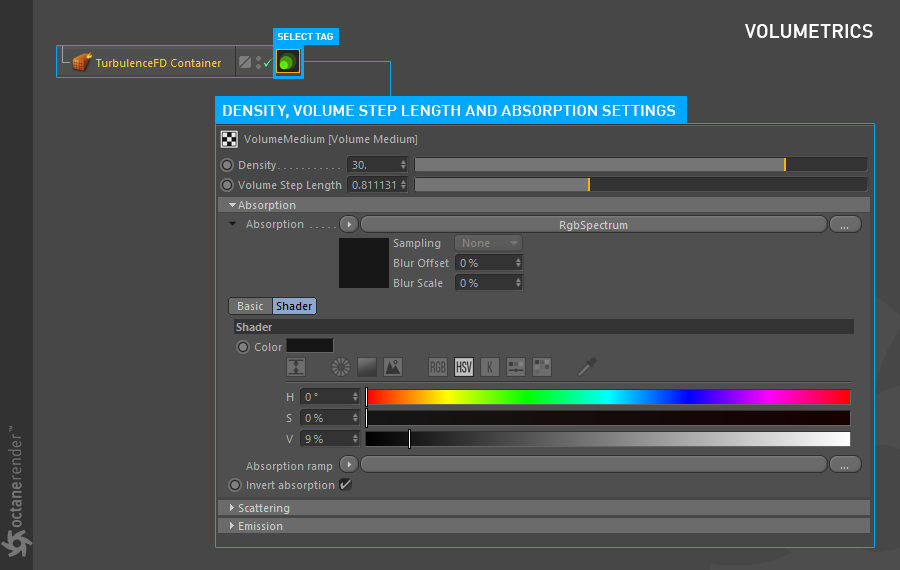
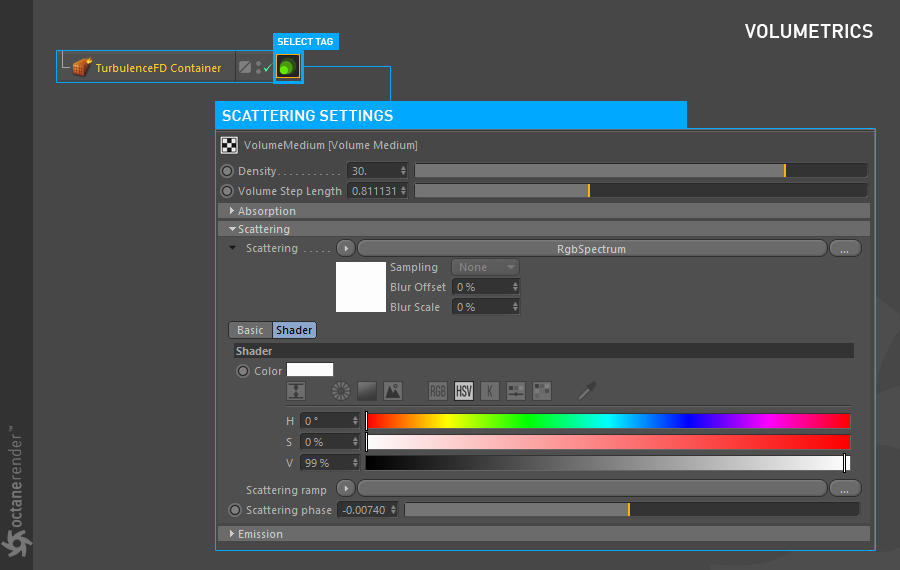
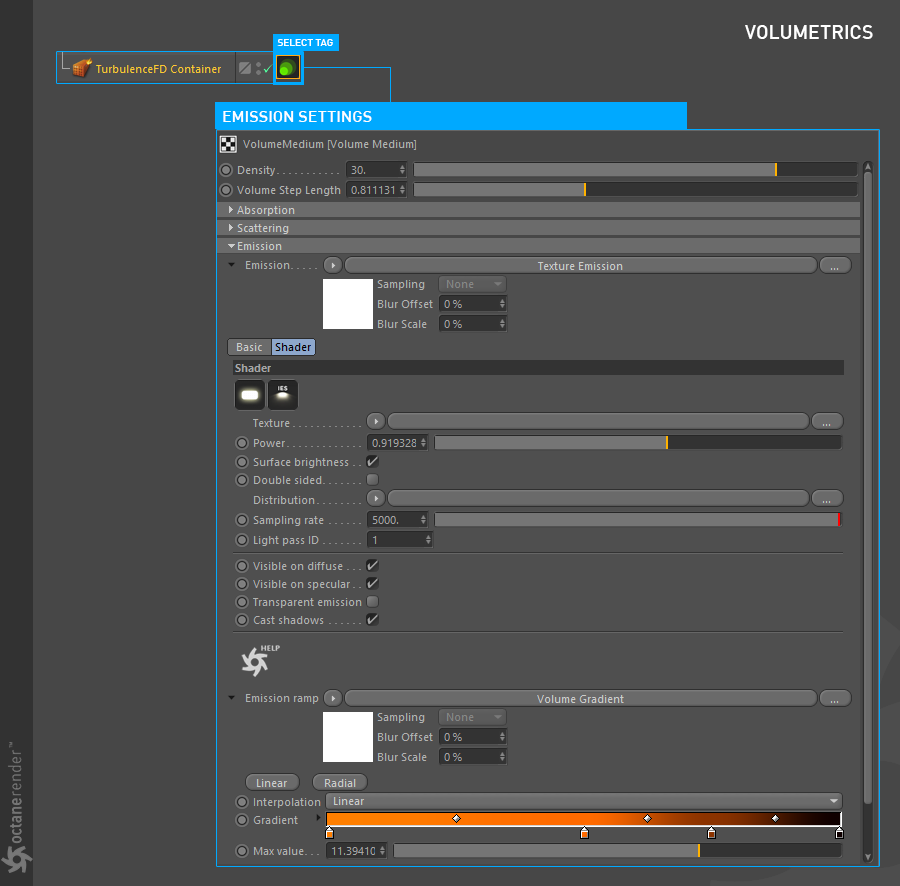
08- Now run Live Viewer. If you have done everything right, you will get the following result. As you can see in the picture, it has been given a relatively low density to make the fire bulky. You can also make this fire thin by playing with the density setting in the same way. Volume Step lenght is the most important setting. Here you determine how much of the distance between voxels can be covered. In the event of a fire, you can lower the value to make it more detailed. Do not decrease too much because you can get a solid look. Of course, all of these settings work in conjunction with all other settings. So make a lot of practice.
08-现在运行Live Viewer。 如果您做对了所有事情,您将得到以下结果。 如您在图片中所看到的,它已经被赋予了相对较低的密度以使火势庞大。 您也可以通过以相同方式使用浓度设置来减轻这种火焰。 音量步进长度是最重要的设置。 在这里,您可以确定体素之间的距离可以覆盖多少。 万一发生火焰,您可以降低此值使其更详细。 不要减少太多,因为这样可以使您看起来很立体。 当然,所有这些设置都可以与所有其他设置一起使用。 因此,请多多练习。


赶快留个言打破零评论!~