MAKING SPOT LIGHT
There is no Spot Light in Octane by default, but there are ways to do it. Now we will show you step by step how to do the simplest "Spot Light". Of course, this example does not include the complex features that may be in a spotlight. You need to write Expresso for this. Writing a script or Expresso is not within the scope of this manual, so we will keep our explanations at a basic level. However, there are both free and commercial products on the web regarding this subject.
You can download the example scene from here.
射灯
默认情况下,Octane中没有Spot Light,但是有很多方法可以做到这一点。 现在,我们将逐步向您展示如何进行最简单的“ Spot Light”。 当然,此示例不包括可能成为聚光灯的复杂功能。 您需要为此编写Expresso。 编写脚本或Expresso不在本手册的范围之内,因此我们将在基本水平上进行解释。 但是,与此主题相关的网络上有免费和商业产品。
您可以从此处下载示例场景。
1- Create a scene or download and open the scene from the link above that we provided to you. Once you've created the scene (or open), create a light by selecting Lights / Octane Area Light from the Live Viewer menu. Place this light somewhere on top of your subject and turn the "Z" axis towards the object.
1-创建一个场景或从我们提供给您的上方链接下载并打开场景。 创建场景(或打开场景)后,通过从“实时查看器”菜单中选择“灯光” /“Octane区域灯光”来创建灯光。 将此光放在对象的顶部,然后将“ Z”轴转向对象。
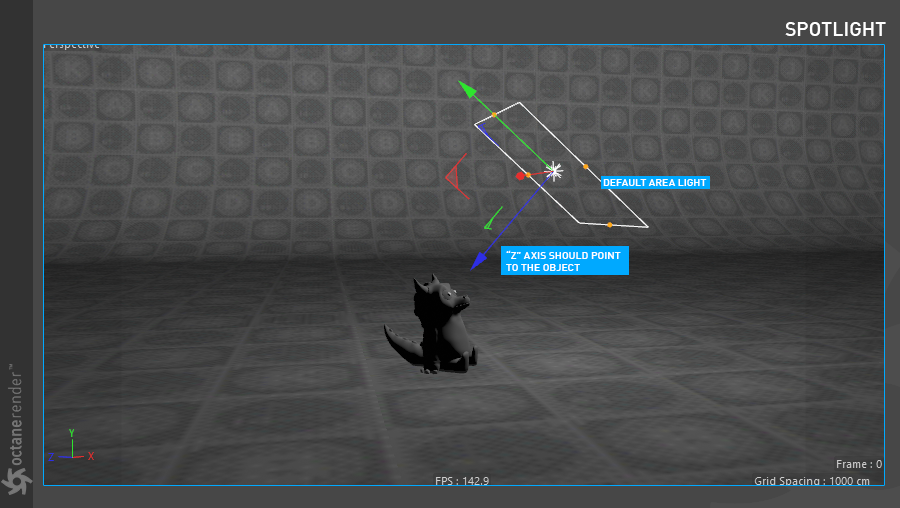
2- Select the light you created from the object manager and select Cinema4D Tags / Target with the right mouse button. Then go to the "Target" Tag and drag and drop the desired object into the "Target Object" field. This option is for locking the light to a fixed point when you move it. It also makes navigating easier when you have PSR from Viewport.
2-从对象管理器中选择创建的光源,然后用鼠标右键选择Cinema4D标签/目标。 然后转到“目标”标签,然后将所需的对象拖放到“目标对象”字段中。 此选项用于在移动灯光时将其锁定到固定点。 当您从Viewport获得PSR时,这也使导航更容易。

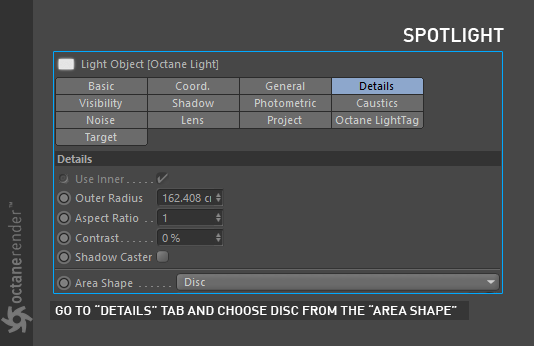
3- From the Object Manager, select the light and go to the "Details" tab. Change "Area Shape" to Disc here.
3-从对象管理器中,选择光源,然后转到“详细信息”选项卡。 在此处将“区域形状”更改为“光盘”。
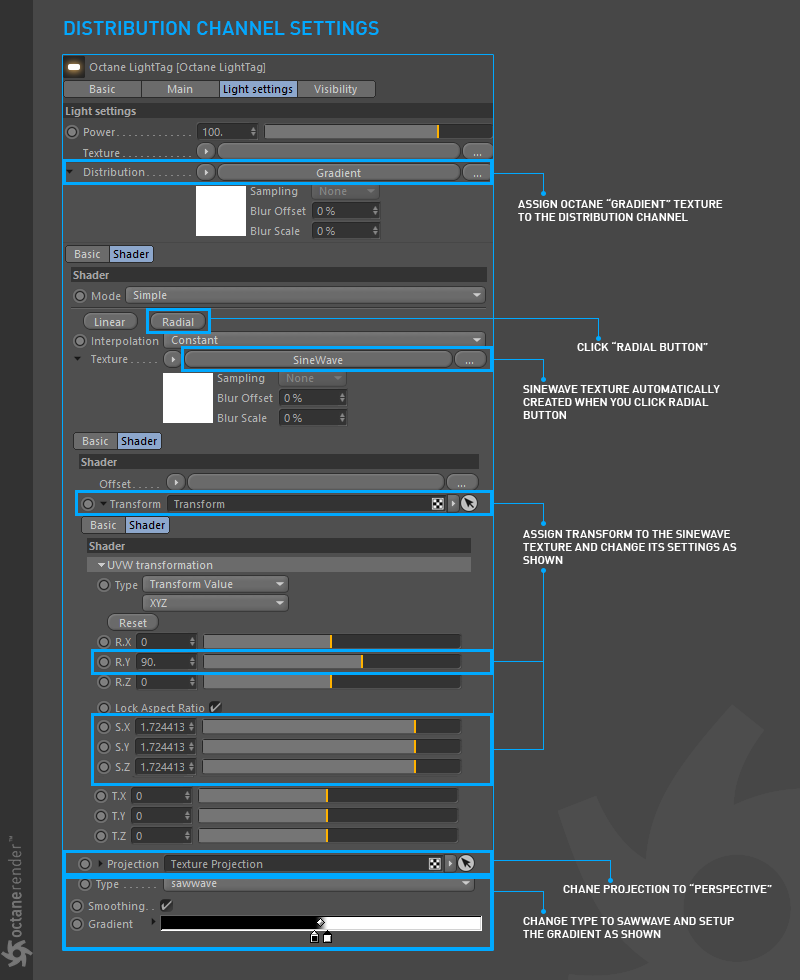
4- Now select Octane Light Tag. Here we will create a spotlight by defining a procedural texture in the "Distribution" section. For this, define the Octane "Gradient" for the texture channel of the Distribution (you can also define the native Cinema 4D gradient if you want). Change the options as you see in the picture below.
4-现在选择Octane灯光标签。 在这里,我们将通过在“分布”部分中定义程序纹理来创建聚光灯。 为此,为“分布”的纹理通道定义“Octane”“渐变”(如果需要,还可以定义本机Cinema 4D渐变)。 如下图所示,更改选项。
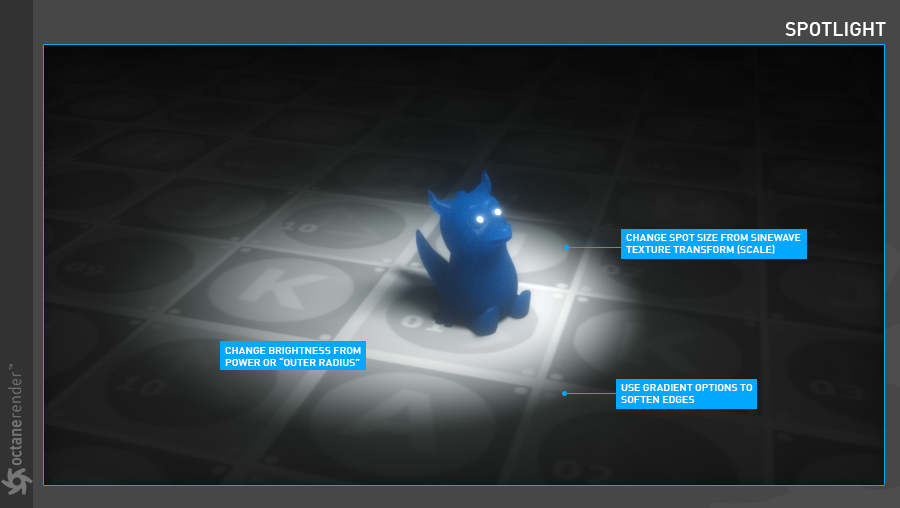
5- And your Octane spotlight is ready. As you can see, we created spotlight easily with the gradient texture we defined in Distribution channel. If the above texture setup is complicated, you can use it in any alpha image texture. In this case you will select the "Image Texture" node instead of the gradient. You can change the brightness of the spotlight you see in the picture below by using power from Light settings. Or you can select the light from the object manager and play with "Outer Radius" from the details tab. If you want to change the spotlight's size, go to the gradient's sinewave options and scale with the texture transform. Likewise, you can change the edge softness of the spot by playing with the position of the "gradient" colors. The reason for our procedural texture assignment here is that it gives us more control. When we assigned an image texture, it will not have that much control. If you know how to write expresso, you can set all these options and more. It is also possible to make it more user friendly user interface.
5-和Octane的聚光灯准备就绪。如您所见,我们使用在“分发”通道中定义的渐变纹理轻松创建了聚光灯。如果上述纹理设置很复杂,则可以在任何alpha图像纹理中使用它。在这种情况下,您将选择“图像纹理”节点而不是渐变。您可以使用“灯光”设置中的电源来更改下图中看到的聚光灯的亮度。或者,您可以从对象管理器中选择灯光,然后从详细信息选项卡中使用“外部半径”进行播放。如果要更改聚光灯的大小,请转到渐变的正弦波选项并使用纹理变换进行缩放。同样,您可以通过使用“渐变”颜色的位置来更改斑点的边缘柔和度。之所以在这里分配程序纹理,是因为它赋予了我们更多的控制权。当我们分配图像纹理时,它将没有太多控制权。如果您知道如何编写Expresso,则可以设置所有这些选项以及更多选项。也可以使其更加用户友好的用户界面。


赶快留个言打破零评论!~