KERNELS: DIRECT LIGHTING
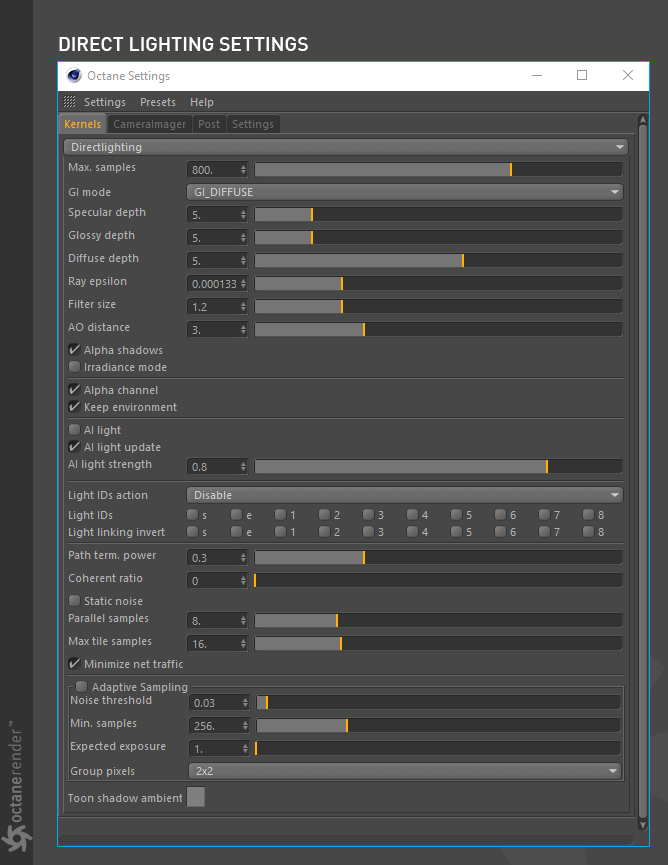
The Direct Lighting Kernel is generally used for faster preview rendering. It's not unbiased and will not yield photorealistic results, however because of its speed it can be the ideal choice for rendering animations or stills depending on your purpose. The following picture shows the Directlighting settings. Some of these settings are shared with the other kernel types. Now let's see what these options are:
内核:直接照明
Direct Lighting Kernel通常用于更快的预览渲染。 它并不是一成不变的,不会产生真实感的结果,但是由于它的速度,它可以根据您的目的成为渲染动画或静止图像的理想选择。 下图显示了Directlighting设置。 其中一些设置与其他内核类型共享。 现在让我们看看这些选项是什么:
Max. Samples:
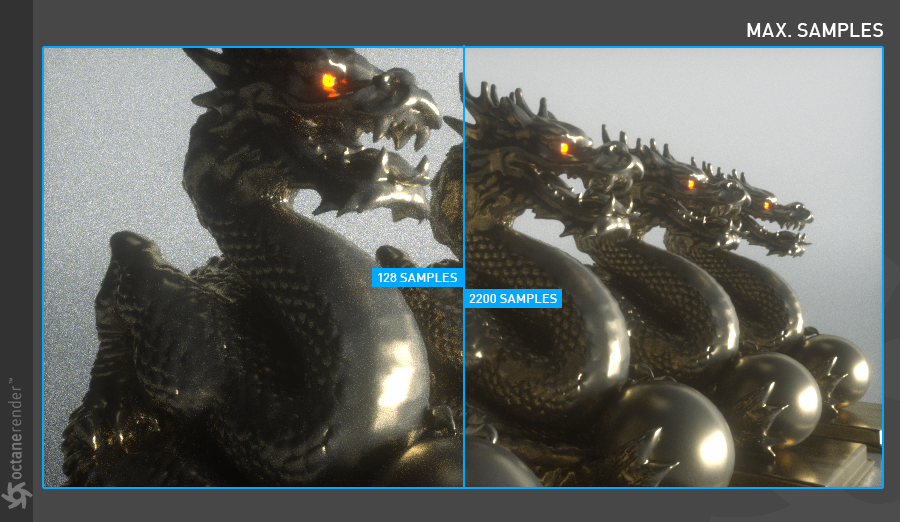
Sets the maximum number of samples per pixel before the rendering process stops. The higher the number of samples per pixel, the cleaner the render. There is no rule as to how many samples per pixel are required for a good render, it is subjective and may vary depending on the content and complexity of the scene being rendered. For example, since Directlighting is a fast kernel, 500-1000 samples for static images and animations will suffice. If you have more than one direct and indirect light source in your scene and you are also using mesh light, you can increase a few hundred samples. But we can not say the same thing for Pathtracing kernel mode, for instance. As we've just mentioned, there is no magic number for it.
最高 采样:
设置渲染过程停止之前每个像素的最大采样数。 每个像素的采样数越高,渲染越清晰。 对于良好的渲染,每个像素需要多少个采样没有规则,这是主观的,并且可能会有所不同,具体取决于所渲染场景的内容和复杂性。 例如,由于Directlighting是一个快速内核,因此可以使用500-1000个静态图像和动画采样。 如果场景中有多个直接和间接光源,并且还使用了网格光,则可以增加数百个采样。 但是,例如,对于路径跟踪内核模式,我们不能说相同的话。 正如我们刚刚提到的,没有神奇的数字。
GI Mode:
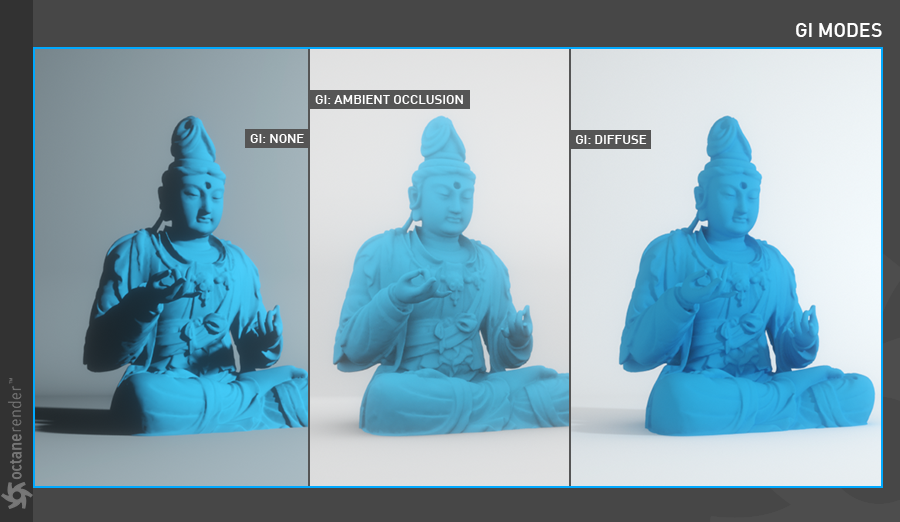
From here you can choose GI Mode for Directlighting. This mode also has 3 sub options:
GI模式:
在这里,您可以选择GI模式进行Directlighting。 此模式还具有3个子选项:
GI_NONE
Only direct lighting from the sun or area lights is included. Shadowed areas receive no contribution and will be black.
无全局光照
仅包括来自太阳的直接照明或区域照明。 阴影区域不起作用,将变为黑色。
GI_AMBIENT OCCLUSION
Standard ambient occlusion. This mode can often provide realistic images but offers no color bleeding.
全局光照+环境吸收
标准环境光遮挡。 此模式通常可以提供逼真的图像,但不会产生色差。
GI_DIFFUSE
Provides GI quality that is in between Ambient Occlusion and Pathtracing. In this mode, the indirect light sources also taken into account and affects the diffuse mode. This increases the level of realism of your render. However the caustics does not appear in this mode, but the realism level of your render is often sufficient. At least you get better results than Ambient Occlusion mode. Since it is a fast mode, you can quickly get a final render; for both static images and animations.
全局光照+漫射
提供介于环境光遮挡和路径跟踪之间的GI质量。 在这种模式下,间接光源也会被考虑并影响漫射模式。 这样可以提高渲染的真实感。 但是,焦散在这种模式下不会出现,但是渲染的真实程度通常就足够了。 至少您可以获得比“环境光遮蔽”模式更好的结果。 由于这是一种快速模式,因此您可以快速获得最终渲染。 用于静态图像和动画
Specular Depth:
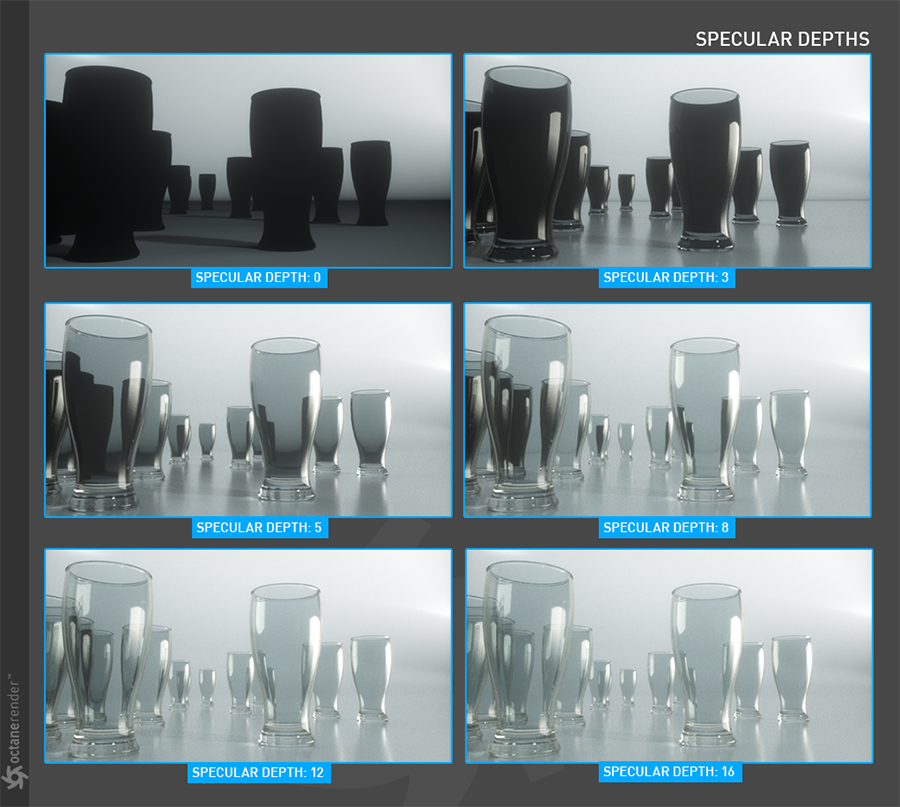
Controls how many times a ray is refracted after hit the surface without losing its energy. A zero number means that the ray does not hit the surface and can not continue on the path (reflect or refract). if it is greater than zero, it continues on its way through the surface and refracts until it loses its energy. Higher numbers mean higher render times but more color bleeding and more details in transparent materials. Low numbers can introduce artifacts or turn some refractions into pure black. You can see different specular depth results from the picture below.
镜面深度:
控制射线撞击表面后折射多少次而不会损失其能量。 零表示射线不会撞击表面并且不能在路径上继续反射或折射。 如果它大于零,它将继续穿过表面并折射直到失去能量。 较高的数字表示更长的渲染时间,但更多的颜色渗色和透明材质中的更多细节。 低数字可能会引入伪影或将某些折射变成纯黑色。 您可以从下图看到不同的镜面反射深度结果。
Glossy Depth:
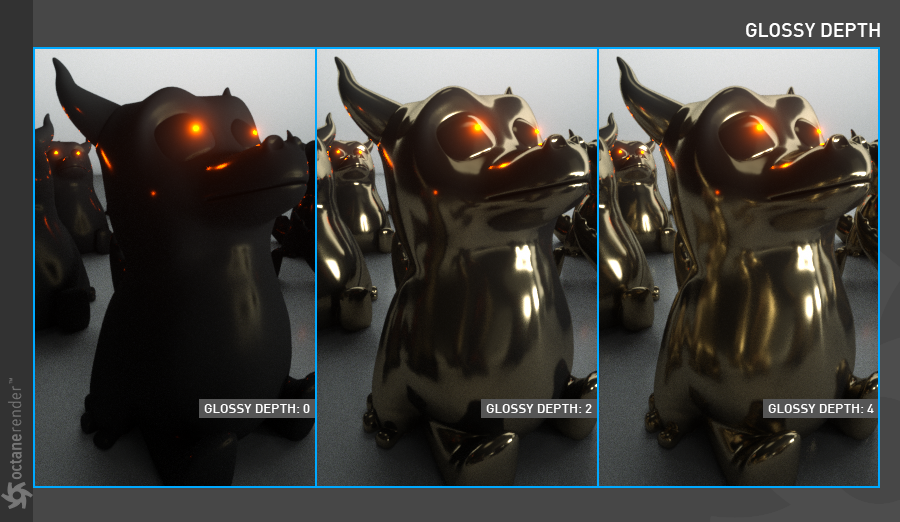
Controls how many times a ray is reflected after hit the surface. A zero number means that the ray does not hit the surface and can not continue on its path (reflect or refract). When it is greater than zero, it hits the surface and continues to be the same as the angle of incidence, so the reflection occurs. Higher numbers mean higher render time. Low numbers (under 4) can introduce artifacts, or turn some reflections into pure black. You can see different glossy depth results from the picture below.
光泽深度:
控制射线撞击表面后反射的次数。 零表示射线不会撞击表面并且不能在其路径上继续反射或折射。 当它大于零时,它将撞击表面并继续与入射角相同,因此会发生反射。 数字越高意味着渲染时间越长。 较小的数字(小于4)可能会引入伪影,或将某些反射变为纯黑色。 您可以从下图看到不同的光泽深度结果。
Diffuse Depth:
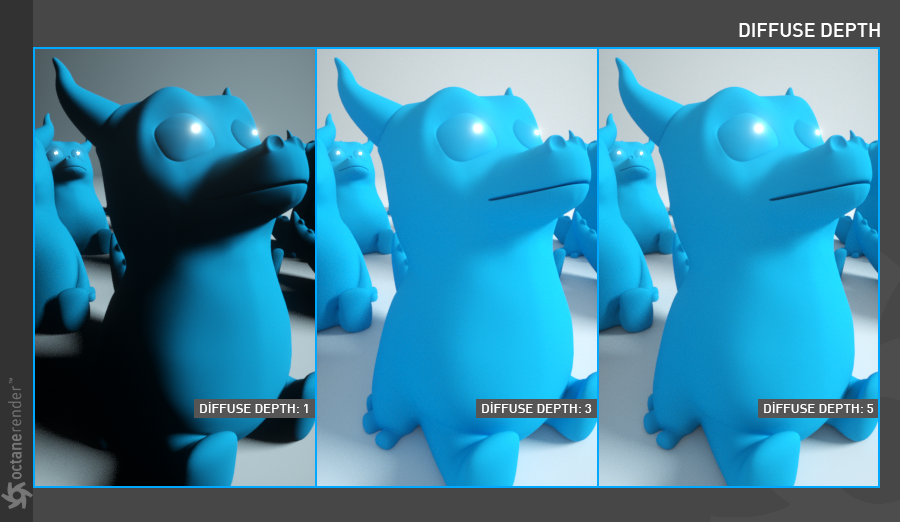
Gives the maximum number of diffuse reflections if GI Mode is set to Diffuse. 3-5 is enough for the most scenarios.
漫射深度:
如果“ GI模式”设置为“漫反射”,则给出最大漫反射的数量。 在大多数情况下,3-5就足够了。
Ray Epsilon:
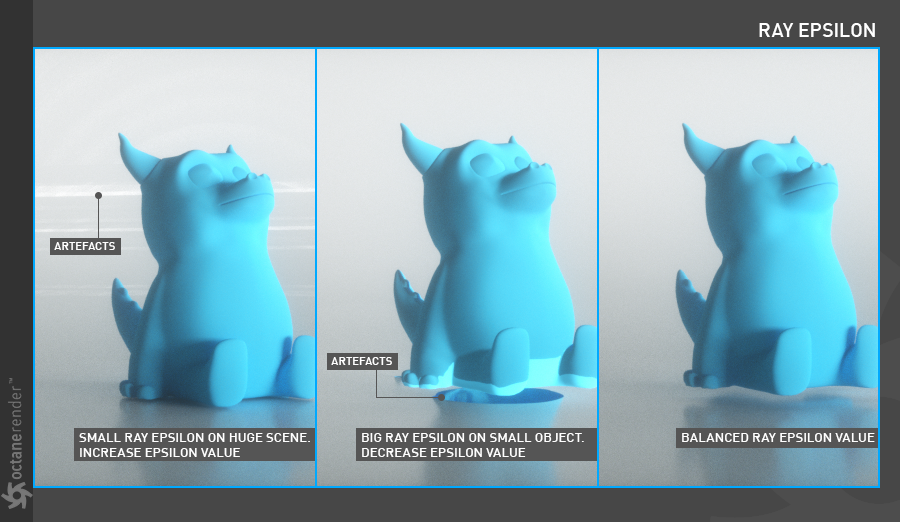
The distance between the geometry and the light ray when calculating ray intersections for lighting and shadowing. Larger values push rays away from the geometry surface. Lower values are more accurate, but can cause artifacts on large or distant objects. Ray Epsilon is similar to raytracing bias in other rendering engines. Adjust Ray Epsilon to reduce artifacts in large scale scenes. Look at the picture below.
光线偏移(Ray Epsilon):
计算照明和阴影的光线交点时,几何图形与光线之间的距离。 较大的值将光线推离几何图形表面。 较低的值更准确,但会在较大或较远的物体上造成伪影。 Ray Epsilon与其他渲染引擎中的光线追踪偏差相似。 调整Ray Epsilon以减少大型场景中的伪影。 看下面的图片。
Filter Size:
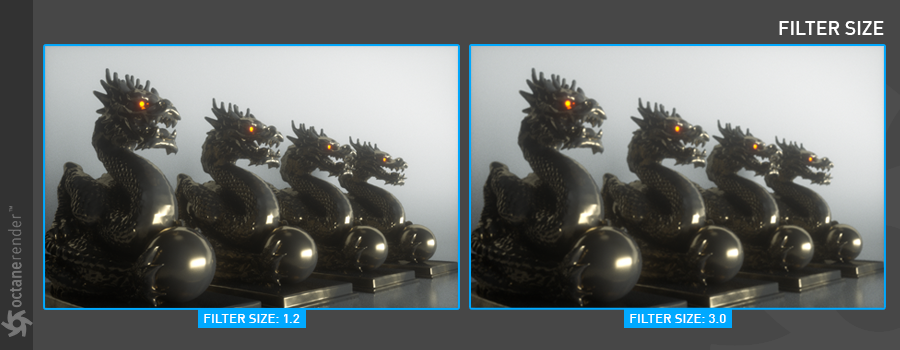
Sets the filter size in terms of pixels. This can improve aliasing artifacts in the render. However, if the filter is set too high, the image can become blurry.
过滤器尺寸:
以像素为单位设置滤镜大小。 这可以改善渲染中的锯齿失真。 但是,如果滤镜设置得太高,图像可能会变得模糊。
AO Distance:
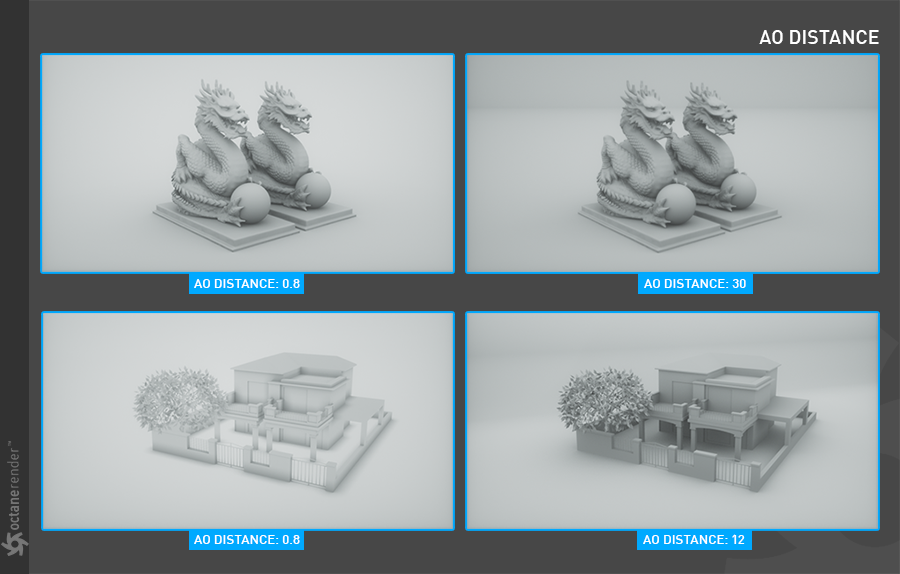
Controls the distance of the ambient occlusion shadowing spread. This setting should be adjusted in order to achieve realistic results depending on the scale of the objects in the scene. For example a small value is more appropriate for small objects such as toys and larger values for an object such as a house.
AO距离:
控制环境遮挡阴影散布的距离。 为了达到逼真的效果,应根据场景中对象的比例调整此设置。 例如,较小的值更适合诸如玩具之类的小物体,而较大的值则适合于诸如房屋之类的物体。
Alpha Shadows:
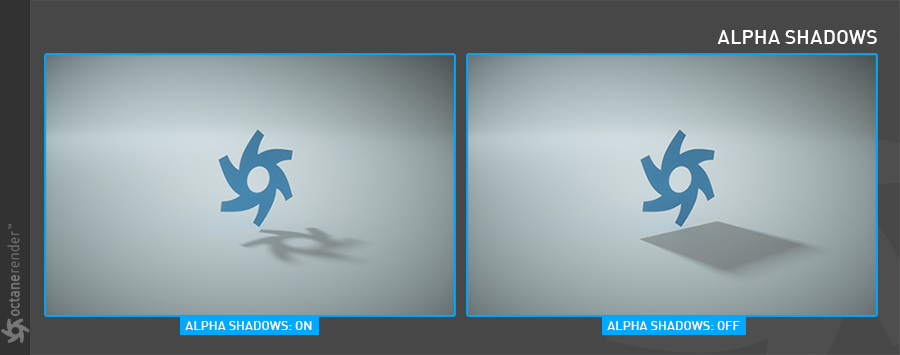
Allows any object with transparency (specular materials, materials with opacity settings, and alpha channels) to cast a shadow accordingly instead of behaving as a solid object. As you can see in the picture below, we have a plane object in the scene and we only put an image in the opacity channel with an alpha. Shadows look correct when turned on.
阿尔法阴影:
允许任何具有透明度的对象(镜面材质,具有不透明度设置的材质和Alpha通道)相应地投射阴影,而不是表现为实体对象。 如您在下图中所看到的,场景中有一个平面对象,我们只将图像放在带有alpha的不透明度通道中。 阴影在打开时看起来正确。
irradiance mode
This setting works similar to clay mode, but is only applied to the first bounce, disables bump and makes samples that are blocked by back faces transparent. (In case you are wondering: This is required for baking in Unity).
辐照模式
此设置的工作方式类似于黏土模式,但仅适用于第一次反弹,禁用凹凸并使被背面遮挡的采样透明。 (以防万一:在Unity中进行烘焙是必需的)。
Alpha Channel:
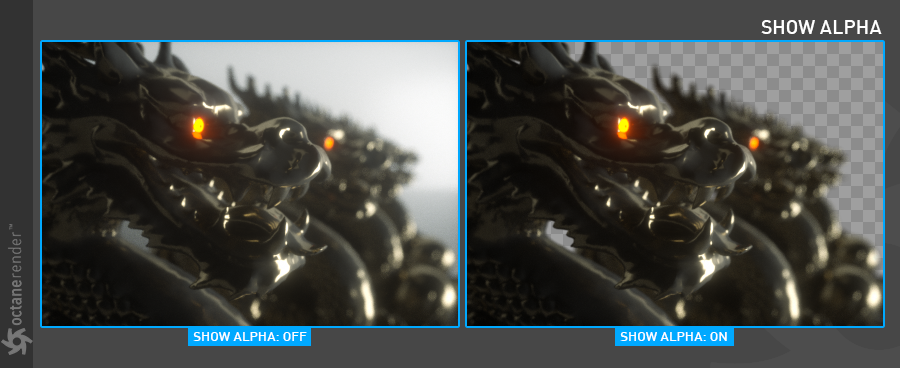
This option removes the background (for example daylight or any sky background) and renders it as transparent (zero alpha). This can be useful if you want to composite the render over another image and does not want the background to be present.
Alpha通道:
此选项将删除背景(例如,日光或任何天空背景)并将其呈现为透明(零Alpha)。 如果您要在另一个图像上合成渲染并且不希望出现背景,这将很有用。
Keep Environment:
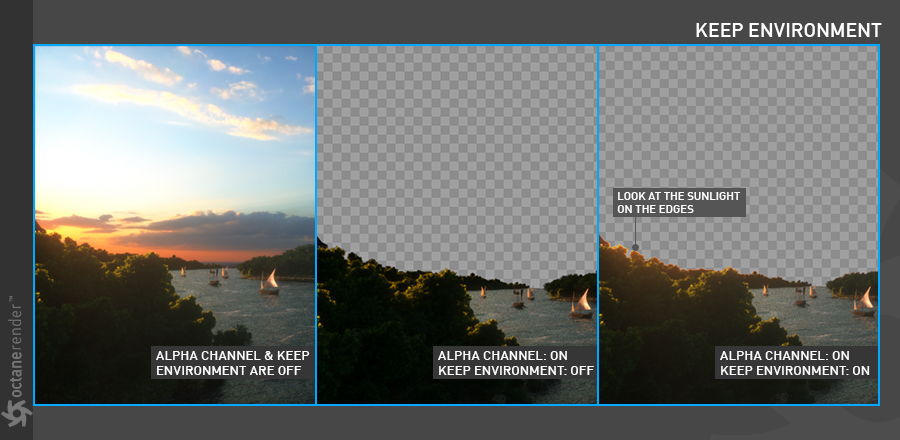
This option is used in conjunction with the Alpha Channel setting. It allows the background to be rendered with zero alpha but it's still visible in the final render. This allows even further flexibility in compositing software.
保持环境:
该选项与Alpha通道设置结合使用。 它允许以零Alpha渲染背景,但在最终渲染中仍然可见。 这在合成软件方面提供了更大的灵活性。
AI LIGHT, AI LIGHT UPDATE & AI LIGHT STRENGTH:
You can go to this link for detailed information.
AI灯光,AI灯光更新和AI 灯光强度:
您可以转到此链接以获取详细信息。
AI LIGHT IDs actION, LIGHT IDs, lIght LINKING INVERT
You can go to this link for detailed information.
AI 灯光ID操作,LIGHT ID,灯光链接反转
您可以转到此链接以获取详细信息。
Path term. power:
This parameter provides a system where users can tweak samples/second vs. convergence (how fast noise vanishes). Increasing this value will cause the kernels to keep paths shorter and spend less time on dark areas (which means they stay noisy longer) but may increase samples/second. Reducing this value will cause kernels to trace longer paths on average and spend more time on dark areas. In short, high values increases the render speed but may lead to higher noise in dark areas.
路径终止强度:
此参数提供了一个系统,用户可以在该系统中调整采样/秒与收敛的关系(消除噪波的速度)。增大此值将导致内核使路径更短,并在暗区上花费更少的时间(这意味着它们在嘈杂的环境中停留的时间更长),但可能会增加采样/秒。降低此值将导致内核平均跟踪更长的路径,并在暗处花费更多时间。简而言之,较高的值会提高渲染速度,但可能会在黑暗区域导致较高的噪点。
Coherent Ratio:
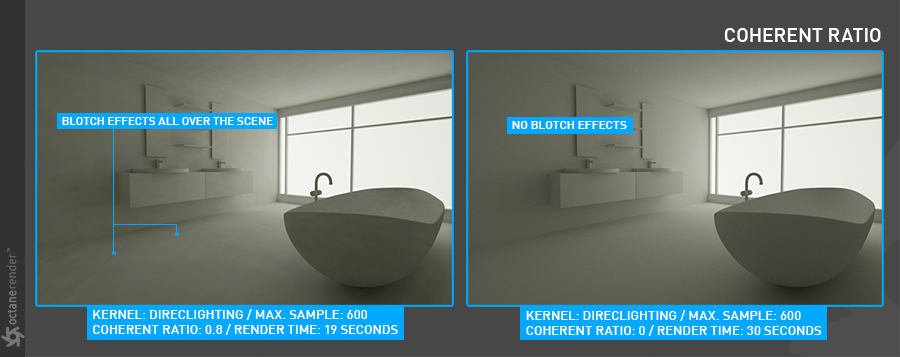
When the coherent mode is turned on, the picture is quickly noise-free, but the negative side of the feature is that you see a flickering blotch effect in the animation output. It's just like the effect you used to see when you did Light Cache in old days (now these techniques are out of date since the unbiased render engines are available). Just use it if you want to get the test animation quickly. Do not use it in Final Production.
连贯比率:
开启相干模式后,图片会快速消除噪点,但此功能的不利方面是您会在动画输出中看到闪烁的斑点效果。就像您过去看Light Cache时所见的效果一样(现在这些技术已经过时了,因为可以使用无偏的渲染引擎了)。如果您想快速获得测试动画,请使用它。不要在最终生产中使用它。
Static Noise:
Keeps noise patterns static between rendered frames in a sequence when enabled. Note that the noise is fully static as long as the same GPU architecture is being used for rendering. Different architectures will produce slightly different numerical errors which manifest as small differences in the noise pattern.
静态噪波:
启用后,在序列中的渲染帧之间保持噪波模式不变。 请注意,只要使用相同的GPU架构进行渲染,噪波就完全是静态的。 不同的体系结构将产生略有不同的数值误差,这表现为噪波模式的细微差异。
Parallel Samples:
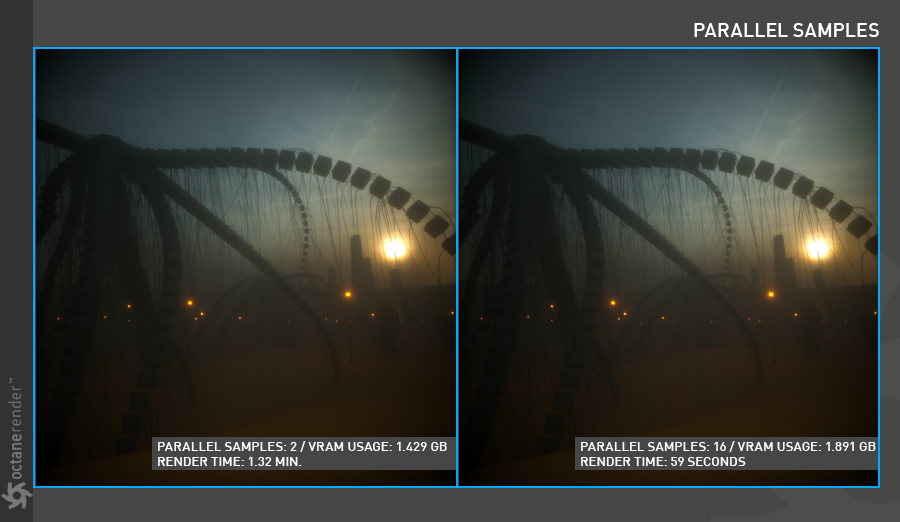
Controls how many samples are calculated in parallel. Smaller values require less memory to store the samples state but may cause the render to be a bit slower. High values require more memory but can reduce render time. The change in performance depends on the scene and the GPU architecture. As you can see in the picture below, more Vram usage is shortening the render time. If you have a lot of Vram, be sure to use this option.
平衡采样:
控制并行计算多少个采样。 较小的值需要较少的内存来存储采样状态,但可能会导致渲染速度变慢。 较高的值需要更多的内存,但可以减少渲染时间。 性能的变化取决于场景和GPU架构。 如下图所示,更多Vram的使用正在缩短渲染时间。 如果您有很多Vram,请确保使用此选项。
Max. Tile Samples:
This controls the number of samples per pixel that Octane will render until it takes the result and stores it in the film buffer. A higher number means that results arrive less often at the film buffer, but reduce the CPU overhead during rendering and as a consequence can improve performance, too.
最大平铺采样:
这将控制Octane将渲染的每个像素的采样数量,直到获取结果并将其存储在胶片缓冲区中为止。较高的数字表示结果很少到达胶片缓冲区,但是减少了渲染期间的CPU开销,因此也可以提高性能。
Minimize Net Traffic:
Distributes only the same tile to the net render slaves until the max samples/pixel has been reached for that tile and only then will the next tile is distributed to slaves when enabled. Work done by local GPUs is not affected by this option. This way a slave can merge all its results into the same cached tile until the master switches to a different tile.
最小化网络流量:
仅将相同的图块分配给网络渲染从属,直到达到该图块的最大采样/像素为止,然后才将下一个图块分配给从属。本地GPU完成的工作不受此选项的影响。这样,从站可以将其所有结果合并到相同的缓存切片中,直到主节点切换到其他切片。
Adaptive Sampling:
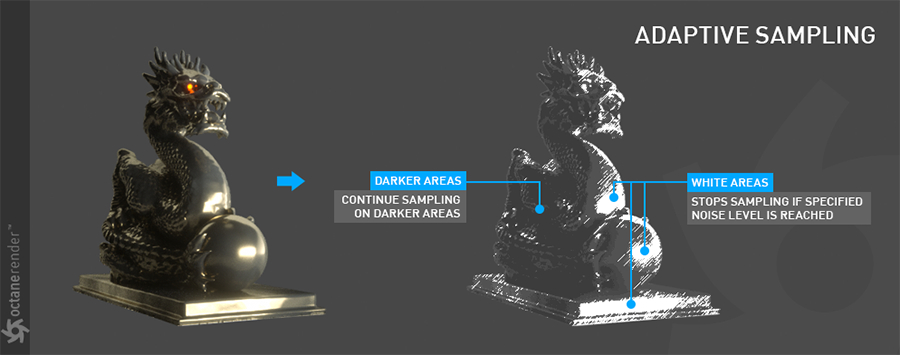
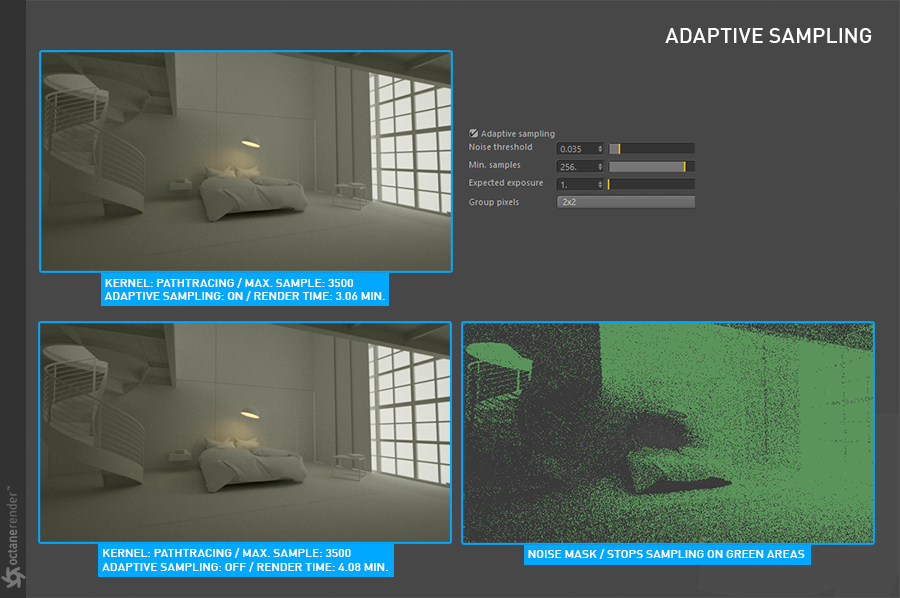
A method of sampling that determines if areas of a rendering require more sampling than other areas instead of sampling the entire rendering equally. In Octane, Adaptive Sampling disables sampling for pixels that have reached a specified noise level. With adaptive sampling, Octane is able to stop rendering on areas which no longer need to be rendered thus, freeing more gpu power to render on pixels that still need to be rendered. This allows you to bump up the maximum samples quite high (even more than 30,000) and then rely on the adaptive sampling to figure out which pixels actually need that many samples and which don't.
自适应采样:
一种采样方法,确定渲染区域是否比其他区域需要更多采样,而不是对整个渲染进行均等采样。在Octane中,“自适应采样”会禁用对达到指定噪波级别的像素的采样。通过自适应采样,Octane能够在不再需要渲染的区域上停止渲染,从而释放出更多的gpu功率来渲染仍需要渲染的像素。这样,您就可以提高最大采样量(甚至超过30,000),然后依靠自适应采样来确定哪些像素实际需要多少采样,哪些不需要。
Adaptive sampling
Enables adaptive sampling.
自适应采样
启用自适应采样。
Noise threshold
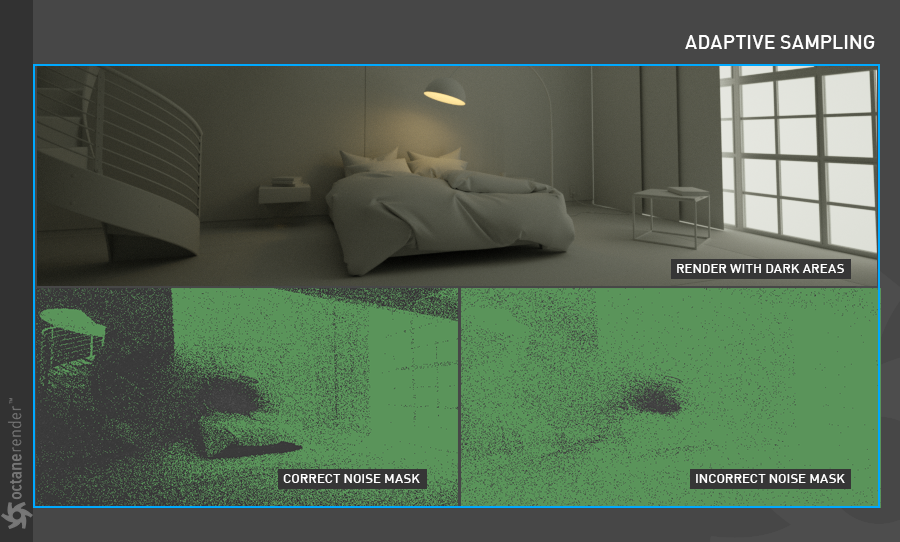
Specifies the smallest relative noise level. When the noise estimate of a pixel becomes less than this value, sampling will be switched off for this pixel. Good values are in the range of 0.01 - 0.03. The default is 0.02, which is pretty clean. This is the most important part of Adaptive Sampling process. The effective processing of the adaptive sample depends on the structure of your scene settings. So you should pay attention to the Noise Mask part during the render. If there are dark places in your scene and all the areas are green, then there is a problem. In this case, you may need to adjust the noise threshold setting. The following picture shows the correct and incorrect Noise mask.
噪波阈值
指定最小的相对噪波水平。当像素的噪波估计值变得小于此值时,将为此像素关闭采样。好的值在0.01-0.03的范围内。默认值为0.02,非常干净。这是自适应采样过程中最重要的部分。自适应采样的有效处理取决于场景设置的结构。因此,在渲染期间应注意“噪波蒙版”部分。如果场景中有黑暗的地方,而所有区域都是绿色,则存在问题。在这种情况下,您可能需要调整噪波阈值设置。下图显示了正确和不正确的“噪波屏蔽”。
Min. adaptive samples
Specifies the minimum samples that must have been calculated before adaptive sampling kicks in. The reason for this option is the fact that the noise estimate of a pixel is just an estimate with a fairly large initial error. The higher you set the noise threshold, the higher you should also set min. samples, to avoid artifacts.
最小自适应采样
指定在开始自适应采样之前必须已计算的最小采样。此选项的原因是这样的事实,即像素的噪波估计仅仅是具有相当大的初始误差的估计。噪波阈值设置得越高,最小值也应设置得越高。采样,以避免伪像。
Pixel grouping
Specifies the number of pixels that are handled together. Only if all pixels of a group have reached the noise level, sampling will stop for all of these pixels.
群组像素
指定一起处理的像素数。仅当组中的所有像素均达到噪波水平时,才会对所有这些像素停止采样。
Expected Exposure
The expected exposure should be approximately the same value as the exposure in the image or 0 to ignore these settings. The default value is 0. This parameter is used by Adaptive Sampling to determine the pixels that are bright and those that are dark - which depends on the exposure setting in the Octane Imager. If the value is not 0, Adaptive Sampling will tweak/reduce the noise estimate of very dark areas of the image. It also will also increase the minimum adaptive samples limit for very dark areas, because very dark areas tend to find paths to light sources irregularly resulting to an otherwise overly optimistic noise estimate.
深度图像
预期的曝光值应与图像中的曝光值大致相同,或忽略这些设置为0。默认值为0。自适应采样使用此参数来确定亮像素和暗像素-取决于Octane Imager中的曝光设置。如果该值不为0,则“自适应采样”将调整/减少图像非常暗区域的噪波估计。这也将增加非常暗的区域的最小自适应采样限制,因为非常暗的区域趋向于不规则地找到通往光源的路径,从而导致原本过于乐观的噪波估计。
toon shadow ambient
This is used for the setting default toon ambient light color.
卡通阴影环境光
这用于设置默认的卡通环境光颜色。


赶快留个言打破零评论!~