CAMERA TAG/motion blur TAB
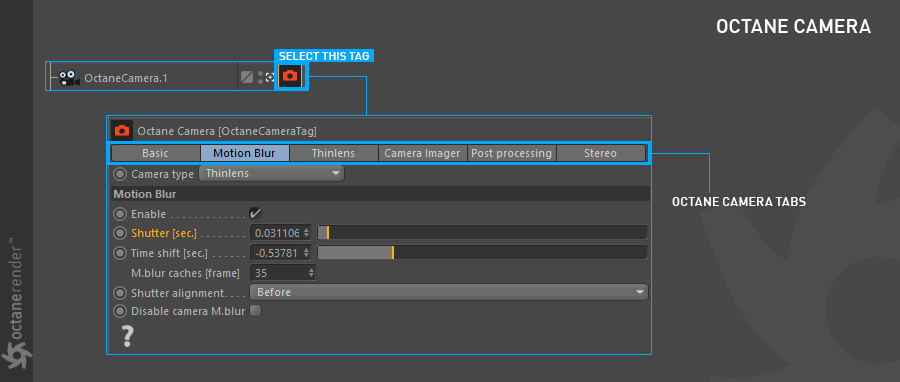
Octane has a powerful and fast motion blur feature. In general, people do not prefer to render with native motion blur of any 3D software. Because Motion Blur increases the rendering time. This is usually done with 3rd party compositing softwares. And frankly, none of them have ever been able to capture the 3D motion blur quality (because it's real). So you can use Octane Motion Blur as long as you optimize your scene and render settings. Because it's fast. Now let's explain the options in Motion Blur Tab.
Important note: Octane has 2 different motion blur: Camera and Object Motion blur. You will see the camera motion blur when the camera is moving. Object motion blur is used when the object is animated. You can control the camera motion blur from the Octane Camera Tag and the Object motion blur from the Octane Object Tag. Detailed explanations for both will be found in this section.
相机标签/运动模糊标签
Octane具有强大而快速的运动模糊功能。通常,人们不喜欢使用任何3D软件的本机运动模糊进行渲染。因为运动模糊会增加渲染时间。通常,这是使用第三方合成软件完成的。坦率地说,它们都无法捕获3D运动模糊质量(因为它是真实的)。因此,只要优化场景和渲染设置,就可以使用Octane Motion Blur。因为速度很快。现在,让我们解释“运动模糊”选项卡中的选项。
重要说明:Octane有2种不同的运动模糊:相机和对象运动模糊。相机移动时,您会看到相机运动模糊。动画对象时使用对象运动模糊。您可以从“ Octane相机”标签控制相机运动模糊,并从“ Octane对象”标签控制物体运动模糊。两者的详细说明将在本节中找到。
camera motion blur
It is the type of motion blur you will use when the camera in your scene is moving. Let's take a look at the options now.
Info: Whether a camera or Object motion blur, the options you see in the picture below are global options for both situations.
相机运动模糊
这是场景中的摄像机移动时将使用的运动模糊类型。现在让我们看一下这些选项。
信息:无论是相机模糊还是物体运动模糊,您在下图中看到的选项都是这两种情况的全局选项。
ABOUT shutter speeds
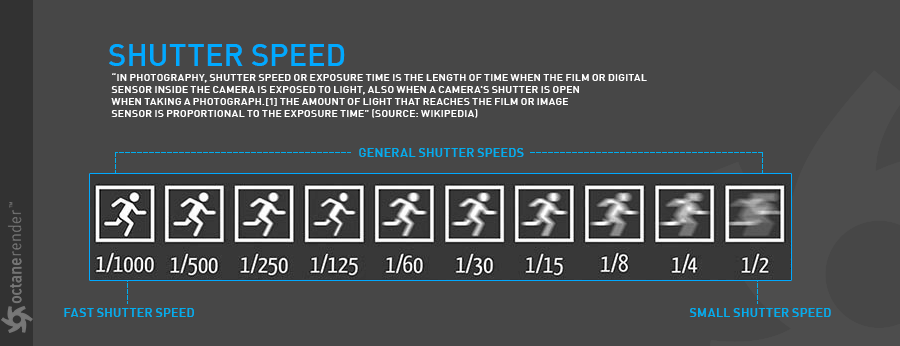
To understand the Octane motion blur, let's look at the definition of "Shutter Speed" briefly: "In photography, shutter speed or exposure time is the length of time when the film or digital sensor inside the camera is exposed to light, also when a camera's shutter is open when taking a photograph. The amount of light that reaches the film or imagesensor is proportional to the exposure time" (Source: Wikipedia).
Shutter Speed determines the shutter opening and closing time, which is until the image is formed. The quality of moving images is dependent on Shutter Speed. The shutter speed can also determine the sharpness of the image which is also affects the amount of light reaching the camera sensor. If shutter speed is slow, blurred image occurs.
Shutter Speed values are expressed in proportions such as 16, 8, 4, 1, 1/4, 1/8, 1/16. As the number increases, your exposure increases. As the number decreases, you will have shorter exposure (like 1/15 or 1/500 of a second). "1/500" means the shutter opens and closes 500 times in a second. If you consider that eye blinking is 20 times in a minute, you can more easily understand how fast 1/500 is a shutter speed value.
There are many factors that affect Shutter Speed. However, we recommend that you browse the resources on the Web because it is very broad subject to explain here.
关于快门速度
要了解Octane运动模糊,让我们简要地看一下“快门速度”的定义:“在摄影中,快门速度或曝光时间是指照相机内部的胶片或数字传感器曝光的时间长度,拍照时,相机的快门是打开的。到达胶片或图像传感器的光量与曝光时间成正比''(来源:Wikipedia)。
快门速度决定了快门的打开和关闭时间,直到图像形成为止。运动图像的质量取决于快门速度。快门速度还可以确定图像的清晰度,这也影响到达相机传感器的光量。如果快门速度慢,则图像模糊。
快门速度值以16、8、4、1、1 / 4、1 / 8、1 / 16等比例表示。随着数量的增加,您的曝光率也会增加。随着数量的减少,您的曝光时间会缩短(例如1/15或1/500秒)。 “ 1/500”表示百叶窗每秒打开和关闭500次。如果您认为眨眼在一分钟内有20次,则可以更轻松地了解1/500是快门速度值的速度。
影响快门速度的因素很多。但是,我们建议您浏览Web上的资源,因为这里涉及的内容非常广泛。
motion blur SETTINGS
运动模糊设置
Enable
Used to turn Motion Blur on and off.
启用
用于打开和关闭运动模糊。
Shutter (sec.)
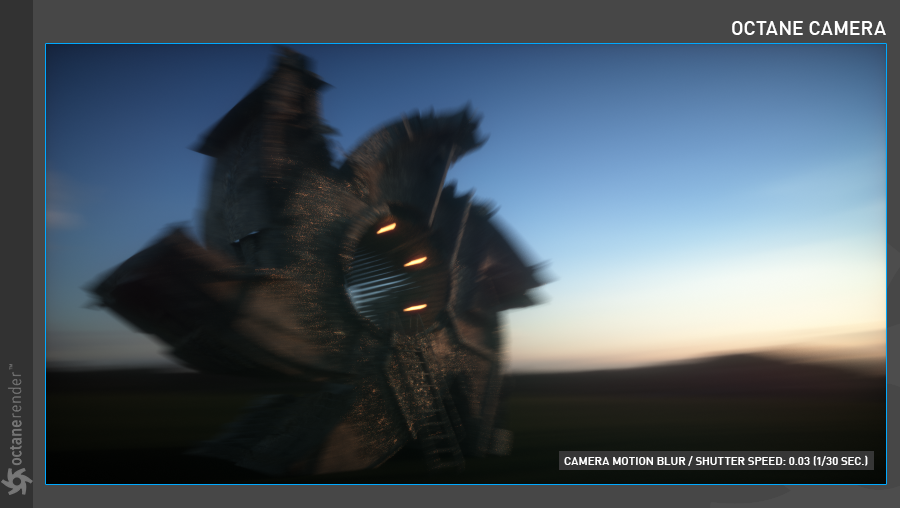
Here you can adjust the Motion Blur amount in Octane. You can enter real camera values or a random value in this field. If you want to enter the actual value, you can adjust the shutter speed with a simple calculation. For example, if you want to make a shutter speed of 30 in 1 second, what you will do is divide 1 into 30; the result you get is the shutter speed value you will enter in Octane. In this case, 1/30 = 0.03.
快门(秒)
您可以在此处调整Octane中的运动模糊量。 您可以在此字段中输入真实摄像机值或随机值。 如果要输入实际值,则可以通过简单的计算来调整快门速度。 例如,如果您想在1秒内将快门速度设为30,那么您要做的就是将1除以30。 得到的结果是您将在Octane中输入的快门速度值。 在这种情况下,1/30 = 0.03。
time shift (sec.)
Used to shift the calculation frame of the motion blur. You can leave it at the default value.
时移(秒)
用于移动运动模糊的计算框架。您可以将其保留为默认值。
m.blur caches (frames)
This feature determines how many frames will be cached when moving back and forth in Live Viewer. Because LV can only know the data in existing frames. Therefore, you can store the motion data in LV by entering the frame number to be cached in this field.
m.blur缓存(帧)
此功能确定在Live Viewer中来回移动时将缓存多少帧。因为LV只能知道现有帧中的数据。因此,可以通过在此字段中输入要缓存的帧号将运动数据存储在LV中。
SHUTTER ALIGNMENT
It consists of 3 options: Before, Centered, After. In general, it specifies how the motion blur effect is calculated relative to the previous or next frames. For example, if there is a motion blur of 10 frames and you are at 20th frame; Before: Produces blur according to frames between 10-20, Center 15-25 and After 20-30.
快门对齐
它包含3个选项:之前,居中,之后。通常,它指定相对于上一帧或下一帧如何计算运动模糊效果。例如,如果运动模糊为10帧,而您处于第20帧;之前:根据10-20,中心15-25和20-30之后的帧产生模糊。
disable camera m.blur
You can activate this feature if you want to see only the motion blur of the objects, but not the motion blur effect of the camera. It works effectively when both camera and objects are moving in the scene.
禁用相机m.blur
如果您只想看物体的运动模糊,而不想看摄像机的运动模糊效果,则可以激活此功能。当摄像机和物体在场景中移动时,它可以有效工作。
object motion blur
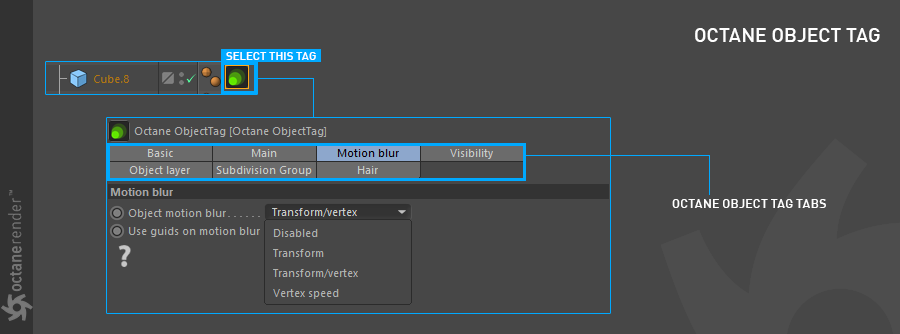
It is used to apply motion blur only to objects so the objects in your scene must be moving. Once you have selected the relevant object to use, you can assign "Octane Object Tag" to the object by going to the object manager's C4DOctane Tags. Now let's take a look at these options:
对象运动模糊
它仅用于将运动模糊应用于对象,因此场景中的对象必须处于运动状态。一旦选择了要使用的相关对象,就可以通过转到对象管理器的C4DOctane标签为该对象分配“ Octane对象标签”。现在让我们看一下这些选项:
Object Motion blur
From here you can apply motion blur types to your object. There are four options: Disabled, Transform, Transform / Vertex, and Vertex Speed. Now let's explain these.
物体运动模糊
在这里,您可以将运动模糊类型应用于对象。 有四个选项:“禁用”,“变换”,“变换/顶点”和“顶点速度”。 现在让我们解释一下。
disabled
It is used to disable the motion blur effect of any object in the scene. Let's say you have 10 different objects and you want to disable a few of them. In that case, select the object you want to turn off the motion blur and disable it here. Simple.
禁用
它用于禁用场景中任何对象的运动模糊效果。 假设您有10个不同的对象,并且要禁用其中一些对象。 在这种情况下,请选择要关闭运动模糊的对象,然后在此处禁用它。 简单。
Transform
You can use this option to apply motion blur to the PSR transformations of your object. It only functions at Position / Rotation / Scale values. For example if your object has deformation movement other than PSR then this option will not work. It is necessary to use the Transform / Vertex option to blur deformation-like movements. We will explain this in the next chapter. You can use the options in global camera motion blur to make adjustments. The options there are also used for object motion blur.
转变
您可以使用此选项将运动模糊应用于对象的PSR转换。 它仅适用于“位置/旋转/比例”值。 例如,如果对象的变形运动不是PSR,则此选项将不起作用。 必须使用“变形/顶点”选项来模糊变形样的运动。 我们将在下一章中对此进行解释。 您可以使用全局相机运动模糊中的选项进行调整。 那里的选项也用于对象运动模糊。
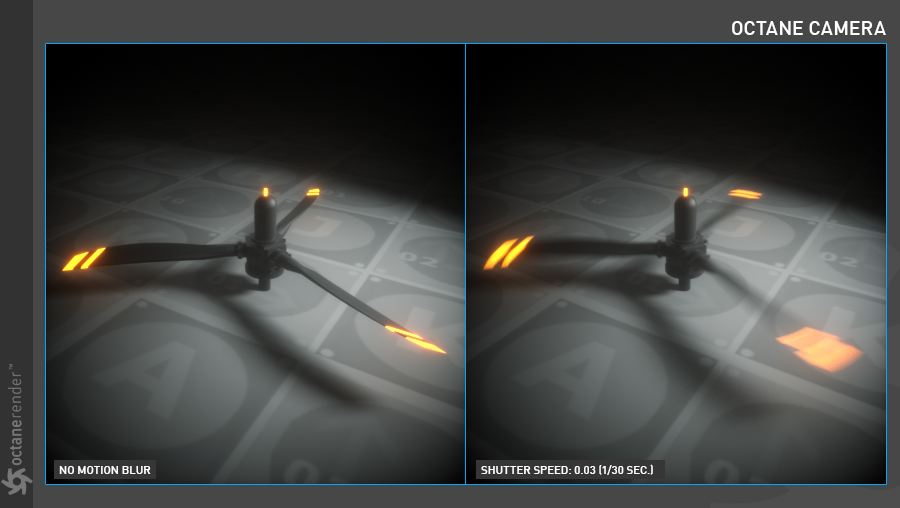
Transform/vertex
You can create motion blur based on both the transform and vertex movements of your object. According to vertex, motion blurring can be a complicated process. So in the following mini tutorial we will tell you how vertex blur works. In the tutorial, we will describe how to apply motion blur a certain part of a fast moving flag using vertex map. If you want the tutorial's scene, you can download it from the link below and check it out. Shading / texturing and rendering are not described in this one. These sections are outside the scope of this tutorial. However, the shading and rendering setups are ready in the scene we link to. You can use it as you like.
Download scene from here:
变换/顶点
您可以基于对象的变换和顶点运动来创建运动模糊。 根据顶点,运动模糊可能是一个复杂的过程。 因此,在下面的迷你教程中,我们将告诉您顶点模糊是如何工作的。 在本教程中,我们将描述如何使用顶点贴图将运动模糊应用于快速移动标志的特定部分。 如果您想了解本教程的场景,可以从下面的链接下载它并签出。 阴影/纹理和渲染在这一部分中没有描述。 这些部分不在本教程的讨论范围之内。 但是,我们链接到的场景中的着色和渲染设置已准备就绪。 您可以随意使用它。
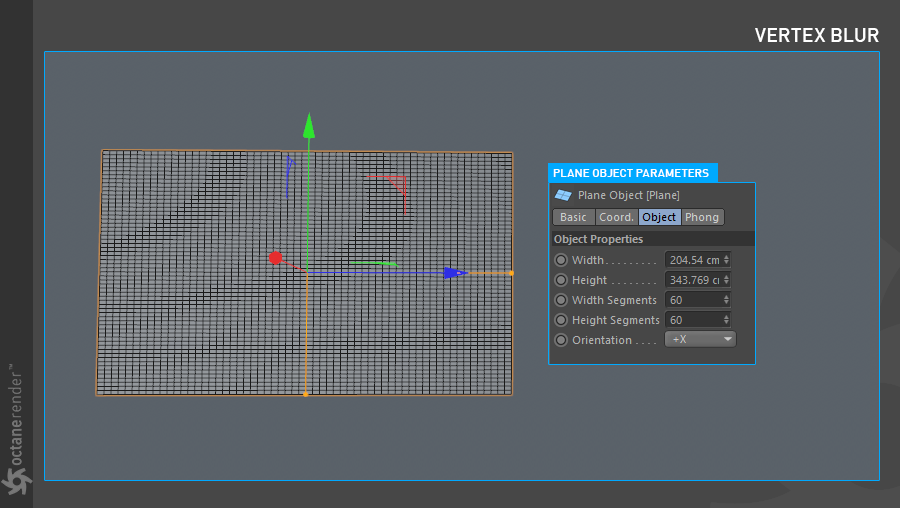
01- Create one plane object and modify its properties as shown in the following picture. Then press "C" to make the object editable.
从这里下载场景:
01-创建一个平面对象并修改其属性,如下图所示。 然后按“ C”使对象可编辑。
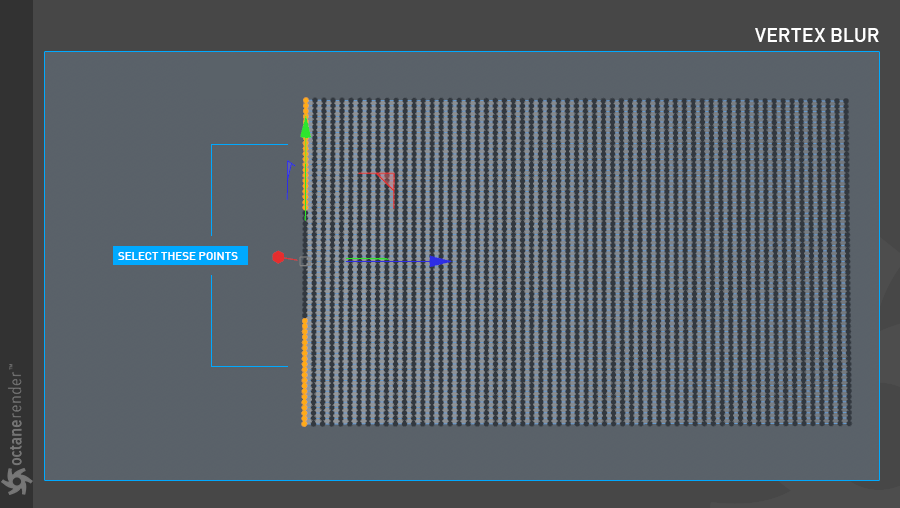
02- Now we will make a cloth simulation to the object. First, switch to point mode when selecting an object and select the points on the left side of the plane object as you see in the picture below. We choose these points to fix the flag.
02-现在我们将对对象进行布料模拟。 首先,在选择对象时切换到点模式,然后选择平面对象左侧的点,如下图所示。 我们选择这些点来修复标志。
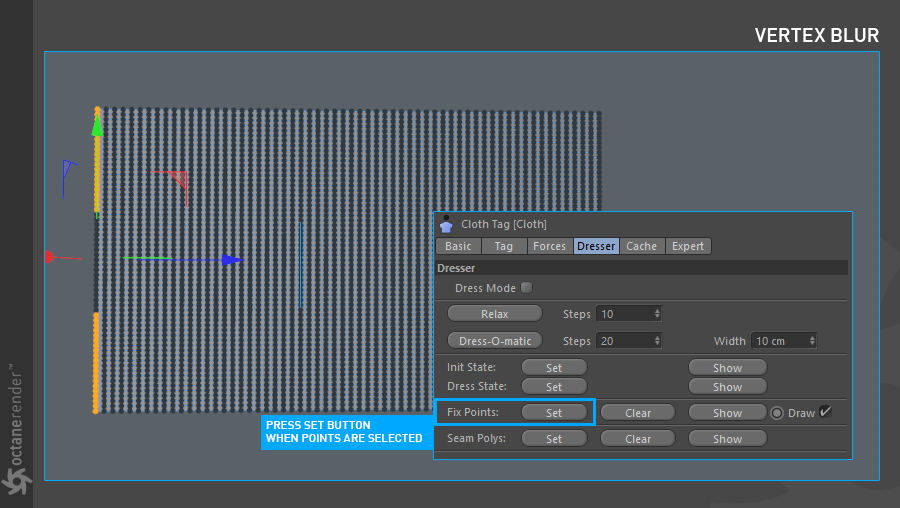
03- When points are selected, right click on object manager and select "simulation tags / Cloth" from the menu. Go to the Cloth Tag and press the "Fix points set" button on the Dresser Tab. Now our flag is fixed.
03-选择了点后,右键单击对象管理器,然后从菜单中选择“模拟标签/布料”。 转到“布料标签”,然后在“修整器”选项卡上按“固定点设置”按钮。 现在,我们的标志已修复。
04- Now increase the number of frames in the timeline for the cloth simulation as you wish. Go to the Cloth Tag and enter the values you see in the picture below into the relevant fields.
04-现在根据需要增加时间线中布料模拟的帧数。 转到“布料标签”,然后将您在下图中看到的值输入到相关字段中。
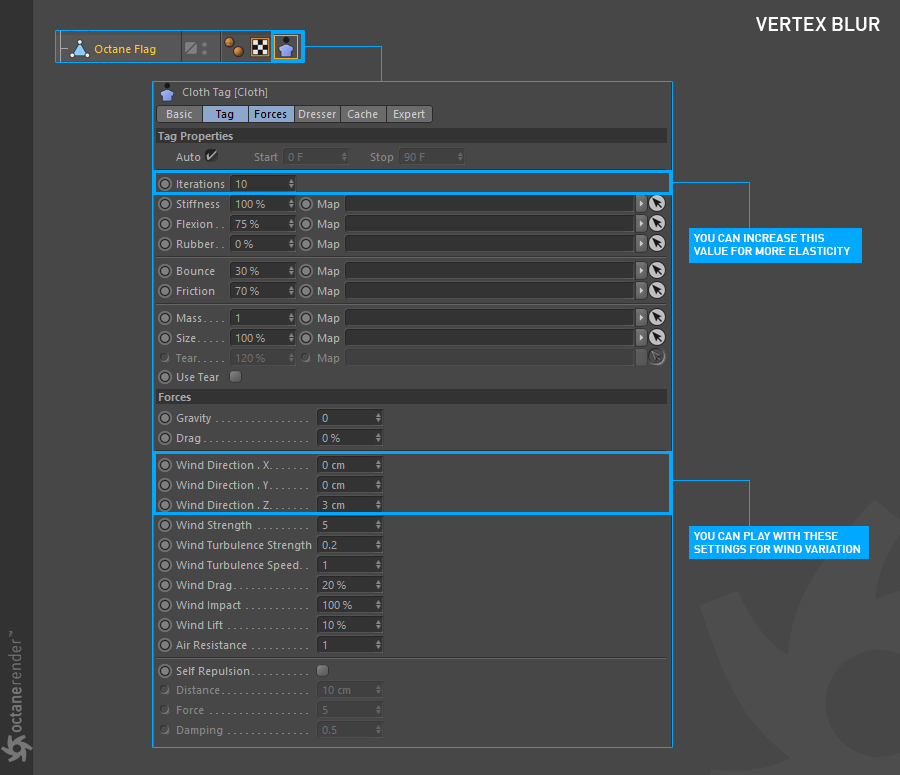
05- After finishing Simulation, go to the cache tab and cache it. Now we need to "PLA bake" the flag movement. So we can reach the vertex points, paint and create the vertex map. Let's make a PLA bake first. Press Shift+Alt+F3 when your flag object is selected. The Timeline window will open. While selecting an object, go to the "Functions" menu and select "Bake Objects". Make the settings you see in the image below in the opened window. When you press the "Ok" button, the Flag object will be baked. Now you can easily go back and forth in the timeline and see the animation without sim calculation. The bake process is very useful, but it has no return. So it is always recommended to work with backup.
05-完成仿真后,转到“缓存”选项卡并对其进行缓存。 现在我们需要“ PLA烘焙”标志运动。 这样我们就可以到达顶点,绘制并创建顶点图。 让我们先进行PLA烘焙。 选择标记对象后,按Shift + Alt + F3。 “时间轴”窗口将打开。 选择对象时,转到“功能”菜单,然后选择“烘焙对象”。 在打开的窗口中进行下图所示的设置。 当您按下“确定”按钮时,标志对象将被烘焙。 现在,您可以轻松地在时间轴上来回浏览动画,而无需进行SIM卡计算。 烘焙过程非常有用,但是没有任何回报。 因此,始终建议使用备份。
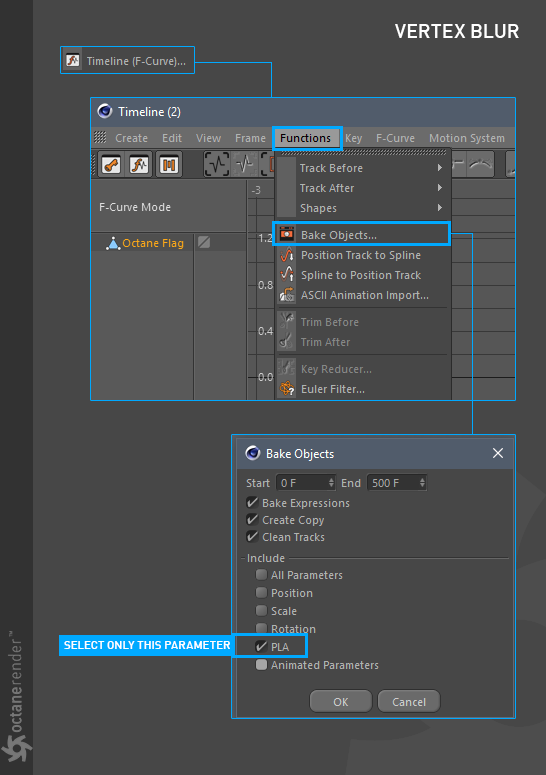
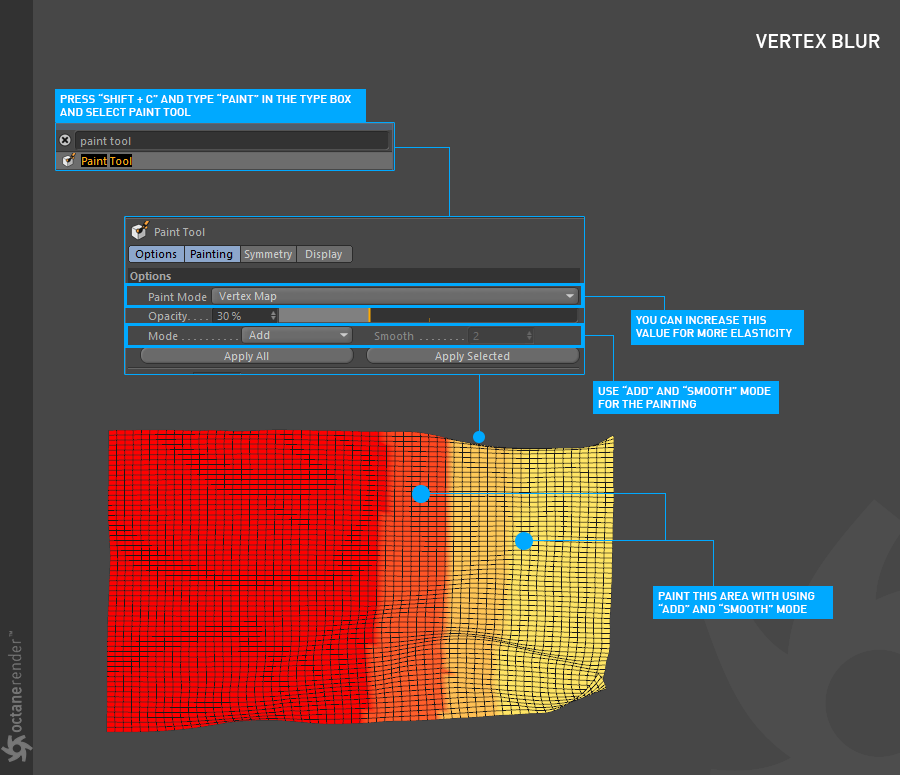
06- After the simulation of the cloth and the bake process is finished, we can now create a vertex map. Switch to point mode, then press "Shift + C" and type "Paint" in the resulting box. Select "Paint Tool" from the drop down menu. You can start painting by selecting "Paint Mode / Vertex Map" from the Paint tool options. You can paint it as you see in the picture below. All you need to use "add" and "Smooth" alternately from Mode while you are painting. So you can create a smooth transition of the painting areas.
06-模拟布料并完成烘焙过程后,我们现在可以创建一个顶点贴图。 切换到点模式,然后按“ Shift + C”,然后在结果框中键入“ Paint”。 从下拉菜单中选择“绘画工具”。 您可以通过从“绘画”工具选项中选择“绘画模式/顶点贴图”来开始绘画。 您可以按照下图所示对其进行绘画。 绘画时,您需要从Mode交替使用“ add”和“ Smooth”。 因此,您可以创建绘画区域的平滑过渡。
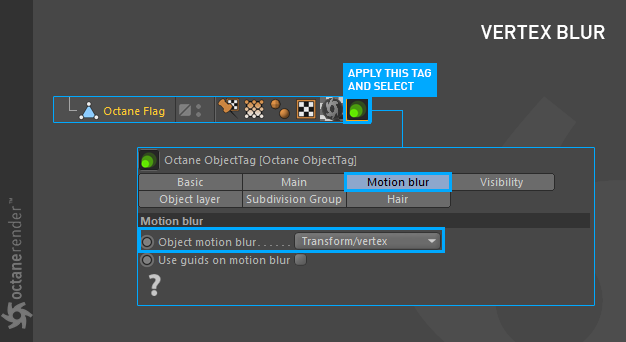
07- Now let's make "Octane Object Tag" and "Octane Camera Tag" setup. After painting, exit point mode and return to object mode. When Flag object is selected, right click to "C4d Octane Tags" and select "Octane Object Tag" from the menu. From there, go to Motion Blur Tab and select "Transform / Vertex" from "Object Motion Blur".
07-现在,我们进行“ Octane Object Tag”和“ Octane Camera Tag”的设置。 绘制后,退出点模式并返回到对象模式。 选择标记对象后,右键单击“ C4dOctane标签”,然后从菜单中选择“Octane对象标签”。 从那里转到“运动模糊”选项卡,然后从“对象运动模糊”中选择“变换/顶点”。
08 - Create an Octane Camera on the scene and change the Motion blur settings on the Octane Camera Tag as you see in the picture below.
08-在场景中创建一个Octane Camera,并如下图所示更改Octane Camera Tag上的运动模糊设置。
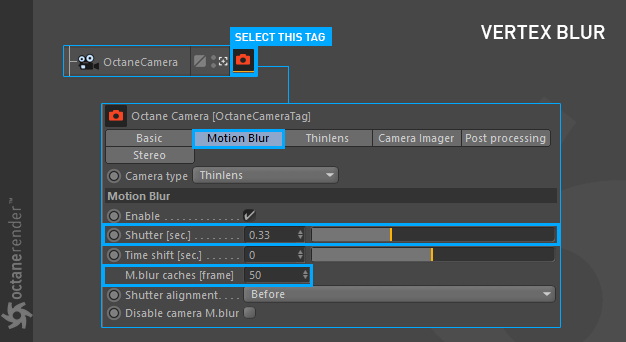
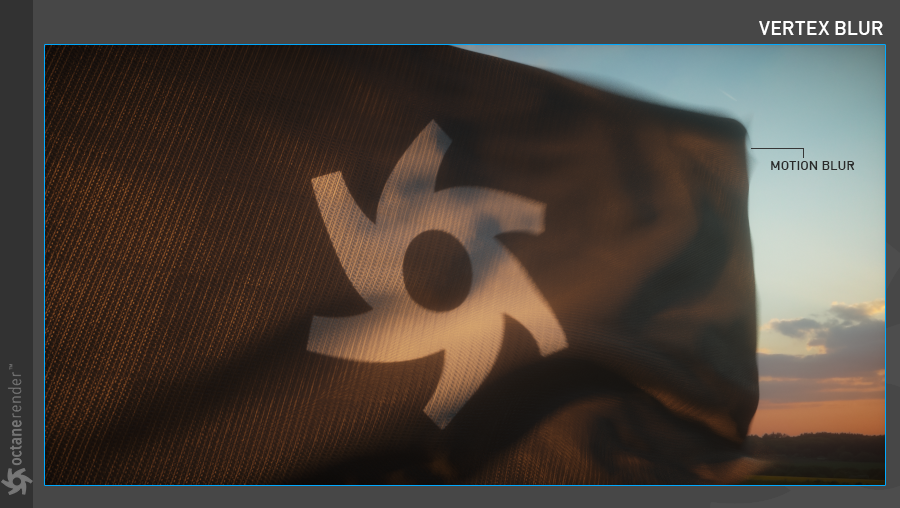
09- Now run Live Viewer. As you can see in the picture below, the vertices we paint are blurred by the Transform / Vertex option. If you could select only Transform, you could not see the blur effect because there is no real transform value in the flag object. So you could not get the blur effect because there would not be Position / Rotation / Scale data. What is important here is how you define vertex maps and points. You can apply this method to whole flag instead of a part of the flag. It is important to realize that the vertex movement is very different from the PSR movement.
09-现在运行Live Viewer。 如下图所示,“变换/顶点”选项使我们绘制的顶点变得模糊。 如果只能选择“变换”,则看不到模糊效果,因为标记对象中没有实际的变换值。 因此,由于没有“位置/旋转/缩放”数据,因此无法获得模糊效果。 这里重要的是如何定义顶点贴图和点。 您可以将此方法应用于整个标志而不是标志的一部分。 重要的是要认识到顶点运动与PSR运动非常不同。
vertex SPeed
With this option you can create motion blur according to the movement speed of vertices. This option works very efficiently in Fluid / Liquid simulations. Basically a vertex map consisting of 3 separate axes is required. By defining these vertex maps to Octane, you can give motion blur to the flow of fluids. Now let's explain this situation again with the help of a tutorial. You can download the scene from the link below. Because you need this scene to follow this tutorial.
顶点
使用此选项,可以根据顶点的移动速度创建运动模糊。此选项在流体/液体模拟中非常有效。基本上需要一个由3个独立轴组成的顶点图。通过将这些顶点贴图定义为Octane,可以为流体流动提供运动模糊。现在,让我们借助教程再次解释这种情况。您可以从下面的链接下载场景。因为您需要此场景才能跟随本教程。
In the Tutorial we will add motion blur to the liquid (for example milk) poured onto a chocolate bar. We will keep the simulation fairly simple because entering the endless simulation details is beyond the scope of this tutorial. For fluid simulation we will use Next Limit's Real Flow for Cinema 4D V2.5 plugin. In this case, make sure you have installed the Realflow Plugin before opening the scene. You can buy plugin from here
在本教程中,我们将对倒入巧克力棒上的液体(例如牛奶)添加运动模糊。我们将使模拟保持相当简单,因为输入无尽的模拟详细信息超出了本教程的范围。对于流体模拟,我们将使用Next Limit的Real Flow for Cinema 4D V2.5插件。在这种情况下,请确保在打开场景之前已安装Realflow插件。您可以从这里购买插件
Dowload the scene from here
从这里下载场景
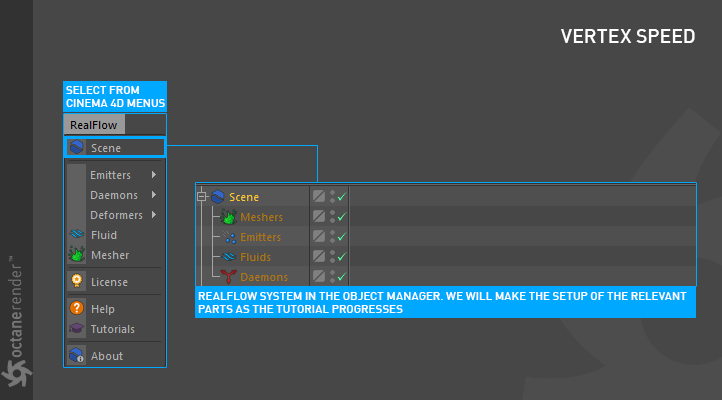
01- First download and open the scene we link to above. Camera angle and everything else is ready, so we will not deal with their setup. Now go to Reaflow from the Cinema 4D menus and select "Scene". Once selected, the Realflow system will appear in the object manager.
01-首先下载并打开我们上面链接的场景。摄像机角度和其他所有内容均已准备就绪,因此我们将不处理其设置。现在,从Cinema 4D菜单转到Reaflow,然后选择“场景”。选择后,Realflow系统将出现在对象管理器中。
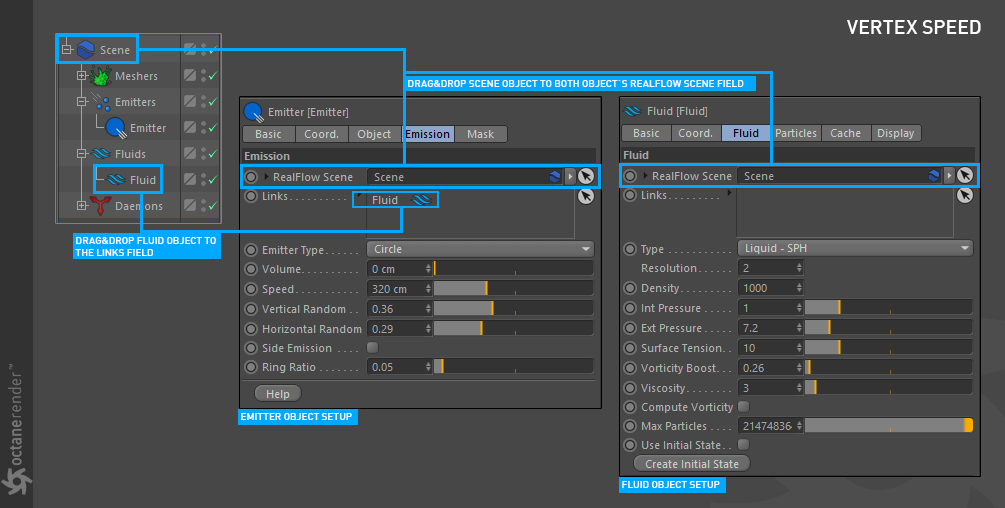
02- Now create an "Emitter" and a "Fluid" object. For Emitter go to the RealFlow menu and select "Circle" from "Emitters". For Fluid object, select "Fluid" from the menu. Drag and drop the Emitter and Fluid objects into the relevant sections of the RealFlow system and make settings for both objects as shown in the image below.
02-现在创建一个“发射器”和一个“流体”对象。 对于发射器,请转到RealFlow菜单,然后从“发射器”中选择“圆形”。 对于“流体对象”,从菜单中选择“流体”。 将“发射器”和“流体”对象拖放到RealFlow系统的相关部分,并对两个对象进行设置,如下图所示。
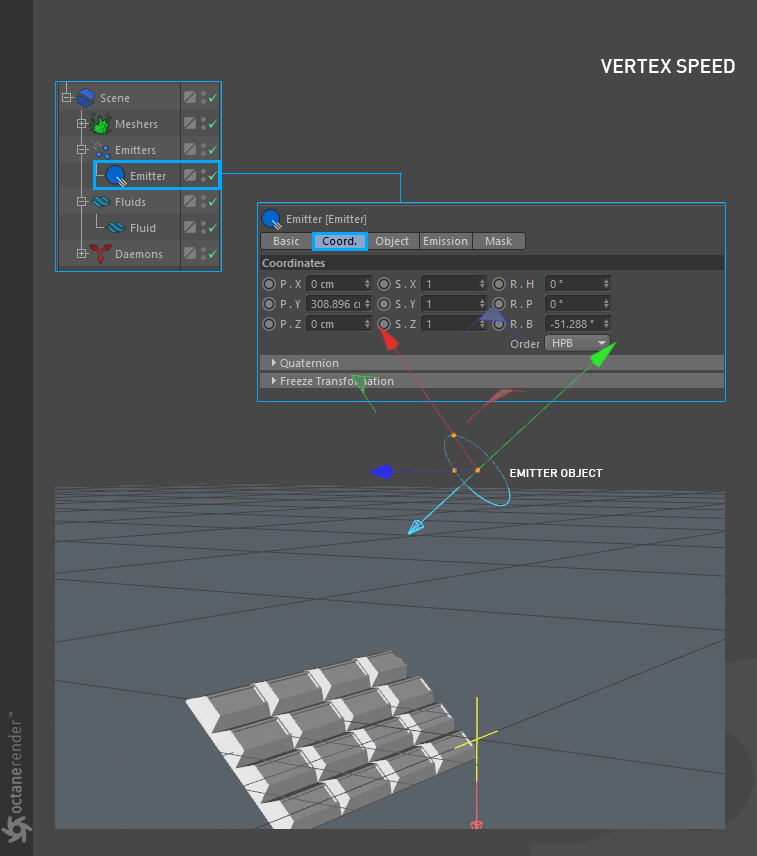
03- Go to the Coord. Tab for the position of the emitter. Enter the following values: "P.X: 0 / P.Y: 308.896 / P.Z: 0" and "RB: -51.288". Once you have entered the values, the Emitter position should look like the picture below. If not, you can manually place it directly above the chocolate bar. In this angle, we will spray the particles.
03-前往协调中心。 标签为发射器的位置。 输入以下值:“ P.X:0 / P.Y:308.896 / P.Z:0”和“ RB:-51.288”。 输入值后,“发射器”位置应如下图所示。 如果没有,您可以手动将其直接放在巧克力棒上方。 在这个角度,我们将喷涂颗粒。
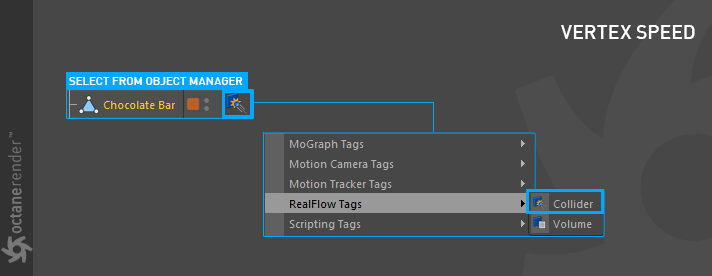
04- Let's do the setup for the chocolate bar. Right-click while selecting object in Object manager and select Realflow Tags / Collider from the menu. With this tag, the particles falling on the chocolate will interact with the object.
04-让我们为巧克力棒进行设置。 在对象管理器中选择对象时单击鼠标右键,然后从菜单中选择“ Realflow标签/碰撞器”。 有了这个标签,落在巧克力上的颗粒将与物体相互作用。
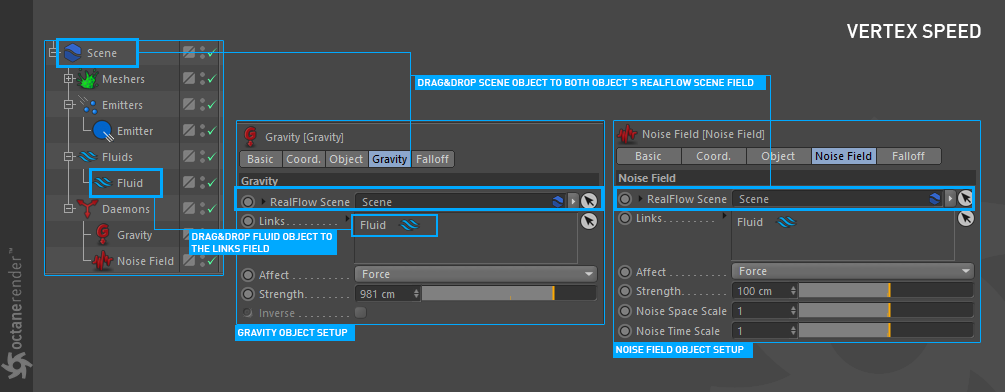
05- Now let's add 2 daemon objects for the liquid spill action. Go to the menu and select "Gravity" and "Noise Field" from the Daemon Section. Leave the Setups as default for now. If it's not automatically linked when creating these 2 objects, drag and drop the related objects into the fields you see in the picture below.
05-现在让我们添加2个守护程序对象以进行液体溢出操作。 转到菜单,然后从“守护程序”部分中选择“重力”和“噪波场”。 现在将设置保留为默认设置。 如果在创建这2个对象时未自动链接,请将相关对象拖放到您在下图中看到的字段中。
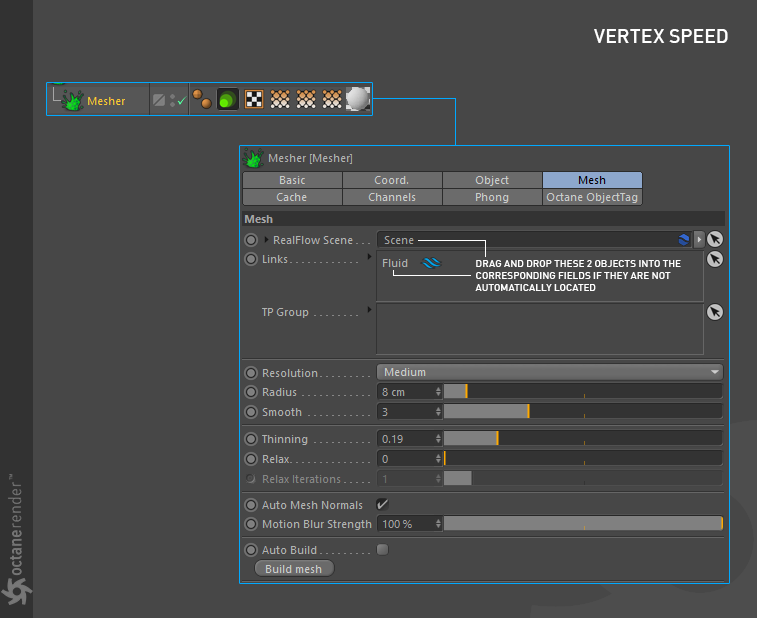
06- Press the play button to test the simulation. As you can see, the particles that spill from the top quickly spread and interact with the chocolate bar. Now it's time to mesh these particles. Go back to the RealFlow menu and choose "Mesher" this time. Make the setup as you see in the picture below.
06-按播放按钮测试模拟。 如您所见,从顶部溢出的颗粒迅速散开并与巧克力棒相互作用。 现在是时候对这些粒子进行网格化了。 返回RealFlow菜单,这次选择“ Mesher”。 进行设置,如下图所示。
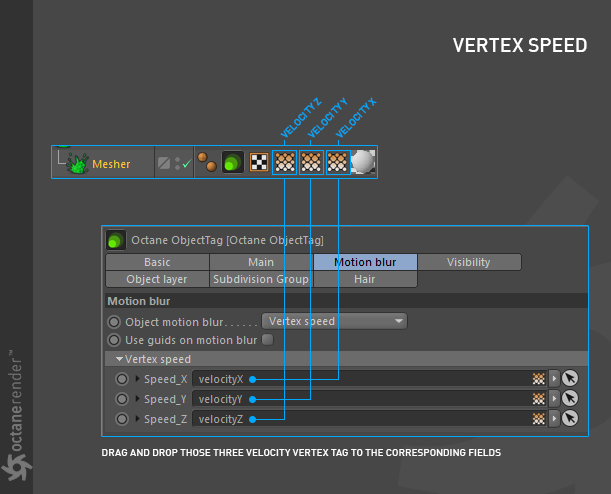
07- Now let's add motion blur to this spilled liquid. To do this, right click on the "Mesher" object and select "C4doctane Tags / Octane Object Tag" from the pop-up menu. From Tag options, go to the motion blur tab and select the Vertex Speed. Three separate tags are required for vertex speed. These tags are automatically created during Mesher object creation in realflow. These tags are 3-axis vertex map tags. Now drag and drop these tags into the vertex speed slots in the motion blur section. Make sure you select the correct tags.
07-现在让我们向溢出的液体添加运动模糊。 为此,右键单击“ Mesher”对象,然后从弹出菜单中选择“ C4doctane标签/ Octane对象标签”。 从“标记”选项中,转到“运动模糊”选项卡,然后选择“顶点速度”。 顶点速度需要三个单独的标签。 这些标签是在Realflow中创建Mesher对象期间自动创建的。 这些标签是3轴顶点贴图标签。 现在,将这些标签拖放到运动模糊部分的顶点速度槽中。 确保选择正确的标签。
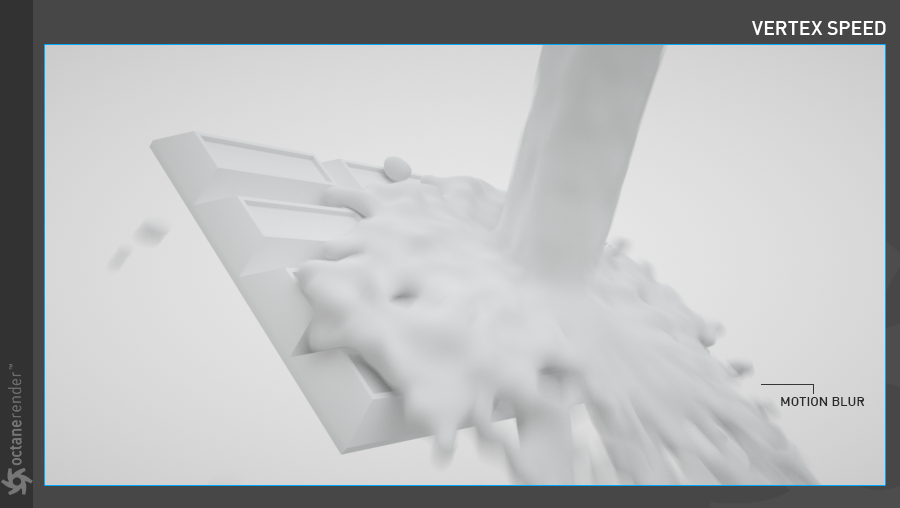
08- If you have done everything right, you will get a result similar to the following picture. As you can see, there is a motion blur that flows through the velocity vertex tags we define. The important thing here is the vertex map tags consisting of 3 separate axes. Realflow automatically generates these tags during the mesher operation. Other simulation software/plugins also have these vertex tags. You can do the same in Houdini or Xparticles 4.
08-如果正确完成所有操作,将得到与下图类似的结果。 如您所见,在我们定义的速度顶点标签中流过运动模糊。 这里重要的是由3个独立轴组成的顶点贴图标签。 在网格划分器操作期间,Realflow会自动生成这些标签。 其他仿真软件/插件也具有这些顶点标签。 您可以在Houdini或Xparticles 4中执行相同的操作。


赶快留个言打破零评论!~