System 系统
Log
原木
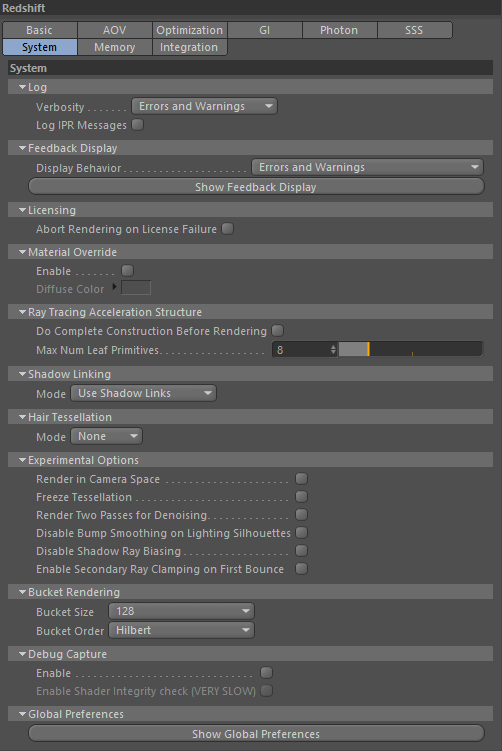
Defines the path of the Redshift log file and the verbosity (detail level) or the log messages printed out within the 3d app. Setting the verbosity to "Debug" will make Redshift print out all messages to the 3d app.
定义红移日志文件的路径和详细级别(详细级别)或在3d 应用程序中打印出的日志消息。将详细程度设置为“ Debug”将使 Redshift 打印所有消息到3d 应用程序。
You can find more information about the log file here.
您可以在这里找到有关日志文件的更多信息。
Feedback Display
反馈显示
Redshift can show important statistics about the scene (such as GPU memory usage and certain errors/warnings) in its "Feedback display" window. The 'Show behavior' option determines when the window should pop up. By default, it only pop ups when there is an important error or warning that the user should know about. But it can also be configured to appear always (when the user renders a new frame) or only when important errors are triggered (but not warnings).
红移可以在“反馈显示”窗口中显示关于场景的重要统计信息(如 GPU 内存使用情况和某些错误/警告)。“显示行为”选项决定窗口何时弹出。默认情况下,它只在出现用户应该知道的重要错误或警告时弹出。但是也可以将其配置为始终显示(当用户呈现新帧时)或仅当触发重要错误时(但不包括警告)。
Material Override
材料覆盖
Redshift has the ability of overriding every material in the scene with a gray lambert material. This is also known as a 'clay render'. This can be a useful feature when diagnosing lighting/shading issues.
红移有能力覆盖场景中的每一个材质与灰色朗伯材质。这也被称为粘土渲染。在诊断照明/阴影问题时,这可能是一个有用的特性。
This clay render can also be easily toggled on and off directly from the Redshift Render View.
这种粘土渲染也可以很容易地从红移渲染视图中直接切换开关。
Shadow Ray Biasing
阴影光线偏置
For information on what is 'shadow ray biasing' and why you might want to disable it, please look here.
关于什么是“阴影射线偏置”的信息,以及为什么你可能想要禁用它,请看这里。
Ray Tracing Acceleration Structure
光线追踪加速结构
Do Complete Scene Construction Before Rendering
在渲染之前完成场景构建
By default, Redshift loads and optimizes geometry data during the rendering process. This has the benefit of only loading/processing data that is actually visible by rays. The drawback is that, in certain cases, the CPU utilization might be less than ideal which means that geometric data processing might take longer than needed.
默认情况下,Redshift 在呈现过程中加载和优化几何数据。这样做的好处是只加载/处理射线实际上可见的数据。缺点是,在某些情况下,CPU 利用率可能不够理想,这意味着几何数据处理所需的时间可能会超过所需的时间。
This option forces Redshift to load and process all geometry upfront, before actual rendering starts. For certain scenes this can have a positive performance impact.
此选项强制 Redshift 在实际渲染开始之前预先加载和处理所有的几何图形。对于某些场景,这可以产生积极的性能影响。
Max Num Leaf Primitives
This option determines the accuracy of the ray tracing acceleration structures. Lower values can speed up difficult-to-ray-trace scenes such as ones that contain lots of hair, leaves or grass. However, reducing the number of leaf primitives also increases the GPU memory requirements. We, therefore, advise using lower values (such as 4, instead of the default 8) on fairly lightweight scenes or if your GPU already has plenty of VRAM. You can diagnose the ray tracing acceleration structure memory requirements by looking in the Redshift log file, at the memory usage statistics printed at the end of each frame.
这个选项决定了光线跟踪加速结构的精度。较低的值可以加快难以进行光线追踪的场景,比如包含大量头发、叶子或草的场景。然而,减少叶原语的数量也增加了 GPU 的内存需求。因此,我们建议在相当轻量级的场景中使用较低的值(比如4,而不是默认的8) ,或者如果你的 GPU 已经有足够的 VRAM。通过查看红移日志文件,可以诊断光线跟踪加速结构内存需求,该日志文件在每帧结束时打印内存使用统计信息。
Hair Tessellation
头发镶嵌
Mode
模式
Determines how hair should be tessellated at render time. Render-time hair tessellation improves the smoothness of hair without requiring more VRAM. However, it can increase render times.
决定了在渲染时头发应该如何镶嵌。渲染时头发镶嵌提高了头发的柔滑度而不需要更多的 VRAM。然而,它可以增加渲染时间。
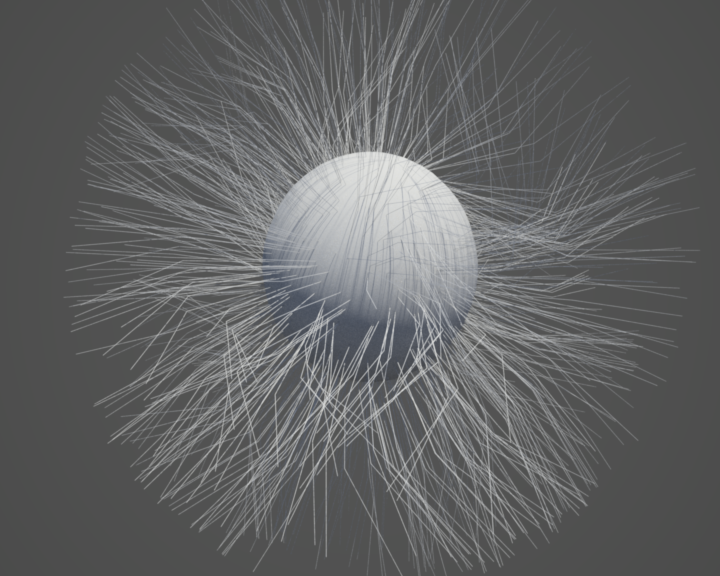
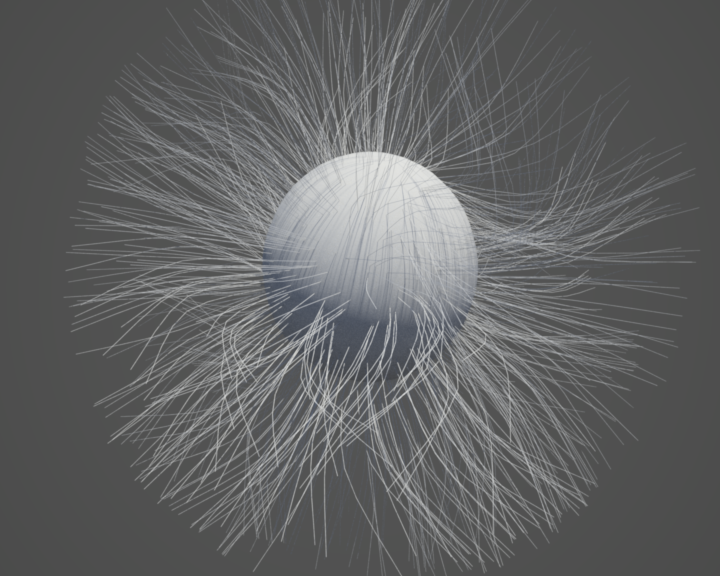
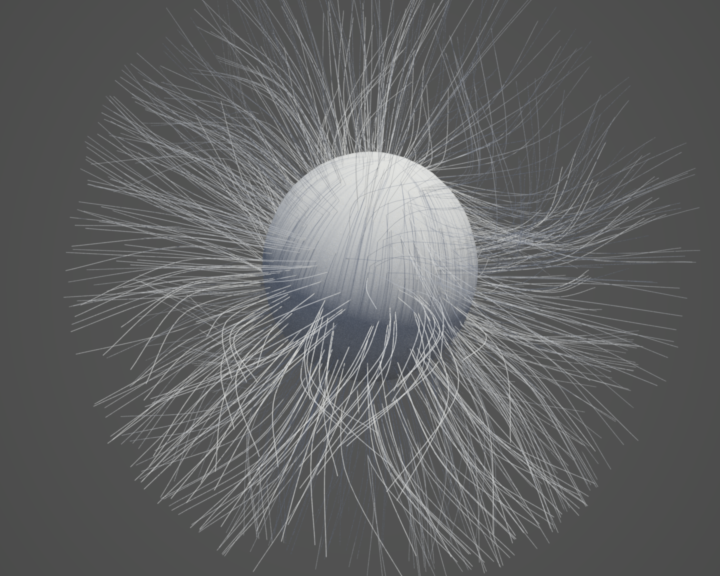
Below we show a hair mesh using only 2 segments per strand. Notice the angular artifacts on the "None" image and how render-time hair tessellation fixes them.
下面我们显示了一个头发网只使用2节每股。请注意“ None”图像上角度分明的工件以及渲染时的头发镶嵌如何修正它们。
|
|
|
|
|
Mode set to "None". Lots of angular artifacts are visible. 模式设置为“无”。许多有角度的人工制品是可见的。 |
Mode set to "4-steps" 模式设置为“4步” |
Mode set to "8-steps" 模式设置为“8步” |
Experimental Options
实验选项
Render in camera space
在相机空间渲染
When a scene has large extents (for example a space battle scene), precision problems might appear far away from the scene origin, i.e. the (0, 0, 0) coordinate. These precision problems might look like triangles being warped, lighting leaking through geometry or gaps appearing between polygons.
当场景具有较大的范围(例如空间战斗场景)时,精度问题可能出现在远离场景原点(即(0,0,0)坐标)的地方。这些精度问题可能看起来像是三角形被扭曲了,透过几何图形或多边形之间出现了裂缝。
The "render in camera space" option eliminates this type of issue by moving the scene around the camera so that numerical precision is maintained as much as possible.
“在相机空间中渲染”选项通过在相机周围移动场景来尽可能保持数字精度,从而消除了这种类型的问题。
Render Two Passes For Denoising
渲染两个通行证去噪
Generates pairs of all active AOVs, with the filenames post-fixed with _denoise0 and _denoise1. These two images can be used by Innobright's Altus Denoising System.
生成所有活动的 AOVs 对,其文件名使用 _ denise0和 _ denoise1进行 post-fixed。这两幅图像可用于 Innobright 的 Altus 去噪系统。
Disable Bump Smoothing On Lighting Silhouettes
关闭灯光轮廓上的凹凸平滑
Redshift by default smooths bump and normal maps on the light silhouettes of objects. I.e. there the surface normal and the light direction are perpendicular to each other. This is done to avoid faceting artifacts that can arise on those areas, especially if the object is low-poly. However, this can also produce loss of surface detail that might be necessary in some cases. For this reason, Redshift allows the user to turn off the light silhouette bump smoothing.
默认情况下,红移使物体的光线剪影上的凹凸和法线贴图变得平滑。也就是说,表面法线和光线方向互相垂直。这样做是为了避免出现在这些区域的小面工件,特别是如果对象是低多边形。然而,这也会导致在某些情况下可能需要的表面细节的丢失。由于这个原因,红移允许用户关闭光线轮廓凸起平滑。
Bucket Rendering
桶渲染
When Redshift renders in non-progressive mode, it renders the image in square tiles. These tiles are also known as 'buckets'.
当红移以非渐进模式呈现时,它会以方块方式呈现图像。这些方块也称为“桶”。
The size of each bucket can be important to GPU performance! By default Redshift uses 128x128 buckets but the user can force Redshift to use smaller ones (64x64) or larger ones (256x256). We recommend that the users leave the default 128x128 setting. Please keep in mind that, when rendering with multiple GPUs, using a large bucket size can reduce performance unless the frame is of a very high resolution. This is due to the 'last bucket effect' where the frame's last bucket has been assigned to a GPU and is currently rendering while the other GPUs have finished with their buckets and waiting for that last bucket to be rendered. This effect, in essence, reduces parallelism and can waste several seconds of rendering time per frame. For this reason, we recommend using 128x128 buckets. Please refrain from using small 64x64 buckets as these can underutilize the GPU.
每个桶的大小可以对 GPU 的性能很重要!默认情况下,Redshift 使用128x128个存储桶,但用户可以强制 Redshift 使用较小的存储桶(64x64)或较大的存储桶(256x256)。我们建议用户保留默认的128x128设置。请记住,当使用多个 gpu 呈现时,使用大桶大小会降低性能,除非帧的分辨率非常高。这是由于“最后一桶效应”,帧的最后一桶已经被分配给一个 GPU,目前正在渲染,而其他 GPU 已经完成了他们的桶,并等待最后一桶渲染。从本质上讲,这种效果降低了并行性,并且可能会浪费每帧渲染时间的几秒钟。出于这个原因,我们建议使用128x128的桶。请不要使用64x64的小水桶,因为这些水桶可以充分利用 GPU。
The order that the buckets are rendered can also be configured. There are three available options:
渲染 bucket 的顺序也可以进行配置:
- Horizontal, where buckets are rendered left to right, top to bottom 水平方向,即从左到右、从上到下呈现桶
- Hilbert, where the buckets are rendered using a zig-zag pattern that is designed to pick the next closest bucket to the current one Hilbert,其中 bucket 使用之字形模式呈现,该模式旨在选择离当前桶最近的桶
- Spiral, where rendering starts at the center of the frame and then gradually covers the outer parts 螺旋线,渲染从画面中心开始,然后逐渐覆盖外部
Debug Capture
调试捕获
If the user gets a GPU crash, they will see a message recommending that they re-rendering their frame using the 'debug capture' option enabled. This option allows Redshift to produce a lot of extra information during rendering which, when sent to the developers, can help them diagnose and fix issues.
如果用户得到一个 GPU 崩溃,他们会看到一条消息,建议他们使用启用的“ debug capture”选项重新呈现他们的框架。这个选项允许 Redshift 在渲染期间产生大量额外的信息,当发送给开发人员时,可以帮助他们诊断和修复问题。
Global Preferences
全球偏好
Selecting the GPU
选择 GPU
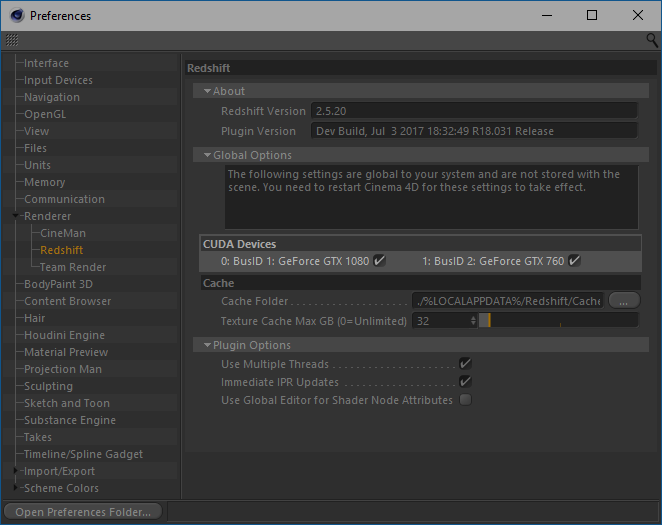
By default, Redshift will select the first available and compatible GPU on your system. You can configure Redshift to run on a particular GPU in the Redshift section of the C4D Preferences window.
默认情况下,红移将选择系统上第一个可用的兼容 GPU。你可以在 C4D 参数设置窗口的红移部分配置红移在特定的 GPU 上运行。
A GPU can operate in 'headless' mode, which means it's not connected to a monitor and Windows does not use any of its memory. If you have more than one GPU in your system, we recommend that you connect the 图形处理器可以在无头模式下运行,这意味着它没有连接到显示器,Windows 也不使用它的任何内存。如果您的系统中有多个 GPU,我们建议您连接least 最少 powerful GPU to your monitor and configure Redshift to use your unconnected ('headless') GPU. Using the most powerful GPU for Redshift in 'headless' mode has two benefits: 强大的 GPU 到您的显示器和配置红移使用您的非连接(“无头”) GPU。在无头模式下使用最强大的 GPU 进行红移有两个好处:
- Windows will not use any VRAM on the headless GPU, giving Redshift access to more VRAM without competing with other 3D applications. Windows 不会在无头 GPU 上使用任何 VRAM,这使得 Redshift 可以访问更多的 VRAM,而无需与其他3 d 应用程序竞争
- While Redshift is rendering on the headless GPU, the system will still be 100% responsive so you can do other things – even open up another 3d app and continue working! 当 Redshift 在无头 GPU 上渲染的时候,系统仍然是100% 响应的,所以你可以做其他事情——甚至打开另一个3d 应用程序继续工作
Cache Folders
缓存文件夹
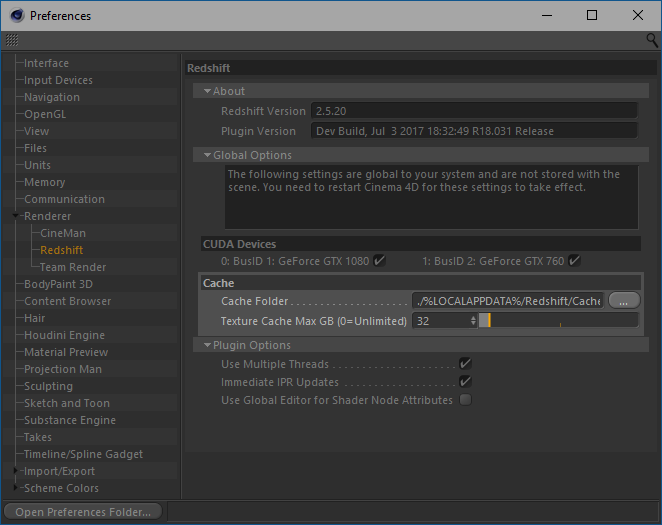
Redshift transparently converts any textures used for rendering to a proprietary tiled format for optimal rendering performance. These converted textures are cached to disk and regenerated only when the source texture changes. Because the texture cache can occupy a significant amount of disk space, Redshift allows you to customize the location of the cache folder and to set a limit on how large the texture cache can grow. You will find these settings in the Redshift Global Preferences in the System tab of the Redshift renderer options.
Redshift 透明地转换任何用于渲染的纹理到专有的平铺格式,以获得最佳的渲染性能。这些经过转换的纹理缓存到磁盘,只有在源纹理发生更改时才重新生成。因为纹理缓存占用大量磁盘空间,所以 Redshift 允许您自定义缓存文件夹的位置,并设置纹理缓存增长的限制。您可以在红移渲染器选项的系统选项卡中的红移全局首选项中找到这些设置。

赶快留个言打破零评论!~