MAKING VOLUME LIGHT
In this section we will explain how to make volume light in Octane using 3 different methods. Volume is a fairly wide issue; so we will not go into the details of using the volume in these examples. You can look at "Volumetrics" for this. There are a few ways to create a volume light in Octane. First look at Realistic usage.
发出体积光
在本节中,我们将说明如何使用3种不同的方法使Octane体积轻。数量是一个相当广泛的问题;因此在这些示例中,我们将不涉及使用该卷的详细信息。您可以为此查看“体积”。有几种方法可以在Octane中创建体积光。首先看一下实际用法。
Creating spotlight volume by using octane volume object (realistic)
1- In the "Making Spotlight" section, reopen the spotlight scene we provided. This time we will define a "Volume" to the spotlight. Now that you know how to make Spotlight in general, you can also load your own scene or spotlight setup for this example. First go to the "Objects" menu in Live Viewer and select "Fog Volume". Once you've created Fog, set the dimensions of this volume object from the viewport so that it covers the spotlight. You can enlarge the volume object with the scale tool. Be careful because it will scale uniformly because of the nature of the volume object (usually consuming too much GPU power and Vram). Perform setup as you see in the picture below.
使用Octane体积对象创建聚光灯体积(实际)
1-在“制作聚光灯”部分中,重新打开我们提供的聚光灯场景。这次,我们将为聚光灯定义一个“音量”。现在您已经知道如何制作Spotlight,现在还可以为该示例加载自己的场景或Spotlight设置。首先转到Live Viewer中的“对象”菜单,然后选择“雾体积”。创建雾后,从视口中设置该体积对象的尺寸,使其覆盖聚光灯。您可以使用缩放工具来放大体积对象。请注意,由于体积对象的性质,它会均匀缩放(通常会消耗过多的GPU功率和Vram)。执行设置,如下图所示。
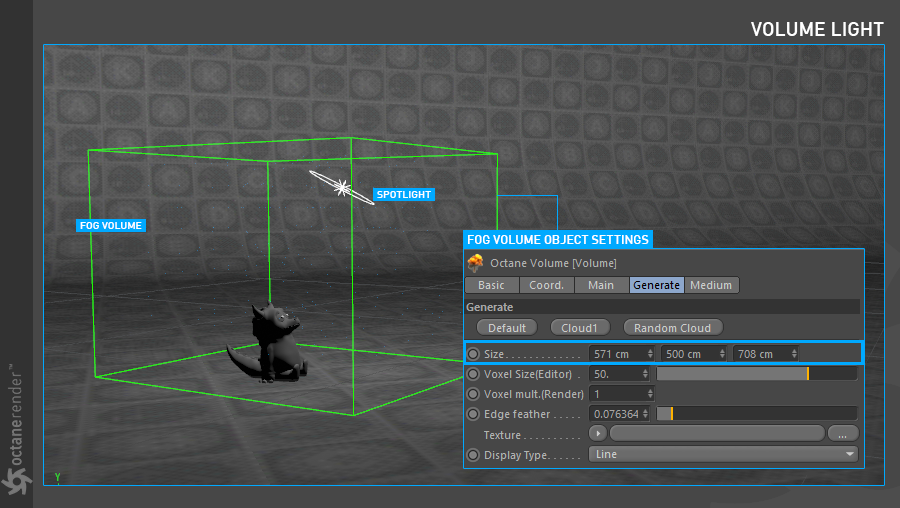
2- You no longer need to do any action in the viewport from this point. Now the whole action will be in the Medium setting of the Volume object. So go to the medium tab and change the settings as you see in the picture below. Do not worry, we will describe volume and medium options in more detail in the "Volumetrics" section.
2-从这一点开始,您不再需要在视口中执行任何操作。 现在,整个操作将在“音量”对象的“中等”设置中。 因此,请转到媒体标签并更改设置,如下图所示。 不用担心,我们将在“体积”部分中更详细地描述体积和中度选项。
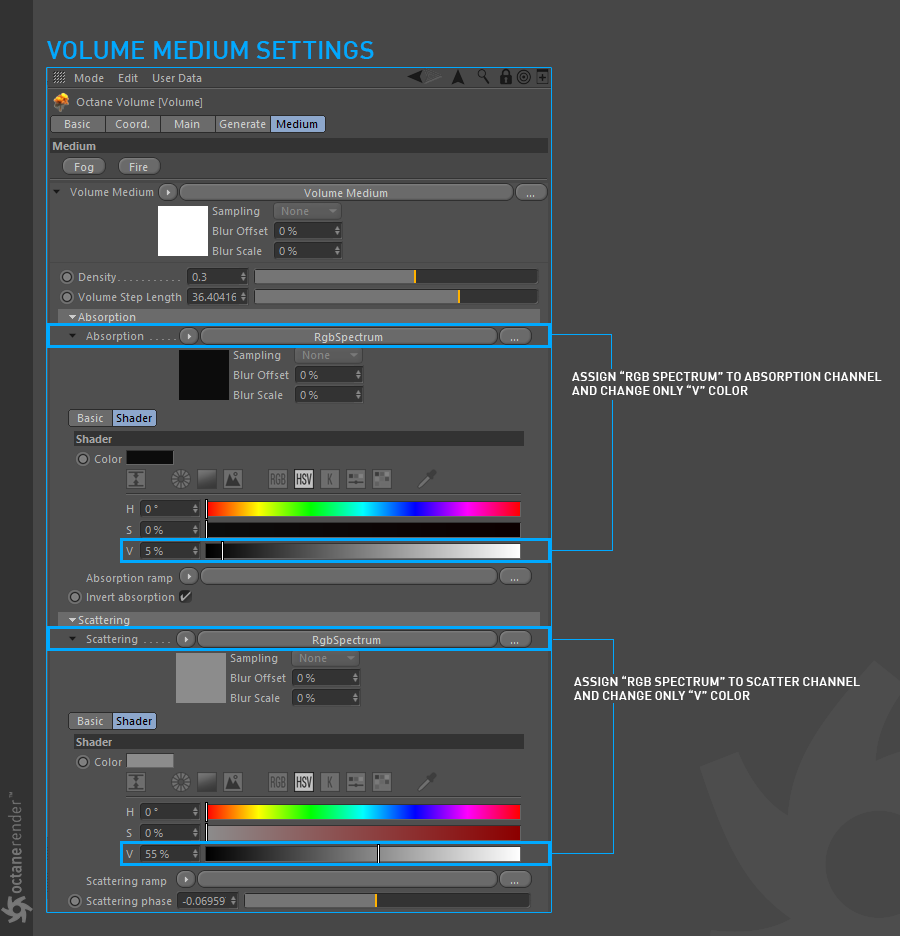
3-Before running Live Viewer, go to the Octane settings and select Path Tracing as the render kernel. Apply the options you see below.
3-在运行Live Viewer之前,转到“ Octane”设置,然后选择“路径跟踪”作为渲染内核。 应用您在下面看到的选项。
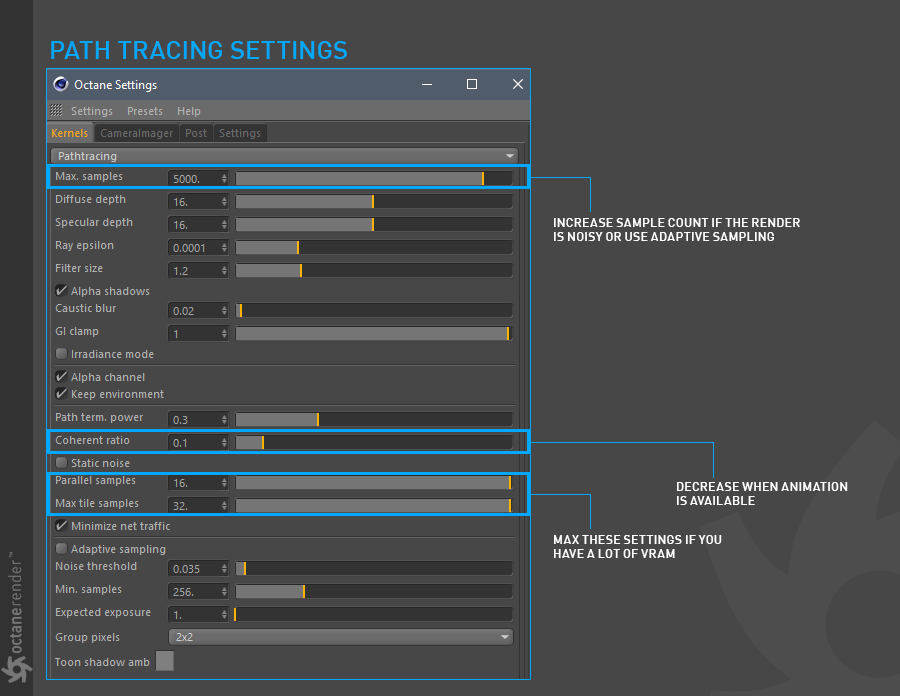
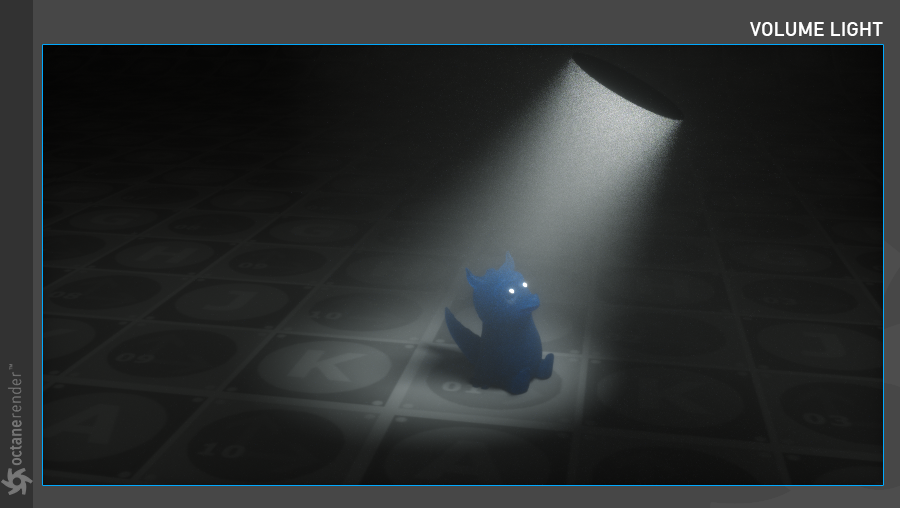
4- If you've done everything right, you'll see something like the following render (except cosmetic factors). As you can see in the picture, spotlight interacts directly with the volume object, giving a realistic result. By putting the "Fog Volume" in the medium, you can actually imagine that you are theoretically filling up the space with very small particles. Just as in the real world, photons interact with these particles and scatter (or absorb) to give us a foggy or hazy appearance.
4-如果您已正确完成所有操作,则将看到类似以下渲染的内容(除了外观因素)。 如您在图片中看到的,聚光灯直接与体积对象交互,从而提供逼真的结果。 通过将“雾体积”放入介质中,您实际上可以想象到,理论上您是用很小的粒子填充空间。 就像在现实世界中一样,光子与这些粒子相互作用并发生散射(或吸收),从而使我们看起来有雾或朦胧。
Creating spotlight volume by using texture/hdr environment (realistic)
1- This time we will create the same scene and spotlight setup using the environment. To do this, first create a "Texture Environment" from the Live Viewer and go to the main tab and set the options as you see in the picture below.
使用纹理/ hdr环境(逼真的)创建聚光灯体积
1-这次,我们将使用该环境创建相同的场景和聚光灯设置。 为此,首先在Live Viewer中创建一个“纹理环境”,然后转到主选项卡并设置选项,如下图所示。
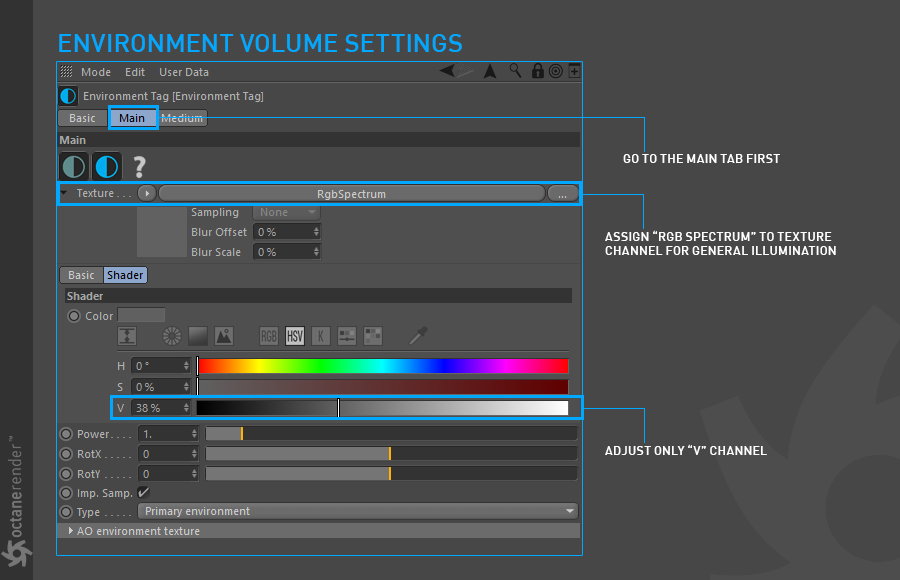
2- Now go to the medium tab and make the settings you see in the picture below.
2-现在转到媒体选项卡,然后进行设置,如下图所示。
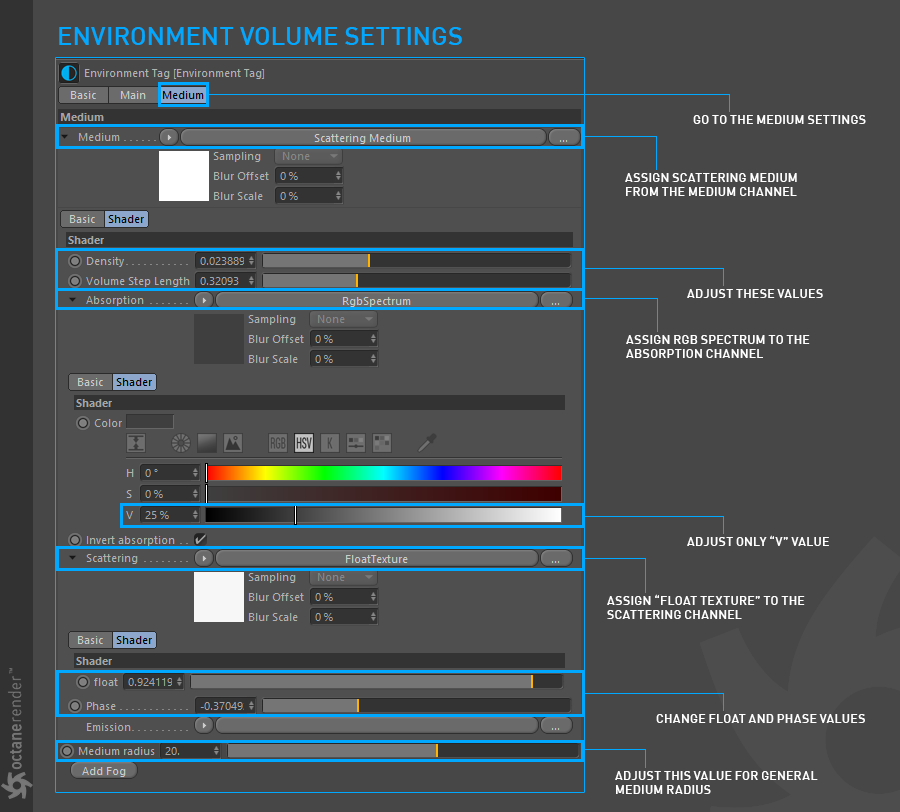
3- You can set the Render kernel as the previous example. Depending on the scene, some settings may need to be changed. It is important to choose the kernel method as Path Tracing in every scene you use Medium. If you've done everything right, you'll see something like the following render (except cosmetic factors). As you can see in the picture, spotlight interacts directly with the environment volume, giving a realistic result. If necessary, you can increase or decrease the power of the light.
3-您可以将Render内核设置为上一个示例。 根据现场情况,可能需要更改某些设置。 在使用“中”的每个场景中,选择内核方法作为“路径跟踪”非常重要。 如果一切正确,您将看到类似以下渲染的内容(除了外观因素)。 如您在图片中所看到的,聚光灯与环境体积直接交互,从而获得逼真的效果。 如有必要,可以增加或减少光功率。
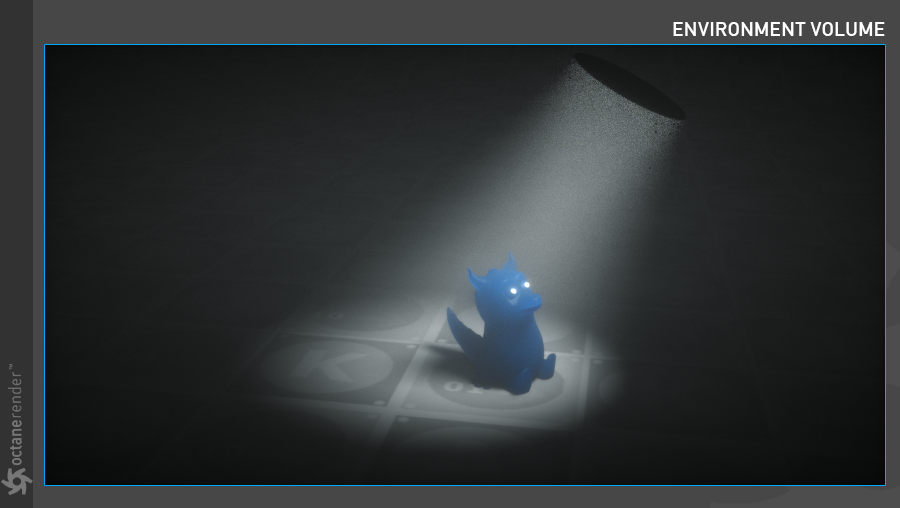
Creating spotlight volume (non-realistic)
1- In the "Making Spotlight" section, open the spotlight scene we link to. This time we will give a volume effect to a cone object, not to the environment. First create a Cone object and position it where you want in your scene. Then right-click on this cone object from the object manager and select "octane object tag" by selecting c4d octane tags from the drop down menu. Set the options as follows.
创建聚光灯体积(非现实)
1-在“制作聚光灯”部分中,打开我们链接到的聚光灯场景。 这次,我们将为圆锥对象而不是环境赋予体积效果。 首先创建一个Cone对象,并将其放置在场景中所需的位置。 然后在对象管理器中右键单击此圆锥体对象,然后从下拉菜单中选择c4dOctane标签,选择“Octane对象标签”。 如下设置选项。
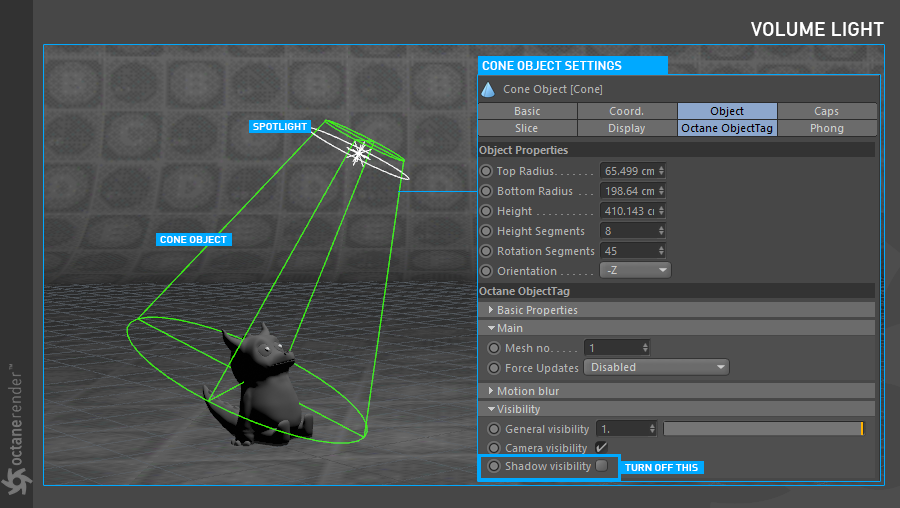
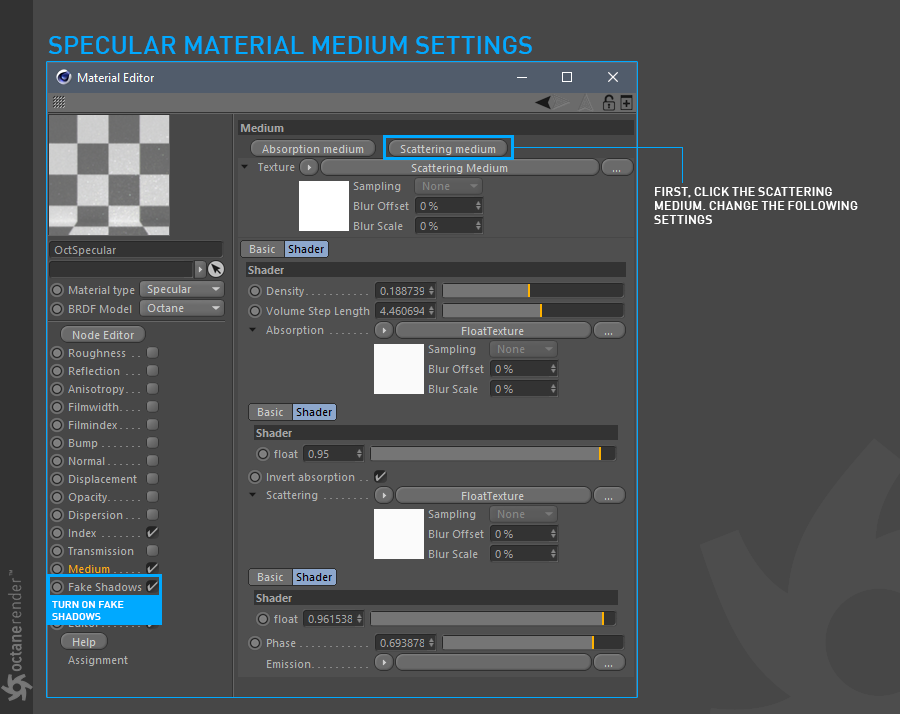
2- Now create the Octane Specular material and open the Material Attribute window with a double click. In this window, close all channels except Index, Medium, Fake shadows, Common and Editor. Go to Fake shadows and activate it. Make Index 1. Now go to the Medium settings and change them as shown below. After finishing the Medium settings, assign the material to the cone object.
2-现在创建Octane镜面材质,并双击打开“材质属性”窗口。 在此窗口中,关闭除“索引”,“中等”,“假阴影”,“通用”和“编辑器”以外的所有通道。 转到“假阴影”并将其激活。 进行索引1.现在进入“中”设置并按如下所示进行更改。 完成“中”设置后,将材质分配给圆锥对象。
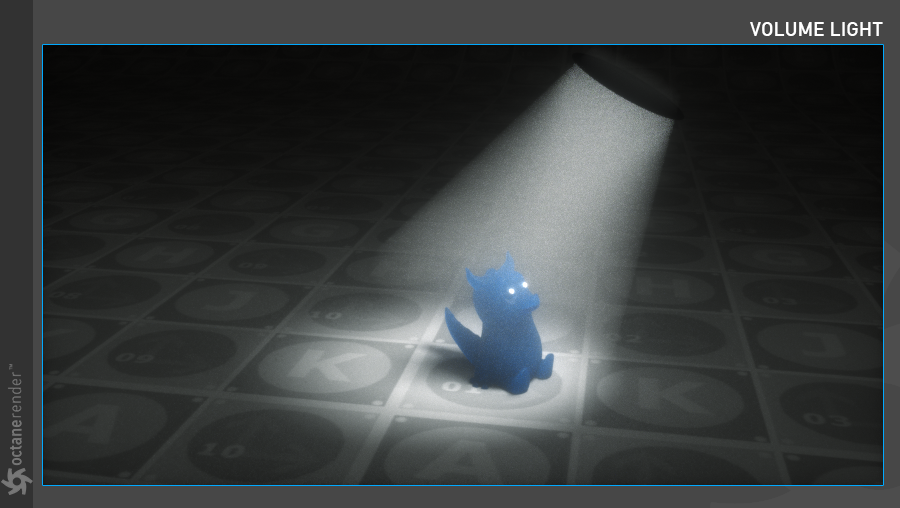
3- Run LV. If you've done everything right, you'll see something like the following render (except cosmetic factors). As you can see in the picture, the volume medium we assign to the cone object is quite far from the previous realistic samples; especially the edge of the cone object is very sharp. But since this method is practical, you can use this setup according to your purpose.
3-运行LV。 如果一切正确,您将看到类似以下渲染的内容(除了外观因素)。 如您在图片中所看到的,我们分配给圆锥对象的体积介质与以前的逼真的采样相去甚远。 特别是圆锥对象的边缘非常锋利。 但是由于此方法很实用,因此您可以根据自己的目的使用此设置。


赶快留个言打破零评论!~