LAYERED MATERIAL
New nodes: layered material, diffuse layer, specular layer, sheen layer, metallic layer, layer group nodes.
图层材质
新节点:分层材质,漫射层,镜面层,光泽层,金属层,层组节点。
The new Layered Material system allows you to construct a complex material that consists of a Base Material, with a maximum of 8 layers which can be inserted on top of the base layer. We separated and exposed a set of layers (Diffuse layer, Specular layer, Metallic layer, Sheen layer) that made up the complex materials from previous Octane versions (Diffuse material, Glossy material, Specular material, Metal material, Universal material). Using this set of unique layers, Octane 2019.1 now empowers users to recreate complex materials in a physically-based manner as opposed to manually mix materials together.
Note: we cannot guarantee stability when using C4D shaders inside the Layered Material, so please be advised that using them may cause quality loss, low performance, and/or crashes. It's best to use osl textures and/or combinations of octane nodes to achieve those similar effects instead.
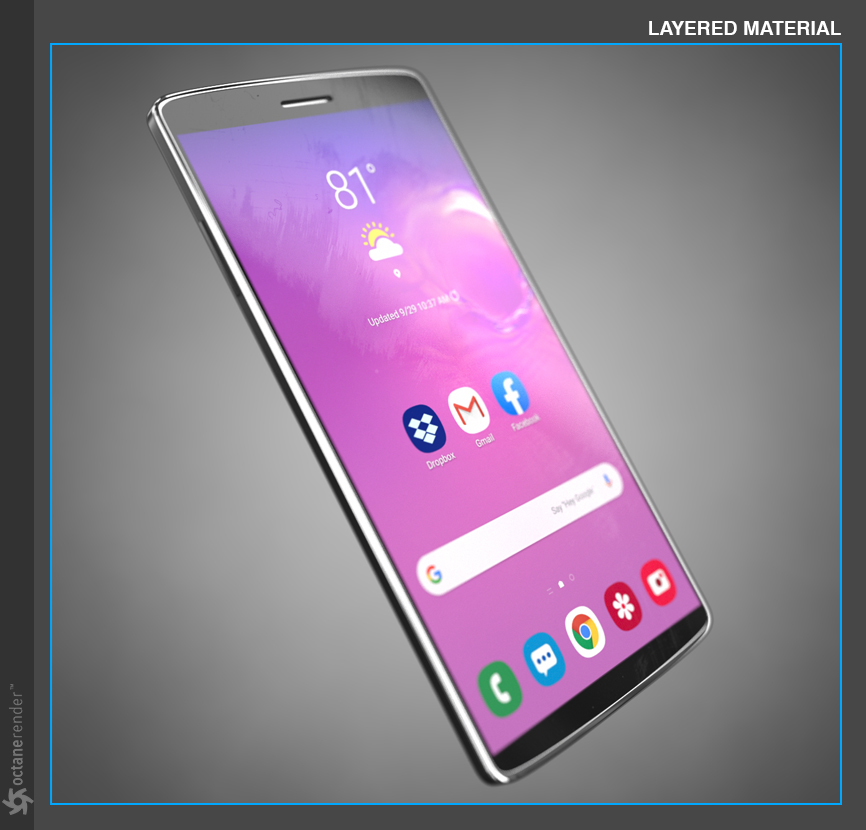
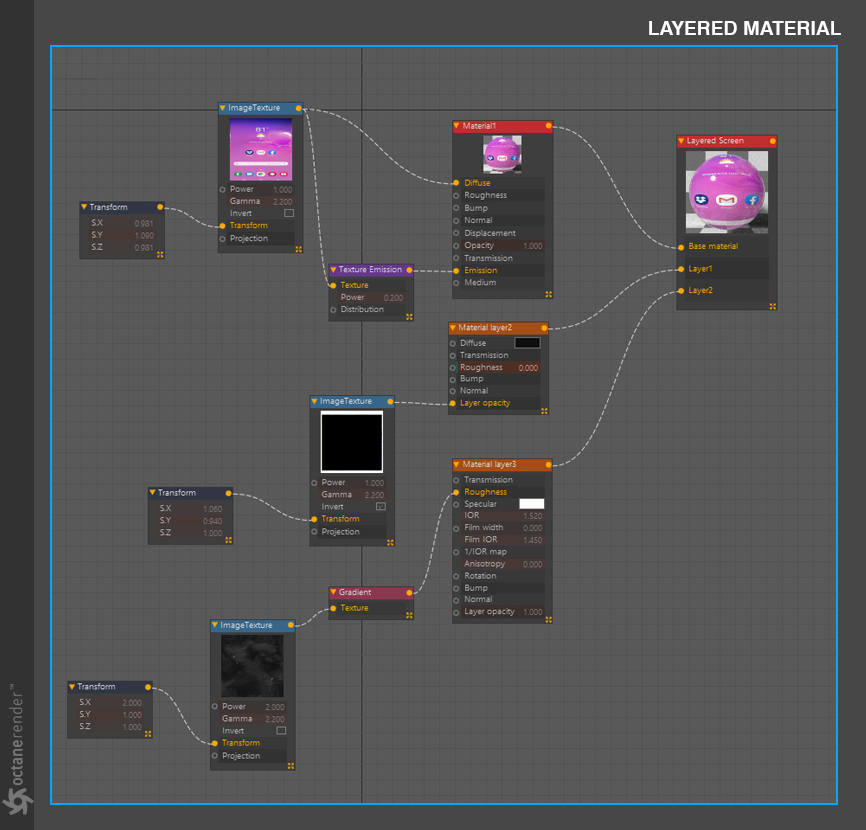
As an example, below we have a generic phone screen with a material built from of a diffuse emission layer as the Base Material, a diffuse, black material as a mask layer for the black non-emissive areas for Layer1, then a specular layer to provide the overal gloss on top, with a smudge map in the roughness, for Layer2:
新的``分层材质''系统使您可以构造由基础材质组成的复杂材质,最多可以将8层插入基础层的顶部。我们分离并暴露了一组图层(漫反射层,镜面反射层,金属层,光泽层),这些层由以前的Octane构成的复杂材质(漫反射材质,光面材质,镜面反射材质,金属材质,通用材质)组成。使用这组独特的图层,Octane 2019.1现在使用户能够以基于物理的方式重新创建复杂的材质,而不是手动将材质混合在一起。
注意:在分层材质中使用C4D着色器时,我们不能保证稳定性,因此请注意,使用它们可能会导致质量下降,性能降低和/或崩溃。最好使用osl纹理和/或Octane节点的组合来实现类似的效果。
例如,下面有一个通用的电话屏幕,其材质是由漫射发射层作为基础材质,由漫射的黑色材质作为遮罩层,用于第1层的黑色非发光区域,然后是镜面反射层。为第2层提供顶部的总体光泽度,并在粗糙度中带有污迹图:
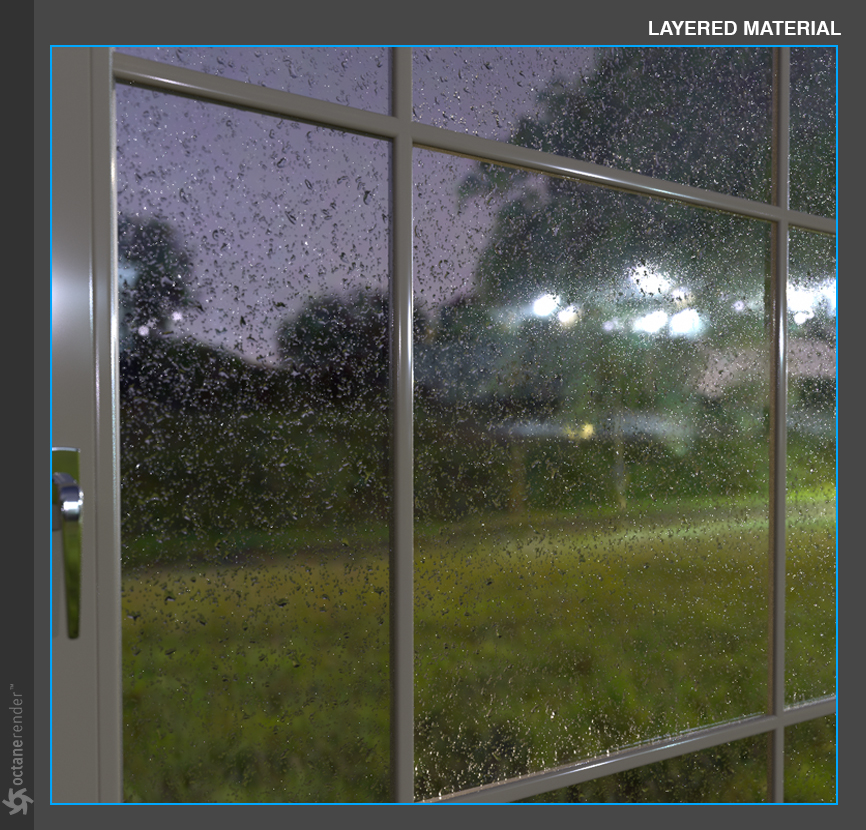
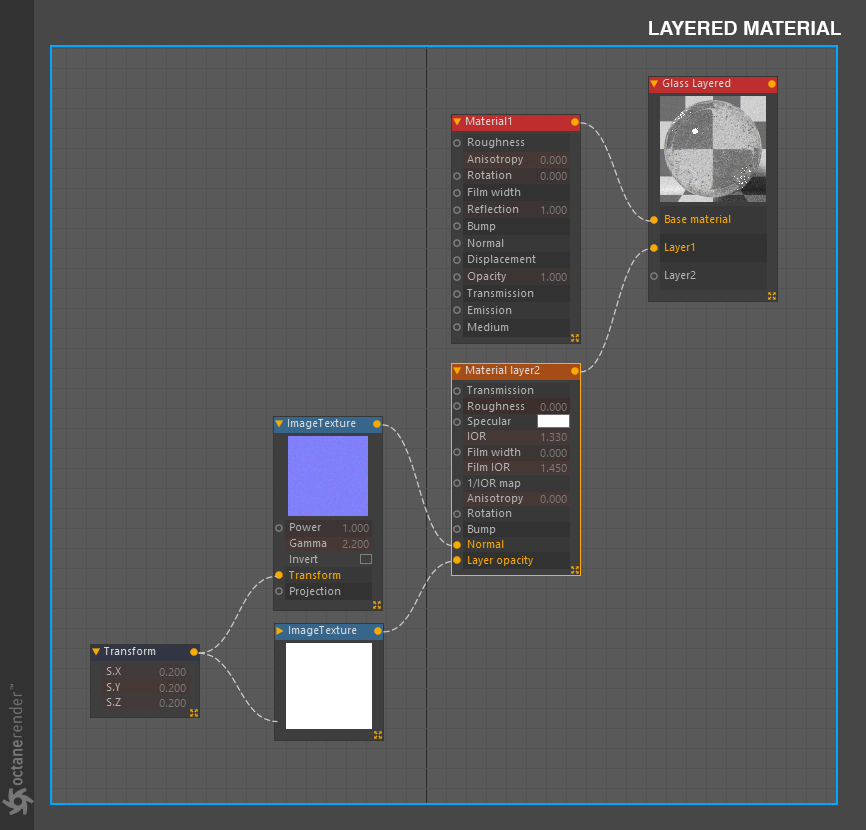
Another example, you can achieve a raindrop effect using per layer bump map and normal map perturbation. This example consists of two specular layers, with the top specular layer using a custom raindrop normal map while the bottom (the Base Material's specular layer) uses the geometry's normal. In order to use a different IOR for the water (without affecting the glass), we used an alpha map for the raindrop layer's Layer Opacity to isolate any layer attributes to only the drops:
另一个示例,您可以使用每层凹凸贴图和法线贴图扰动来实现雨滴效果。 此示例由两个镜面图层组成,其中顶部镜面图层使用自定义的雨滴法线贴图,而底部(基础材质的镜面图层)使用几何体的法线。 为了对水使用不同的IOR(在不影响玻璃的情况下),我们为雨滴层的图层不透明度使用了Alpha贴图,以将任何图层属性隔离为仅水滴:
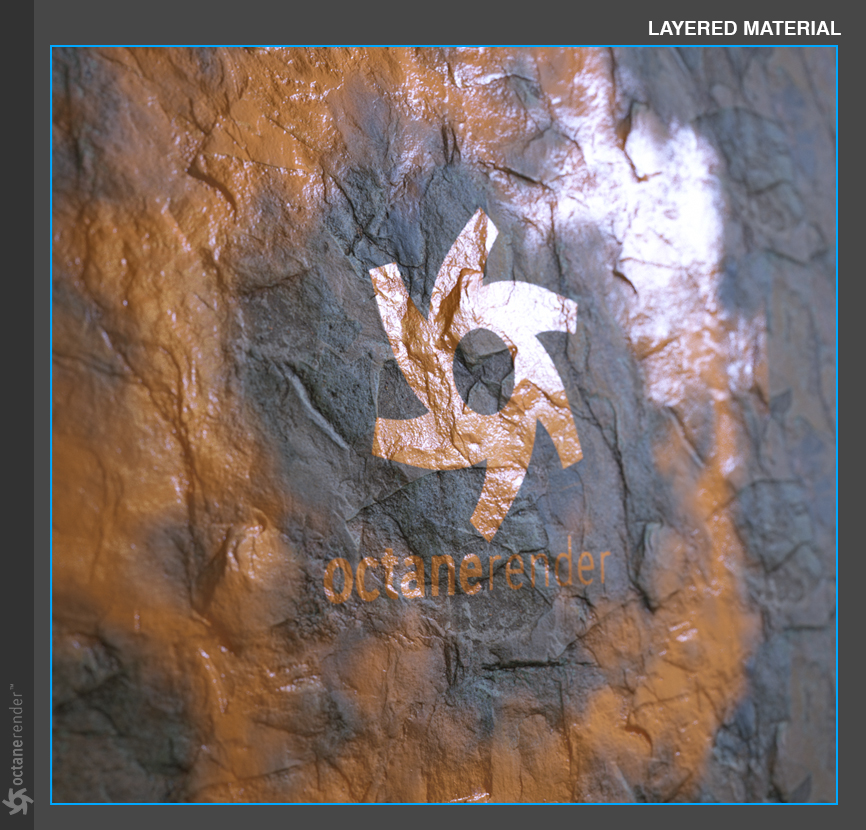
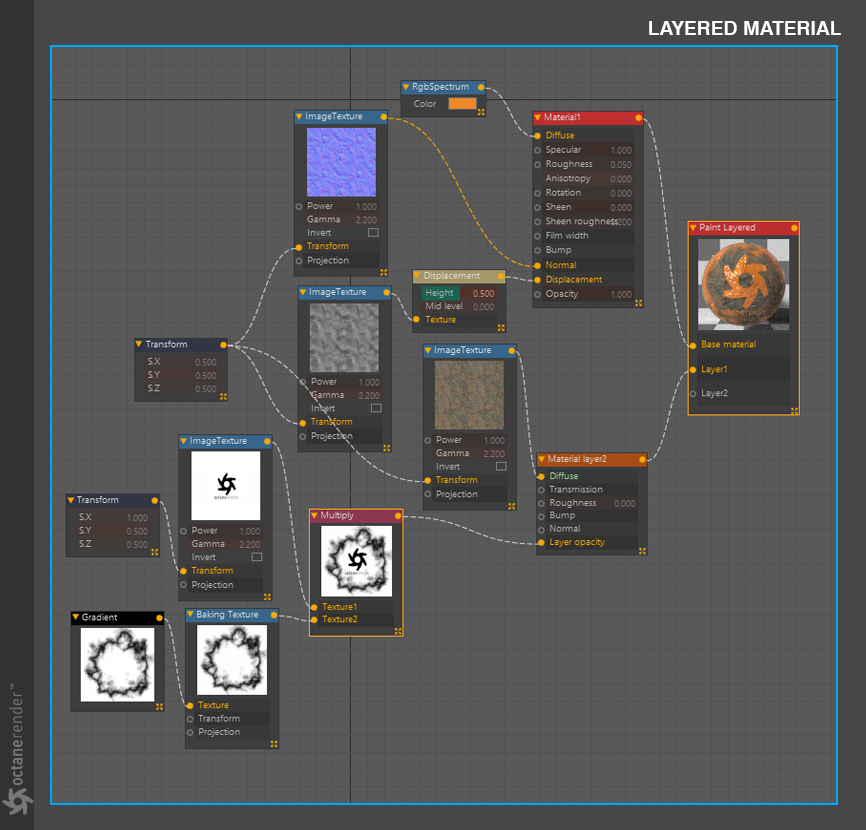
With the Layered Material, you can layer decals on top of your Base Material (or build in reverse). Consider this spray painted rocky wall as an example. While this example can be built in many different ways with the Layered Material, here we used a specific approach. Since there is not a glossy layer that you can add to the Layer1 or Layer2 inputs (laying the paint on top of the rocks), we created the glossy material as the Base Material (the spray paint). We used masks in Layer1 (the rock layer) to allow the spray paint to show through, giving it the appearance of being on top. As a bonus, we can use a displacement in the base layer that will also make the layers on top appear as though they are displaced as well. As mentioned, you can achieve this look in many different ways, for instance: create your rocky wall as the base diffuse or rough glossy material, create your diffuse spray paint material as Layer1, then lay a specular material on top of all the layers in your Layer2 input and use your spraypaint mask in the Layer Opacity.
使用分层材质,您可以在基础材质的顶部分层贴花(或反向构建)。以这个喷涂的岩石墙为例。尽管可以使用“分层材质”以多种不同方式构建此示例,但在此我们使用了一种特定方法。由于没有可添加到第1层或第2层输入中的光亮层(将涂料放置在岩石上),因此我们将光亮材质创建为基础材质(喷涂涂料)。我们在第1层(岩石层)中使用了遮罩,以使喷漆能够透过,从而使其看起来像在顶部。另外,我们可以在基础层中使用置换,这也将使顶部的图层看起来也一样。如前所述,您可以通过许多不同的方法来实现这种外观,例如:将岩壁创建为基础漫反射或粗糙的光泽材质,将漫射喷涂材质创建为Layer1,然后在其中的所有图层之上放置镜面反射材质。您的Layer2输入并在Layer Opacity中使用Spraypaint蒙版。
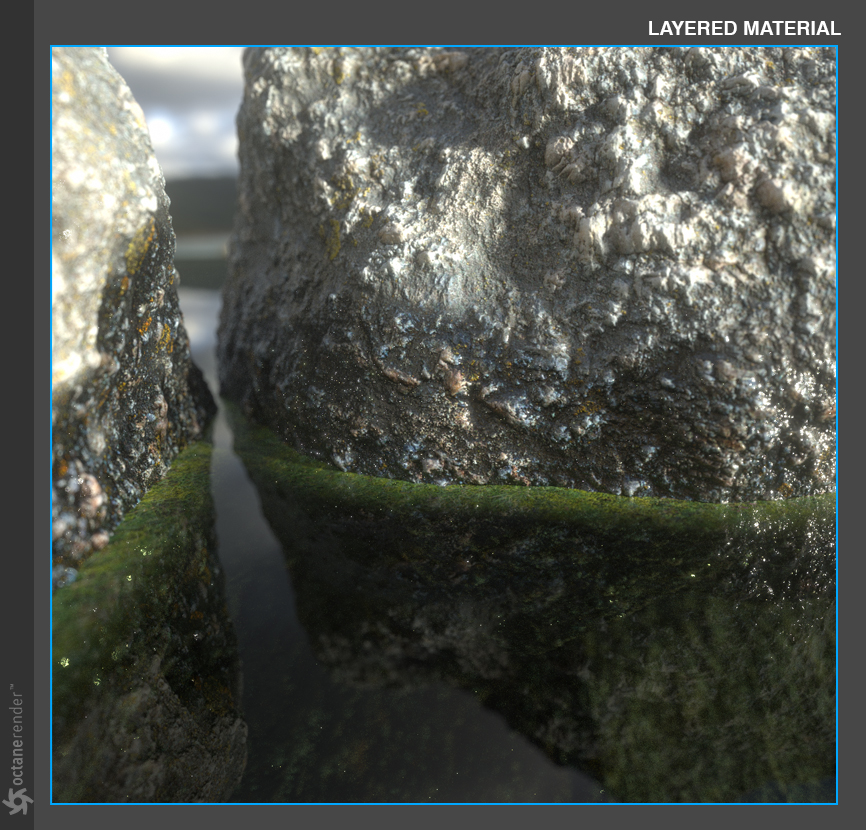
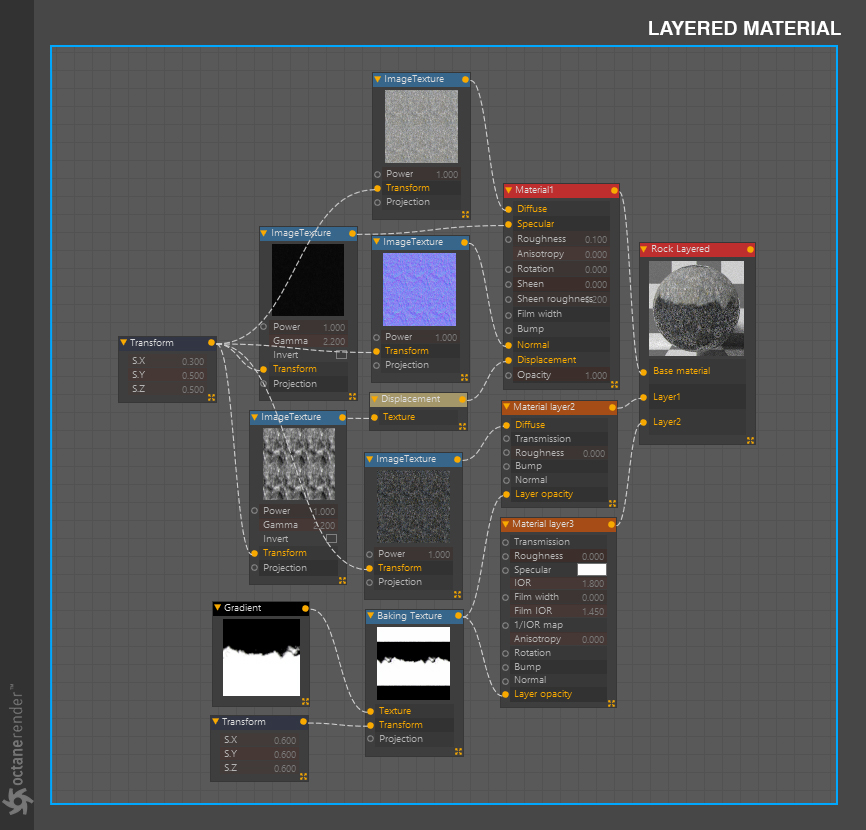
Below imagines another example of what the Layered Material can be used for. In this seemingly complex node build, what's actually happening is fairly simple. Our Base Material is the underlying dry portion of the rock, our Layer1 material is a darker diffuse material version of the same rock texture, and our Layer2 material is merely a specular to overlay a shiny wetness. Both our Layer1 and Layer2 are masked with a gradient in the Layer Opacity inputs so that the darkerer material is confined to the lower portion of the mesh, and reusing that same gradient, we can make just that portion shiny and wet in appearance. The displacement and normals only need to be used in our Base Material:
下面想象了分层材质可以用来做什么的另一个例子。 在这种看似复杂的节点构建中,实际发生的事情非常简单。 我们的基础材质是岩石的底层干燥部分,我们的Layer1材质是相同岩石纹理的较暗漫射材质版本,而我们的Layer2材质只是用来覆盖闪亮湿润的镜面反射。 我们的第1层和第2层都在``层不透明度''输入中被渐变遮罩,以便将较暗的材质限制在网格的下部,并重复使用相同的渐变,我们可以使该部分在外观上变得发亮潮湿。 置换和法线只需要在我们的基础材质中使用:
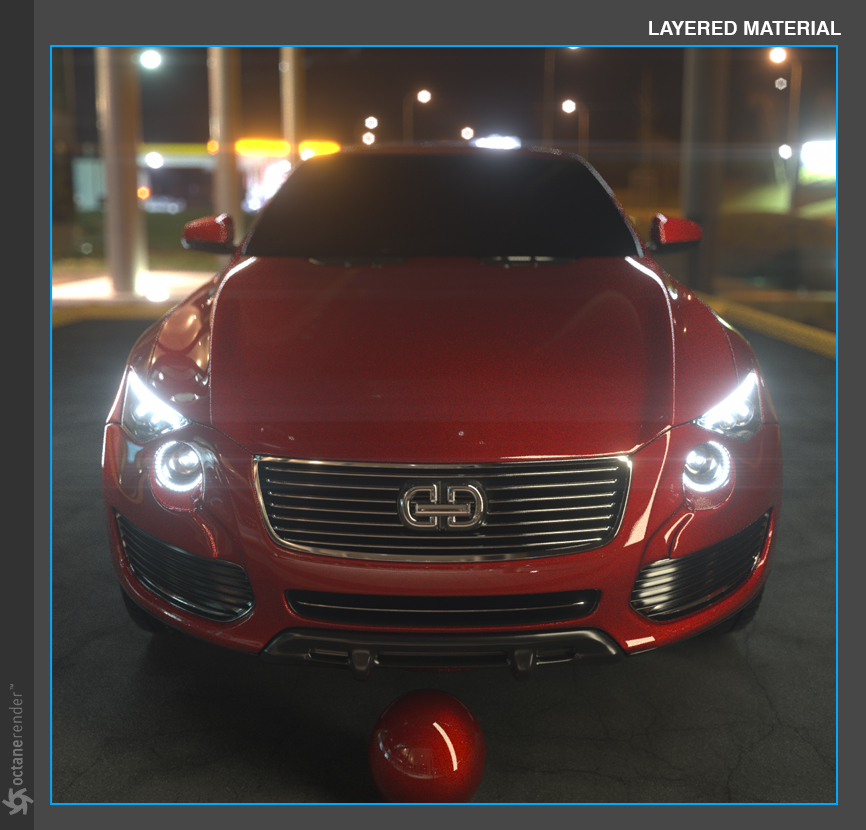
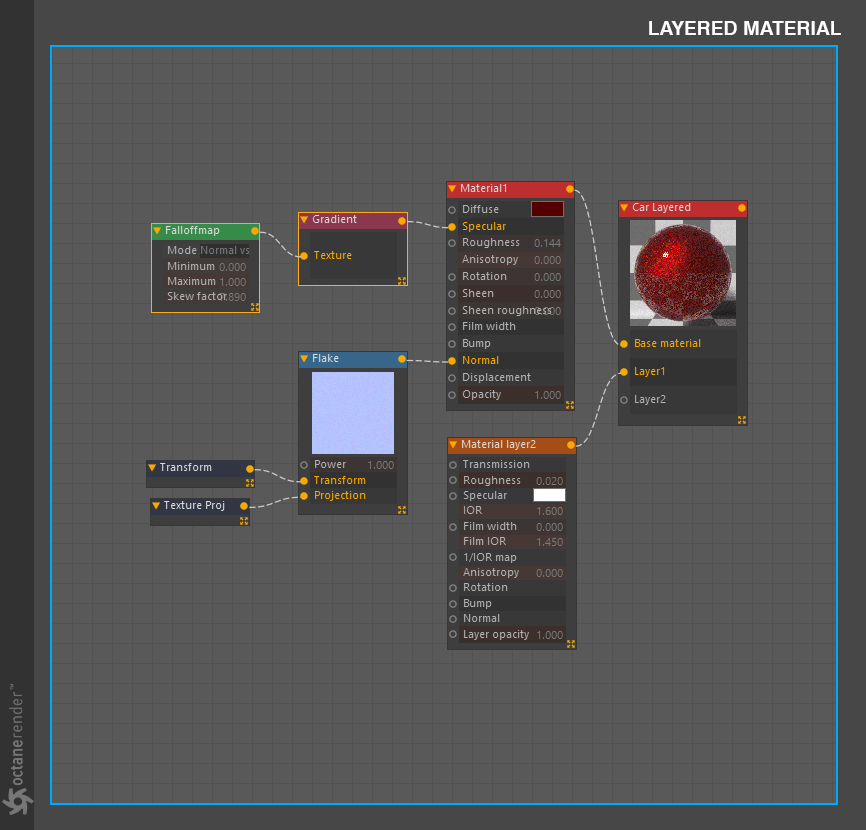
With the Layered Material, aside from using it in creative ways, you can easily craft materials in the same way they are constructed in the real world, for example...car paint. There are quite a few ways to do this, but in the simpler example here, we've used the, recently added, metallic Base Material with color driven mainly from the specular channel, and a bit of roughness. A flake normal map was placed into the Base Material to produce the metallic flake. After that, we simply added a clear coat with a specular material in Layer1:
使用分层材质,除了以创造性的方式使用它之外,您还可以轻松地以与现实世界中构造材质相同的方式来制作材质,例如...汽车油漆。 有很多方法可以做到这一点,但是在这里的简单示例中,我们使用了最近添加的金属基础材质,其颜色主要来自镜面反射通道,并且有点粗糙。 将薄片法线贴图放置到基础材质中以产生金属薄片。 之后,我们只需在Layer1中添加带有镜面材质的透明涂层:
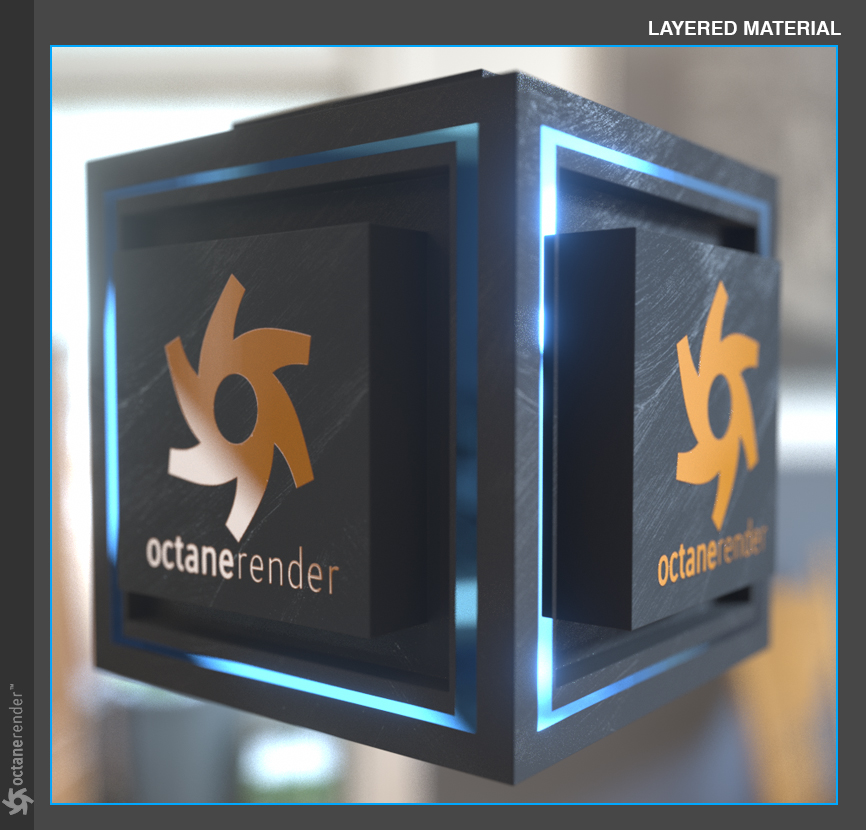
In this example, we show a more complicated Layered Material that involves the use of Layer Group nodes. We have created a Layer Group node that works together with the Layered Material for simpler grouping of material layers to help sharing of layers between materials. To show how this works, we're going to use a simplfied example to illustrate the power of Layer Groups. In the example we're using a glossy Base Material with a smudge texture in the roughness channel. In the Layer1 input, you'll see we're using our Layer Group node where we're combining a diffuse orange layer with a specular layer (for gloss) into one node, masked with the OctaneRender logo; we've done all this whilst only using one input on the Layered Material, leaving another input open for extra details. For our Layer2 input, we used a metallic layer masked with a simple square frame. Now the metallic is only revealed in the white areas of the mask on the mesh.
在此示例中,我们显示了一个更复杂的分层材质,其中涉及到图层组节点的使用。 我们创建了一个与Grouped Material一起使用的Layer Group节点,以简化材质层的分组,以帮助在材质之间共享层。 为了展示它是如何工作的,我们将使用一个简化的示例来说明图层组的功能。 在示例中,我们使用的是在粗糙通道中具有污点纹理的光泽基础材质。 在``Layer1''输入中,您将看到我们正在使用``图层组''节点,在该节点中,我们将一个漫反射橙色层和一个镜面层(用于光泽度)组合到一个被OctaneRender徽标遮盖的节点中; 我们完成了所有这些工作,同时仅在“分层材质”上使用一个输入,而为其他细节保留了另一个输入。 对于我们的Layer2输入,我们使用了一个带有简单方形框架遮盖的金属层。 现在,金属元素仅显示在网格上蒙版的白色区域中。

As you can imagine, the possibilities are endless when you start understanding how to effectively make use of the Layered Material.
可以想象,当您开始了解如何有效利用分层材质时,可能性是无限的。


赶快留个言打破零评论!~