RENDER PASS ?
When you work in a production in the real world, you face 2 major problems:
1-You never have as much time as you want and,
2- The customer is always makes trouble.
For example, let's say you have to make a car render for your customer, and you've done a great deal of work. When the customer looks at the result, they may not like the color of the car, the reflections may look weak or the shadows may be more specific. They may dislike the ground or background, or say something else. All of these are nightmarish comments for a 3D artist and means to make changes and re-render. Time is lost.
The solution is to render the components separately (color, diffuse, specular, reflection, shadow, SSS) and combine them all into a compositing software. This is called Render Pass for these different render components and Multi-pass compositing (or simply Compositing) for processing these components in compositing software.
With this method, the result can be achieve quickly. If the customer changes the color, the layer (pass) that is the only color can be changed and the result can be seen immediately. You can win both times, and instantly show the changes while your customer is with you.
The render passes used for compositing are also used to show your render output more realistically. Compositing is a profession. And it has its own rules and tricks. This is why we recommend you to develop yourself in the field of compositing, not just with 3D creation. In this regard, you can find many paid or free courses on the web.
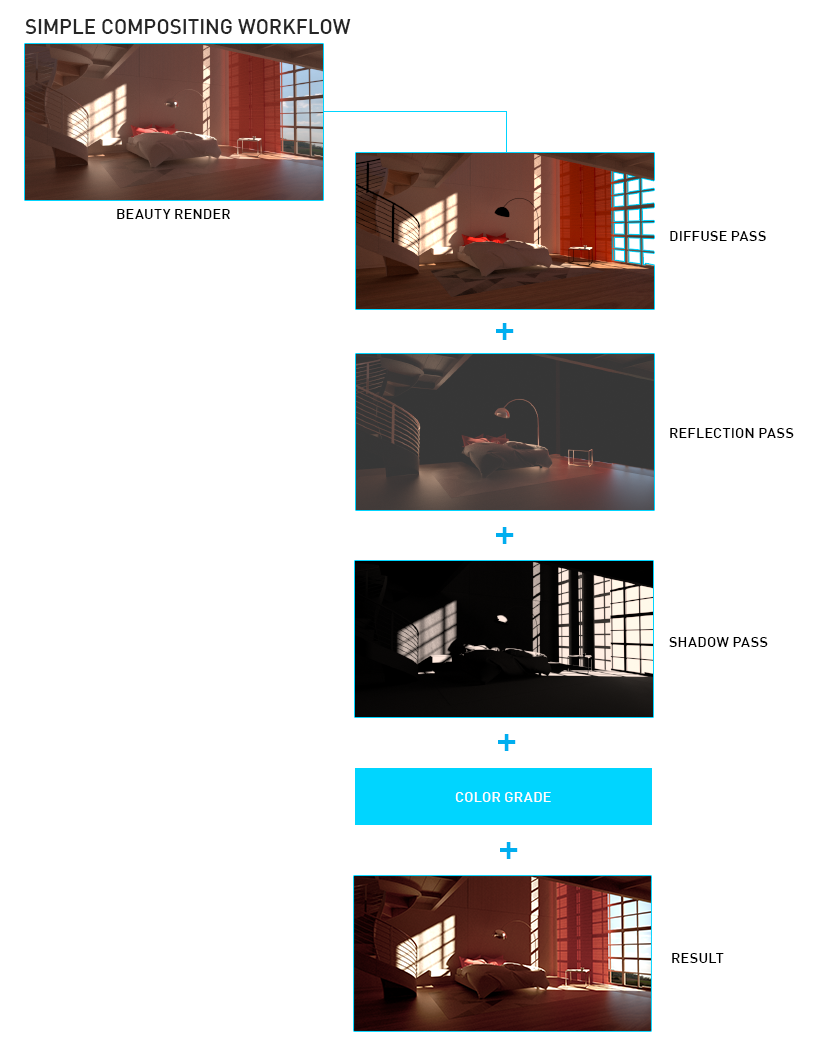
The following diagram shows a classic compositing style of work.
Important Note: Always use the Octane Render section to save the Render Pass file. Do nothing about the render pass section in Cinema 4D.
Important Note 2: If you see jagged edges in your multi-pass, make "Premultiply Alpha" active or inactive from Camera Imager settings. Also check your Passes in the Live Viewer before you get the Final Render.
Important Note 3: When rendering multi-pass, be sure that your bit depth depth is always 16-32 bits. You can even forget 8-bit and don't come back for it.
RENDER PASS?
在现实世界中工作时,您会遇到两个主要问题:
1-您永远没有想要的时间,
2-客户总是麻烦。
例如,假设您必须为客户制作汽车渲染,并且您已经做了很多工作。当客户查看结果时,他们可能不喜欢汽车的颜色,反射看起来可能微弱,或者阴影可能更具体。他们可能不喜欢地面或背景,或者说其他话。所有这些对于3D画家来说都是噩梦般的评论,并且意味着进行更改和重新渲染。时间浪费了。
解决方案是分别渲染组件(颜色,漫反射,镜面反射,反射,阴影,SSS),并将它们全部组合到一个合成软件中。对于这些不同的渲染组件,这称为“渲染过程”;对于在合成软件中处理这些组件的过程,则称为“多遍合成”(或简称为“合成”)。
使用这种方法,可以快速获得结果。如果客户更改颜色,则可以更改唯一的颜色层(通过),并且可以立即看到结果。您可以赢得两次,并在客户陪伴下立即显示更改。
用于合成的渲染通道还用于更真实地显示渲染输出。合成是一种职业。它有自己的规则和技巧。这就是为什么我们建议您在合成领域发展自己的原因,而不仅仅是3D创作。在这方面,您可以在网上找到许多付费或免费课程。
下图显示了经典的合成方式。
重要说明:始终使用Octane Render部分保存Render Pass文件。在Cinema 4D中不执行渲染过程部分。
重要说明2:如果您在多遍处理中看到锯齿状边缘,请从Camera Imager设置中启用或禁用``预乘Alpha''。在获得最终渲染之前,还要在实时查看器中检查您的通道。
重要说明3:渲染多遍时,请确保您的位深度始终为16-32位。您甚至可以忘记8位,而不会再选择它。
TONEMAP VS. LINEAR
In Octane, Live Viewer or Picture Viewer render is default Tonemapped. Each response curve you choose from the Camera Imager or post effcets is reflected in the final render. This is the default render behavior unless you select Linear. However, when you choose Linear Workflow, the ToneMap and Linear options have a different meaning. If you'll get a Render Pass, your first choice should be Linear (do not forget 16-32 Bit depth). Leave "Image color profile" and "Tonemap Type" as Linear. Render Pass output means that you will be compositing. In this case you will see the raw output of the Linear in the compositing software. Comp everything accordingly. But if you render out of Tonemap type, and your passes are in Linear, then you'll have problems with compositing. This is true for all render pass types in Octane (and all other renderers). In this case, you may have to do a lot of comp operations to get the same result in LV. If the image in LV is the final result for you, you no longer need to enter the linear adventure.
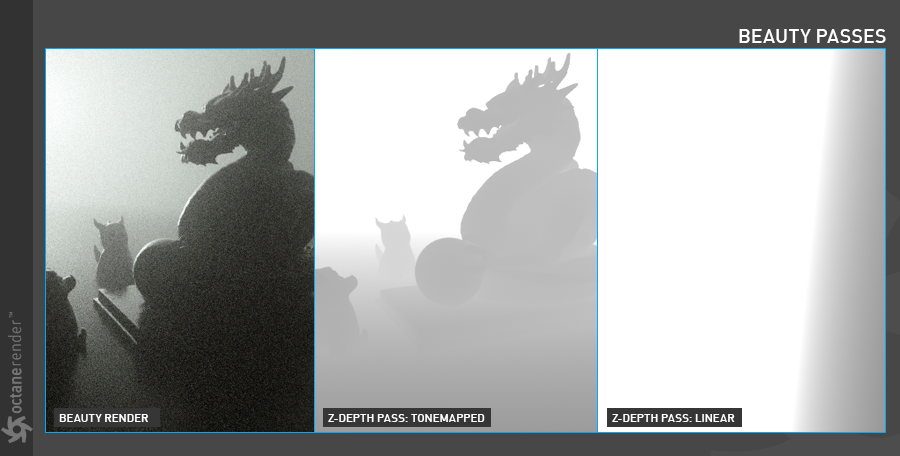
In the following picture you can see the rendered Z-depth passes for both Tonemaped and Linear. The Tonemaped image is what you see in the Live Viewer. On the other hand, Linear is almost white. This is because the data range is too large. This makes it possible to work comfortably in a wide range of colors. However, if you open this linear image render in After Effects and extract it, you will get the correct image. And you can continue comp operations. We explained the linear working logic under the "Linear Workflow" section.
色调图VS.线性的
在Octane中,“实时查看器”或“图片查看器”渲染默认为“已色调”。从“相机成像器”或后期效果中选择的每个响应曲线都会反映在最终渲染中。除非选择“线性”,否则这是默认的渲染行为。但是,当您选择线性工作流时,ToneMap和线性选项具有不同的含义。如果您将获得“渲染通道”,则您的首选应该是“线性”(不要忘记16-32位深度)。将“图像颜色配置文件”和“色调图类型”保留为线性。 Render Pass输出意味着您将进行合成。在这种情况下,您将在合成软件中看到线性的原始输出。相应地比较所有内容。但是,如果使用非Tonemap类型进行渲染,并且传递为线性,则合成会遇到问题。对于Octane中的所有渲染遍历类型(以及所有其他渲染器)都是如此。在这种情况下,您可能必须执行很多补偿操作才能在LV中获得相同的结果。如果LV中的图像对您来说是最终结果,则您不再需要输入线性冒险。
在下图中,您可以看到“色调映射”和“线性”的渲染的Z深度通道。色调映射的图像就是您在实时查看器中看到的图像。另一方面,线性几乎是白色的。这是因为数据范围太大。这使得可以在多种颜色下舒适地工作。但是,如果在After Effects中打开此线性图像渲染并将其提取,则将获得正确的图像。您可以继续进行合成操作。我们在“线性工作流程”部分解释了线性工作逻辑。
general settings
OctaneRender’s Render Passes allow users to segregate the different aspects of the scene, respectively rendering each aspect across multiple images. This is particularly useful in fine-tuning projects, compositing, and creating remarkably detailed and photorealistic images. Render passes allow a rendered frame to be further broken down beyond the capabilities of Render Layers. Render Passes vary among render engines but typically they allow an image to be separated into its fundamental visual components such as diffuse, ambient, specular, etc.
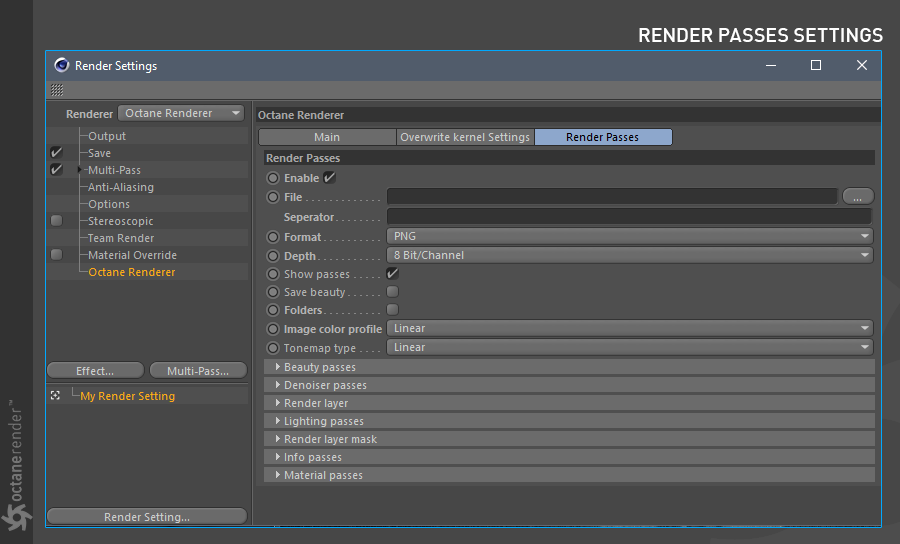
Now let's take a look at the Render Passes main settings:
通用设置
OctaneRender的渲染通道允许用户隔离场景的不同方面,分别在多张图像上渲染每个方面。 这在微调项目,合成和创建非常详细和逼真的图像时特别有用。 渲染过程可以使渲染帧进一步超出渲染层的功能范围。 渲染通道在渲染引擎之间有所不同,但通常它们允许将图像分为其基本视觉组件,例如漫反射,环境,镜面反射等。
现在让我们看一下“渲染通道”的主要设置:
enable
If you enable it, you will see both Render Passes in real time in Live Viewer and also enable export option in Picture Viewer. It will be very convenient for you to check the passes at the Live Viewer before you get the final render. In the final render, the options you select will be exported.
启用
如果启用它,您将在Live Viewer中实时看到渲染通道,并在Picture Viewer中启用导出选项。在获得最终渲染之前,在Live Viewer上检查通过非常方便。在最终渲染中,您选择的选项将被导出。
File
Here you specify where you will save the Passes.
文件
在此处指定保存通道的位置。
seperator
You can put a seperator at the end of the file. Sometimes the pass names are mixed with the main file name. For example, you can put a underscore (_) sign here to separate the file name and the pass name.
分隔符
您可以在文件末尾放置分隔符。有时,密码名称与主文件名混合在一起。例如,您可以在此处加下划线(_)分隔文件名和密码名。
FORMAT
You can select the image format of the passes from here. The format you choose according to Tonemap or Linear workflow is also important. For example, the most logical choice for the linear workflow is the EXR format. You can also choose 8 bit formats such as Jpeg, Png or Targa.
格式
您可以从此处选择通道的图像格式。根据Tonemap或Linear工作流程选择的格式也很重要。例如,线性工作流程最合乎逻辑的选择是EXR格式。您还可以选择8位格式,例如Jpeg,Png或Targa。
DEPTH
You can adjust the bit depth from here and for the final compositing you have to choose according to the quality you need. EXR 32-bit is the maximum quality, but the file sizes will be quite large. You also need a good computer configuration to do compositing with 32 bit-depth. We recommend that you determine your needs first.
深度
您可以从此处调整位深度,对于最终的合成,您必须根据所需的质量进行选择。 EXR 32位是最高质量,但是文件大小会很大。您还需要良好的计算机配置才能进行32位深度的合成。我们建议您首先确定您的需求。
multilayer file
It will save the selected render passes into a single layer file. Think like a Photoshop file. If you open this file in any compositing software, you can see your Passes layer by layer.
多层文件
它将选择的渲染通道保存到单个图层文件中。像Photoshop文件一样思考。如果您在任何合成软件中打开此文件,则可以逐层查看Passes。
folders
It is an option that appears when you disable the Multilayer. In this option, all of your selected Passes are saved with their folder names. It is useful if you render a lot of passes.
资料夹
禁用多层时,会出现一个选项。在此选项中,所有选定的通道均与文件夹名称一起保存。如果渲染大量通道,则很有用。
image color profile (click here for lInear Workflow)
There are 2 options: sRGB and Linear. sRGB is the color space you are currently working with. It can be 8 or 16 bits. Linear color space is for the maximum quality and accurate compositing. Here, too, it becomes important how and where the final output will be shown or play. If you are only working on 3D creation for a motion picture (or some production process), then this decision is made by Director of Photography, Technical Director and Creative Director. And most likely they are going to require a Linear output. If your goal is to play videos on channels such as youtube or vimeo, it is logical to choose sRGB rather than Linear.
图像颜色配置文件(单击此处以获取在线工作流程)
有2个选项:sRGB和线性。 sRGB是您当前使用的色彩空间。它可以是8位或16位。线性色彩空间可实现最高质量和准确的合成。在这里,如何以及在何处显示或播放最终输出也很重要。如果您仅针对电影(或某些生产过程)的3D创作,则此决定由摄影总监,技术总监和创意总监决定。而且很可能他们将需要线性输出。如果您的目标是在youtube或vimeo等频道上播放视频,则选择sRGB而不是Linear是合乎逻辑的。
tonemap type
The previous description also applies to this option. Maximum quality and control are always at Linear outputs. In addition, the most suitable workflow for color grading is Linear Workflow. However, Tonemapped outputs are also quite good and working on them are also very easy. Choose wisely depending on your purpose.
色调图类型
前面的描述也适用于此选项。最高的质量和控制始终是线性输出。此外,最适合进行颜色分级的工作流程是线性工作流程。但是,Tonemapped输出也相当不错,对其进行操作也非常容易。根据您的目的明智地选择。


赶快留个言打破零评论!~