Intro to AOVs 多通道简介
Introduction
引言
|
|
|
|
|
AOV Type: Integrated AOV 型号: 综合型 AOV Output: Reflection AOV 输出: 反射式 |
Integrated Utility AOV 综合公用事业飞机 Depth AOV 深度视野 |
Custom AOV 自定义 AOV Custom wireframe 自定义线框图 |
|
|
||
| Beauty 美丽 |
AOV stands for "arbitrary output variables". It refers to the different types of per-pixel information Redshift can produce. While typically Redshift will only produce a color for each pixel of the frame you can configure it to include individual shading elements like reflections, refractions, global illumination, etc. Redshift can output these shading elements isolated on their own separate AOV pass which can help with things like fast small-scale color adjustments in post without having to re-render the entire frame. These built-in AOVs are referred to as Integrated AOVs. You can add even more control with Integrated AOVs by making use of Light Group AOVs, these can give you per-light control of your render in post.
AOV 代表“任意输出变量”。它是指每像素可以产生不同类型的红移信息。通常红移只会为帧的每个像素产生一种颜色,你可以将其配置为包含单独的阴影元素,如反射、折射、全局光源等。红移可以输出这些独立的阴影元素在他们自己的独立的 AOV 通道,可以帮助像快速小规模的颜色调整后,无需重新渲染整个框架的事情。这些内置的 aov 被称为综合 aov。你可以添加更多的控制与集成的 aov 通过使用光组 aov,这些可以让你每光控制你的渲染后。
There are other built-in AOVs that can contain non-beauty data like depth information, motion vectors, and world position information. These kinds of AOVs can be used in post to allow for much greater flexibility, like being able to add bokeh depth of field effects by making use of a Depth AOV. These types of built-in non-beauty AOVs are referred to as Utility AOVs.
还有其他内置的 aov 可以包含非美数据,如深度信息,运动矢量和世界位置信息。这些类型的 AOV 可以在后期使用,以便获得更大的灵活性,比如可以通过使用深度 AOV 来增加景深效果。这些类型的内置非美观 aov 被称为公用事业 aov。
There may also be times where you need to output custom data that isn't covered by an integrated AOV or wouldn't be output as a shading element of the beauty rendering process. In situations like this you can turn to Custom AOVs, these allow you to define your own custom render output for specific needs you may have like a custom ambient occlusion pass. Normally you might accomplish something like this as a completely separate render and pay the price in additional render time, but this can be avoided by using Custom AOVs instead since they are processed and output at the same time as your primary beauty render.
也许有时候你需要输出自定义数据,这些数据没有被集成的 AOV 所覆盖,或者不会作为美丽渲染过程中的阴影元素输出。在这样的情况下,你可以转向自定义 aov,这些允许你定义自己的自定义渲染输出特定的需求,你可能有一个自定义的环境遮挡通道。通常情况下,你可以通过完全独立的渲染来完成这样的工作,并在额外的渲染时间内支付费用,但是这可以通过使用自定义的 aov 来避免,因为他们是在你的初级美丽渲染同时进行处理和输出的。
This page covers the basics of creating and managing AOVs for Redshift as well as the most common options available for AOV output.
本页涵盖了创建和管理用于红移的 AOV 的基础知识,以及最常用的 AOV 输出选项。
Managing AOVs
管理卓越学科领域
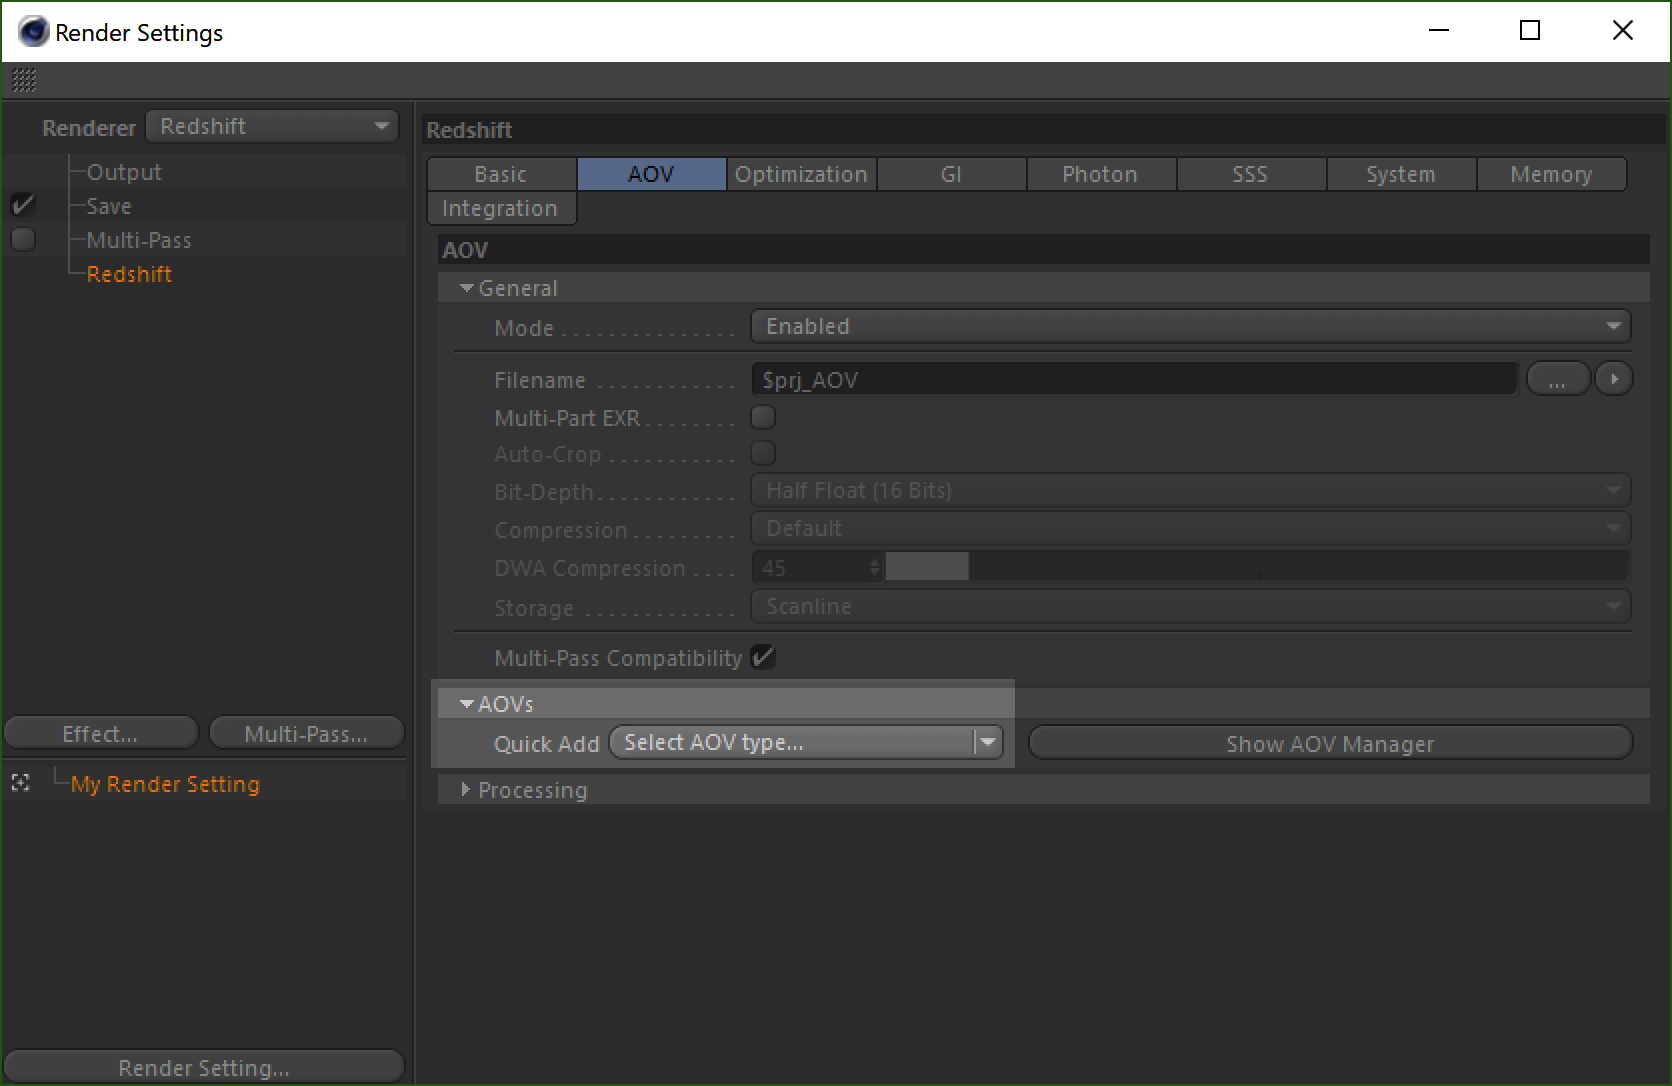
The AOV settings can be located within Redshift's Render Settings, under the AOV tab.
AOV 设置可以位于红移的渲染设置,在 AOV 标签下。
Creating an AOV
创建一个 AOV
To quickly create a new AOV click on the arrow next to the "Quick Add Select AOV Type" dropdown and then select the your new AOV type.
要快速创建一个新的 AOV 点击箭头旁边的“快速添加选择 AOV 类型”下拉,然后选择您的新 AOV 类型。
Cinema 4D AOV Quick Add
电影院4 d AOV 快速添加
Alternatively you can use the Cinema 4D AOV Manager to create AOVs as well which is described in the section below.
或者你也可以使用电影院4D 视觉效果管理器来创建视觉效果,如下所述。
AOV Manager
视觉及视觉效果经理
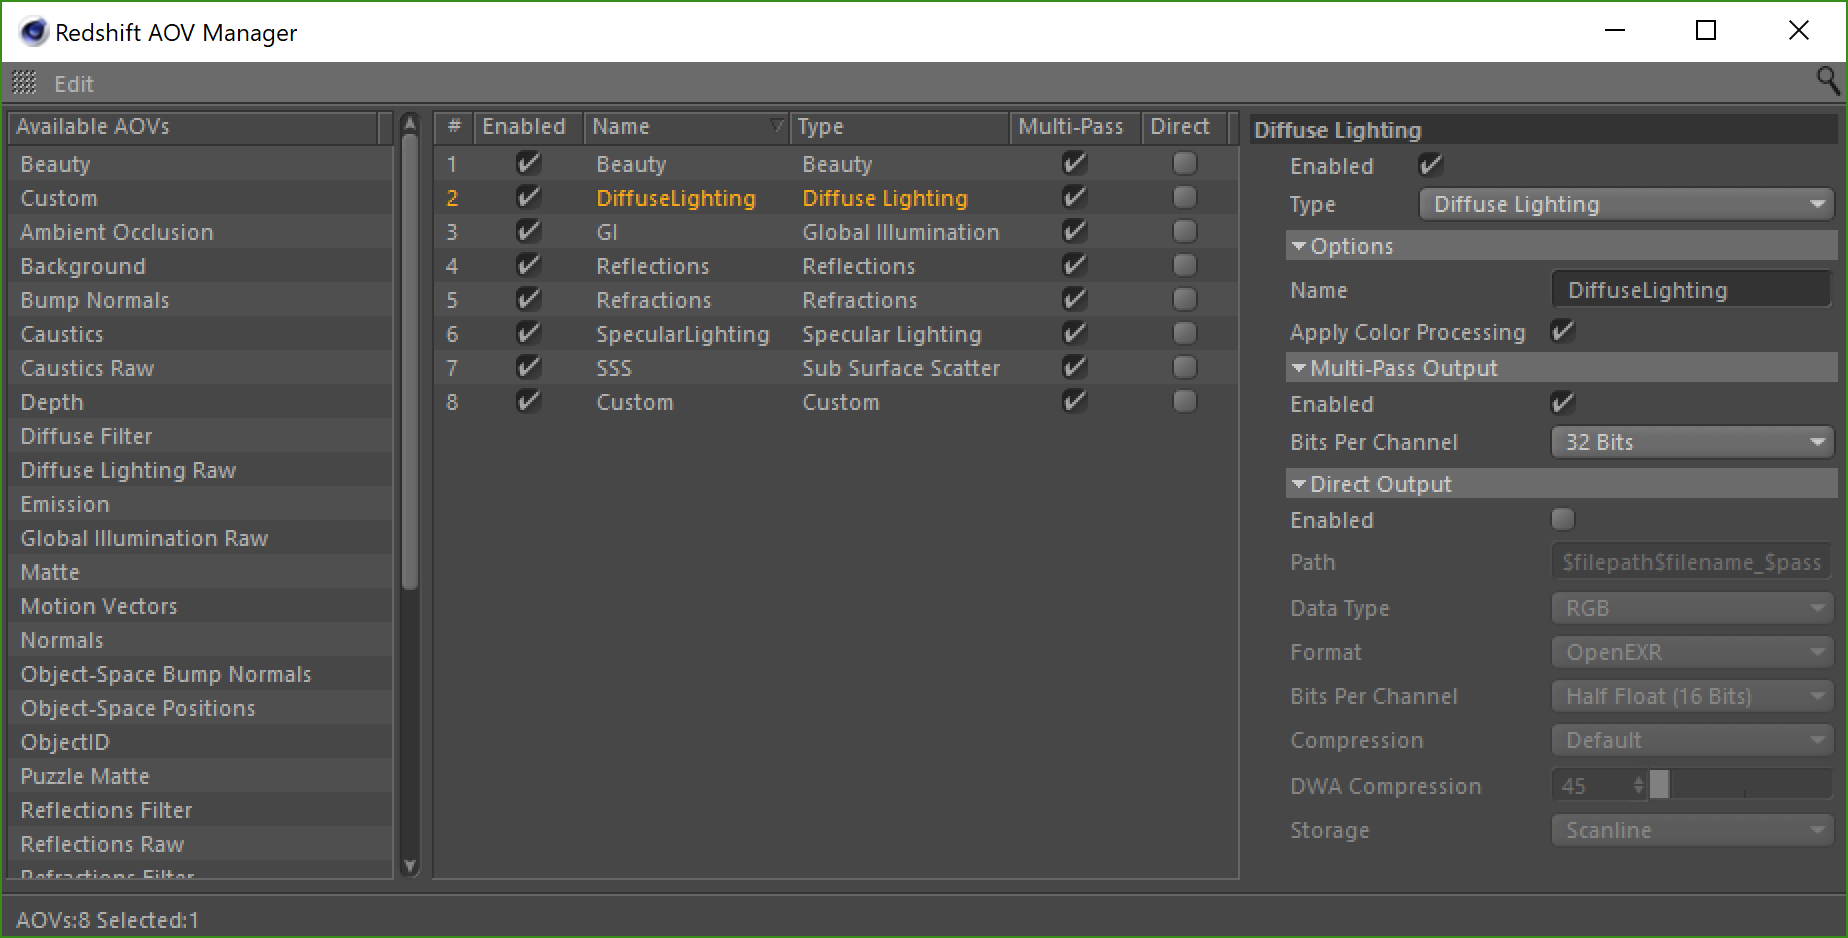
Cinema 4D AOV Manager
电影院4D 视觉效果经理
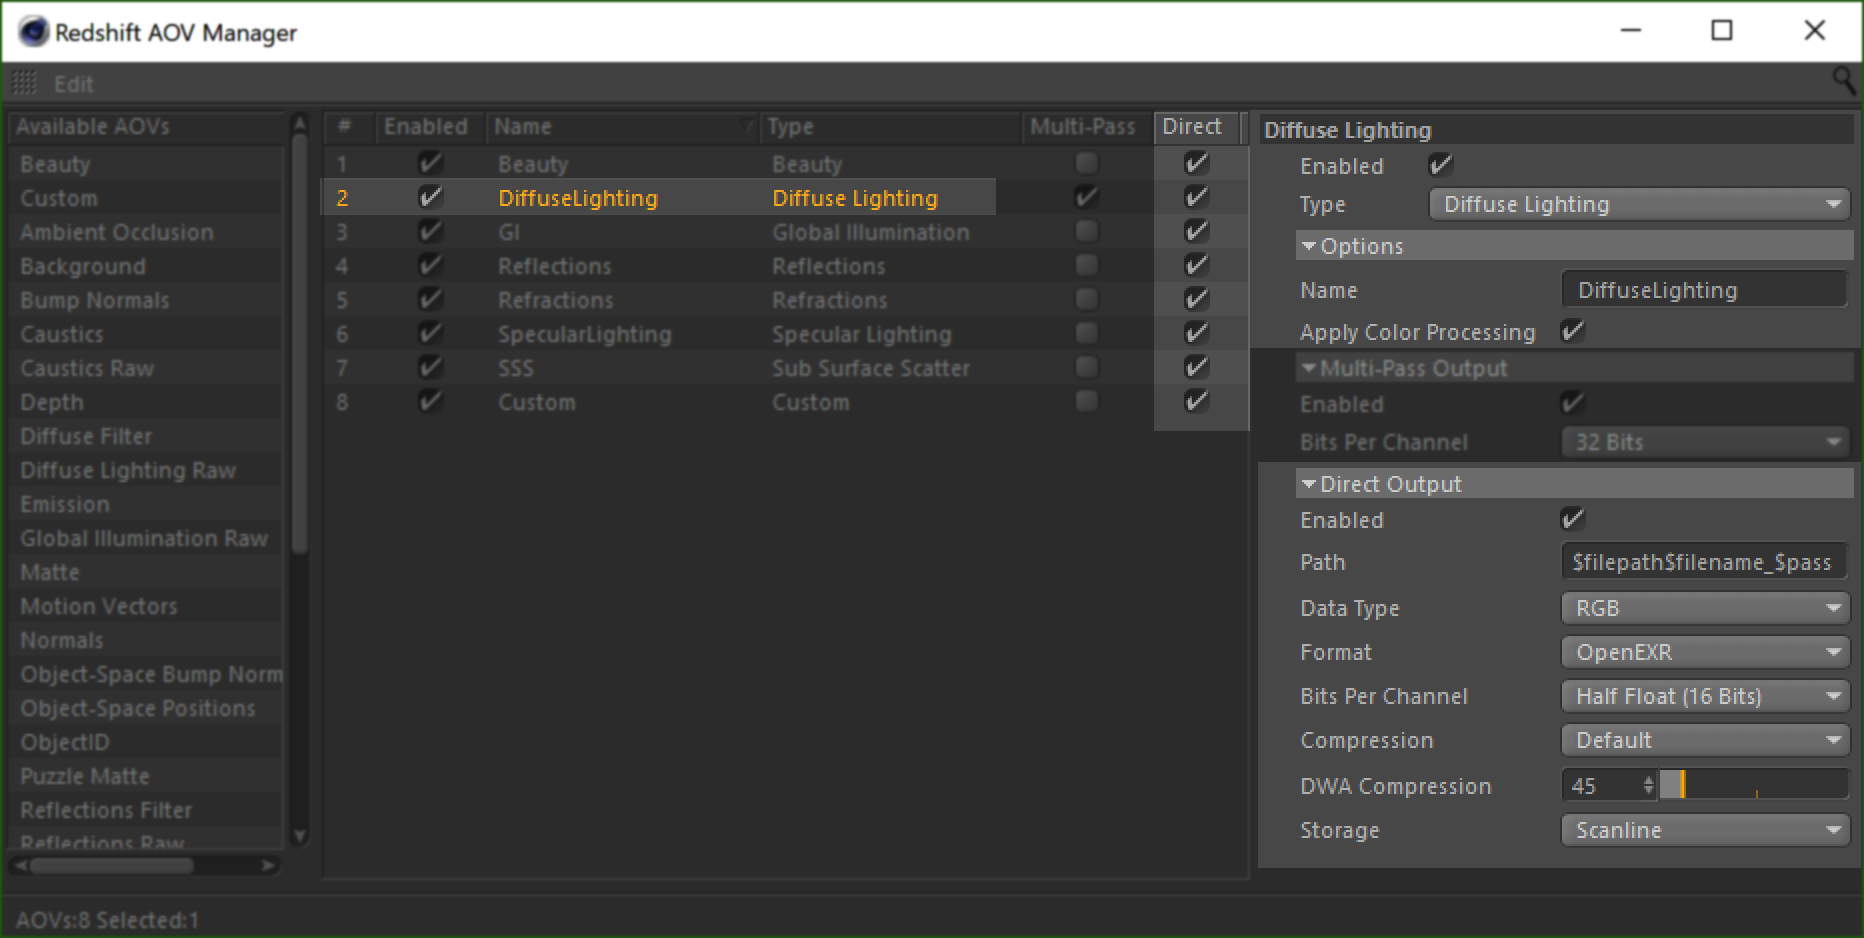
The Cinema 4D AOV Manager is an exclusive tool used to efficiently manage all AOVs for your current project. You can use it to create new AOVs and modify or delete existing ones all while being given an easy to manage overview of all the AOVs in the scene.
电影院4D AOV 管理器是一个独家的工具,用于有效地管理所有的 AOV 为您当前的项目。您可以使用它来创建新的 aov 和修改或删除现有的所有,同时给予一个简单的管理场景中的所有 aov 的概述。
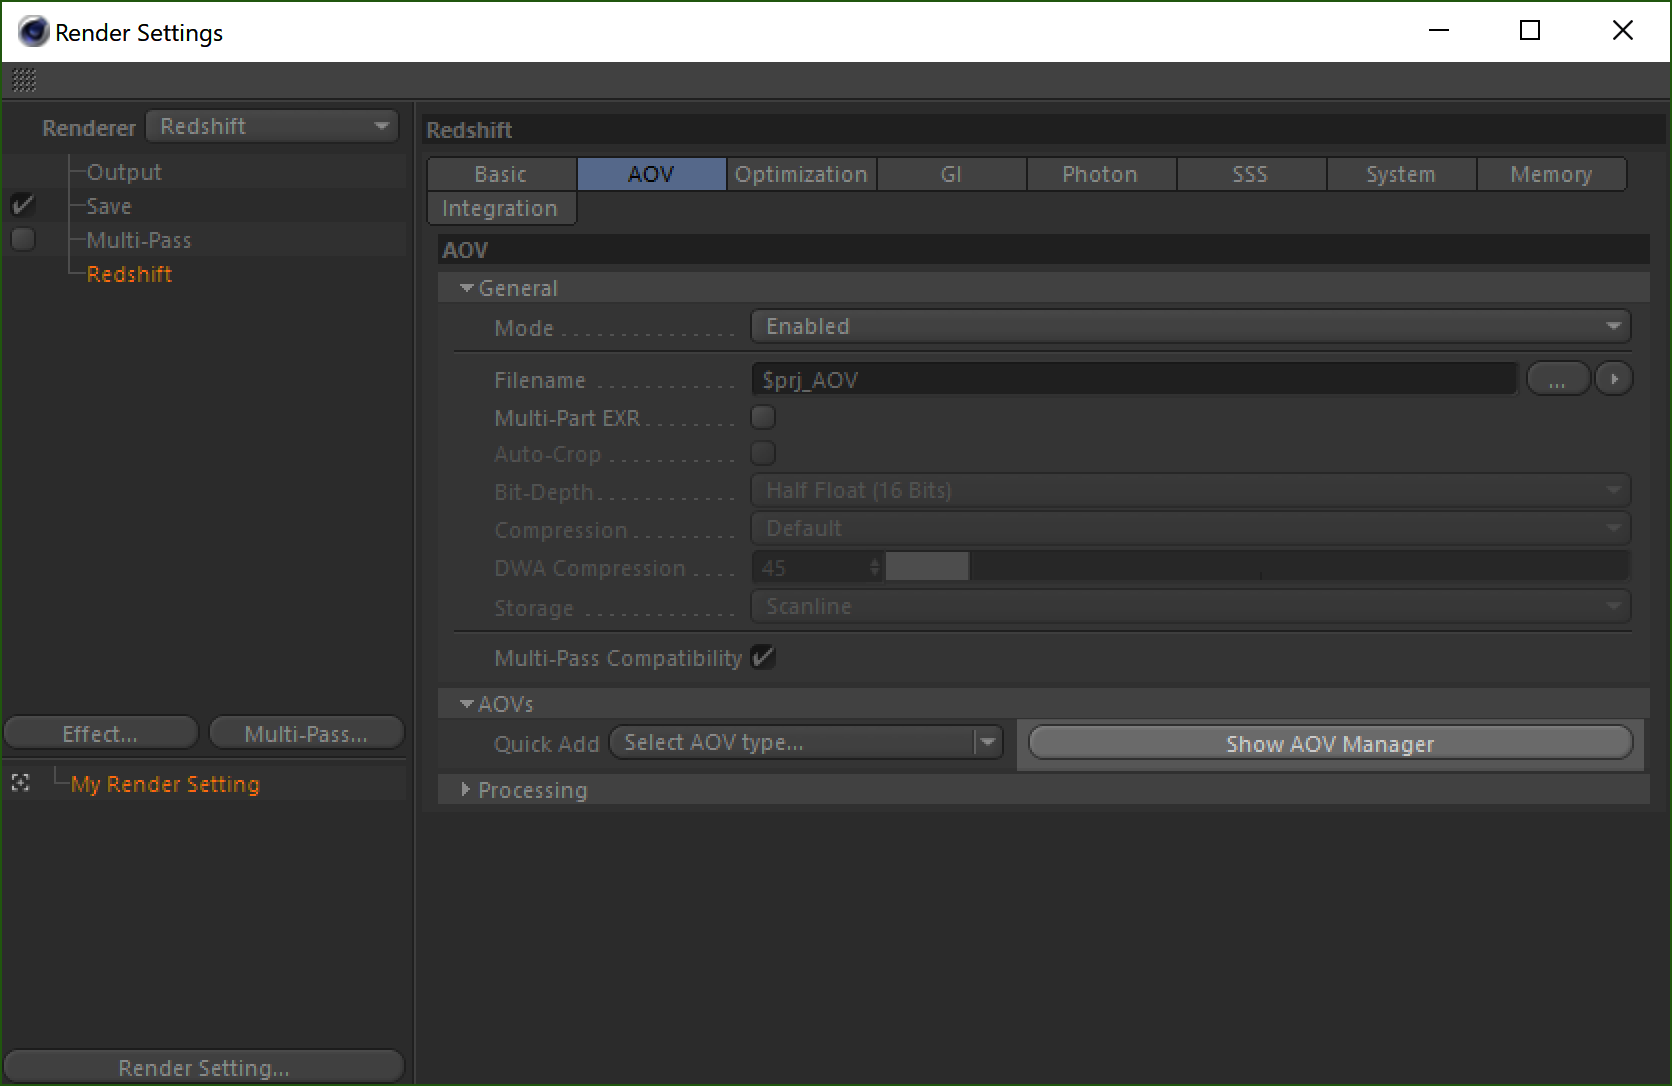
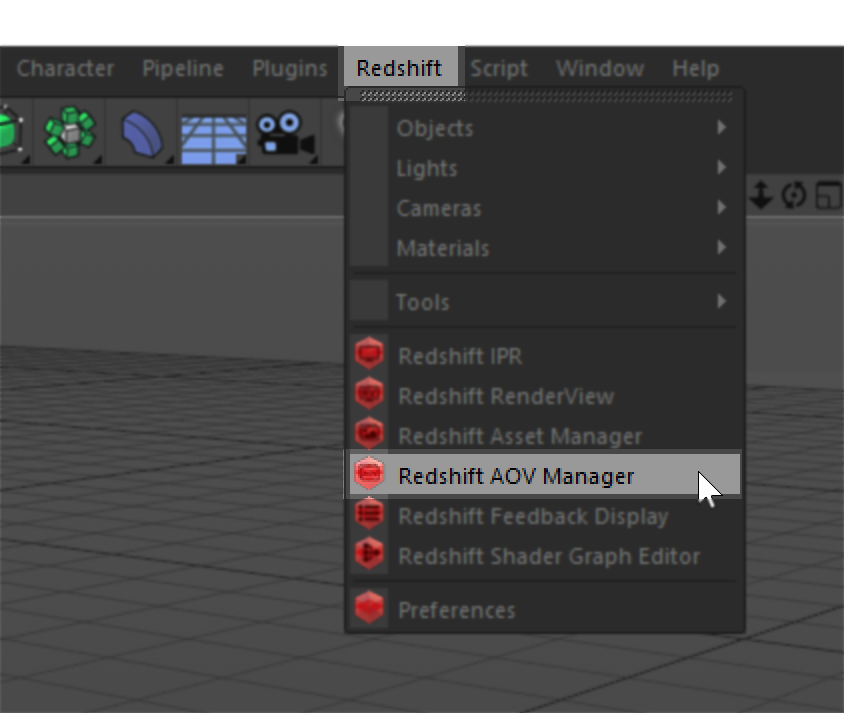
To open the AOV Manager you can access it from the Redshift Render Settings AOV tab or open it directly from the Redshift toolbar menu as depicted below:
要打开 AOV 管理器,你可以通过红移渲染设置 AOV 选项卡访问它,或者直接从红移工具栏菜单打开它,如下图所示:
Cinema 4D Redshift Render Settings "Show AOV Manager" button
电影院4D 红移渲染设置“显示 AOV 管理器”按钮
Cinema 4D Redshift Toolbar "Redshift AOV Manager" button
电影院4D 红移工具栏“红移 AOV 管理器”按钮
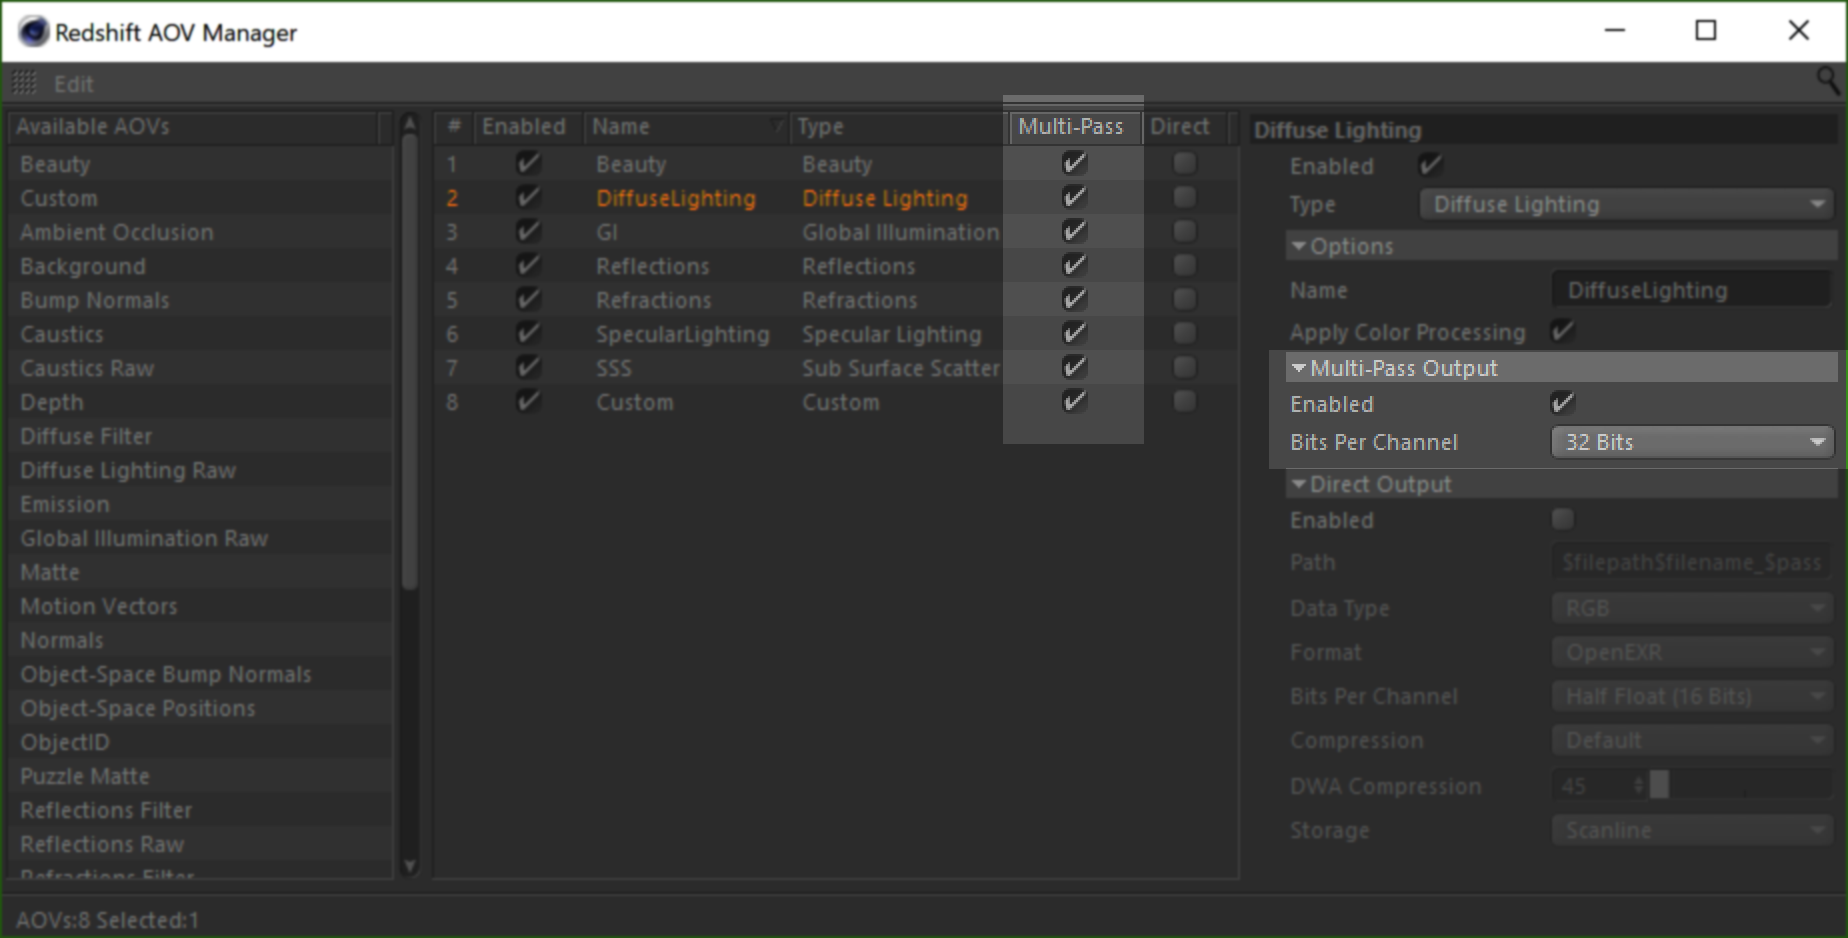
From the left "Available AOVs" panel you can click and drag AOVs from this area to the middle panel or double click them to create new AOVs. When you create these AOVs they will automatically be removed from the "Available AOVs" panel.
从左边的“可用的 aov”面板,你可以点击并拖动 aov 从这个地区到中间面板或双击他们创建新的 aov。当您创建这些 aov 时,它们将自动从“可用 aov”面板中删除。
The middle panel lets you select, reorganize and delete AOVs.
中间的面板可以让你选择,重新组织和删除 aov。
The right panel shows you all of the relevant AOV options for the currently selected AOV.
右边的面板显示了当前选择的所有相关的 AOV 选项。
Multi-pass vs Direct Output Method
多程与直接输出法
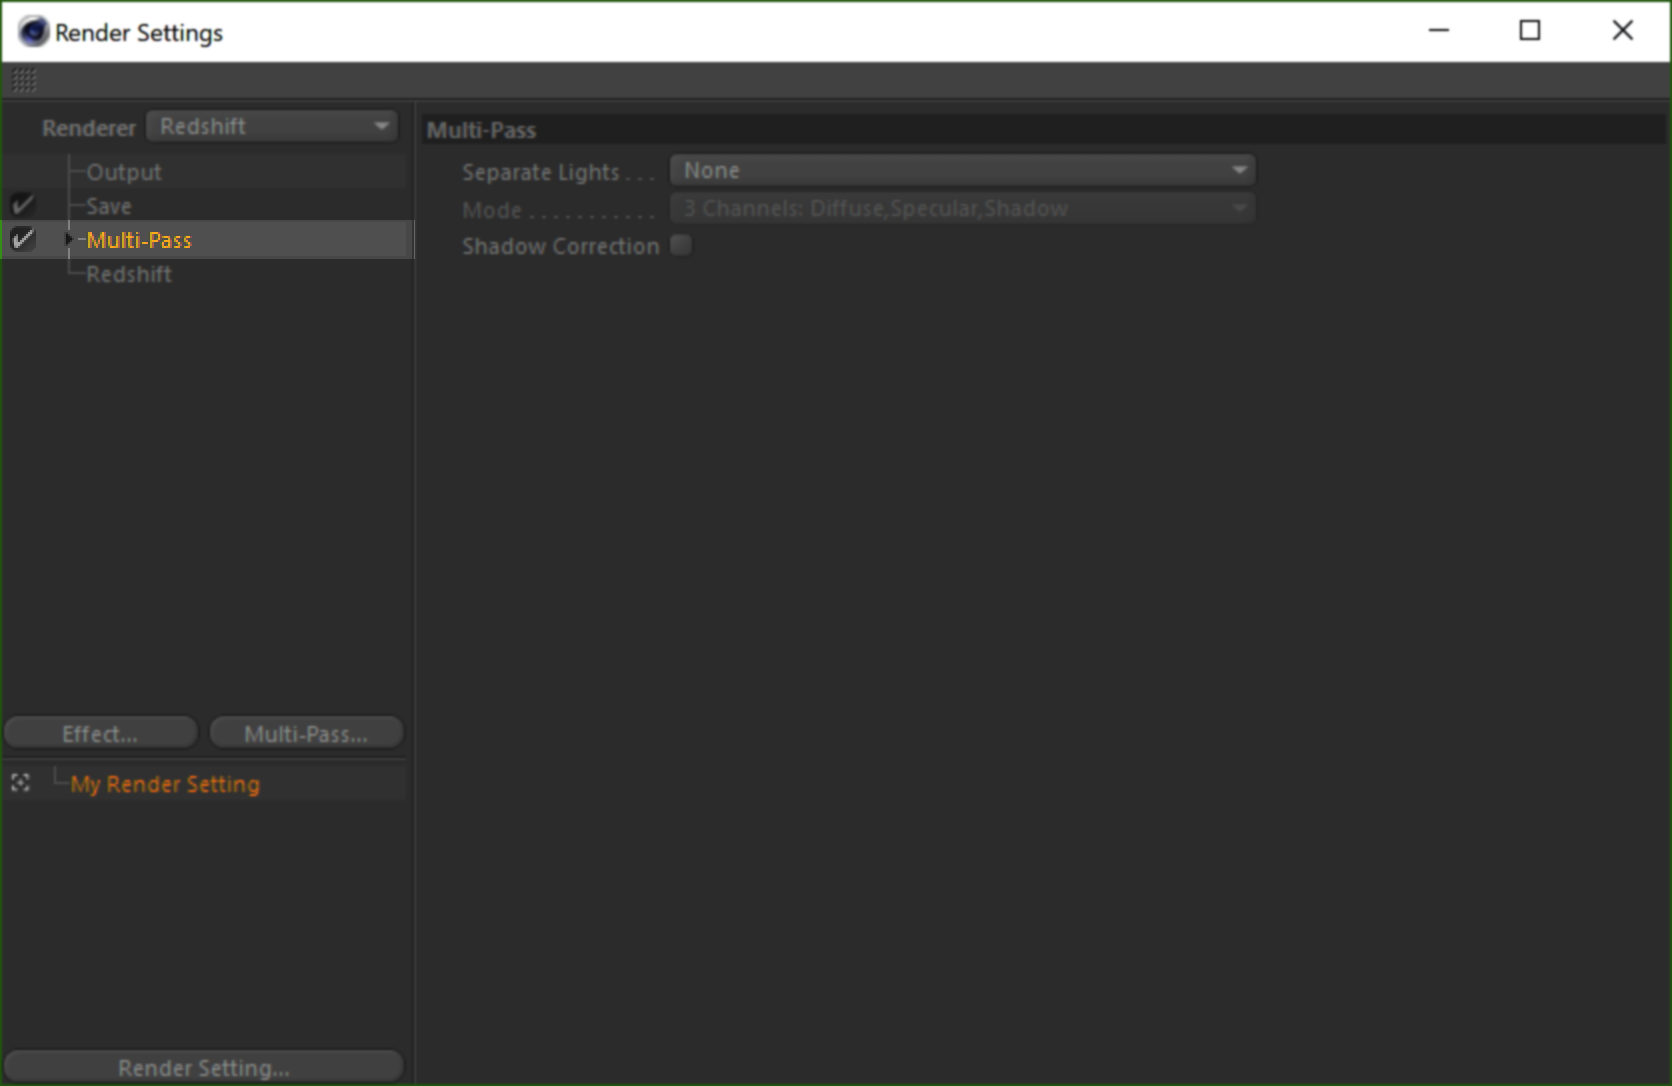
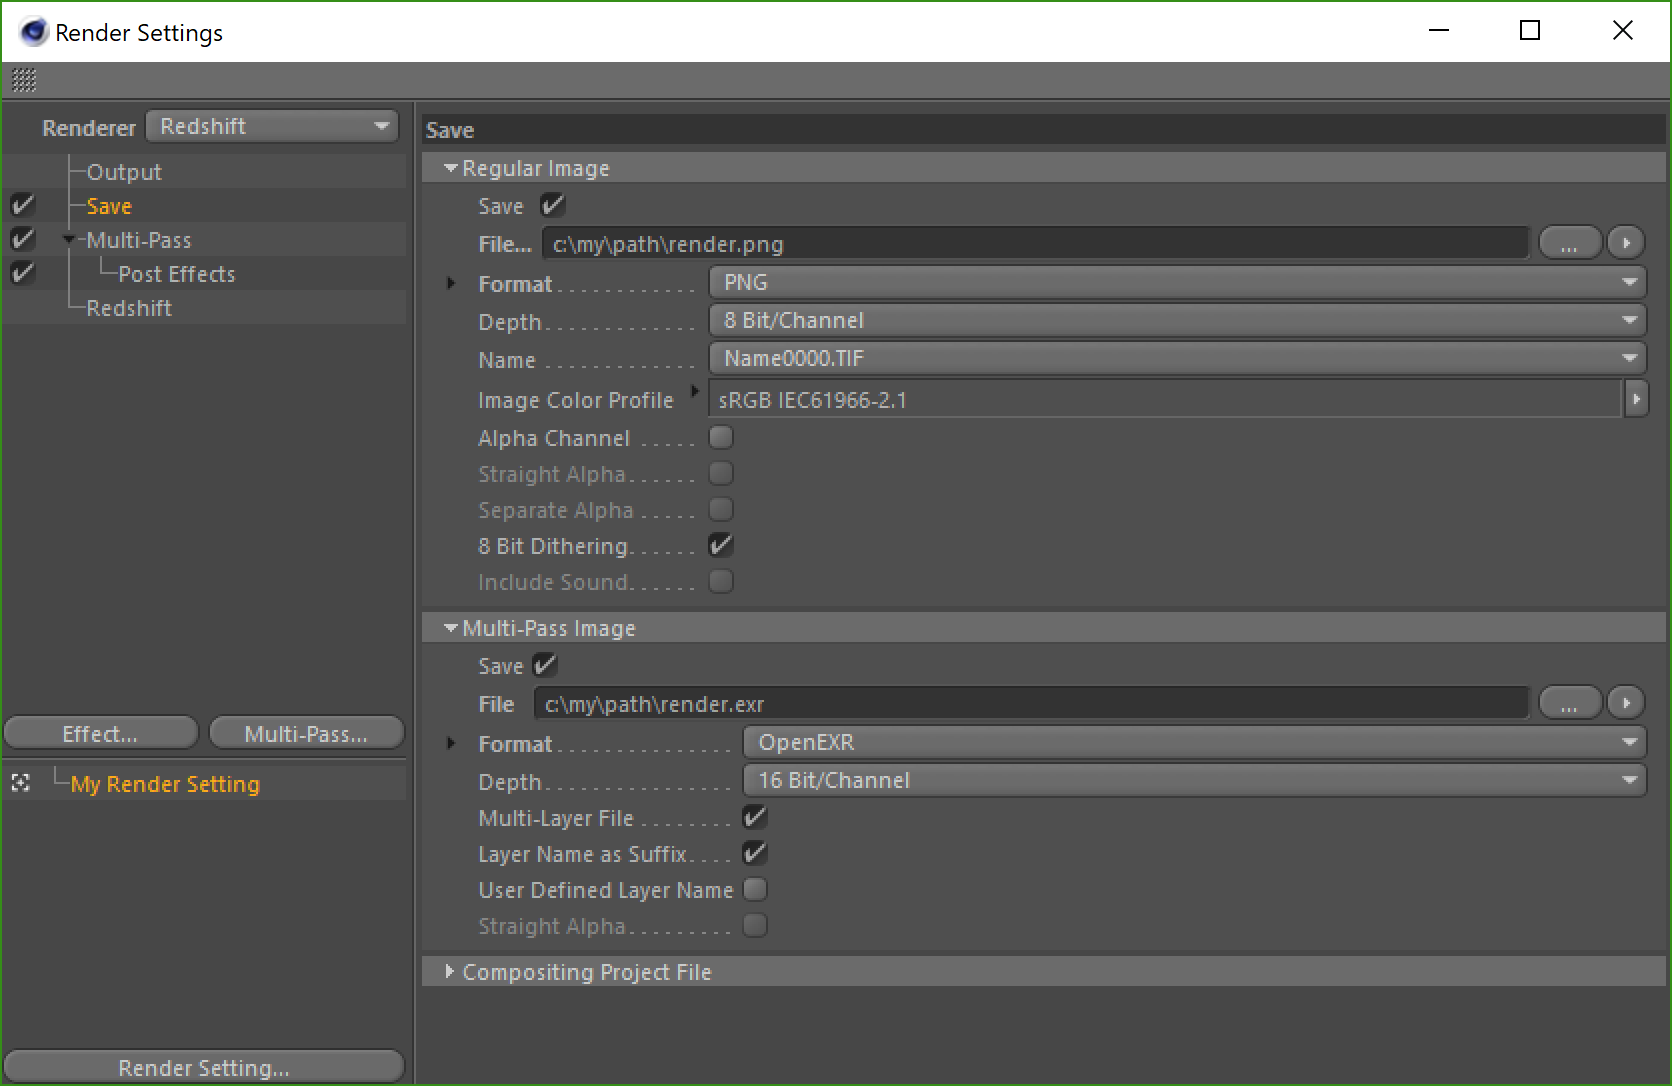
AOVs can be output via the Cinema 4D's Multi-Pass system, in addition to Redshift's native file output system. For C4D's Multi-pass system and previewing in the Picture Viewer, the Multi-Pass output should be enabled. The Multi-pass setting needs to be enabled on the global render settings as well as per-AOV that you want passed through C4D's Multi-pass system.
Aov 可以通过 Cinema 4D 的 Multi-Pass 系统输出,另外还有 Redshift 的原生文件输出系统。对于 C4D 的多通道系统和在图片浏览器中预览,应该启用多通道输出。多通道设置需要在全局渲染设置以及通过 C4D 的多通道系统通过的每个 aov 上启用。
Cinema 4D Render Rettings Multi-pass
电影院4D 渲染多通道
Cinema 4D's AOV Manager Multi-pass settings
电影院4D 的 AOV 管理器多通道设置
If you instead just want to use Redshift's native file output system and preview the AOV's in Redshift's Render View then Multi-pass can be disabled and you can just have Direct Output enabled.
如果你只是想使用红移的本地文件输出系统和预览的 AOV 的红移的渲染视图,然后多通道可以被禁用,你可以只是启用直接输出。
Cinema 4D's AOV Manager Direct Output settings and an example with Multi-pass enabled simultaneously
电影院4D 的 AOV 管理器直接输出设置和一个多通道同时启用的例子
Mult-Pass and Direct Output can be enabled at the same time and on the same AOVs but keep in mind that this will result in the output of each system's files, taking up more space.
多通和直接输出可以同时在相同的操作变量上启用,但要记住,这将导致每个系统的文件输出,占用更多的空间。
Make note that Redshift's Render View will be able to view the AOV passes whether set to Multi-pass or Direct Output but at least one of them has to be enabled to be output at all.
请注意,红移的渲染视图将能够查看的 AOV 通行证,无论是设置为多通道或直接输出,但至少其中一个必须被启用的输出在所有。
During proxy export, Multi-pass-enabled-AOVs will be silently converted to Direct AOVs which RS knows how to store their settings in the proxy file.
在代理导出期间,启用多通道的 aov 将静默转换为直接 aov,RS 知道如何在代理文件中存储它们的设置。
A quick comparison of the potential pros and cons of each method are listed below:
以下是每种方法的优缺点的简单比较:
Multi-Pass Output:
+ Integration with the Picture Viewer
+ Automatic handling of AOV images during TeamRender
+ C4D Render Post-effects are supported (subject to some limitations)
+ Supported by C4D’s Save Compositing Project function
- Limited saving options per AOV. Single save format for all AOVs
- Output may go through C4D’s color-space conversion functions depending on the output settings
- Order and naming of AOVs is not fully customizable.
多通道输出: + 集成图片查看器 + 在 TeamRender + C4D 渲染后期效果自动处理 AOV 图像支持(受到一些限制) + 支持 C4D 的保存合成项目功能-每个 AOV 有限的保存选项。所有 aov 的单一保存格式-输出可以通过 C4D 的颜色空间转换功能,这取决于输出设置-命令和命名的 aov 是不完全可定制的。
Direct Output:
+ Save method identical to other Redshift DCCs, so output is consistent across DCCs
+ Per AOV save options
+ Supports special output for third-party denoising (two-pass render)
+ DeepEXR support
+ Order and naming of AOVs user controllable
- AOVs not visible in the Picture Viewer
- No automatic management of AOVs for TeamRender. Output paths need to be set manually to point to some network share etc.
- C4D Post-effects are not supported.
- No compositing project support
直接输出: + Save 方法相同于其他红移 DCCs,因此输出是一致的 DCCs + 每 AOV 保存选项 + 支持特殊输出为第三方去噪(两次渲染) + DeepEXR 支持 + 命令和命名的 AOV 用户可控-AOV 不可见在图片浏览器-没有自动管理的 AOV 为 TeamRender。输出路径需要手动设置,以指向某些网络共享等-C4D 后效不受支持。- 没有合成项目支持
Disabling an AOV
禁用操作指令
To disable an AOV simply uncheck the "Enabled" option at the top of the AOV's settings.
要禁用一个 AOV 只需取消选中“启用”选项在顶部的 AOV 的设置。
Deleting an AOV
删除一个 AOV
To delete an AOV simply select the AOV in the AOV Manager and hit the delete key.
要删除一个 AOV 只需在 AOV 管理器中选择 AOV,然后点击删除键。
Per-AOV General Options
一般选择
Cinema 4D AOV General Options
电影院4D AOV 一般选择
This section covers only the Direct Output options.
本节仅讨论 Direct Output 选项。
This section covers the common per-AOV parameters that are available for most AOVs. 本节涵盖了大多数 aov 可用的通用的每个 aov 参数
AOV
视野范围
This section shows you what type of AOV it is.
这一部分向您展示了它是什么类型的 AOV。
Name
姓名
Here you can set your own custom name for the AOV, by default this is set to the type of AOV.
在这里你可以设置自己的自定义名称的 AOV,默认情况下,这是设置为类型的 AOV。
The name given here refers to the $filename token seen in the path section below.
这里给出的名称指的是下面路径部分中看到的 $filename 标记。
File Name Prefix / Path
文件名前缀/路径
This section shows you how the AOV file names will be output and allows you to change that here.
本节将向您展示如何输出 AOV 文件名,并允许您在这里更改这个名称。
The $filepath token will use the regular or multi-pass image path as long as it has a sensible file path value derived from the main Cinema 4D render settings.
$filepath 令牌将使用常规或多遍图像路径,只要它具有从主 Cinema 4D 渲染设置派生的合理文件路径值。
Cinema 4D Render Settings Save Paths
4 d 渲染设置保存路径
Data Type
数据类型
Select the data output type for the AOVs from the following options:
从以下选项中选择 aov 的数据输出类型:
- RGB 三原色
- RGBA 农业生物技术
- Scalar (when appropriate) 标量(适当时)
By default AOVs output as RGB image files with no alpha.
默认情况下,AOVs 输出为 RGB 图像文件,没有 alpha 值。
Format
格式
Select the image file format from the following options:
从下列选项中选择图像文件格式:
- OpenEXR (exr)
- Tiff (tif)
- PNG (png)
- Targa (tga) 塔尔加(tga)
- JPEG (jpg)
By default Redshift AOVs use OpenEXR file format.
默认情况下红移 AOVs 使用 OpenEXR 文件格式。
Bits Per Channel
每通道位数
Select the bits per channel:
选择每个通道的位:
-
8 bits
8位
- Half float (16 bits) 半浮点数(16位)
- Float (32 bits) 浮点数(32位)
By default Redshift AOVs use Half float (16 bits).
默认情况下红移 AOVs 使用半浮点(16位)。
Bits per channel options are dependent on the AOV file format currently selected.
每个通道的位选项取决于当前选择的 AOV 文件格式。
Compression
压缩
Select the compression method for the relevent file format:
选择相关文件格式的压缩方法:
- OpenEXR compression 压缩
- default (zip scanline) / none / rle / zip16 / zip1 / piz / pxr24 / b44 / dwaa / dwab Default (zip scanline)/none/rle/zip16/zip1/piz/pxr24/b44/dwaa/dwab
- Tiff compression Tiff 压缩
- none / lzw / zip / packbits 没有/lzw/zip/packbits
- PNG / Targa / JPEG compression PNG/Targa/JPEG 压缩
- N/A 不适用
DWA Compression Level
数据包压缩级别
Set the level of compression for OpenEXR file format, default of 45 will yield a perceptibly lossless image but a drastic reduction in file size. Higher values mean more compression at smaller file sizes and vice versa.
设置 OpenEXR 文件格式的压缩级别,默认值为45将产生一个明显的无损图像,但是文件大小会急剧减少。更高的值意味着在更小的文件大小上更多的压缩,反之亦然。
This setting only affects the DWAA and DWAB OpenEXR compression methods.
此设置仅影响 DWAA 和 DWAB OpenEXR 压缩方法。
Storage Format
存储格式
Select the storage format:
选择存储格式:
- scanline 扫描线
- tiled 瓷砖
By default Redshift AOVs use scanline.
默认情况下红移 AOVs 使用扫描行。
Apply Color Processing
应用色彩处理
Enables or disables "Apply Color Processing."
启用或禁用“应用颜色处理”
The "apply color processing" option means that gamma correction (if gamma is other than 1.0) and photographic exposure (if a photographic exposure lens shader is present) will both be applied to the AOVs.
“应用色彩处理”选项意味着伽玛校正(如果伽马值不是1.0)和摄影曝光(如果存在摄影曝光镜头着色器)都将应用于 aov。
Several AOVs have an "apply color processing" option which is enabled by default. These AOVs are:
有几个 aov 有一个默认启用的“应用颜色处理”选项。这些 aov 是:
- Diffuse Lighting 漫射照明
- Diffuse Lighting Raw 漫反射照明原材料
- Specular Lighting 镜面照明
- Subsurface Scatter 地下散射
- Subsurface Scatter Raw 地下散射原料
- Reflections 反思
- Reflections Raw 原始的思考
- Refractions 折射
- Refractions Raw 折射原始数据
- Emission 排放
- Global Illumination 全局光源
- Global Illumination Raw 全局光源
- Caustics 焦散
- Caustics Raw 原始焦散线
- Volume Lighting 音量照明
- Translucency Lighting Raw 半透明照明原料
- Translucency GI Raw 半透明 GI Raw
AOV Processing
处理视觉效果图
Cinema 4D AOV Processing
电影院4D 视觉效果处理
This section controls the way all other AOVs are processed and is found under the AOV render settings tab. 这一部分控制所有其他 AOV 处理的方式,并且在 AOV 渲染设置标签下找到
Enable Deep Output
启用深度输出
Enables or disables OpenEXR deep output.
启用或禁用 OpenEXR 深度输出。
For more information on Deep output for Redshift please see this page where all of the deep settings below are covered in much greater detail.
有关红移深度输出的更多信息,请参见本页面,其中所有深度设置都包含了更多的细节。
Deep Merge Mode
深度合并模式
Select the Deep merge mode:
选择深度合并模式:
- "Z" merges depth samples that are close to each other based on the "Deep Merge Z threshold." 根据“ Deep Merge z 阈值”合并彼此相近的深度样本
- "ObjectID 目的" merges all samples that belong to the same objectID without caring about whether they are close to each other in Z or not. By default, the ObjectID mode performs more sample merging than the Z mode, which in turn produces significantly smaller EXR files. 将属于同一目标的所有样本合并,而不考虑它们在 z 中是否彼此接近。默认情况下,ObjectID 模式比 z 模式执行更多的示例合并,后者反过来产生更小的 EXR 文件
For the ObjectID Deep Merge mode to be effective, objects need to be assigned different ObjectIDs.
为了使深层合并模式有效,需要为对象分配不同的目标。
Deep Merge Z Threshold
深度合并 z 阈值
The "Deep Merge Z Threshold" parameter controls how close the samples will need to be in order for them to be merged together.
“ Deep Merge z Threshold”参数控制样本合并到一起所需的距离。
This setting only applies to Deep Merge Mode: Z
此设置仅适用于深度合并模式: z
Enable Clamping (Color and AO channels only)
启用夹紧(只有彩色和 AO 通道)
This enables clamping on AOVs separate from the beauty.
这使得夹紧在卓越学科领域的美丽分离。
In Redshift's Output tab and in Redshift's AOV tab there are options to clamp the color/AO AOVs. Redshift can perform sub-sample intensity clamping during unified sampling, which limits noise (grain) that can be produced when combining depth of field and motion blur with bright light sources. The AOV clamping offers the same type of sub-sample control for AOVs. Please refer to the AOV tutorial page for more information about how and when these should be used.
在红移的输出选项卡和红移的 AOV 选项卡中,有一些选项可以夹住颜色/AO 的 AOV。红移可以在统一采样时进行子采样强度钳制,从而限制了景深和运动模糊与亮光源结合时产生的噪声(纹理)。AOV 夹紧为 AOV 提供了相同类型的子样本控制。有关如何以及何时使用它们的更多信息,请参考 AOV 教程页面。
Max Value
最大值
This sets the maximum sub-sample intensity clamping value for AOVs.
这设置了最大子样品强度为 AOVs 钳制值。
Disable Importance-based Optimizations
禁用基于重要性的优化
Redshift has importance-based optimizations that can result in samples being dropped if they are deemed too dim to impact the final appearance of the beauty render, which is great for performance. AOVs however can suffer from these kind of optimizations, because if you wanted to brighten your reflections AOV channel and samples had been dropped because they were deemed too dim, then you would reveal unexpected noise that would be difficult to clean up by hand.
红移有基于重要性的优化,可以导致样本被删除,如果他们被认为太暗,以影响美丽渲染的最终外观,这是伟大的性能。然而,AOV 可能会遭受这种优化,因为如果你想照亮你的反射 AOV 通道和样品被认为是太暗了,然后你会发现意想不到的噪音,将难以清理手工。
Disabling Importance-based Optimizations will not add noise to the beauty, but it will impact rendering performance.
禁用基于重要性的优化不会增加噪音的美丽,但它会影响渲染性能。
By default Redshift uses importance-based optimizations for all AOVs.
默认情况下,Redshift 对所有 aov 使用基于重要性的优化。
Adjust RAW AOVs To Fix Halo Artifacts
调整 RAW 的 aov 来修复晕轮效果
This option works by adjusting the Raw AOV results based on the appropriate Filter AOV results in order to ensure the resultant composite will match the beauty. Because of this adjustment, you may see unexpected colors around the high-contrast edge images in the Raw AOVs – while this may look strange, mathematically it ensures the correct beauty results when multiplied with the appropriate albedo Filter AOV. For more information, please see here.
这个选项通过基于适当的过滤器 AOV 结果调整原始 AOV 结果来工作,以确保结果的组合将匹配美丽。由于这种调整,你可能会看到周围的高对比度边缘图像的原始 AOV-虽然这可能看起来奇怪,数学上它确保了正确的美丽结果时,乘以适当的反照率滤波器 AOV。详情请参阅此处。
By default this option is enabled to ensure final composites matches beauty.
默认情况下,启用此选项是为了确保最终的合成匹配漂亮。




赶快留个言打破零评论!~