AI DENOISER
Although the Octane version 4 comes with many innovations, the most exciting of these innovations is no doubt the "Spectral AI Denoiser". AI Denoiser, a by-product of Machine Deep Learning, which has been researched and developed for years, seems to be taking us to the future already. No longer need to think of for long rendering times and plenty of noise. This new technology, which is the result of the "Big Data" era, is now ready to use and has begun to show itself in the latest products as in Octane. Since AI Denoiser or its broader definition "Deep Machine Learning" is a very complicated subject, our recommendation is to read the resources on the Internet and get an idea.
The use of AI Denoiser in Octane is not as difficult and complicated as it is thought, and the results are quite amazing. Although there are many products used in the market as Denoiser, we should not to confuse "Spectral AI Denoiser" with classical denoisers. In case of Deep Learning, the background algorithm works far beyond the classical linear algorithm. AI Denoisers are trained with "Large Data Sets" and if the result is "expected" it is assumed to be true. So the AI is learning. The information we have accumulated throughout history is now classified as "Big Data" and finally we have reached the stage of teaching machines of this "Big Data" by using our fast computer technology. This the revolutionary side of this subject. Now an AI can now recognize tables, chairs or other objects in a picture and separate them from each other because of the "Large Data Sets Training". AI works on this logic in Denoisers. They are no longer blind and know what part is dark or bright. This is the future. Let's put aside whether this is going to be good or bad, and how to use AI Denoiser.
First, Keep in mind for following rules to use AI Denoiser:
1- The first action you will make to use Denoiser is to go to the Live Viewer/Settings/Devices section and activate the "Use for Denoising" option on your GPU device(s). If you have a single GPU, it can be automatically activated. If you have more than one GPU and you want to use other GPUs for Denoise, you can activate it here.
2- AI Denoiser needs to use a lot of VRAM and GPU power. By its very nature, it requires a lot of processing power to deal with any scene. This is why you will benefit from a new generation GPU.
3- If you have stability problems while working with AI Denoiser, you can try update your Nvidia drivers.
AI降噪器
尽管Octane版本4包含许多创新,但是这些创新中最令人兴奋的无疑是“ Spectral AI Denoiser”。经过多年研究和开发的机器深度学习的副产品AI Denoiser似乎已经将我们带到了未来。不再需要考虑较长的渲染时间和大量的噪点。这项新技术是“大数据”时代的产物,现已可以使用,并且已开始在Octane的最新产品中展示自己。由于AI Denoiser或其更广泛的定义“深度机器学习”是一个非常复杂的主题,因此我们的建议是阅读Internet上的资源并获得想法。
在Octane中使用AI Denoiser并不像想象中的那么困难和复杂,并且结果令人惊讶。尽管市场上有许多产品用作降噪器,但我们不应该将“ Spectral AI Denoiser”与经典降噪器混淆。在深度学习的情况下,背景算法的工作范围远远超出了经典线性算法。 AI“降噪器”使用“大数据集”进行训练,并且如果结果是“预期”,则假定为真实。因此,人工智能正在学习。我们在整个历史中积累的信息现在被归类为“大数据”,最后,我们已经使用我们的快速计算机技术进入了“大数据”教学阶段。这是这个主题的革命性一面。现在,由于“大数据集训练”,人工智能现在可以识别图片中的桌子,椅子或其他对象,并将它们彼此分开。人工智能在Denoisers中采用了这种逻辑。他们不再盲目,知道什么部分是黑暗的还是明亮的。这就是未来。让我们抛开这是好事还是坏事,以及如何使用AI Denoiser。
首先,请记住使用AI Denoiser的以下规则:
1-要使用Denoiser进行的第一个操作是转到“实时查看器/设置/设备”部分,然后激活GPU设备上的“用于降噪”选项。如果只有一个GPU,则可以自动激活它。如果您有多个GPU,并且想将其他GPU用于降噪,则可以在此处激活它。
2- AI Denoiser需要使用大量的VRAM和GPU功能。就其本质而言,它需要大量处理能力才能处理任何场景。这就是为什么您将从新一代GPU中受益。
3-如果使用AI Denoiser时遇到稳定性问题,可以尝试更新Nvidia驱动程序。
accessIng the aI denoIser
You can access AI Denoiser in two ways.
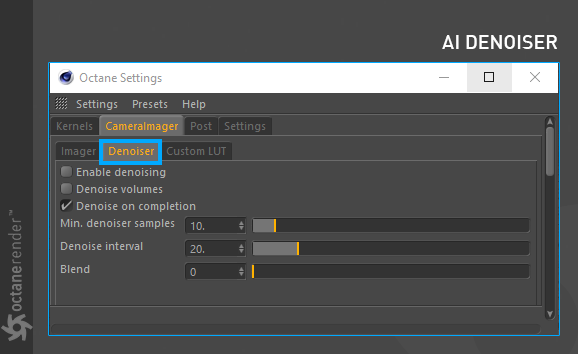
1- Press the "Settings" icon from the Live Viewer and go to "Camera Imager Tab". Here you will see the "Denoiser Tab" right below.
访问AI Denoiser
您可以通过两种方式访问AI Denoiser。
1-按Live Viewer中的“设置”图标,然后转到“ Camera Imager选项卡”。 在这里,您会在下面看到“ Denoiser标签”。
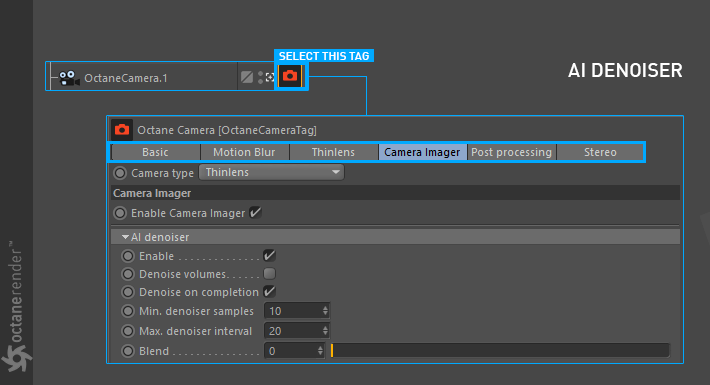
2- Click the Octane Camera Tag, go to the camera imager tab and enable the Denoiser below. We will make our explanations via Tag option. However, you can choose one of these two ways. After all, they both do the same job.
2-单击“ Octane相机标签”,转到“相机成像器”选项卡并启用下面的“降噪器”。 我们将通过标签选项进行解释。 但是,您可以选择以下两种方式之一。 毕竟,他们俩都做同样的工作。
To see the denoIsed render In LV
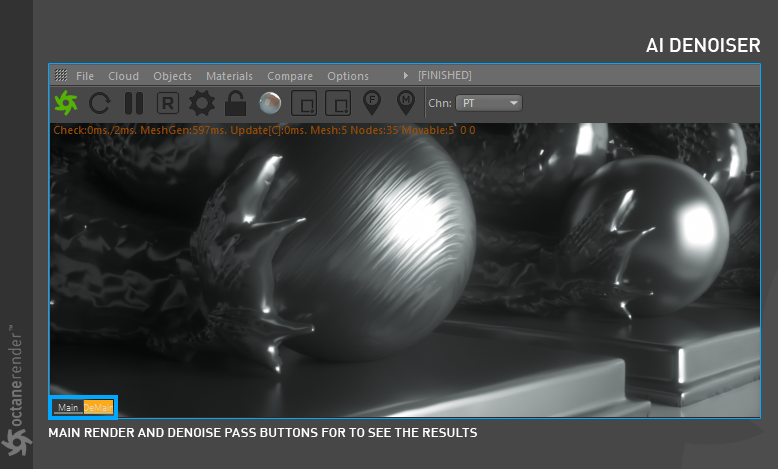
After activating AI Denoiser, you will see two buttons named "Main" and "DeMain" at the bottom left of LV. The "Main" button shows the active render. The "DeMain" button shows the Denoised Render. If you have activated the "Denoise on Completion" option, AI Denoiser does not progress during the rendering in the Demain view. But after the main rendering is finished, the Denoiser process starts and you see the result. If you want to see the synchronous work of Denoiser with Main, you can close "Denoise on Completion".
在LV中查看denoIsed渲染
激活AI Denoiser后,您将在LV的左下方看到两个分别名为“ Main”和“ DeMain”的按钮。 “主”按钮显示活动的渲染。 “ DeMain”按钮显示“降噪的渲染”。 如果您已激活“完成时降噪”选项,则在Demain视图中的渲染过程中AI Denoiser不会继续进行。 但是在完成主渲染后,“降噪器”过程开始,您会看到结果。 如果要查看Denoiser与Main的同步工作,可以关闭“完成Denoise”。
SAMPLEs / AI DENOISER RELATION
Yes it's a revolutionary innovation but different output may appear in each scenario (or scene). Some of these outputs may disappoint you if you don't know what you're doing. For example, if you are planning to open one of your old scenes and get a fast render with AI Denoiser, this happens to some extent. However, the quality and aesthetics ratio is not AI but your point of view determines. Do not forget this. Therefore, it may be appropriate to briefly explain the relationship between the number of samples and AI Denoiser. So you'll know better the use of AI Denoiser without losing quality, speed and details.
采样/ AI降噪器关系
是的,这是一项革命性的创新,但是在每种情况(或场景)中可能会出现不同的输出。如果您不知道自己在做什么,其中的一些输出可能会让您失望。例如,如果您打算打开一个旧场景并使用AI Denoiser进行快速渲染,则在某种程度上会发生这种情况。但是,质量和美观比不是AI,而是您的观点决定。不要忘了这个。因此,可能需要简要说明采样数量与AI Denoiser之间的关系。因此,您将更好地了解AI Denoiser的使用,而不会损失质量,速度和细节。
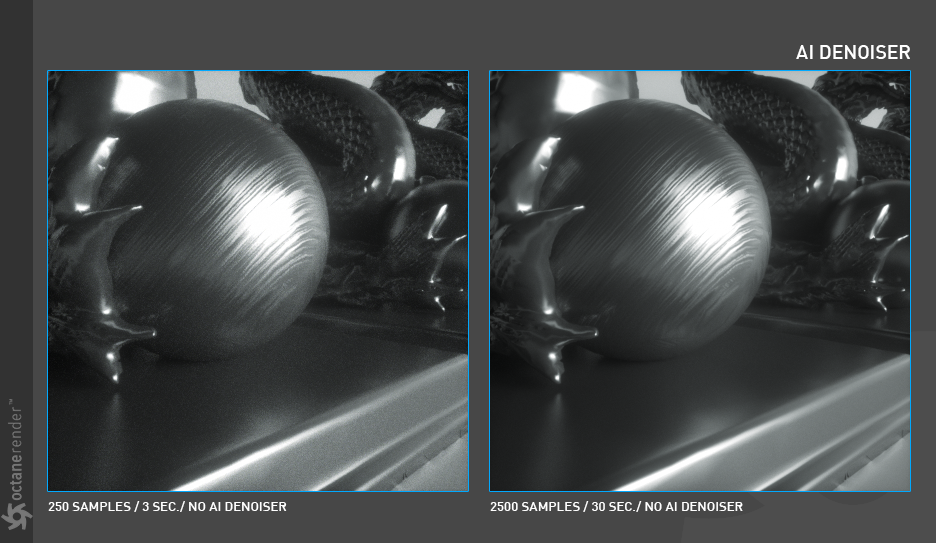
Let's start with the classic scenario. A method we used for years before the AI Denoiser. According to this method, the scene shown in the picture below requires a higher number of samples to achieve a quality result. The result you see on the right is almost noise-free. And this the final image. Let's call it "TARGET RENDER". However, the result is 30 seconds. The picture you see on the left is fine, but it is not enough for the final output.
让我们从经典场景开始。我们在AI Denoiser之前使用了多年的方法。根据这种方法,下图所示的场景需要更多的采样才能获得高质量的结果。您在右侧看到的结果几乎没有噪波。这是最终的图像。我们称其为“ TARGET RENDER”。但是,结果是30秒。您在左侧看到的图片很好,但是对于最终输出而言还不够。
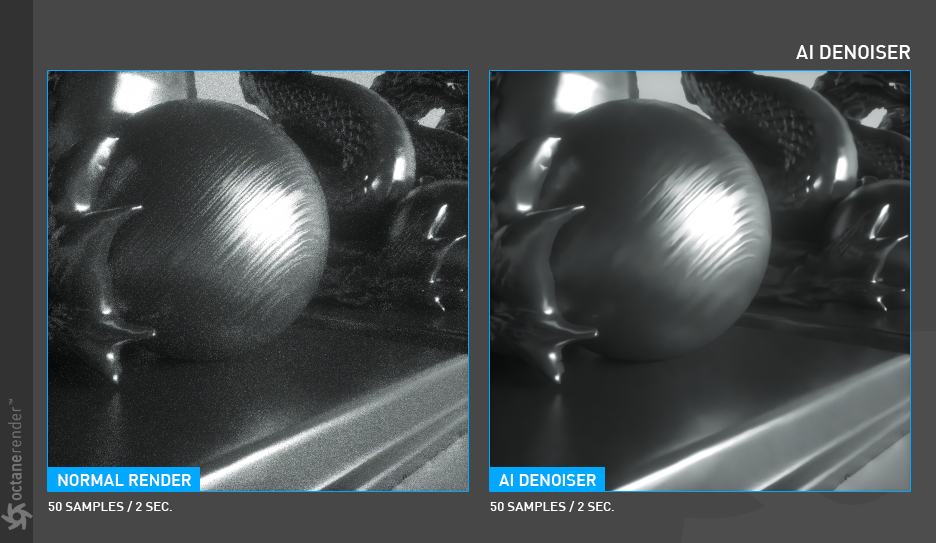
Now let's try to reach the "TARGET RENDER" using AI Denoiser with less rendering time. First of all, if you have the idea that "there is such a technology under my hand, and now I can use low sample, turn on AI denoiser and get short render times and quality outputs", we recommend you to be careful. Because, as you can see in the picture below, the splotchy effects all over in the Denoised image (on the right). And much worse is that the details are lost. So, do not expect miracles. Of course AI Denoiser has worked, but there is not enough data to be able to do the job properly. We have to advance.
现在,让我们尝试使用AI Denoiser以更少的渲染时间到达“ TARGET RENDER”。 首先,如果您有“我手头有这样的技术,现在我可以使用低采样率,打开AI降噪器并获得较短的渲染时间和高质量输出”的想法,建议您多加注意。 因为,如您在下图中所看到的,去噪图像中的斑点效应遍布整个右侧。 更糟糕的是细节丢失了。 因此,不要指望奇迹。 AI Denoiser当然可以工作,但是没有足够的数据来正确完成这项工作。 我们必须前进。
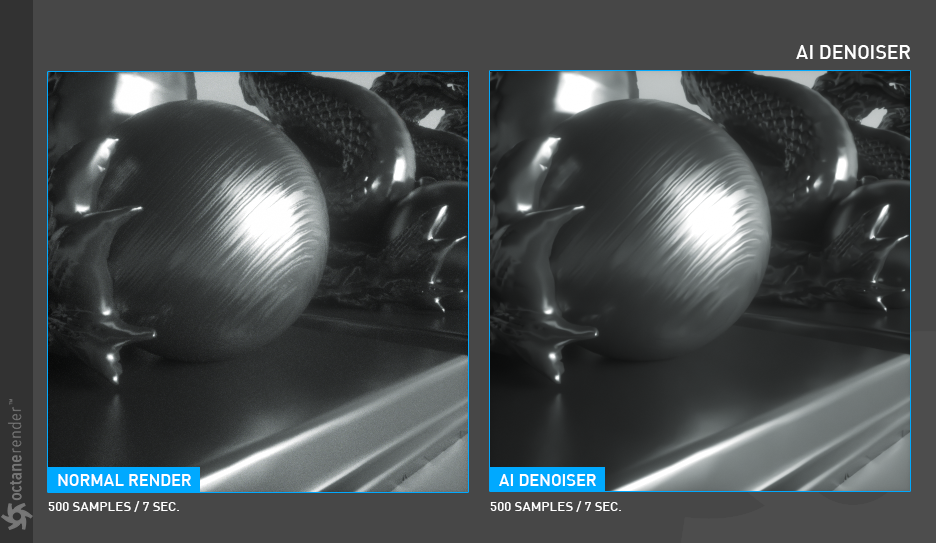
Now let's increase the number of samples. For example, let's make 500 samples. Although the rendering looks nice, we still have not reached the quality of the "TARGET RENDER". If you look a little careful, you can see the details in Denoised render are still missing. At least we get rid off the splotchy effect. Now we are close to the conclusion. Of course, if this result pleases you, in addition to the first "TARGET RENDER" that lasts 30 seconds, you will get a medium quality rendering in 7 seconds which is a very good time gain.
现在让我们增加采样数量。 例如,让我们制作500个采样。 尽管渲染效果看起来不错,但我们仍未达到“ TARGET RENDER”的质量。 如果稍加注意,您会发现Denoised渲染中的细节仍然缺失。 至少我们摆脱了斑点效应。 现在我们接近结论了。 当然,如果此结果令您满意,那么除了可以持续30秒的第一个“ TARGET RENDER”之外,您还将在7秒内获得中等质量的渲染,这是非常不错的时间收益。
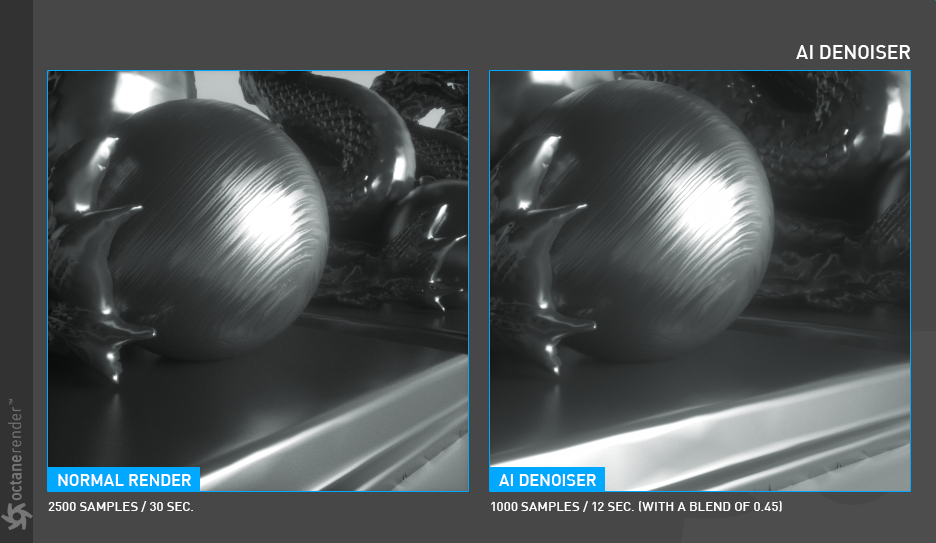
And lastly, let's make 1000 samples. As you can see in the picture below, there is minimal quality difference between 2500 samples of "TARGET RENDER" with "no AI Denoiser" and 1000 samples with "AI Denoiser". However, when we look at the durations we spent almost 2.5 times less and reached a high quality result.
最后,让我们制作1000个采样。 如下图所示,“无AI去噪器”的2500个“ TARGET RENDER”采样与“ AI去噪器”的1000个采样之间的质量差异最小。 但是,当我们查看持续时间时,我们的花费减少了将近2.5倍,并获得了高质量的结果。
If you approach AI Denoiser in this respect, you can get high quality renderings in less durations. In short, do not expect to receive very good quality Denoised Render with a few samples. AI Denoiser's ability to do a good job is still dependent on your aesthetic and your point of view. This system also varies according to each scene. If you have a lot of detail on your scene and you don't need a close-up view of these details, you can use less samples for the AI Denoiser. But if you're going to get a close-up render including details, you can also use AI Denoiser as described above.
如果您在这方面采用AI Denoiser,则可以在较短的时间内获得高质量的渲染。 简而言之,不要指望会收到带有几个采样的高质量降噪渲染。 AI Denoiser做好工作的能力仍然取决于您的审美和观点。 该系统还根据每个场景而变化。 如果场景中有很多细节,并且不需要这些细节的特写视图,则可以为AI Denoiser使用更少的采样。 但是,如果您要获得包含细节的特写渲染,则也可以使用如上所述的AI Denoiser。
AI DENOISER WORKFLOW
To get output using AI Denoiser, first perform all the tests on your scene. The following paths are shown below when you move to the final stage:
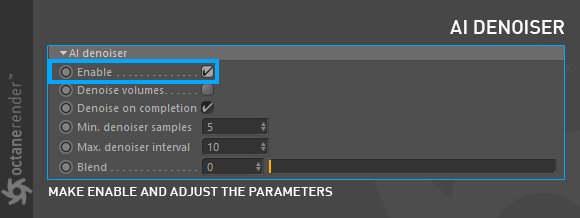
1- First enable AI Denoiser. Make your final settings using other parameters.
AI降噪器工作流程
要使用AI Denoiser获得输出,请首先执行场景中的所有测试。 当您进入最后阶段时,以下路径如下所示:
1-首先启用AI Denoiser。 使用其他参数进行最终设置。
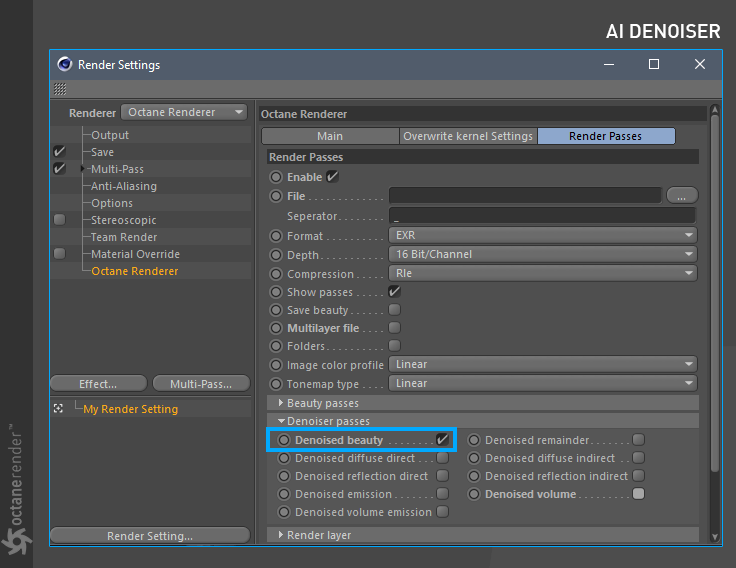
2- Enter Render settings (CTRL + B) and go to "Render Passes" from the Octane renderer section. After making the necessary settings, go to "Denoiser Passes" section and check "Denoised Beauty". When you select this option, it means that you will now use Denoise render beauty. You will use this output after the final render. If you have Volumetrics on your scene, be sure to also check "Denoised Volume". Render Passes and other settings in Main Tab are not explained here. You can find detailed explanations in the relevant sections of this manual.
2-输入渲染设置(CTRL + B),然后从Octane渲染器部分转到``渲染通道''。 进行必要的设置后,转到“ Denoiser Passs”部分,然后选中“ Denoised Beauty”。 选择此选项时,这意味着您现在将使用“降噪”渲染美感。 您将在最终渲染之后使用此输出。 如果您的场景中有“体积”,请确保还选中“降噪后的体积”。 此处不解释“渲染”和其他“主选项卡”中的设置。 您可以在本手册的相关章节中找到详细说明。
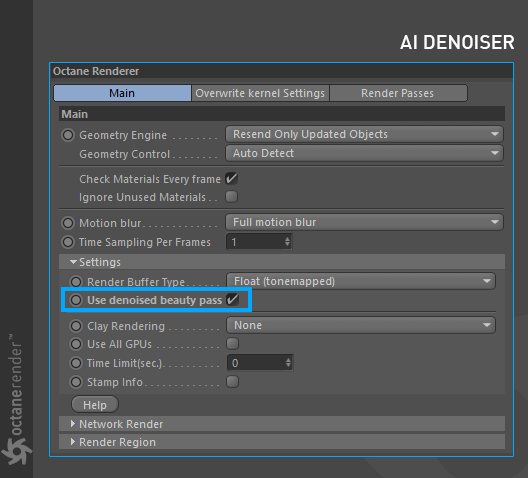
3- If you say "I don't want to deal with these render passes settings" we have a nice option for you: "Use Denoised Beauty Pass". First, disable Render Passes. Go to Octane Renderer's "Main tab" and check "Use Denoised Beauty Pass" in the "Settings" section below. So your final rendering will only be Denoised Picture. You don't need to deal with Passes.
Info: This option does not have much control. Also, if your scene has Volumetrics, it is not included in Denoised render. Make sure your Denoise settings are correct before to go this option.
3-如果您说“我不想处理这些渲染过程设置”,我们为您提供一个不错的选择:“使用降噪的完美过程”。 首先,禁用渲染通道。 转到Octane Renderer的“主选项卡”,然后在下面的“设置”部分中选中“使用经过降噪的Beauty Pass”。 因此,您最终的渲染将仅是“去噪的图片”。 您不需要处理通道。
信息:此选项没有太多控制权。 同样,如果您的场景具有“体积”,则它也不会包含在“降噪”渲染中。 在使用此选项之前,请确保您的“降噪”设置正确。
4- If you are sure of everything you can render your scene.
4-如果您确定所有内容都可以渲染场景。
AI DENOISER SETTINGS
Now let's look at AI Denoiser's options:
AI降噪器设置
现在让我们看一下AI Denoiser的选项:
enable
Used to enable or disable AI Denoiser.
启用
用于启用或禁用AI Denoiser。
DENOISE VOLUMES
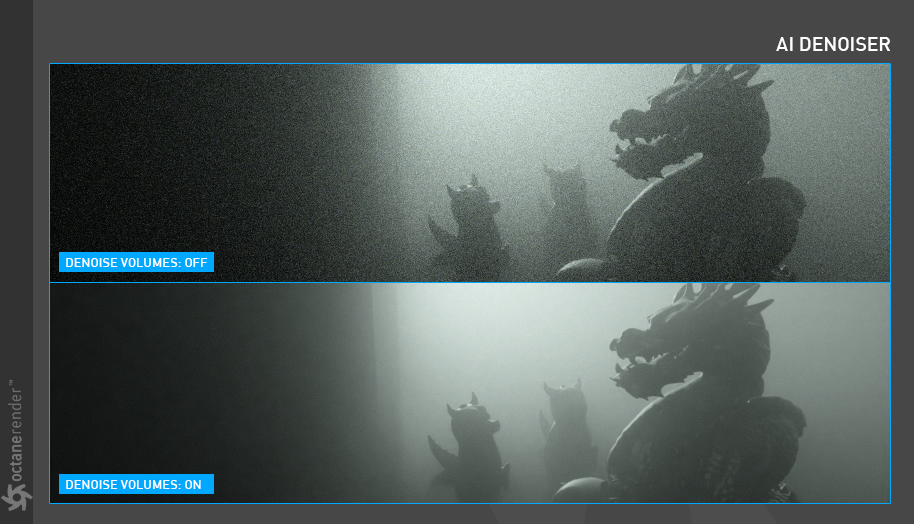
If you have any volumetric objects on your scene (Volume light, fog etc.), you can also enable this option to apply Denoise to them. Close this option if you do not have volume on your scene.
降噪量
如果场景中有任何体积对象(体积光,雾等),也可以启用此选项以对它们应用“降噪”。 如果场景中没有音量,请关闭此选项。
DENOISE ON COMPLETION
If you deactivate this option, the "Main" and "Denoise" is rendered at the same time. If you activate this option, then "Denoise" is applied to the image only after the main render is finished.
完成时降噪
如果禁用此选项,则同时渲染“主要”和“ Denoise”。如果激活此选项,则仅在主渲染完成后才将“ Denoise”应用于图像。
MIN. DenoIser samples
You can check the start of the Denoise process after a certain number of samples. For example, if you enter 100 in this field, the Denoise operation will only start after 100 samples. This option does not work if "Noise on Compeltion" is active.
最小DenoIser采样
您可以在一定数量的采样后检查去噪处理的开始。例如,如果您在此字段中输入100,则“降噪”操作将仅在100个采样后开始。如果“强制噪波”处于活动状态,则此选项不起作用。
MAX. DenoIser Interval
With this option you can control how many seconds intervals to denoise. Reduce if you find the default value too high for the brightness/darkness ratio of your scene. For example, you can reduce this value if you are going to render the night scene. This option does not work if "Denoise on Compeltion" is active.
最高降噪间隔
使用此选项,您可以控制去噪多少秒间隔。如果发现默认值对于场景的明暗比而言过高,则降低此值。例如,如果要渲染夜景,则可以减小此值。如果“强制降噪”处于活动状态,则此选项不起作用。
Blend
With this option you can Blend between "Main image" and "Denoised image". It is a very useful option. For example, if you see a loss of detail in your "Denoised" image, you can use this option to blend a few details in the noise picture with a Denoised result. In some scenes you can use this feature if the image is too flat, lack of depth or if it has an artificial appearance due to the AI Denoiser. This is a post effect so it's render-free.
混合
使用此选项,您可以在“主图像”和“降噪图像”之间混合。这是一个非常有用的选项。例如,如果在“降噪”图像中看到细节丢失,则可以使用此选项将噪波图片中的一些细节与“降噪”结果混合在一起。在某些场景中,如果图像过于平坦,深度不足或由于AI去噪器而具有人为外观,则可以使用此功能。这是后期效果,因此不渲染。


赶快留个言打破零评论!~