TEXTURE DISPLACEMENT
Displacement changes the vertexes of your object using a greyscale image and creates a real surface based on the image you are using. The more detail the picture is, the more detailed your object will be. For your Displacement to work well, you have enough vertices / polygons of your object. The advantage of this parameter is that it creates extremely realistic surface indents. When you look at the camera from any angle, your object will look detailed in every sense. Unfortunately, every good thing has a price: Displacement is a process that requires a lot of computation and Vram. So, use it carefully.
纹理置换
置换使用灰度图像更改对象的顶点,并根据所使用的图像创建真实的曲面。 图片越详细,对象将越详细。 为了使“置换”正常工作,您的对象具有足够的顶点/多边形。 此参数的优点是,它会创建非常逼真的表面凹痕。 当您从任何角度看摄像机时,您的物体在各个方面都会看起来很细致。 不幸的是,每件好事都有代价:置换是一个需要大量计算和Vram的过程。 因此,请小心使用。

how to use
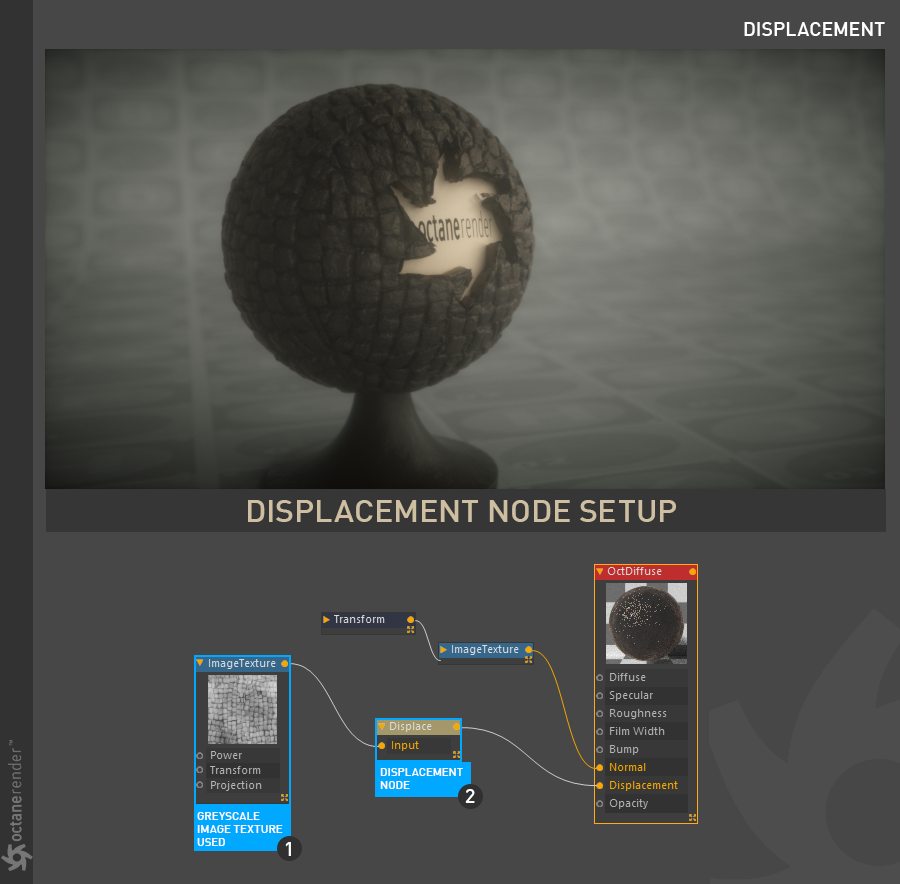
Open the Node editor and prepare the setup as you see in the picture below. The setup is very simple as you can see in the picture. Two nodes are required. One is the "Image Texture" node and the other is the "Displacement" Node. You can define any grey scale texture from the "Image texture" node. Then connect this node to the displacement node and then connect the displacement node to the displacement channel of the main material. Here, the structure of your scene and the details of the objects are important. If you see your objects at distance, you can use "Normal Map" instead of displacement. However, if your object(s) plays a main role and you look at the various angles then it is recommended that you use a high resolution image. Be careful for the number of polygons. A high number of polygons requires too much vram and computation. Finally, you need to use a greyscale image to work with Displacement. It is also available to use procedural texture with the help of another Node.
如何使用
打开节点编辑器并准备设置,如下图所示。如图所示,设置非常简单。需要两个节点。一个是“图像纹理”节点,另一个是“置换”节点。您可以从“图像纹理”节点定义任何灰度纹理。然后将此节点连接到置换节点,然后将置换节点连接到主要材质的置换通道。在这里,场景的结构和对象的细节很重要。如果您在远处看到对象,则可以使用“法线贴图”代替置换。但是,如果您的物体起着主要作用,并且您从各个角度观察,那么建议您使用高分辨率图像。注意多边形的数量。大量的多边形需要太多的vram和计算。最后,您需要使用灰度图像来处理“置换”。也可以在另一个节点的帮助下使用程序纹理。
If you want to see and inspect the scene, you can download it from the link below.
Download the scene from here
如果要查看和检查场景,可以从下面的链接下载。
从这里下载场景

dIsplacement SETTINGS
置换设置
Texture
From here you can define any greyscale image. Another way is to create a displacement map using any image 3rd party software. For example, bitmap2Material is such a software.
纹理
从这里您可以定义任何灰度图像。 另一种方法是使用任何第三方图像软件创建置换图。 例如,bitmap2Material就是这样的软件。
AMOUNT
Controls the strength of the displacement.
数量
控制置换的强度。

MID level
Defines the shift of the displacement in texture value range. This value should be set to 0.5 for image textures that use 50% to represent no displacement.
中级
在纹理值范围内定义置换的置换。 对于使用50%表示无置换的图像纹理,此值应设置为0.5。

LEVEL OF DETAILS
From here you can determine the displacement map quality. Artefact can occur at lower resolutions, especially on shadows. We recommend that you adjust according to the map resolution you normally use. Remember that when the resolution is increased, the GPU Vram will be used too much, and of course the render times will also increase.
细节水平
从这里您可以确定置换图的质量。 伪影可能会以较低的分辨率发生,尤其是在阴影上。 我们建议您根据通常使用的地图分辨率进行调整。 请记住,提高分辨率后,GPU Vram将被过多使用,当然渲染时间也会增加。
FILTER TYPE & FILTER RADIUS
Here you can adjust the softness of the displacement map. When you apply Box or Gaussian, a slight blur occurs in the picture. The Fiter Radius is to increase or decrease the strength of this blur.
过滤器类型和过滤器半径
在这里,您可以调整置换贴图的柔和度。 应用Box或Gaussian时,图片中会出现轻微的模糊。 拟合半径是增加或减少这种模糊的强度。


赶快留个言打破零评论!~