The Irradiance Point Cloud GI Engine 辐射点云 GI 引擎
Introduction
引言
When multiple GI bounces are needed, each ray has to bounce a few times around until it reaches a light. Because the ray bouncing happens randomly finding lighting, in some ways, is left to chance. Using more rays improves these chances, which is why increasing the ray counts always produces cleaner results.
当需要多个 GI 反弹时,每个光线必须反弹几次,直到到达一个光线。因为光线的反射是随机发生的,所以在某些方面,光线的反射是随机的。使用更多的射线可以提高这些机会,这就是为什么增加射线计数总能产生更清晰的结果。
The Irradiance Point Cloud attempts to improve the situation by computing a coarse GI approximation on random points around the scene. In some ways it's similar to the Irradiance Cache except:
辐照点云通过计算场景周围随机点的粗糙 GI 近似值,试图改善这种情况。在某些方面,它类似于 Irradiance Cache,除了:
- It creates points in places that might not be visible to the camera. This necessary because multiple GI ray bounces will very often land on out-of-camera-frustum locations. 它在摄像机可能看不到的地方创建点。这是必要的,因为多个 GI 射线反弹将非常经常地在摄像机之外的地点
- The points don't care too much about creases and detail. This is done to conserve memory and improve computation time. 这些要点并不太在意折痕和细节,这样做是为了节省内存和提高计算时间
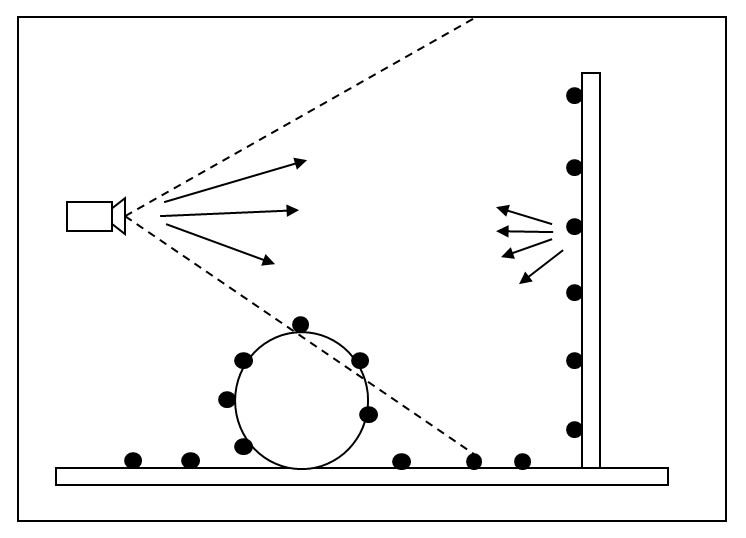
The figures below show how the Irradiance Point Cloud works
下面的图表显示了辐射点云是如何工作的
During the irradiance point cloud computation pass, rays are shot from the camera, create points on intersections and are bounced around. That creates a 'blanket' of points around the scene. A coarse GI solution is incrementally computed on each of these points.
在辐照点云计算过程中,光线从相机中射出,在交叉点上创建点,并在周围反弹。这样就在场景周围创建了一个点的“毯子”。对每个点逐步计算一个粗糙的 GI 解决方案。
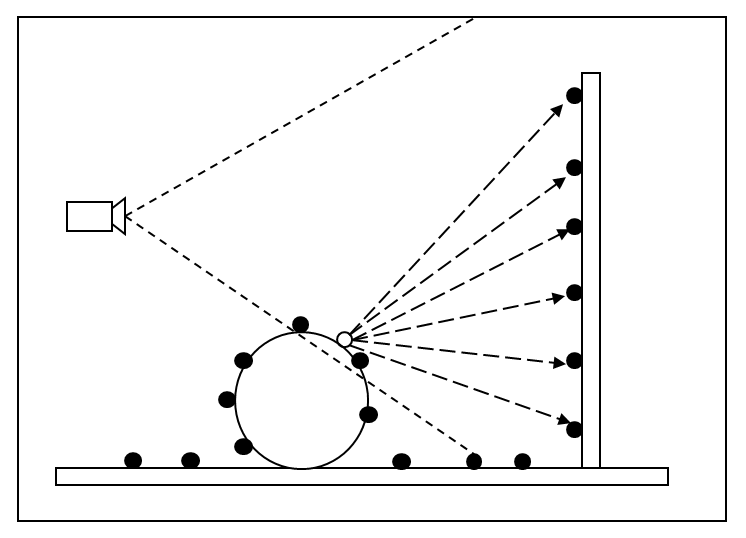
During Irradiance Caching or Brute-Force primary GI, these points are used to compute a smoother GI result. Here, the lighting of an irradiance cache point (shown in white) is computed using the irradiance point cloud.
在 Irradiance Caching 或 Brute-Force 主要 GI 中,这些点被用来计算一个更平滑的 GI 结果。这里,使用辐照度点云计算辐照度缓存点(如白色所示)的照明。
Looking at the second figure, if we didn't have the point cloud enabled, the irradiance cache point (white point) would have to shoot the rays shown as dashed arrows and then bounce those rays off the wall. Finding lighting this way would be hard. Using the irradiance point cloud, instead, each of these dashed array rays gets back lighting that is of higher quality.
看看第二个图,如果我们没有启用点云,辐照度缓存点(白点)将不得不发射射线显示为虚线箭头,然后反弹这些射线的墙壁。要找到这样的光线是很困难的。相反,使用辐射点云,每个虚线阵列光线都能得到质量更高的回光。
Even though each one of these points contains a coarse lighting solution (meaning it can be fairly noisy), that is often not a big issue with secondary GI lighting. The same applies to the Photon Map when it's used as a secondary GI engine: it might be a bit splotchy, but the final result can still be clean.
即使每一个点都包含一个粗糙的照明解决方案(意味着它可以是相当嘈杂的) ,这通常不是一个大问题与二级 GI 照明。同样的道理也适用于光子映射,当它被用作次要的 GI 引擎时: 它可能有点污点,但是最终的结果仍然是干净的。
Later in this document there are pictures that shown the kind of visual benefit you can expect from the Irradiance Point Cloud.
在这个文档的后面有一些图片,展示了你可以期望从辐射点云中获得的那种视觉效益。
Pros
优点
- Helps make Brute-Force and Irradiance Caching faster and cleaner 有助于使蛮力和辐照缓存更快和更干净
- Certain very difficult lighting scenarios can only be rendered with this technique! (i.e. they would take an extremely long time with purely brute force techniques) 某些非常困难的照明场景只能用这种技术渲染!(也就是说,使用纯粹的暴力破解技术需要极长的时间)
Cons
缺点
- Requires some storage (but, typically, not much) 需要一些存储空间(但通常不需要太多)
- There are a few settings to tweak so a bit of experimentation is required. 有一些设置需要调整,所以需要一些实验
- Only provides a benefit when multiple bounces are needed, if the scene contains lots of lights or when the lighting conditions are difficult 只有当需要多次反弹时,如果场景包含大量灯光或者照明条件困难时,才能提供好处
Settings
设置
Mode/Filename
模式/文件名
When "Mode" is set to "Rebuild (don't save)", Redshift will compute a new irradiance point cloud from scratch (for each frame) but will not save it to disk. The frame will be rendered to completion.
当“模式”设置为“重建(不保存)”时,红移将从头计算一个新的辐射点云(每帧) ,但不会将其保存到磁盘。这个框架将被渲染到完成。
When "Mode" is set to "Rebuild (prepass only)", Redshift will compute a new irradiance point cloud from scratch (for each frame) and will save it to the user-specified file. The final rendering pass will be skipped.
当“模式”设置为“重建(只准备)”,红移将从头计算一个新的辐射点云(每帧) ,并将其保存到用户指定的文件。最终的呈现过程将被跳过。
When "Mode" is set to "Rebuild", Redshift will compute a new irradiance point cloud from scratch (for each frame) and will save it to the user-specified file. The frame will be rendered to completion.
当“模式”设置为“重建”,红移将从头计算一个新的辐射点云(每帧) ,并将其保存到用户指定的文件。这个框架将被渲染到完成。
When "Mode" is set to "Load", the computation stage is skipped and the data is loaded from the user-specified file. The frame will be rendered to completion.
当“ Mode”设置为“ Load”时,将跳过计算阶段,并从用户指定的文件加载数据。框架将被渲染到完成。
Number of frames to blend
要混合的帧数
The "Number of frames to blend" parameter is only enabled when the "Mode" is set to "Load". It allows averaging the results of multiple irradiance point cloud files (one for each frame) together in order to improve any flickering effects that might be present because of insufficient quality settings and/or difficult lighting situations. Please refer to this section below for more information on how to use the "Rebuild (prepass)" and "Load" modes. Since this mode has to do with loading and blending multiple frames before rendering, it's only available for the "Load" mode and is grayed out for the "Rebuild" modes.
“要混合的帧数”参数只有在“ Mode”设置为“ Load”时才能启用。它允许对多个辐照度点云文件(每帧一个)的结果进行平均,以改善由于质量设置不足和/或照明情况困难而可能出现的任何闪烁效果。有关如何使用“重建(预置)”和“加载”模式的更多信息,请参阅下面的部分。由于这种模式必须在渲染之前加载和混合多个帧,所以它只能在“加载”模式下使用,并且在“重建”模式下使用灰色。
Irradiance Point Cloud data is view-dependant which means that it has to be re-generated when either the camera or any objects move. It also has to be regenerated if lights change (position or intensity) and if materials are adjusted.
辐照点云的数据是视图依赖的,这意味着它必须重新生成时,无论是相机或任何物体移动。它也必须再生,如果灯光改变(位置或强度) ,如果材料是调整。
Show Calculation
显示计算
Due to the way the irradiance point cloud works, it can be very hard to directly visualize it, unfortunately. So what this option does is show the color results of the rays shot from the camera. For this reason, it looks like progressive rendering.
不幸的是,由于辐照点云的工作方式,很难直接将其可视化。因此,这个选项所做的是显示从相机拍摄的射线的颜色结果。由于这个原因,它看起来像渐进渲染。
The overhead of this option can be significant on some very simple scenes so disabling "Show Calculation" can make the computation a bit faster.
在一些非常简单的场景中,此选项的开销可能非常大,因此禁用“显示计算”可以使计算速度快一点。
Screen Radius
屏幕半径
Like mentioned above, the Irradiance Point Cloud algorithm stores points around the scene. It can't store a point for each ray that was shot from the camera because doing so would generate an extremely large number of points for high-resolution images. Instead, it uses a screen-space metric to space out these points. So the "Screen Radius" parameter refers to pixels.
就像上面提到的,辐射点云算法存储场景周围的点。它不能存储从相机拍摄的每个射线的一个点,因为这样做会为高分辨率图像产生极大数量的点。相反,它使用屏幕空间度量标准来划分这些点。因此“ Screen Radius”参数指的是像素。
This parameter affects two things:
这个参数影响两件事情:
- The used videocard memory. Setting "Screen Radius" to larger values means that fewer points will be created and, therefore, less videocard memory will be used. 使用过的录像带记忆。将“屏幕半径”设置为更大的值意味着将创建更少的点,因此将使用更少的视频卡内存
- How often the results can be used by the primary GI engines. If the points are very far apart (because of a large screen radius), then the primary GI engines (Irradiance Cache, Brute-Force) will not use them as often (and depending on the "Retrace Threshold" parameter). So this can effect the performance of these two primary GI engines. Therefore, lower screen radius values can translate into better rendering performance. 结果可以被主要的胃肠道引擎使用的频率。如果这些点相距很远(因为屏幕半径很大) ,那么主要的 GI 引擎(Irradiance Cache,Brute-Force)将不会经常使用它们(取决于“ Retrace Threshold”参数)。因此,这可以影响这两个主要胃肠道引擎的性能。因此,更低的屏幕半径值可以转化为更好的渲染性能
Often times a setting of 8 or 16 will work fine. If you scene is of a high resolution (2K or larger) you can try larger values such as 32 or 64.
通常设置8或16就可以了。如果你的场景是高分辨率(2K 或更大) ,你可以尝试更大的值,如32或64。
Samples Per Pixel
每像素样本
This parameter controls the quality of each point. In some ways, this works like "Num Rays" for Brute-Force or the Irradiance Cache, i.e. larger values produce smoother results. Scenes that are fairly well-lit (large light sources or several of them covering most surfaces) can use values such as 8 or 16. Harder lighting scenarios (small bright light sources or lighting coming through small openings) will need higher settings such as 32 or 64.
这个参数控制每个点的质量。在某些方面,这个工作原理类似于蛮力的“ Num ray”或者辐照度缓存,也就是说,更大的值会产生更平滑的结果。光线充足的场景(大光源或者几个光源覆盖了大部分表面)可以使用8或16这样的值。较难照明的场景(小型明亮光源或通过小孔照明)将需要更高的设置,如32或64。
The "Screen Radius" can also play a role in the final point quality. If you increase "Screen Radius" there are fewer points so each point will receive more rays and, hence, be smoother.
“屏幕半径”也可以在最终的点质量起到作用。如果你增加“屏幕半径”有更少的点,所以每个点将接收更多的射线,因此,是光滑的。
Filter Size
滤镜尺寸
As shown in the figures near the top of this document, the Irradiance Point Cloud is used by Brute-Force or the Irradiance Cache. When rays shot by Brute-Force or an Irradiance Cache point hit a surface, the closest Irradiaince Point Cloud points are found and used. The "Filter Size" controls how many of these "closest points" the algorithm should use.
如本文件顶部附近的图所示,Irradiance Point Cloud 被 Brute-Force 或 Irradiance Cache 使用。当光线射击暴力或辐照缓存点击中一个表面,最接近的辐照因子点云点被发现和使用。“过滤器大小”控制算法应该使用多少这些“最近点”。
Larger numbers will smooth out the points but will take longer to render. The default 2 value should work for most cases. We generally recommend smoothing out the Irradiance Point Cloud using more "Samples Per Pixel" instead of increasing "Filter Size".
更大的数字会使点平滑,但渲染时间会更长。默认值2在大多数情况下应该可以工作。我们通常建议平滑的辐射点云使用更多的“每像素样本”,而不是增加“滤波器大小”。
Retrace Threshold
回溯阈值
The Irradiance Point Cloud is constructed without too much care about scene detail (creases, corners, etc). This is done to conserve memory. Not doing so would mean creating a very large number of points around corners – like the Irradiance Cache has to do.
辐射点云是构建没有太多关心场景细节(折痕,角落,等)。这样做是为了保存记忆。不这样做将意味着在角落周围创建非常大量的点-像辐照度缓存必须这样做。
For this reason, using the Irradiance Point Cloud as a secondary GI engine can sometimes create splotchy artifacts near corners or cause light leaks. The "Retrace Threshold" parameter prevents Brute-Force or Irradiance Cache from using points in these places. The larger the "Retrace Threshold" is, the more these points will not be used around corners and creases.
由于这个原因,使用辐射点云作为辅助 GI 引擎有时会在角落附近产生斑点状的工件或导致光泄漏。“ Retrace Threshold”参数可以防止 Brute-Force 或 Irradiance Cache 在这些地方使用点。“回溯阈值”越大,这些点就越不会被用在角落和折痕处。
When using Irradiance Cache as the primary GI engine, values such as 1 or 2 as usually sufficient.
当使用 Irradiance Cache 作为主要的 GI 引擎时,如1或2等值通常就足够了。
When using Brute-Force as the primary GI engine, values such as 2 or 3 are usually sufficient. Brute-Force is a more accurate technique than Irradiance Cache so any artifacts would be more visible. This is why this value has to be higher for Brute-Force than the Irradiance Cache.
当使用 Brute-Force 作为主要的 GI 引擎时,值如2或3通常就足够了。蛮力是一个比辐射缓存更准确的技术,所以任何工件将更可见。这就是为什么这个值必须高于蛮力比辐射缓存。
How To Use
如何使用
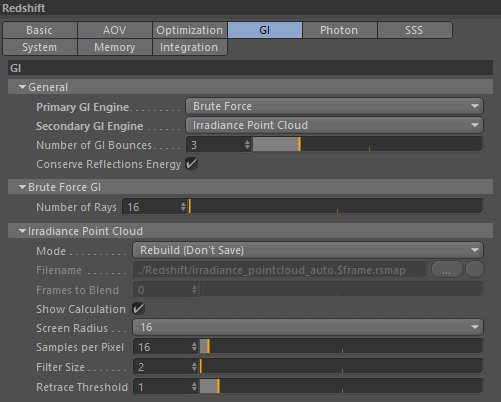
Using the Irradiance Point Cloud is very easy. All you have to do is select it as a secondary GI engine and (typically) only tweak "Screen Radius" and "Samples Per Pixel".
使用辐射点云非常简单。所有你需要做的就是选择它作为一个二级 GI 引擎,(通常)只调整“屏幕半径”和“每像素样本”。
First, we demonstrate the benefits of the Irradiance Point Cloud.
首先,我们演示了辐射点云的好处。
Both of the scenes shown below were rendered with the primary GI engine set to Brute-Force. "Num Rays" was set to a high number: 4000. There is 1 GI bounce in these scene.
下面显示的两个场景都使用设置为 Brute-Force 的主 GI 引擎渲染。“数字光芒”被设置为一个很高的数字: 4000。在这些场景中有1个胃肠反弹。
The first image used Brute-Force for the secondary GI engine while the second image used Irradiance Point Cloud for the secondary GI engine. The second image was rendered approximately twice as fast and is cleaner, too!
第一张图片使用 Brute-Force 作为二级 GI 引擎,而第二张图片使用 Irradiance Point Cloud 作为二级 GI 引擎。第二张图像渲染的速度大约是第一张的两倍,而且也更干净!
|
|
|
|
Using Brute-Force as the secondary GI engine. Even with 4000 rays, there is noise everywhere. 使用蛮力作为第二个 GI 引擎。即使有4000条射线,仍然到处都是噪音。 |
Using the Irradiance Point Cloud as the secondary GI engine. The results are much cleaner and the frame was completed in nearly half the time. 使用辐射点云作为辅助 GI 引擎。结果是清洁得多,框架完成了近一半的时间。 |
We will now demonstrate the effect of the Irradiance Point Cloud parameters.
我们现在将演示辐射点云参数的影响。
The image below is using "Screen radius" of 4, "Samples per pixel" 8, "Filter Size" 3 and "Retrace Threshold 0". We intentionally made the retrace threshold 0 to demonstrate the splotchy effects near corners. These artifacts exist because the Irradiance Point Cloud was created with a fairly low number of samples per pixel (8), so the points are noisy. The recommended way to fix this issue is to use a larger retrace threshold. For Brute-Force values such as 3 or 4 work fine. For Irradiance Caching, you can use values like 1 or 2. Of course, there might be scenes that might not exhibit such issues – for these scenes you can lower the retrace threshold.
下面的图片使用了“屏幕半径”4,“每像素样本”8,“滤镜尺寸”3和“回溯阈值0”。我们有意将回溯阈值设为0,以显示角落附近的斑点效应。这些伪影之所以存在,是因为辐照点云是以相当低的每像素样本数(8)创建的,所以这些点是噪声点。解决这个问题的建议方法是使用更大的回溯阈值。对于 Brute-Force 值,如3或4可以正常工作。对于 Irradiance Caching,你可以使用1或2这样的值。当然,有些场景可能不会出现这样的问题——对于这些场景,您可以降低折返阈值。
Increasing "Retrace Threshold" means that the primary GI engine will not use the points near corners so, instead, it will have to shoot rays. Shooting rays is slower than simply using points, so increasing "Retrace Threshold" can make the rendering a bit slower during the Irradiance Cache computation stage (if Irradiance Cache is selected as the primary GI engine) or during final rendering (if Brute-Force is selected as the primary GI engine).
增加“回溯阈值”意味着主要的 GI 引擎不会使用靠近角落的点,因此,它将不得不发射射线。射线比简单地使用点要慢,所以增加“ Retrace Threshold”会使渲染在 Irradiance Cache 计算阶段(如果 Irradiance Cache 被选为主要 GI 引擎)或者在最终渲染阶段(如果 Brute-Force 被选为主要 GI 引擎)变慢。
|
|
|
|
|
Retrace Threshold set to 0. With 8 samples per pixel, the points are noisy so artifacts appear near corners 回溯阈值设置为0。每像素8个采样点,点是噪声的,因此伪影出现在角落附近 |
Now the samples per pixel was raised to 64 which make the Irradiance Point Cloud computation stage longer, but the corner artifacts were improved. There are still some, though. 现在每个像素的采样量提高到了64个,这使得辐照度点云计算阶段更长,但是角伪影得到了改善。不过,还是有一些。 |
Using 8 samples per pixel but a retrace threshold of 3. The Irradiance Point Cloud computation was fast (because of the low "Samples per pixel") and doesn't have issues. The final rendering was a bit slower, though. 采用8采样每像素,但回溯阈值为3。辐射点云计算是快速的(因为低“每像素样本”) ,并没有问题。不过,最终的渲染速度要慢一些。 |
The corner artifacts will typically be as large as "Screen Radius". This means that reducing "Screen Radius" will shrink the artifacts. Smaller artifacts also mean faster rendering times because "Retrace Threshold" will not have to work as hard. 角落的工件通常和“屏幕半径”一样大。这意味着减少“屏幕半径”将缩小工件。更小的工件也意味着更快的呈现时间,因为“ Retrace Threshold”不必那么辛苦地工作
Because the Irradiance Cache can also generate corner artifacts (if its "Num Rays" is low or "Adaptive Error Threshold" is too high) it can sometimes be a bit confusing understanding which GI engine is responsible for these artifacts. There is a fairly simple rule of thumb: if you set your "Retrace Threshold" properly (i.e. 1 or 2 for the Irradiance Cache) and you are seeing corner artifacts then it's most likely that it's the Irradiance Cache itself that is responsible – and not the Irradiance Point Cloud.
因为辐射缓存也可以产生角落工件(如果它的“ Num ray”低或“ Adaptive Error Threshold”太高) ,它有时可能是一个有点混乱的理解 GI 引擎负责这些工件。有一个相当简单的经验法则: 如果你正确地设置你的“回溯阈值”(比如1或2的辐照度缓存) ,并且你看到的是角落里的人工制品,那么最有可能的是辐照度缓存本身,而不是辐照度点云。
The pictures below use the Irradiance Cache as the primary GI engine. "Retrace Threshold" was set to 1.
下面的图片使用辐照度缓存作为主要的 GI 引擎。“回溯阈值”设置为1。
|
|
|
|
|
|
|
Using Irradiance Cache as the primary GI engine. "Num Rays" set to 1000 and "Adaptive Threshold" set to 0.001. 使用辐照度缓存作为主要的 GI 引擎。“ Num ray”设置为1000,“ Adaptive Threshold”设置为0.001。角落里展出的艺术品,因为低“数字光线” |
The Irradiance Cache "Num Rays" was raised to 4000 and the artifacts are now gone. 辐照度缓存“数字射线”被提高到4000并且人工制品现在消失了。 |
How to use "Rebuild (prepass)" and "Load" modes to improve/eliminate flickering artifacts 如何使用“重建(前置)”和“加载”模式来改善/消除闪烁的工件
When combining the irradiance point cloud with brute-force GI, slight flickering artifacts might appear during animations. These artifacts are quite rare and mostly happen if the lighting conditions are very hard and not enough "Samples per pixel" have been used.
当结合光照点云和蛮力 GI 时,在动画中可能会出现轻微的闪烁效果。这些伪影是非常罕见的,大多数情况下发生的照明条件非常困难,并没有足够的“每像素样本”已被使用。
If you encounter any such artifacts, you can try the following procedure:
如果您遇到任何这样的工件,您可以尝试以下步骤:
- First, select "Rebuild (prepass)" and select an appropriate filename – or use the default filename. 首先,选择“ Rebuild (prepass)”并选择一个合适的文件名——或者使用默认的文件名
- Render your animation. During rendering, one irradiance point cloud file for each frame will be generated but the final rendering pass will be skipped. 渲染你的动画。在渲染期间,将为每个帧生成一个辐射点云文件,但跳过最终的渲染过程
- Then, select the "Load" mode and adjust the "number of frames to blend" parameter. Render your animation. For each frame, Redshift will now load a number of 'neighboring frame' irradiance point cloud files, blend them together and use the blended result to render the final frame. Because of this inter-frame blending, any temporal artifacts (flickering) will be reduced or even eliminated. 然后,选择“加载”模式并调整“要混合的帧数”参数。渲染你的动画。对于每个帧,红移现在将加载一些相邻帧的辐射点云文件,将它们混合在一起,并使用混合结果渲染最终帧。由于这种帧间混合,任何时间伪影(闪烁)都将减少甚至消除
The "number of frames to blend" parameter controls how many 'neighboring' irradiance point cloud files will be loaded and blended together. For example, a setting of 2 means "load the previous two and next two frames". So, for this example, the algorithm will blend 4 neighboring frames plus the current frame, i.e. 5 frames together. A setting of 1 means "load the previous and next frames", so 3 frames will be blended together.
“要混合的帧数”参数控制有多少相邻的辐射点云文件将被加载和混合在一起。例如,设置为2意味着“加载前两帧和后两帧”。所以,在这个例子中,算法将4个相邻帧加上当前帧,也就是5个帧放在一起。设置为1意味着“加载上一帧和下一帧”,因此3帧将被混合在一起。
Larger numbers of blended frames means less flickering. However, blending too many frames together can create a light 'ghosting' or 'lagging' effect in scenes with fast moving objects or lights. If your irradiance point cloud settings are properly adjusted, a setting between 2 and 4 should be sufficient to improve artifacts to the point of either being completely eliminated or barely visible.
更多的混合帧意味着更少的闪烁。然而,在快速移动的物体或灯光的场景中,混合太多的帧会产生光的“重影”或“滞后”效果。如果您的辐照点云设置适当调整,2和4之间的设置应该足以改善工件要么被完全消除或几乎看不见。
Memory Considerations
内存注意事项
If you are rendering very high-resolution images and "Screen Radius" is low, you might get an error regarding the points not fitting in the allotted GPU memory space. The message will read like this:
如果你渲染的是非常高分辨率的图像而“屏幕半径”很低,你可能会得到一个错误的点不适合在分配的 GPU 内存空间。信息内容如下:
Irradiance point cloud doesn't fit in VRAM. Frame aborted. Please either increase the 'Screen Radius' parameter or theirradiance point cloud memory budget in the memory options |
Like the message suggests, you have two options:
正如这条信息所建议的,你有两个选择:
- Increase "Screen Radius". This should drastically reduce the memory requirements and, for high resolution images, will not affect image quality. 增加“屏幕半径”。这将大大减少内存需求,对于高分辨率的图像,不会影响图像质量
- Increase the Irradiance Point Cloud memory in the options. If your GPU has enough memory, you can try increasing the 64MB to something like 80MB or 120MB 在选项中增加辐射点云记忆。如果你的 GPU 有足够的内存,你可以尝试增加64mb 到80mb 或120mb
To edit the Irradiance Point Cloud memory budget, go to Redshift options, Memory Tab and modify the parameter called "Irradiance point cloud working tree reserved memory". The parameter units are in megabytes.
要编辑辐射点云的内存预算,进入红移选项,内存标签和修改参数称为“辐射点云工作树保留内存”。参数单位以兆字节为单位。

赶快留个言打破零评论!~