Subsurface Scattering 次表面散射
这个页面引用了红移的旧次表面散射着色器。这个着色器并不像新的红移皮肤着色器或者红移材质着色器的 SSS 能力那样用户友好,所以,如果你开始使用红移,我们建议使用这些着色器代替。
Introduction
引言
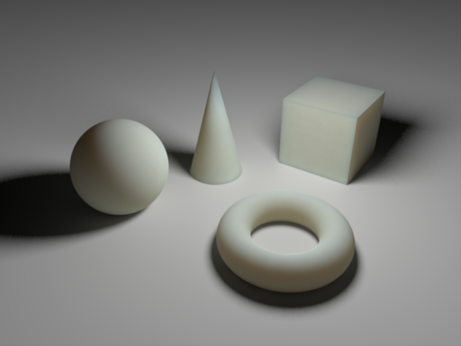
When light hits certain types of translucent surfaces, it enters the medium, gets scattered within it and then a percentage of it exits it. The result is the familiar soft lighting effect of materials such as wax, milk, thin plastic or human skin. That lighting effect is called "Subsurface Scattering", here abbreviated as "SSS".
当光线照射到某些类型的半透明表面时,它进入介质,在其中散射,然后有一定比例的光线退出。其结果就是蜡、牛奶、薄塑料或人体皮肤等材料常见的柔和照明效果。这种照明效果被称为“次表面散射”,在这里缩写为“ SSS”。
Subsurface Scattering
次表面散射
Redshift supports a fast point-based SSS implementation through the "Redshift Subsurface Scattering" shader node. Just like other point-based techniques (such as Irradiance Caching), part of the computation happens in a separate pass and the points are used for shading during the final rendering pass.
通过“红移次表面散射”着色节点,红移支持快速的基于点的 SSS 实现。就像其他基于点的技术(比如辐射缓存)一样,部分计算发生在一个单独的过程中,这些点在最终渲染过程中用于阴影处理。
Because subsurface scattering can be a multi-pass technique, apart from the shader parameters, it also has a few global options. These are explained below.
因为次表面散射可以是一个多遍的技术,除了着色器参数,它还有一些全局选项。 下面将解释这些问题。
Global Options
全球选择权
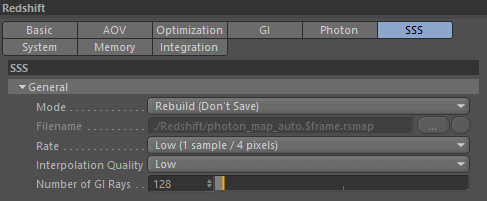
Mode/Filename
模式/文件名
- When "Mode" is set to "Rebuild (don't save)", Redshift will compute new subsurface scattering points from scratch (for each frame) but will not save them to disk. 当“模式”设置为“重建(不保存)”时,红移将从头计算新的次表面散射点(每帧) ,但不会将它们保存到磁盘
- When "Mode" is set to "Rebuild (prepass only)", Redshift will compute new subsurface scattering points from scratch (for each frame) and will save them to the user-specified file. The final rendering pass will be skipped. 当“模式”设置为“重建(仅限前置)”,红移将从头计算新的次表面散射点(每帧) ,并将它们保存到用户指定的文件。最终的呈现过程将被跳过
- When "Mode" is set to "Rebuild", Redshift will compute new subsurface scattering points from scratch (for each frame) and will save them to the user-specified file. 当“模式”设置为“重建”,红移将从头计算新的次表面散射点(每帧) ,并将它们保存到用户指定的文件
- When "Mode" is set to "Load", the computation stage is skipped and the data is loaded from the user-specified file. 当“ Mode”设置为“ Load”时,将跳过计算阶段,并从用户指定的文件加载数据
Subsurface scattering data is view-dependant which means that it has to be re-generated when either the camera or any objects move. It also has to be regenerated if lights change (position or intensity) and if materials are adjusted. However, there are a few settings that do not affect the subsurface scattering points:
次表面散射数据依赖于视图,这意味着当摄像机或任何物体移动时,必须重新生成这些数据。它也必须再生,如果灯光改变(位置或强度) ,如果材料是调整。然而,有一些设置不会影响次表面散射点:
- All antialiasing settings 所有的抗锯齿设置
- Any parameter that has to do with "number of samples". For example "number of glossy rays", "number of area light samples", "depth of field num samples" 任何与“样本数量”有关的参数。例如“光泽线数”、“面积光样数”、“景深数样数”
If you are making any last-minute adjustments to your frame and tweaking these kinds of parameters you can save some time by re-using the irradiance cache you computed last time.
如果你在最后一分钟调整你的框架和调整这些类型的参数,你可以节省一些时间重复使用辐射缓存你上次计算。
Rate
税率
This parameter controls the spacing of the SSS points. Similar to antialiasing, the more samples-per-pixel you use the more points will be created. More points can help catch small details but they also take longer to compute and occupy more memory. It is recommended that, if you get visual artifacts, you try a setting of "Medium (1 sample per pixel)" first and then raise it to "High (4 samples per pixel)".
此参数控制 SSS 点的间距。类似于反走样,使用的每像素采样越多,创建的点就越多。更多的点可以帮助捕捉小细节,但他们也需要更长的时间来计算和占用更多的内存。建议您,如果您得到视觉效果,您首先尝试设置“中等(每像素1个样本)”,然后将其提高到“高(每像素4个样本)”。
Interpolation Quality
插值质量
During the final rendering stage, the SSS points are used to produce the final lighting at each pixel. This parameter controls the quality of this process. The higher the setting, the more points are used and the smaller the chance of any interpolation artifacts appearing on the surfaces of objects. Higher settings, though, also mean longer rendering. We recommend leaving this setting to its default "Low" value and only use "Medium" or "High" if you observe SSS artifacts that look like 'lighting rings' or excessive flickering in animations.
在最终的渲染阶段,SSS 点用于在每个像素处产生最终的照明。这个参数控制这个过程的质量。设置得越高,使用的点就越多,任何插值工件出现在物体表面的机会就越小。更高的设置也意味着更长的渲染时间。我们建议将这个设置保留为默认的“低”值,如果你观察到 SSS 工件看起来像“光环”或在动画中过度闪烁,则只使用“中”或“高”值。
Num GI Rays
数字消化道射线
If Global Illumination is enabled, GI lighting will also be computed for each SSS point. This means that and bounced lighting will also be scattered through any objects using a subsurface scattering shader. The "Num GI Rays" is similar to the Brute-Force GI or Irradiance Cache GI "num rays" settings.
如果启用全局光源,还将计算每个 SSS 点的 GI 照明。这意味着,反射光线也将通过使用次表面散射着色器散射到任何物体上。在“数字 GI 射线”是类似于蛮力 GI 或辐照缓存 GI 的“数字射线”设置。
Since subsurface scattering is a soft effect, it can often work with relatively few GI rays whereas GI on hard surfaces might require several hundred (or even thousands) rays. It is, therefore, recommended that you start with fairly low numbers such as the default 128 and raise this only if you get persistent lighting artifacts on subsurface scattering surfaces.
由于次表面散射是一种软效果,它通常只需要相对较少的胃肠道射线,而对于坚硬的表面,胃肠道可能需要几百甚至几千条射线。因此,我们建议你从相当低的数字开始,比如默认的128,并且只有当你在次表面散射表面获得持久的照明效果时才提高这个数字。(2)
SSS Shader General Parameters
一般参数
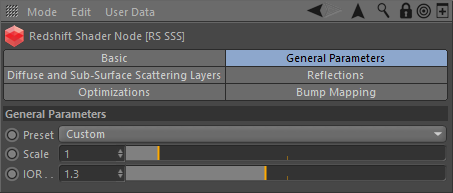
Preset
预置
The "Preset" list contains settings for a few different types of materials. You might have seen the same list on other renderers. These settings originate from the original subsurface scattering paper "A Practical Model For Subsurface Light Transport" by Henrik Wann Jensen. The SSS implementation of Redshift is based on that work.
“预置”列表包含几种不同类型的材料的设置。您可能在其他渲染器上看到了同样的列表。这些设置来源于次表面散射的原始论文《地下光运输的实用模型》 ,作者是 Henrik Wann Jensen。Redshift 的 SSS 实施正是基于这项工作。
If you are new to subsurface scattering, it is recommended that you use the preset list as a starting point as it can help you understand the effect of the "sub-surface color" and "scatter color" parameters.
如果你是次表面散射的新手,建议你使用预设列表作为起点,因为它可以帮助你理解“次表面颜色”和“散射颜色”参数的影响。
Scale
比例
The scale controls how soft or hard the SSS effect will be. Higher numbers make the effect softer. This value is multiplied by the "Scatter Radius" parameter explained below.
这个尺度控制着 SSS 效应的软硬程度。更高的数字会使效果变得更弱。这个值乘以下面解释的“离散半径”参数。
IOR
返回抑制
The index of refraction used to calculate the strength of the Fresnel effect. Often, the IOR of water (which is approximately 1.3) is sufficient for most subsurface scattering effects.
折射率用来计算菲涅耳效应的强度。通常,水的返回抑制值(大约为1.3)对于大多数次表面散射效应来说是足够的。
Diffuse and Sub-Surface Scattering Layers
扩散和亚表面散射层(2)
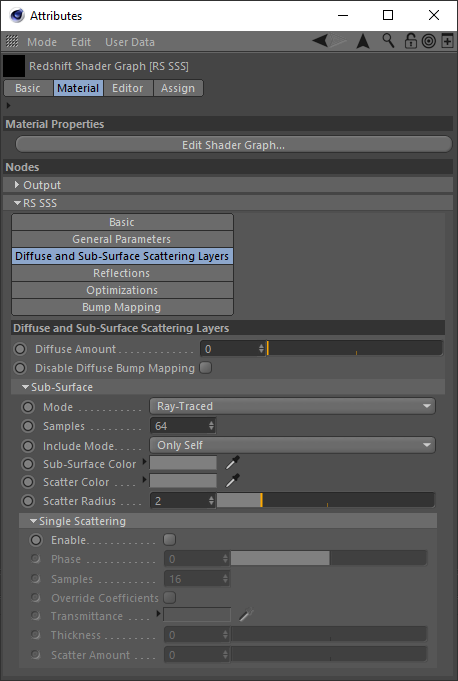
Diffuse Amount
扩散量
This parameter controls how much of the SSS effect you get. A value of 0.0 means that you'll only get subsurface scattering. On the other hand, a value of 1.0 will make this surface behave as a perfectly diffuse surface without any SSS. This parameter is useful for materials that need a weaker SSS effect.
这个参数控制你得到多少 SSS 效果。值为0.0意味着你只能得到次表面散射。另一方面,值为1.0将使这个表面表现为一个完全漫反射表面没有任何 SSS。这个参数对于需要较弱 SSS 效应的材料是有用的。
Sub-Surface
亚表面
Mode
模式
- Point-Based 基于点的
- Ray-Traced 射线追踪
You can use either point-based or ray-traced multiple sub-surface scattering in Redshift and both have their own advantages and disadvantages. In quite a few cases the techniques should look similar to each other but there are situations where the differences will be readily apparent, this is primarily due to the normalization of light that occurs when using point-based mode. Ray-traced mode does not normalize the light which can lead to differences that are most notable on thin objects or objects with more surface detail.
在红移中,可以使用基于点的多次子表面散射或者光线跟踪的多次子表面散射,这两种方法各有优缺点。在相当多的情况下,这些技术应该看起来彼此相似,但是在有些情况下,差异会很明显,这主要是由于在使用基于点的模式时发生的光的正常化。光线追踪模式并不能使光正常化,这会导致在薄物体或表面细节更多的物体上最显著的差异。
If your scene is setup to use point-based SSS shaders and you render in progressive mode it will automatically use ray-traced SSS during progressive renders. This way you can actually see the SSS effect in progressive mode (and not just the diffuse texture) and tweak settings interactively - while still using point-based for the final (bucket) rendering.
如果你的场景设置为使用基于点的 SSS 着色器,并且你在渐进模式下渲染,它会自动在渐进渲染期间使用光线跟踪 SSS。这样你就可以在渐进模式下看到 SSS 效果(不仅仅是漫反射纹理) ,交互式地调整设置,同时仍然使用基于点的最终(桶)渲染。
Please note that due to the differences in the two modes that the final result can differ when comparing progressive ray-traced SSS to the bucket rendered point-based SSS.
请注意,由于两种模式的差异,在比较渐进射线跟踪的 SSS 和基于桶渲染点的 SSS 时,最终结果可能不同。
Point-Based
基于点的
-
Faster and smoother
更快更流畅
-
Less detailed / accurate
不够详细/准确
-
Does not work in progressive mode
不在渐进模式下工作
-
Requires a “prepass” stage
需要一个“准备阶段”
-
Higher chance of flickering in difficult lighting situations.
在光线困难的情况下闪烁的几率更高。
-
Not possible to isolate SSS effect on a particular object which can result in unnecessary “light bleeding” artifacts.
不可能隔离 SSS 效应的一个特定的对象,可能会导致不必要的“光出血”伪影。
Ray-Traced
射线追踪
-
Slower and noisier
更慢更吵
-
More detailed / accurate
更详细/更准确
-
Works in progressive mode
以渐进模式工作
-
The higher the scatter radius the more samples are needed for clean results.
散射半径越大,清洁结果需要的样本就越多。
-
Possible to isolate SSS effect between objects or have it affect all objects. Please see here for more info.
可能隔离 SSS 效果之间的对象或有它影响所有的对象。请看这里的更多信息。
Samples
样本
This controls the number of samples cast for Multiple Sub-Surface Scattering rays. Higher numbers will reduce noise issues but will take longer to render.
这控制了多次亚表面散射射线的采样数量。更高的数字会减少噪音问题,但渲染时间会更长。
Ray-Traced only
光线追踪
Include Mode
包含模式
- All Objects : All other objects participate in the SSS effect. 所有对象: 所有其他对象都参与 SSS 效应
- Only Self : Contain the SSS effect in the same object only. 只有自我: 只在同一个物体中包含 SSS 效果
Ray-Traced only
光线追踪
Sub-Surface Color
亚表面颜色
This color controls what happens to light when it enters the surface for the first time. When light reaches this surface, it will immediately get tinted by the "Sub-surface Color."
这种颜色控制光线第一次进入表面时发生的变化。当光线到达这个表面时,它会立即被“次表面颜色”所染色
Scatter Color
分散色彩
This color controls what happens to light as it gets scattered within the surface, it will get tinted according to "Scatter Color" and according to how deep it travelled.
这种颜色控制光线在表面散射时的变化,它会根据“散射色”以及光线传播的深度来着色。
Scatter Radius
散射半径
This parameter is scene-scale related. It controls how deep light can travel within this surface. If the value is high, light can go deeper which creates a softer effect. Smaller values, on the other hand, mean that the light reaches extinction early which creates a harder effect.
这个参数与场景尺度有关。它控制着光在这个表面的传播深度。如果数值很高,光线可以变得更深,从而产生更柔和的效果。另一方面,较小的数值意味着光线很早就灭绝了,这会产生更难的影响。
This value is multiplied by the "Scale" parameter.
该值乘以“ Scale”参数。
Single Scattering
单次散射
Enable
启用
This enables or disables single scattering.
这样可以实现或禁用单次散射。
Phase
第二阶段
This describes the anisotropy of the scattering effect, for forward and back scattering. Forward scattering requires values between 0 and 1, which means rays will scatter away from the light source. Back scattering requires values between -1 and 0 which means rays will scatter back towards the light source.
这描述了前向和后向散射的散射效应的各向异性。前向散射要求值在0到1之间,这意味着光线会从光源散射开来。后向散射要求值在 -1和0之间,这意味着光线会向后散射到光源。
Samples
样本
This is the maximum number of samples shot for single scattering rays. More samples will mean less noisy looking single scattering, but can affect rendering performance.
这是单次散射射线的最大采样数。更多的样本将意味着更少的噪声看起来单一散射,但会影响渲染性能。
Override Coefficients 超越系数
By default, when single scattering is enabled, Redshift will compute the single scattering absorption and scattering coefficients for you, based on the sub-surface scattering properties of this material. Enabling this option allows you to override these coefficients using the parameters below.
默认情况下,当启用单次散射时,红移将根据这种材料的亚表面散射特性为您计算单次散射吸收和散射系数。启用此选项允许您使用下面的参数覆盖这些系数。
Transmittance 透射率
Describes the sub-surface attenuation color. A color of black means full light absorption, yielding a solid material, while a color of white means light rays will pass right through without being absorbed. Dark colors can be used to describe denser materials.
描述了次表面的衰减颜色。黑色意味着充分的光吸收,产生固体材料,而白色意味着光线会直接穿过而不被吸收。深色可以用来描述密度更大的材料。
Thickness 厚度
This acts as a scale of the absorption effect, with a value of 0.0 meaning no absorption and larger values meaning stronger absorption and thus denser-looking materials.
这就像一个吸收效应的尺度,0.0的值意味着没有吸收,更大的值意味着更强的吸收,因此密度更大的材料。
Scatter Amount 分散数量
Acts as a scale of the scattering effect, with a value of 0.0 meaning no scattering and larger values meaning more scattering and thus denser-looking materials.
作为散射效应的一个尺度,0.0的值意味着没有散射,更大的值意味着更多的散射,因此更密集的材料。
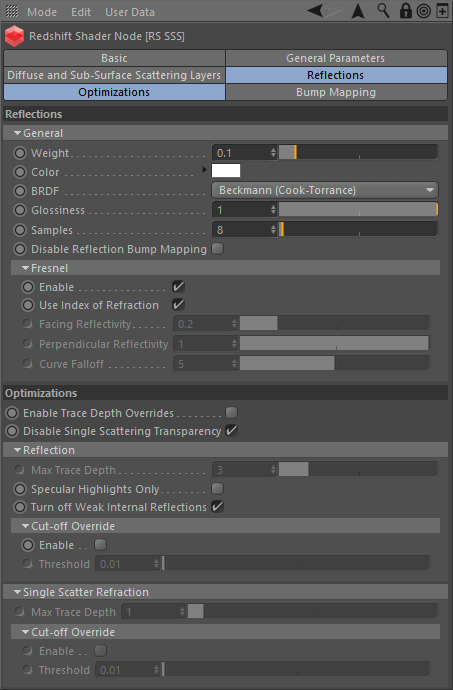
Reflections
反思
The Subsurface scattering shading node also has the capability of adding a reflective/specular layer on top of the subsurface scattering one. This is useful for a multitude of materials such as milk which has subsurface scattering properties but is also reflective.
次表面散射阴影节点也有能力增加一个反射/镜面层的次表面散射之一。这对很多材料都很有用,比如牛奶,它具有次表面散射的特性,但也具有反射性。
General
将军
Weight
重量
This parameter controls the amount of reflection. 0 means "no reflection". 1 means "strong reflections". In-between numbers will produce weaker-than-perfect reflections.
此参数控制反射的数量。0表示“没有反射”。1代表”强烈的反射”。介于两者之间的数字会产生不完美的反射。
Color
颜色
This parameter allows you to tint the reflections. Setting this to black will make reflections invisible.
这个参数允许你给反射着色。设置为黑色将使反射不可见。
BRDF
Allows you to choose the technique for simulating physically correct rough reflections. Beckmann is generally considered the standard for a good range of materials, but GGX has a wide specular tail, which is good for chrome materials.
允许您选择模拟物理上正确的粗糙反射的技术。贝克曼通常被认为是一个很好的材料范围的标准,但 GGX 有一个广泛的镜面尾巴,这是很好的铬材料。
- Ashikhmin-Shirley (legacy) 阿什克明-雪莉(遗产)
- Beckmann (Cook-Torrance) 贝克曼(库克-托伦斯)
- GGX
- Ashikhmin-Shirley
The legacy BRDF option uses a non-linear looking glossiness fall-off and exists to maintain compatibility with 1.0 materials.
传统的 BRDF 选项使用非线性的光泽度下降,并存在与1.0材料保持兼容性。
Glossiness
光泽度
High glossiness means sharp reflections. Lower numbers will make the reflections blurrier.
高光泽度意味着尖锐的反射。低数字会使反射更模糊。
Samples
样本
Blurry reflections (when "Glossiness" is less than 1.0) will need multiple samples to get a clean "grain-free" result. Higher numbers will reduce any potential grain issues but will take longer to render and vice-versa.
模糊反射(当“光泽度”小于1.0)将需要多个样本来得到一个干净的“无颗粒”的结果。更高的数字将减少任何潜在的谷物问题,但将需要更长的渲染时间,反之亦然。
Fresnel
菲涅耳
Enable
启用
This enables Fresnel reflectivity weighting, reflection based on the orientation of the camera to the surface.
这使得菲涅耳反射率加权,反射基于相机的方向对表面。
Use Index of Refraction
使用折射率
When this option is enabled, the IOR value under General Parameters will be used to compute the perpendicular and facing reflection weights. Surfaces with high IOR will have stronger reflections.
当启用此选项时,常规参数下的 IOR 值将用于计算垂直和面向的反射权重。高返回抑制的表面会有更强的反射。
When not enabled, the parameters below will be used instead.
当未启用时,将使用下面的参数。
Facing Reflectivity
面对反射率
This controls the strength of reflections when viewed head on, 0 degree angle from the surface. The values range between 0.0 and 1.0. Typically, metals will have a high setting, with a perfect mirror being 1.0. Most materials with reflective coats, however, should have relatively low values, which is why the default is 0.2.
这控制的力量反射时,观察头部,0度角从表面。值范围在0.0到1.0之间。通常情况下,金属会有一个较高的设置,一个完美的镜子是1.0。然而,大多数有反光外套的材料应该有相对较低的值,这就是为什么默认值是0.2。
Perpendicular Reflectivity
垂直反射率
This controls the strength of reflections when viewed at a 90 angle from the surface. In keeping with the Fresnel effect, this should always bet set to 1.0 so that reflections will be stronger when viewed at shallow angles.
当从表面以90度角观察时,这控制着反射的强度。为了与菲涅耳效应保持一致,这应该总是设置为1.0,这样当从浅角度观察时,反射会更强。
If the Facing and Perpendicular values are the same, then the Fresnel effect will be disabled and there will be equal reflection, regardless of viewing angle.
如果正面和垂直值是相同的,那么菲涅耳效应将被禁用,将有相同的反射,无论视角。
Curve Falloff
曲线下降
This controls how the facing and perpendicular reflected strength transitions between one and the other. Higher values produce a 'tighter' transition.
这控制如何面临和垂直反映力量之间的过渡。更高的价值会产生一个更紧密的过渡。
Optimization
优化
Specular Highlights Only
镜面高光
When this parameter is enabled, only reflections from lights will be computed. I.e. no other object in the scene will show through the reflections. This is faster than computing full reflections and in some cases it might be desirable if reflections look "too busy." However, it will also introduce visual inconsistencies especially if other materials in the same scene are configured to use full reflections. In these cases, this parameter should be enabled.
当启用此参数时,只计算光线的反射。例如,场景中没有其他物体会通过反射显示出来。这比计算完全反射要快,在某些情况下,如果反射看起来“太忙”,这可能是可取的然而,它也会引入视觉不一致,特别是如果在同一场景中的其他材质被配置为使用全反射。在这些情况下,应该启用此参数。
Enable Trace Depth Overrides
启用跟踪深度重写
This enables the Max Reflection Trace Depth parameter. When not enabled, the global trace depth will be used.
这启用了最大反射跟踪深度参数。当没有启用时,将使用全局跟踪深度。
Max Trace Depth
最大追踪深度
This parameter controls the trace depth for reflection rays shot from this material. If the reflections of a material are not very defined (meaning: they are blurry because of the glossiness parameter or have a low weight), then multiple reflection bounces can be a waste of rendering time. This parameter allows the user to reduce the trace depth and speed up rendering.
这个参数控制从这种材料射出的反射光的跟踪深度。如果一个材质的反射没有很好的定义(意思是: 它们因为光泽度参数而变得模糊或者重量很轻) ,那么多次反射反射就会浪费渲染时间。此参数允许用户减少跟踪深度并加快呈现速度。
Cut-off Override Enable
切断重写启用
This parameter allows you to override the global cut-off setting for reflections.
此参数允许您覆盖反射的全局截止设置。
Cut-off Override Threshold
截止覆盖阈值
When the reflections of a material are very dark (because of low "Weight" or "Color" values) they contribute very little to the final image. This parameter defines what is considered "very dark" at which point no more reflection rays will be shot - which will speed up rendering. Scenes containing very strong lights might need this parameter set to very low values such as 0.0001 in order to avoid early termination of tracing which can produce a grain-like effect.
当一个材质的反射非常暗(因为低的“重量”或“颜色”值) ,它们对最终图像的贡献很小。这个参数定义了什么被认为是“非常黑暗”,在这一点上没有更多的反射射线将被拍摄-这将加速渲染。包含非常强光的场景可能需要将这个参数设置为非常低的值,如0.0001,以避免过早终止跟踪,因为跟踪会产生类似颗粒的效果。
Bump 碰一下
Add Bump Input to Material Bump
添加凹凸输入到材质凹凸
This is a legacy option which can have a bump mapping node connected straight to the material. When this parameter is enabled, any bump mapping node results connected to this shader will also be added to the bump mapping results of the material.
这是一个遗留的选项,可以有一个凹凸映射节点直接连接到材质。当这个参数被启用时,任何连接到这个着色器的凹凸映射节点结果也将被添加到材质的凹凸映射结果中。
Bump Input
颠簸输入
Connect your bump map here.
在这里连接你的凹凸贴图。
Sub-Surface Scattering in Detail
亚表面散射的详细研究
SSS Rate in Detail
详细速率
One of the most important SSS quality factors is the "Rate" parameter. The SSS rate parameter looks similar to the antialiasing min/max rates. Using the "Low" setting translates into fewer points, less memory and faster SSS generation times. On the negative side, it also means that small details might be missed! Missed geometry is an undersampling artifact - very similar to the aliasing artifact that happens when a scene is not using high enough antialiasing settings.
其中一个最重要的 SSS 质量因素是“率”参数。SSS 速率参数看起来类似于反走样最小/最大速率。使用“低”设置转化为更少的点,更少的内存和更快的 SSS 生成时间。从消极的一面来看,这也意味着小细节可能会被忽略!漏掉的几何图形是一个欠采样伪影-非常类似的混叠伪影,发生时,一个场景不使用足够高的抗混叠设置。
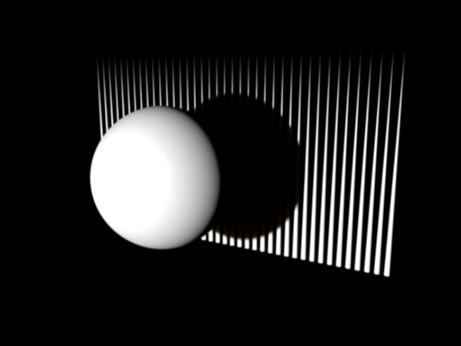
To demonstrate the effect of the different rates, we use the following scene which contains a set of very thin cones shadowed by a sphere. The cones are assigned an SSS material with a very small "Scatter Radius". We have also disabled all GI. The reason we use a small radius and no GI is to ensure that the points have enough SSS contrast in them to better demonstrate the potential issues with the rate setting. Generally speaking, if the SSS radius is large (for a more 'waxy' look) or if the lighting has less contrast (because of GI), the issue is much less apparent.
为了演示不同速率的效果,我们使用下面的场景,其中包含一组被球体遮挡的非常薄的锥体。圆锥体分配一个 SSS 材料与一个非常小的“散射半径”。我们还禁用了所有的 GI。我们使用小半径和无 GI 的原因是为了确保点有足够的 SSS 对比在他们更好地演示与速率设置的潜在问题。一般来说,如果 SSS 半径很大(看起来更像“蜡一样”)或者光线对比较小(因为 GI) ,问题就不那么明显了。
The scene setup
场景设置
|
|
|
|
|
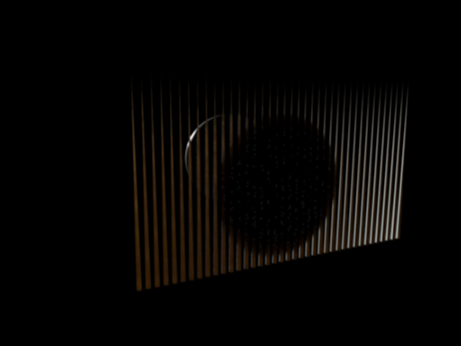
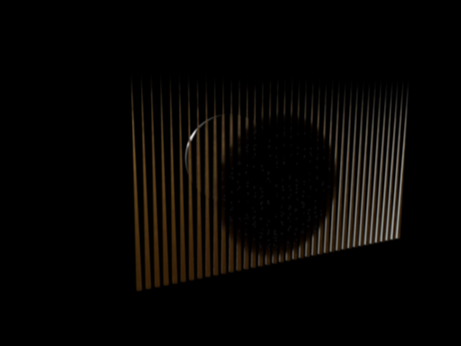
The scene rendered from behind the cones rendered with the "Low" rate. Compared to the next scenes, it is a bit darker and suffers from 'splotches' 从圆锥体后面渲染的场景使用“低”速率渲染。与接下来的场景相比,这部电影有点阴暗,还有点污点 |
Now rendered with the "Medium" rate. The cones look brighter (this is a more correct result) but there are still splotches in the thinner parts of the geometry (the tips of the cones). 现在渲染为“中等”速率。视锥体看起来更明亮(这是一个更正确的结果) ,但是在几何体的较薄的部分(视锥体的顶端)仍然有斑点。 |
Rendered with a "High" rate. The splotches are improved – especially near the tips of the cones. 以“高”速率渲染。斑点得到了改进——特别是在锥体的顶端附近。 |
Like mentioned above, if the radius was larger there would be less of an issue even at low rates. This is shown below. Please note that the scene is now brighter overall because light is allowed to travel unobstructed within the objects.
就像上面提到的,如果半径更大,即使在低速率情况下也不会有什么问题。如下图所示。请注意,现在的场景总体上比较明亮,因为光线可以在物体内畅通无阻地传播。
|
|
||
|
|
|
|
|
Rate set to "Low". While not perfect (slightly darker than it should be), it's visually more acceptable than the scene using the narrower radius. 利率设定为「低」。虽然并不完美(比应有的颜色稍微暗一些) ,但是它在视觉上比使用窄半径的场景更容易接受。 |
Rate set to "Medium". Very slight artifacts on the tips of the cones. 速度设置为“中等”。非常轻微的人工制品的顶端的锥。 |
Rate set to "High". No immediately visible artifacts. 速率设置为“高”。没有立即可见的工件。 |
Sub-Surface Color And Scatter Color in Detail
亚表面颜色和散射颜色的细节
On the shader side of things, the most important parameters for defining the SSS look are the two colors (sub-surface and scatter) and the scatter radius.
在着色器方面,定义 SSS 外观最重要的参数是两种颜色(亚表面和散射)和散射半径。
When light hits an SSS material, part of it immediately bounces away. The remaining light enters the object, scatters inside it and then exits at some point. The "subsurface" color controls the parts of the light will immediately bounce away while "scatter" color is a tint for the remaining light that will scatter inside the object.
当光线照射到 SSS 物质时,它的一部分会立即反射回去。剩余的光线进入物体,在其内部散射,然后在某一点退出。“次表面”颜色控制光的部分将立即反弹远离,而“散射”颜色是一个色调为剩余的光将散射在物体内部。
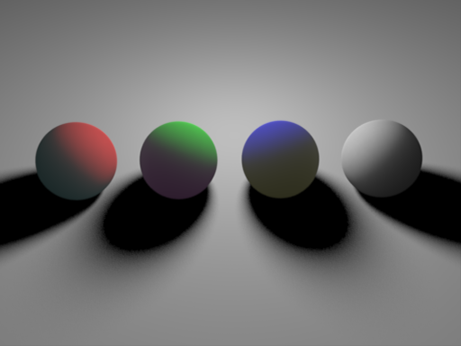
To demonstrate what the previous sentence means, let's take a look at the pictures below. The scene is lit using a purely white light source. Also, all spheres have a "scatter" color set to white. This means that any light entering the object will by tinted by white, i.e. it won't get tinted at all. The sphere "subsurface" colors are set to be red (0.95, 0.5, 0.5), green (0.5, 0.95, 0.5), blue (0.5, 0.5, 0.95) and white (0.95, 0.95, 0.95). Notice that we have intentionally left some gray in all the colors (hence the 0.5 values in there). Also note that we avoid maxing out any of the RGB color channels which is why we use 0.9 instead of 1.0.
为了说明上一句话的意思,让我们看看下面的图片。场景使用纯白光源照明。此外,所有球体都有一个“分散”的颜色设置为白色。这意味着任何进入物体的光线都会被染成白色,也就是说它根本不会染成白色。球体“次表层”的颜色设置为红色(0.95、0.5、0.5)、绿色(0.5、0.95、0.5)、蓝色(0.5、0.5、0.95)和白色(0.95、0.95、0.95)。请注意,我们有意在所有颜色中留下一些灰色(因此那里的值为0.5)。还要注意,我们避免使用任何 RGB 颜色通道,这就是为什么我们使用0.9而不是1.0。
Even though using perfectly primary colors is legal, it can make it really hard to get predictable and adjustable results.
尽管使用完美的原色是合法的,但是它确实很难得到可预测和可调整的结果。
Spheres set to Red, Green, Blue and White "subsurface" colors. All use a "scatter" color of white (0.95, 0.95, 0.95)
球体设置为红色、绿色、蓝色和白色的“次表面”颜色。所有颜色都使用白色的“散点”颜色(0.95、0.95、0.95)
The fact that there is cyan, magenta and yellow on the dark side of the first three spheres might seem puzzling at first but there's an explanation. The first sphere used a red sub-surface color which means that a percentage of red light was bounced away. If you remove red from white, the remaining color becomes cyan (the more red you remove). Similarly for the green sphere, green light was removed so magenta was left.
事实上,在前三个球体的暗面有青色、洋红色和黄色,起初看起来可能令人费解,但这是有原因的。第一个球体使用了红色的亚表面颜色,这意味着一定比例的红光被反弹了。如果你去除了白色中的红色,剩下的颜色就会变成青色(你去除的红色越多)。同样的,对于绿色球体,绿光被删除,所以洋红色被留下。
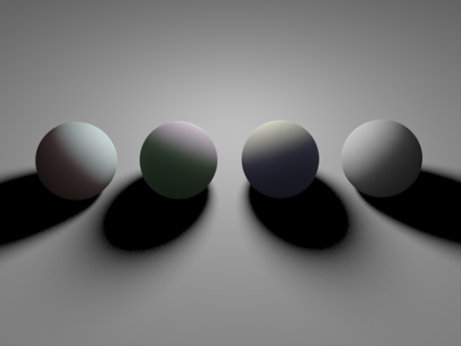
Now let's look at the opposite case, where all "subsurface" colors are set to white and the "scatter" colors are tinted:
现在让我们看看相反的情况,所有“次表层”的颜色都设置为白色,而“散点”的颜色是有色的:
Surface colors all set to white. "Subsurface" colors were set to Red, Green, Blue and White.
表面颜色全部设置为白色。“次表面”颜色设置为红色、绿色、蓝色和白色。
Even though the result is much dimmer here, you can tell that the exiting color on the first sphere is Red, on the second is green and the third is blue. However, another puzzling thing is happening here: the first sphere appears to have a bright cyan hue, the second is bright magenta and the third is yellow! The reason for this is similar to the reason given above: when light enters the object, parts of it travel very little and come back off white others continue forward. The parts that travel a lot become "scatter" color, while the parts that exit very close to point of entering become what remains of that "scattering" color.
尽管这里的结果比较暗,但是你可以看出第一个球面上的退出颜色是红色,第二个是绿色,第三个是蓝色。然而,另一件令人费解的事情发生在这里: 第一个球似乎有一个明亮的青色调,第二个是明亮的洋红色,第三个是黄色!这个原因和上面给出的原因相似: 当光进入物体时,物体的一部分运动很小,而另一部分则继续向前运动。经常旅行的部分变成了“散点”颜色,而离进入点很近的部分则变成了“散点”颜色。
Some of the details above are not super-important when you use the SSS node but it sometimes help to understand why you might get colors other than the two colors that you specified.
当您使用 SSS 节点时,上面的一些细节并不是特别重要,但是有时它可以帮助您理解为什么您可能会得到指定的两种颜色以外的其他颜色。
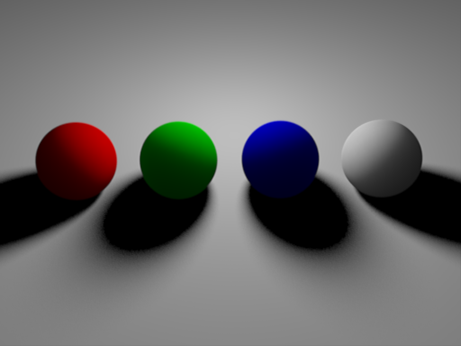
If these tinting effects are undesirable you can 'cancel' them by adjusting the colors. For example, on the first image on the red sphere: If you don't want cyan to come through the other side of the sphere, you can try making "scatter" color red. This will 'tint' the exiting light red which will diminish the cyan hue.
如果这些着色效果是不受欢迎的,你可以通过调整颜色来“取消”它们。例如,对于红色球体上的第一个图像: 如果不希望青色穿过球体的另一边,可以尝试将“散射”颜色设置为红色。这将“着色”的出口淡红色,这将减少青色的色调。
This was done on the first three spheres below. The result looks very saturated because we have used "scatter" colors such as (0.95, 0.0, 0.0) and (0.0, 0.95, 0.0). I.e. we have completely cut-off all color except for red. If this effect is not needed, you can try leaving a bit of color on the other channels and reclaim some gray.
这是在下面的前三个球体上完成的。结果看起来非常饱和,因为我们使用了“散点”颜色,如(0.95,0.0,0.0)和(0.0,0.95,0.0)。也就是说,我们完全切断了除红色以外的所有颜色。如果不需要这个效果,你可以尝试在其他通道上留下一些颜色,并收回一些灰色。
"Scatter" colors adjusted so that no unexpected colors appear on the dark side of spheres
“散布”的颜色调整,以便没有意想不到的颜色出现在黑暗的一面球
Scatter Radius in Detail
细节散射半径
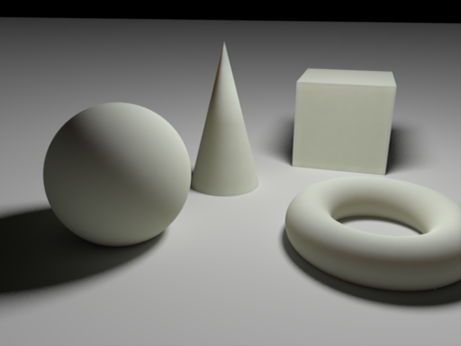
The other parameter that controls the SSS look is the scatter radius. That value is multiplied by the "Scale" value on the "General Parameters" and defines how deep light can travel into the object. The larger this value, the more 'waxy' the effect will look like. This parameter should be set in world units. To give you an impression of the scene scale, the sphere has a radius of 1.0.
The examples below demonstrate the effect of this parameter:
控制 SSS 外观的另一个参数是散射半径。这个值乘以“一般参数”上的“刻度”值,并定义光线进入物体的深度。这个值越大,效果就越像蜡一样。这个参数应该以世界单位来设置。为了给你一个场景尺度的印象,球体的半径为1.0。下面的例子说明了这个参数的影响:
|
|
|
|
Scatter Radius 0.5 散射半径0.5 |
Scatter Radius 1.0 散射半径1.0 |
|
|
|
|
Scatter Radius 4.0 散射半径4.0 |
Scatter Radius 8.0 散射半径8.0 |



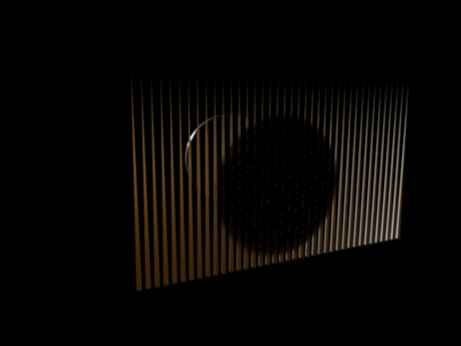
赶快留个言打破零评论!~