Light & Shadow Linking 光影连接
Intro
介绍
|
|
|
|
| Scene with all lights affecting all objects 所有光线影响所有物体的场景 | Same scene demonstrating light linking 同样的场景演示灯光连接 | Same scene demonstrating shadow linking 同样的场景演示阴影连接 |
By default every light in a scene illuminates and casts a shadow of every object in a scene. However there are times when you want specific lights to only affect certain objects. Even further than that you might want a certain light to illuminate an object without casting a shadow.
默认情况下,场景中的每一盏灯都会照亮并投射出场景中每一个物体的阴影。然而,有时候你希望特定的光线只影响特定的物体。甚至更进一步,你可能需要某种特定的光线来照亮一个物体,而不需要投射阴影。
Light linking lets you control the affect a light has on your scene objects on a per-object basis.
光线连接可以让你控制光线对场景物体的影响。
Shadow linking allows you to break the casting of shadows from lights on a per-object basis.
阴影链接允许你打破投射的阴影从灯光对每个对象的基础。
Each of these methods is covered in detail below.
下面将详细介绍这些方法中的每一种。
Light Linking
灯光连接
The example scene below has a simple lighting setup with only 3 lights: a visible red, green, and blue light that are currently affecting all the objects in the scene.
下面的例子场景有一个简单的灯光设置,只有3个灯: 一个可见的红色,绿色和蓝色光,目前正在影响场景中的所有对象。
Example scene with all lights affecting all objects
所有光线影响所有物体的场景示例
This all white scene is helpful in interpreting what is happening further down the road when we start introducing some light linking into the scene. As you can see in the image above every object is white due to the red, green, and blue light mixing together. The slight color shifts here and there are simply due to the slightly different light positions. It is important to remember that in all the examples below all 3 lights are always linked to the ground object.
当我们开始在场景中引入一些光线连接时,这种全白色的场景有助于解释沿着道路进一步发生的情况。正如你在上面的图片中所看到的,由于红色、绿色和蓝色的光混合在一起,每个物体都是白色的。这里和那里的颜色轻微的变化仅仅是由于光线位置的细微差别。重要的是要记住,在下面的所有例子中,所有3个灯总是与地面对象相连。
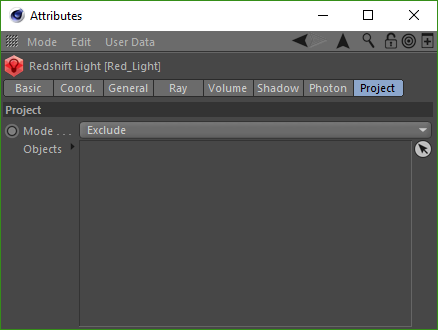
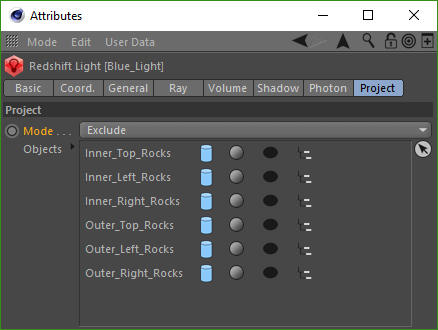
In Cinema 4D you can easily link lights to objects by using the "Project" section of your Redshift lights as pictured below:
在 Cinema 4D 中,你可以通过使用红移灯的“项目”部分轻松地将灯与物体连接起来,如下图所示:
C4D "Project" section for light linking
C4D“项目”部分用于灯光连接
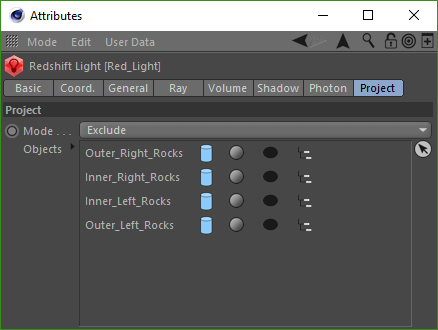
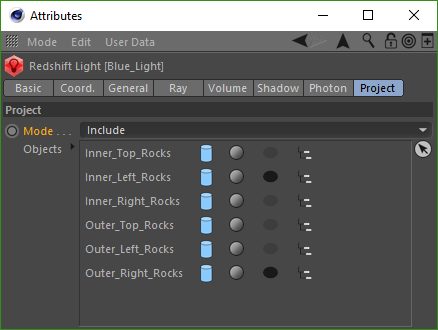
You can set the Project Mode to either "Exclude" or "Include" in which case the light will either ignore or illuminate the objects that are selected and present in the "Objects" portion of the Project panel. Both Include and Exclude modes can achieve the same results.
您可以将项目模式设置为“ Exclude”或“ Include”,在这种情况下,光线将忽略或照亮在项目面板的“ Objects”部分中选择和显示的对象。包含和排除模式都可以实现相同的结果。
To add objects for light linking you can either click and drag objects into the "Objects" area or use the object picker and then select your objects directly in the viewport. Below are two example images illustrating a successfully linked light to objects in a scene. The examples also demonstrate how you can achieve the same results using Include or Exclude as the light link settings below result in identical renders.
要添加光链接对象,你可以点击并拖动对象到“对象”区域,或者使用对象选择器,然后直接在视图中选择对象。下面是两个例子,说明一个成功地连接光线到场景中的物体。这些例子还演示了如何使用包括或排除作为光链接设置下面的结果相同的渲染结果相同的结果。
|
|
|
|
| C4D Example Scene 4d 示例场景 | Project Mode: 项目模式:Exclude 排除 | Exclude 排除 |
Once objects are added to the Project panel light linking can be further customized on a per-object basis by using the light linking button to control illumination, shadow linking button to control the casting of shadows, and apply to children button which controls whether or not these light linking options are also applied to any children for the selected object. For more information on shadow linking please refer to this section.
一旦对象被添加到项目面板灯光链接可以进一步定制的每个对象的基础上使用灯光链接按钮控制照明,阴影链接按钮控制阴影的投射,并适用于子女按钮,控制这些灯光链接选项是否也适用于所选对象的任何子女。有关影子链接的更多信息,请参阅本节。
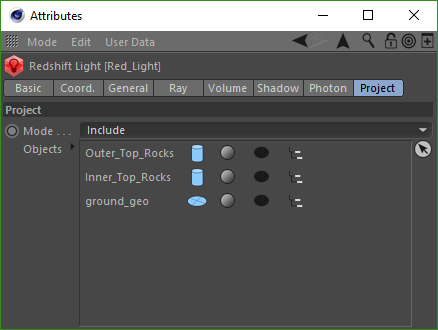
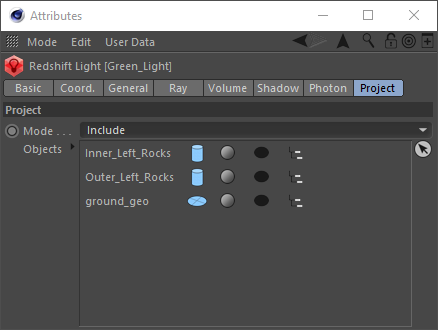
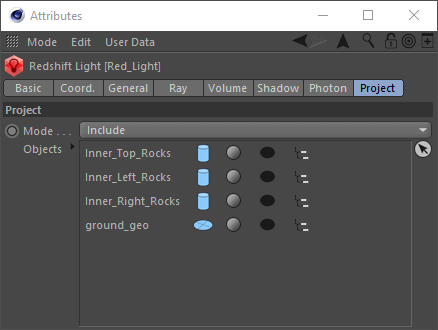
Using the "Include" Project mode the standing rocks in the example scene have now been linked to the 3 different lights as pictured below:
使用“包括”项目模式,示例场景中的立石现在已经连接到下图所示的3个不同的灯:
|
|
|
|
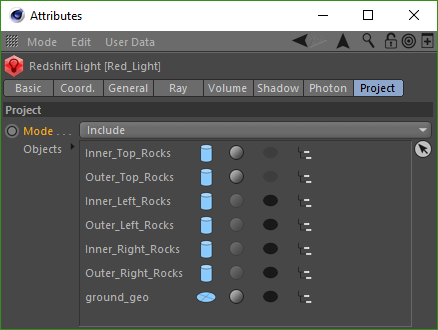
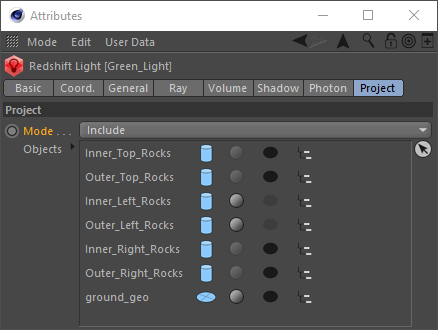
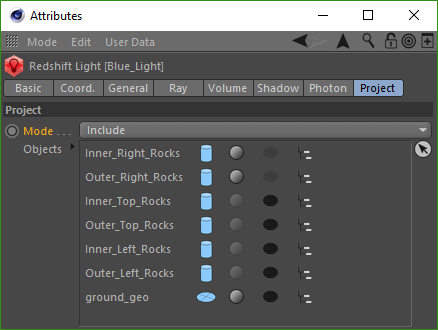
| Red light linking setup 红灯连接设置 | Green light linking setup 绿灯链接设置 | Blue light linking setup 蓝光链接设置 |
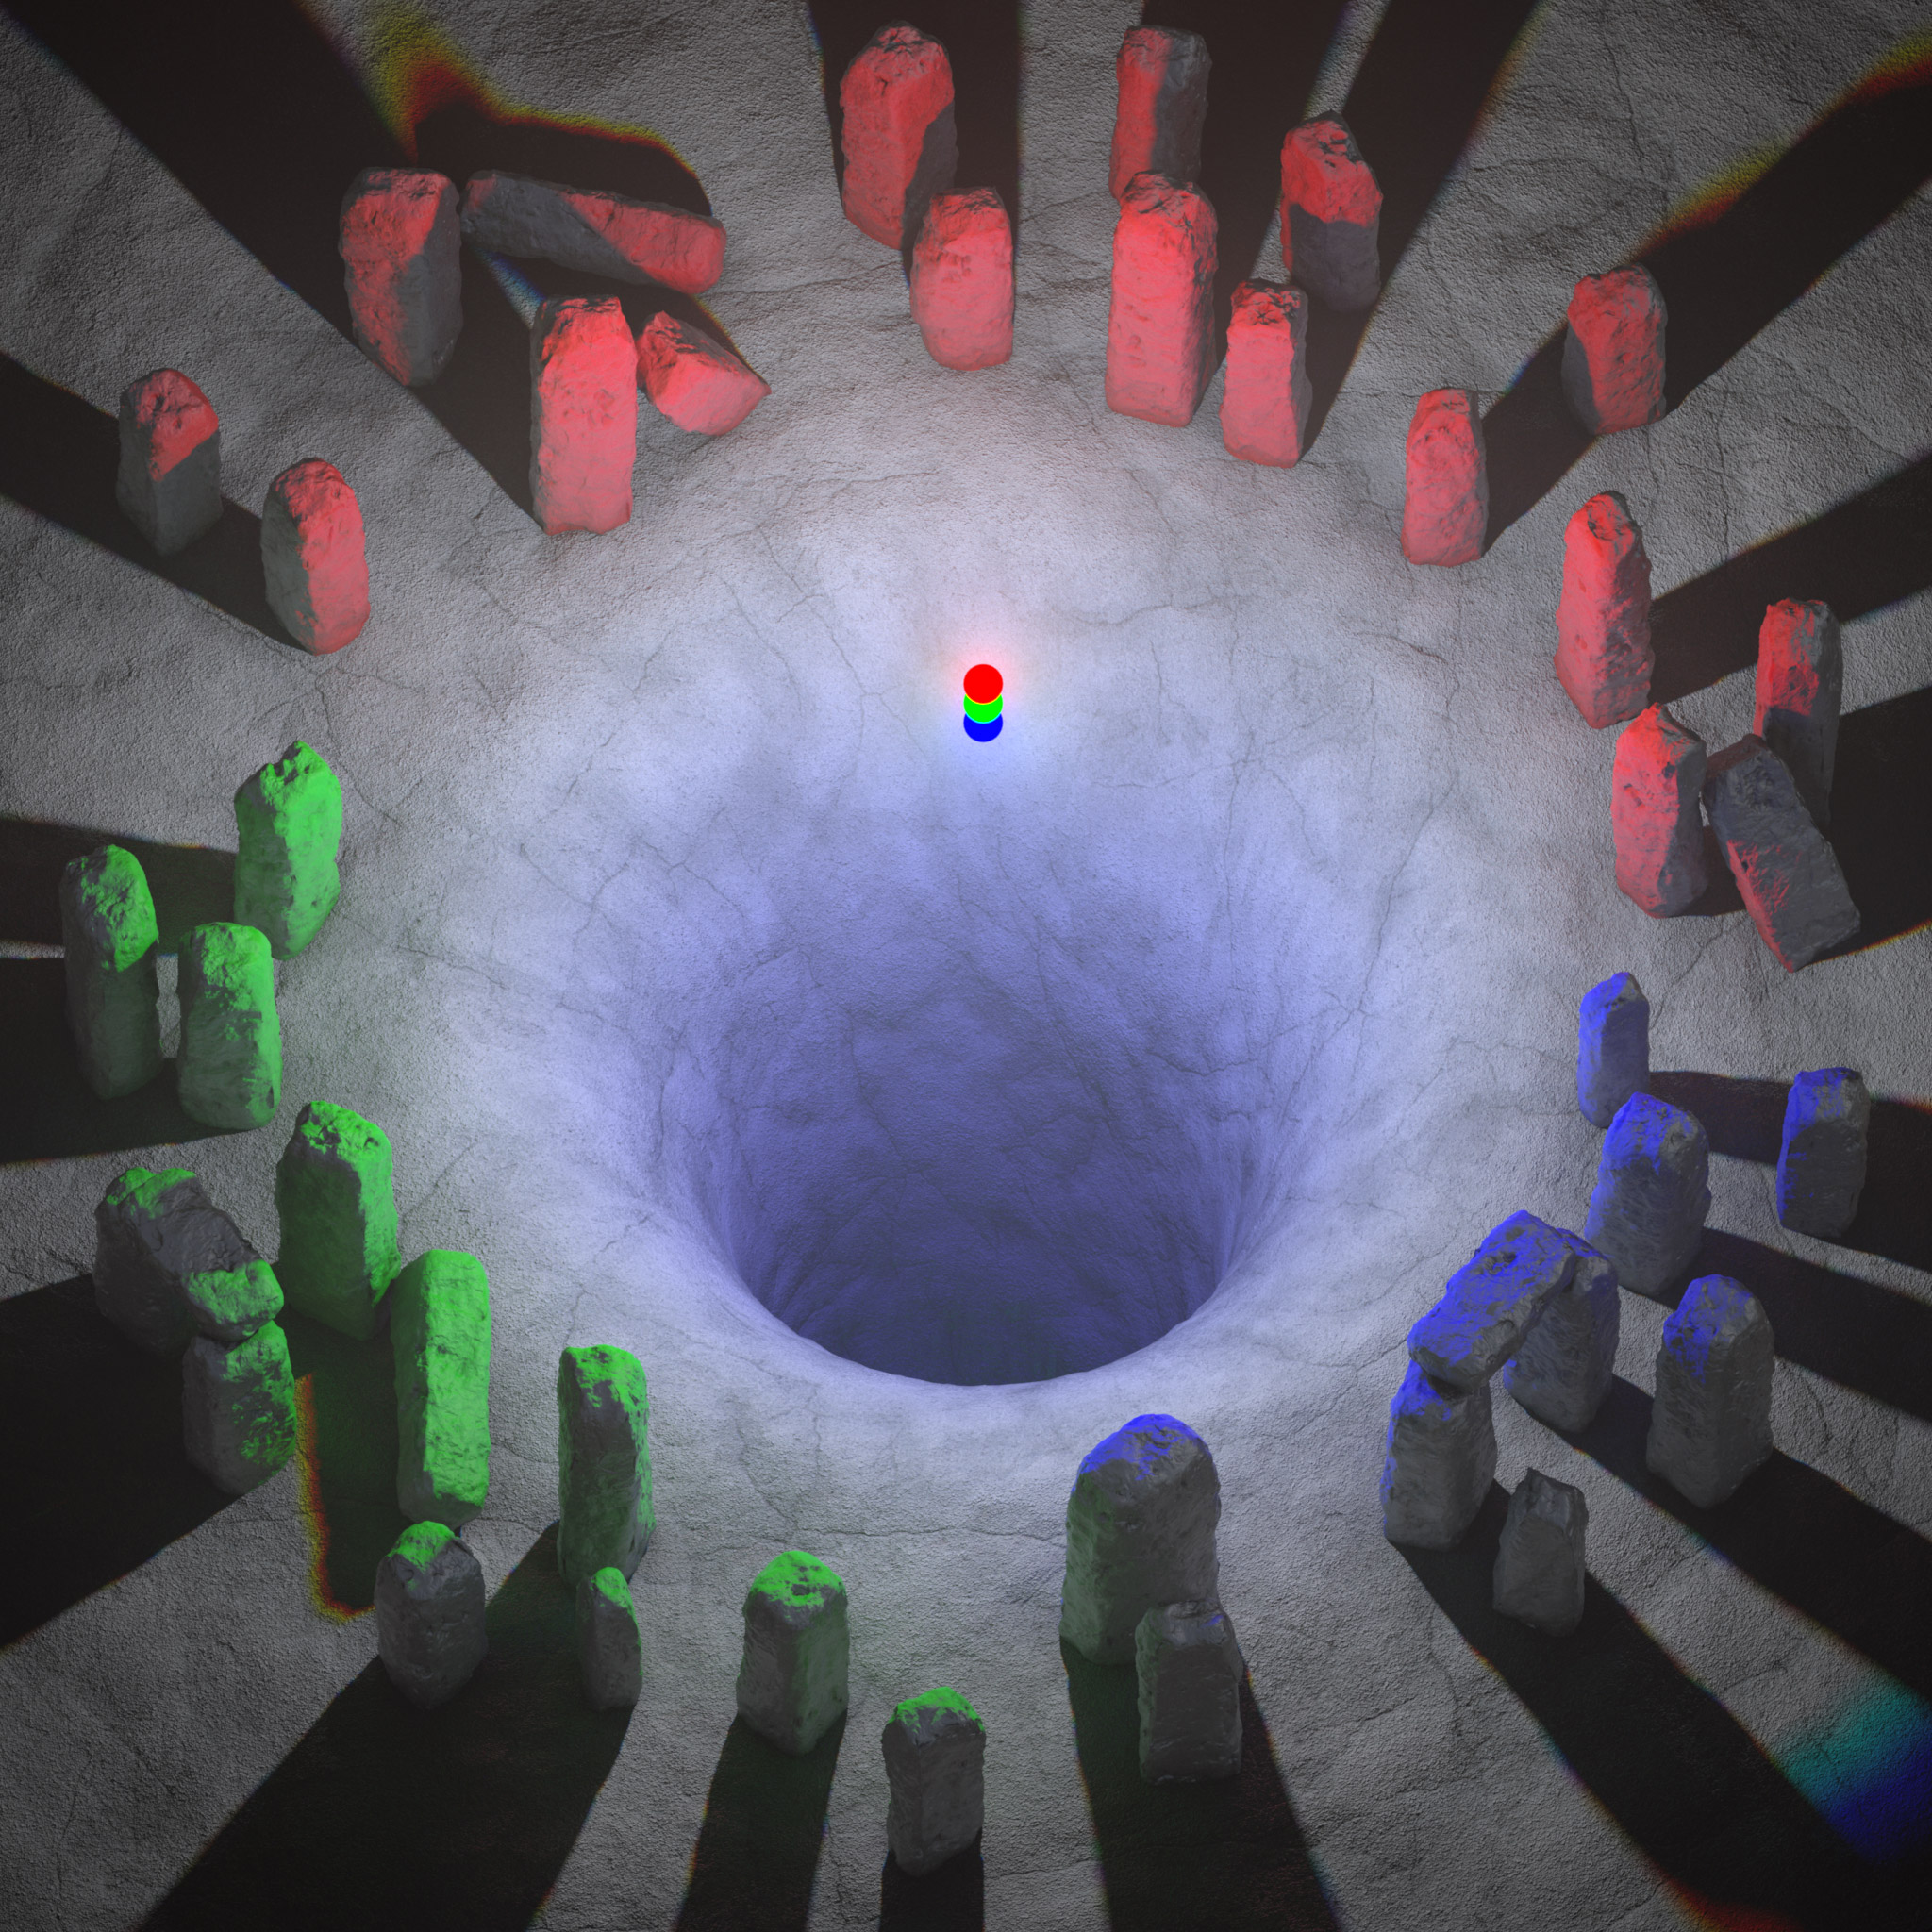
Example scene with the light linking setup above
示例场景与光线连接设置在上面
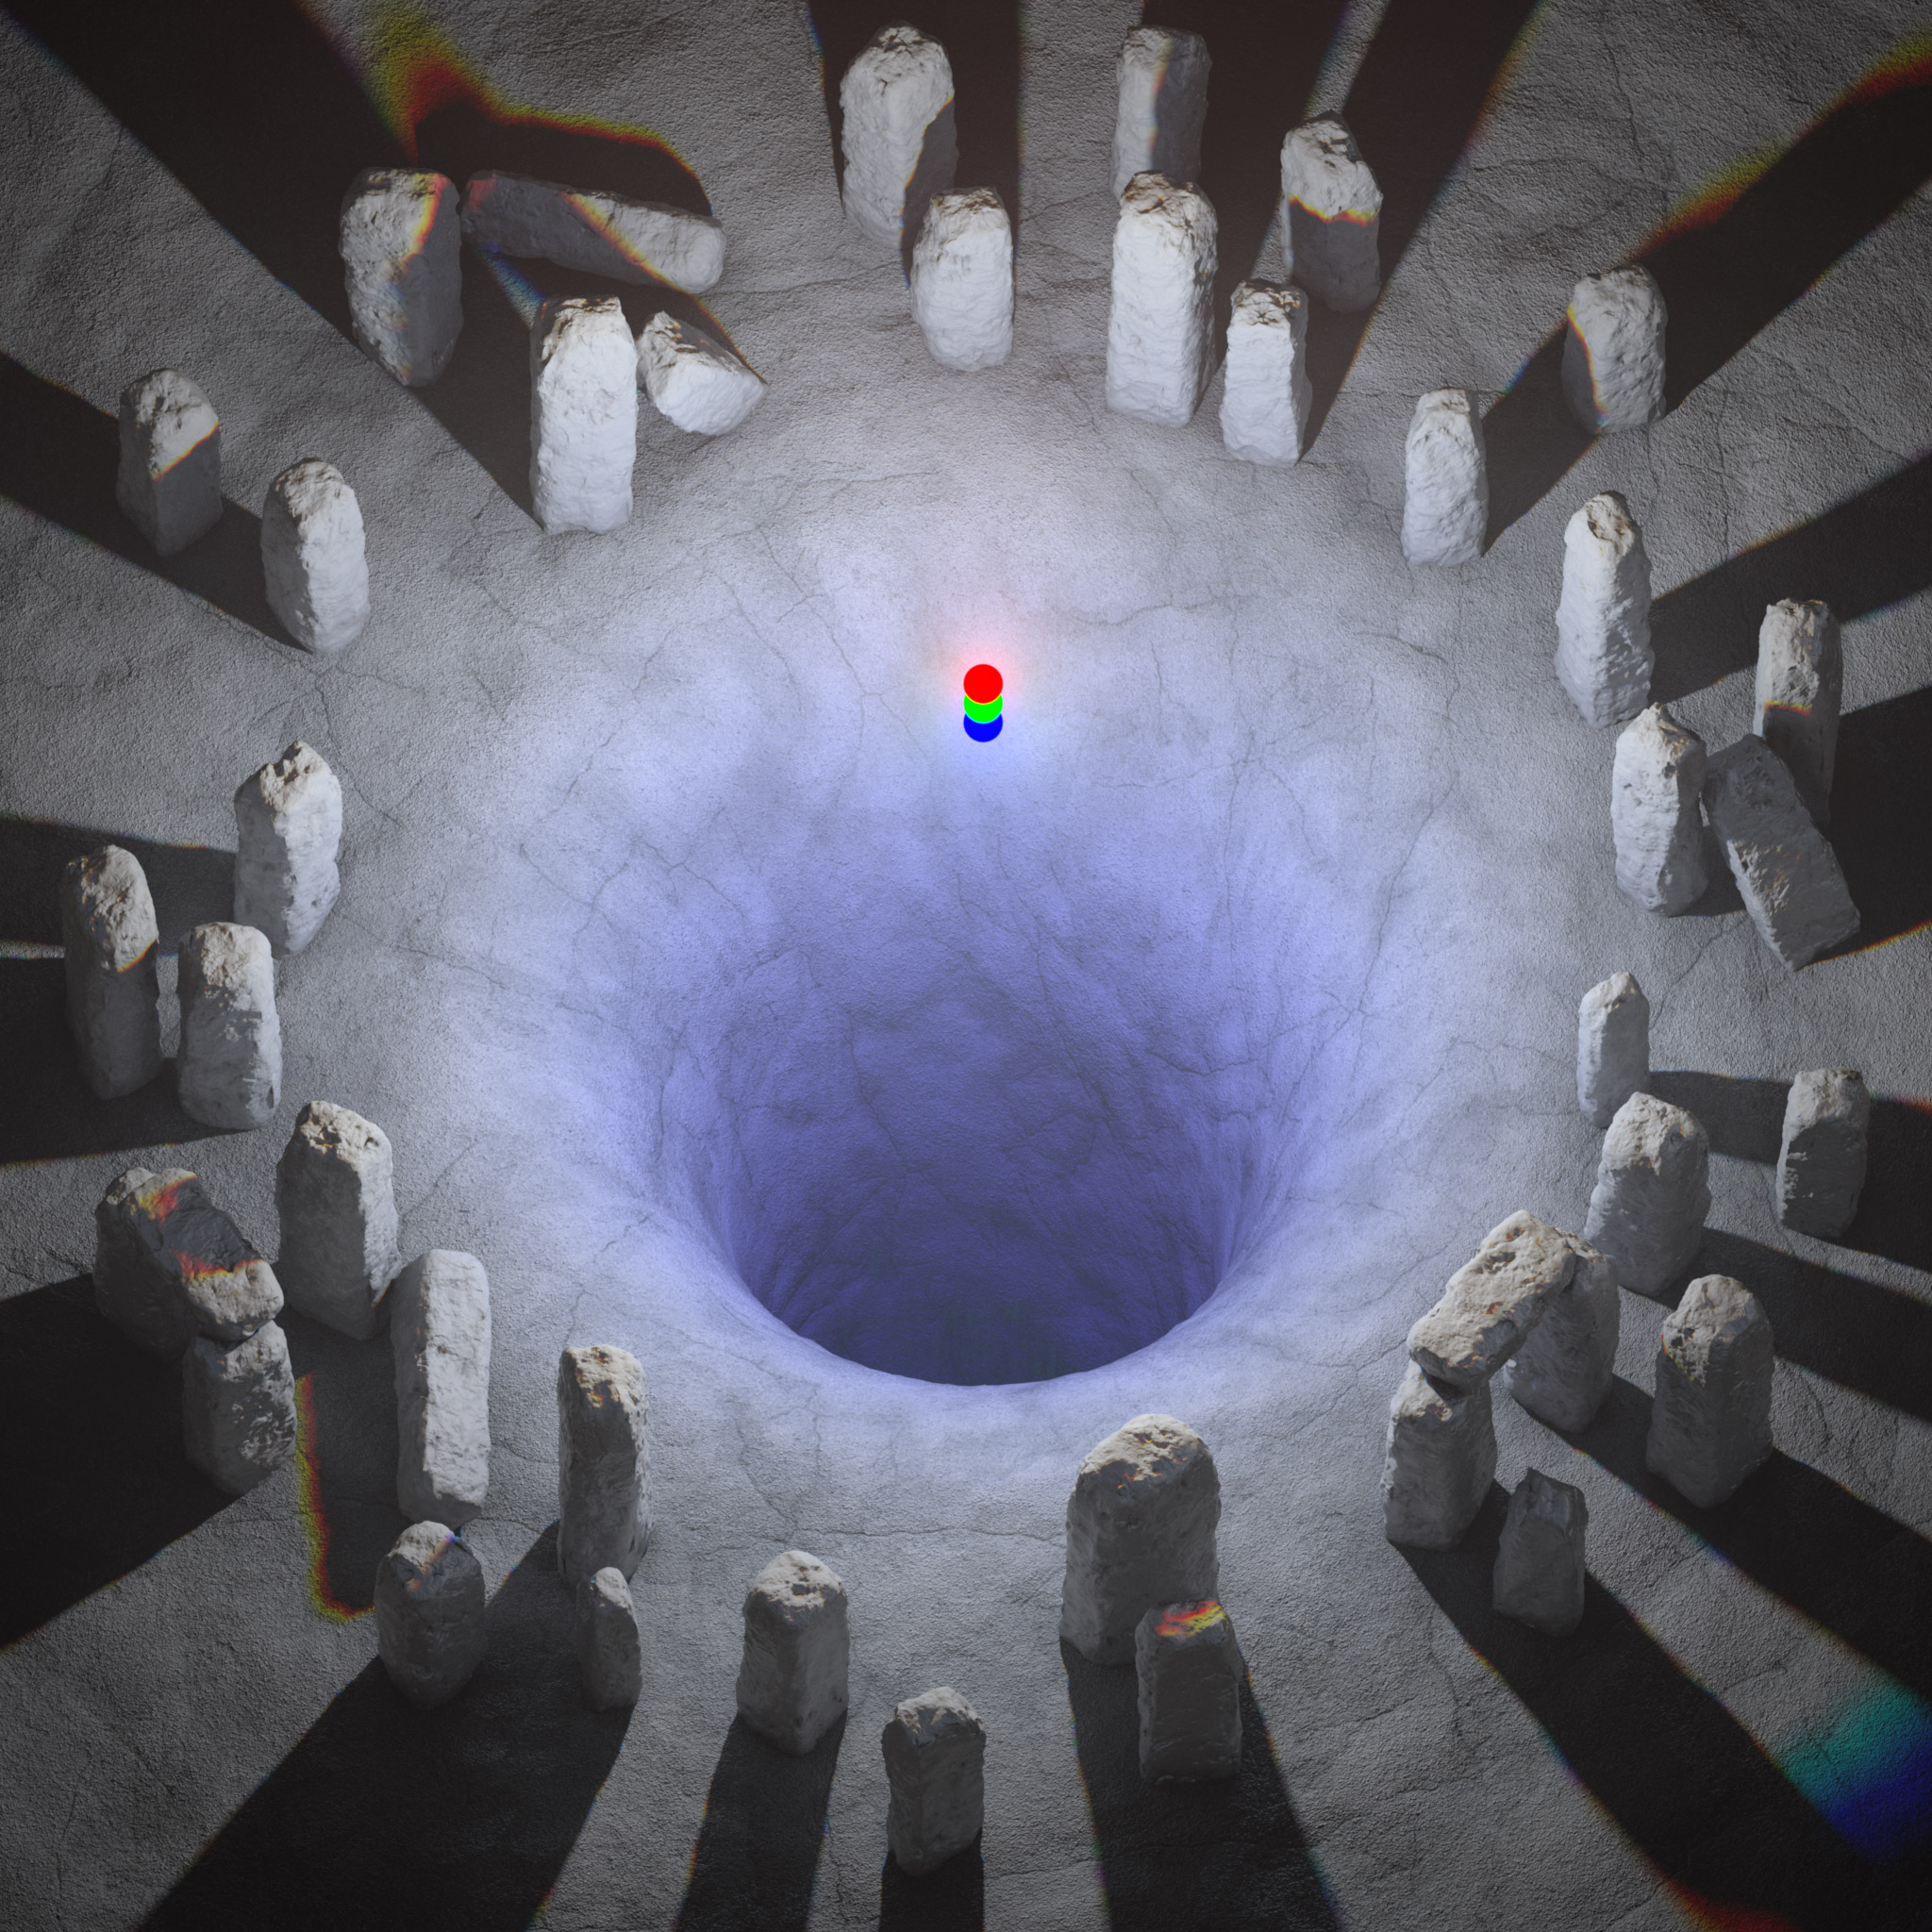
As you can see above, the rocks have been split up into thirds each with their own light exclusively affecting each third. The ground object remains affected by all 3 lights which is why the shadow color of each rock section is the additive result of the remaining lights still casting in this area. For example, the red rocks at the top of the image are receiving light and casting shadows from the red light alone, however, the blue and green lights are still casting light in this shadowed region resulting in cyan colored shadows.
正如你在上面看到的,岩石已经被分成了三分之一,每一个岩石都有自己独特的光线影响着每一个三分之一。地面物体仍然受到所有3个光源的影响,这就是为什么每个岩石部分的阴影颜色是该地区剩余光源仍然投射的叠加结果。例如,图像顶部的红色岩石只接收到红色光线投射阴影,然而,蓝色和绿色光线仍然在阴影区投射光线,导致青色阴影。
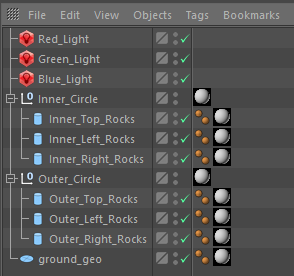
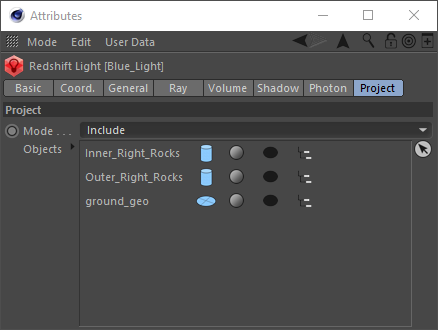
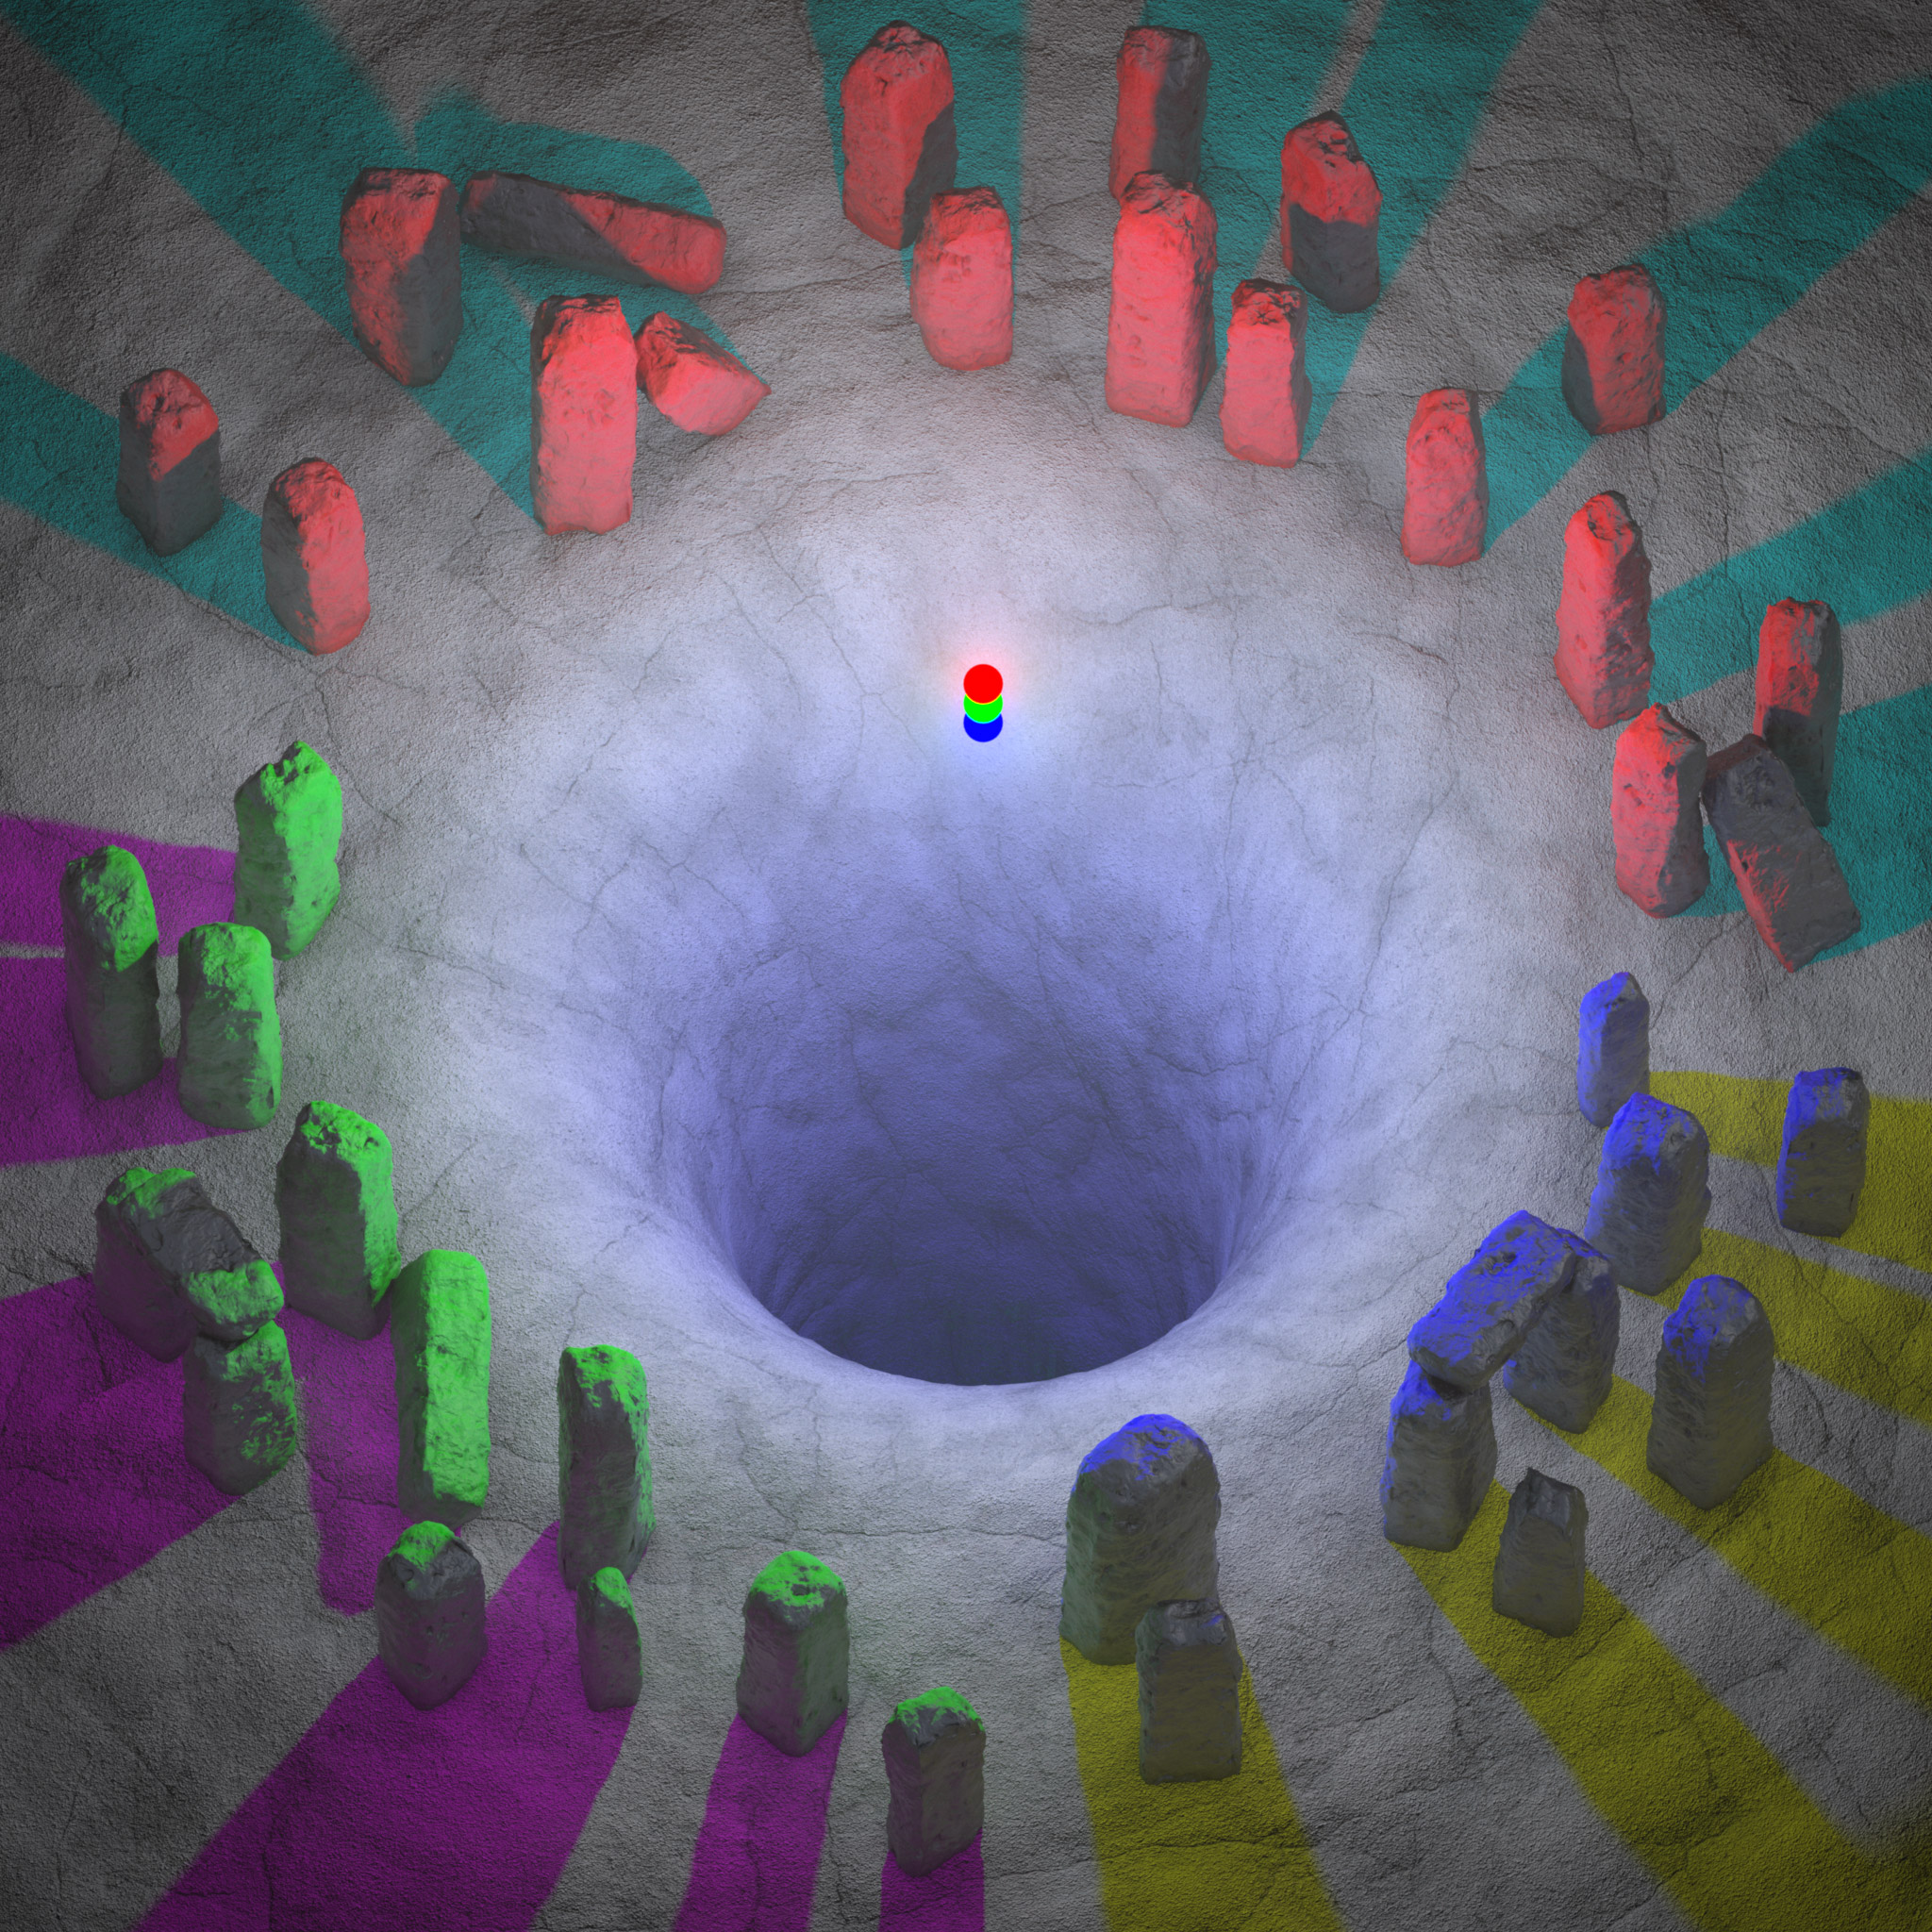
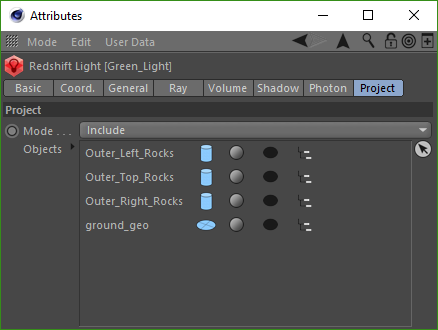
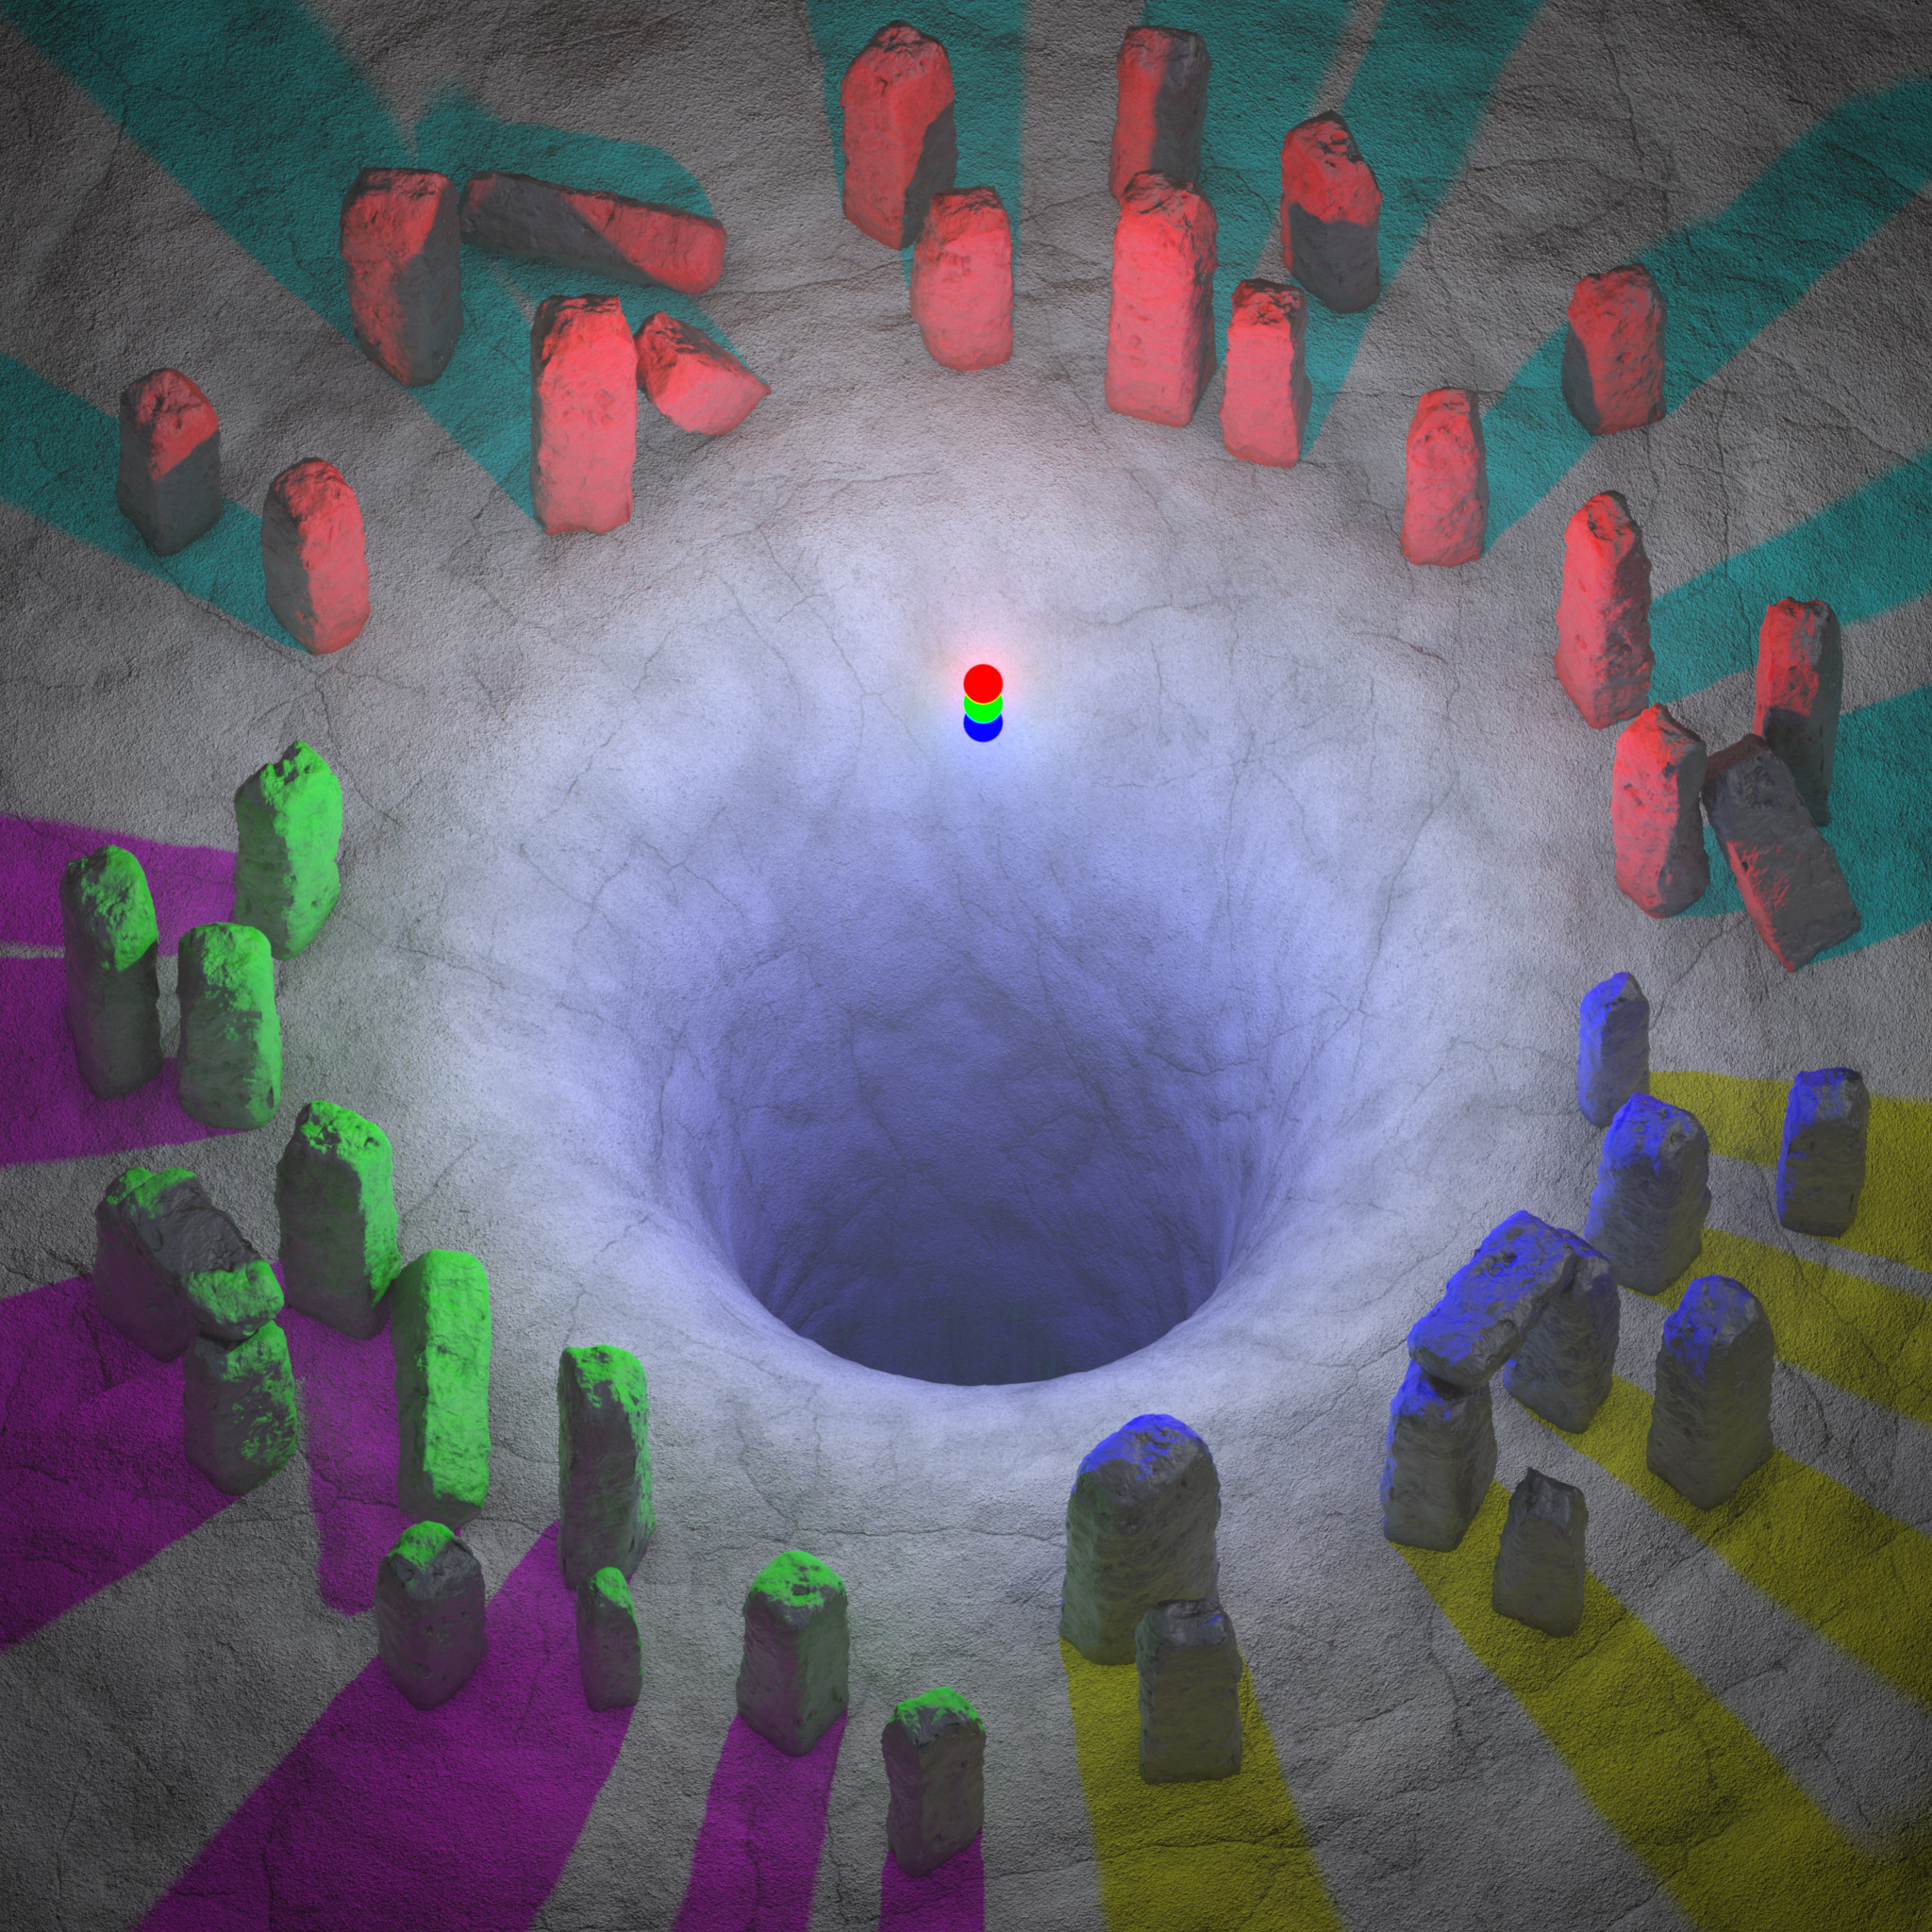
For another example, the inner circle of rocks and outer circle of rocks will be linked to completely separate lights to demonstrate another potential side effect of light linking. The inner circle of rocks is linked to the red light and the outer circle is linked to the green light while the blue light excludes all the rocks as pictured below:
另一个例子,岩石的内圈和外圈将被连接到完全分开的光,以展示光连接的另一个潜在的副作用。岩石的内圈与红光相连,外圈与绿光相连,而蓝光则将所有岩石排除在外,如下图所示:
|
|
|
|
| Red light linking setup 红灯连接设置 | Green light linking setup 绿灯链接设置 | Blue light linking setup 蓝光链接设置 |
Example scene with the light linking setup above
示例场景与光线连接设置在上面
Now with this light linking setup you can see we are getting double shadows and surreal lighting with these rocks. This is due to the fact that the green light is completely ignoring the inner circle of rocks and only illuminating and casting shadows of the outer circle of rocks. You can see that the green light hitting the outer rocks is even bouncing onto the backside of the inner rocks due to global illumination. The double shadows occur when the shadows from the inner red rocks and the shadows cast by the green light coincide with one another, resulting in the darker blue shadow seen in the picture above.
现在,通过这个光线连接设置,你可以看到我们用这些岩石得到了双重阴影和超现实的照明。这是因为绿光完全忽略了岩石的内圈,只照亮和投射岩石的外圈的阴影。你可以看到,绿光打在外部岩石上,甚至反弹到内部岩石的背面,由于全局光源。当来自内部红色岩石的阴影和由绿光投射的阴影相互重合时,就会产生双重阴影,从而产生上图所示的深蓝色阴影。
Shadow Linking
阴影链接
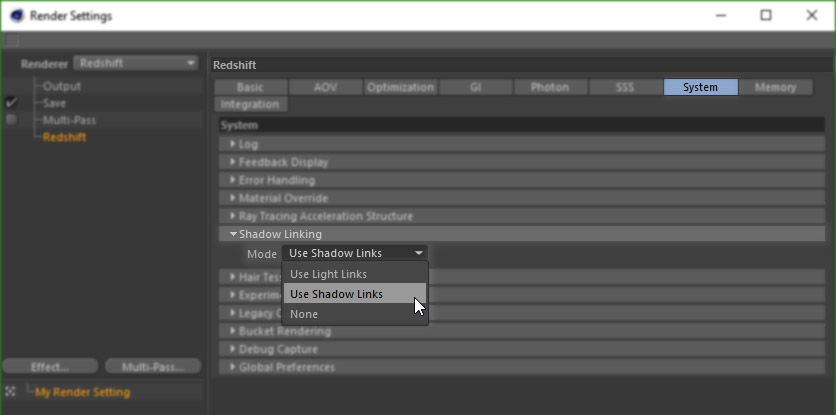
Shadow linking takes light linking a step further by being able to decouple light links from shadow links, allowing for even more custom control over your scenes. Shadow links can be controlled by the "Shadow Linking" option found in the Redshift Render Settings > System tab as pictured below:
阴影链接采取光线链接进一步能够解耦光线链接从阴影链接,允许更多的自定义控制您的场景。阴影链接可以通过红移渲染设置 > 系统选项卡中的“阴影链接”选项来控制,如下图所示:
C4D Shadow Linking options
C4D 影子链接选项
Shadow Linking Mode
阴影连接模式
- Use Light Links: 使用灯光连结:Lights cast shadows according to scene light linking. 灯光根据场景灯光的连接投射阴影
- Use Shadow Links: 使用阴影链接:The default setting, lights cast shadows according to shadow linking that is made or broken between lights and objects. By default lights casts shadows unless the shadow link is broken. 在默认设置中,灯光根据灯光和物体之间的阴影连接投射阴影。默认情况下,灯光投射阴影,除非阴影链接中断
- None: 没有:All lights in a scene cast shadows on all objects by ignoring all light and shadow linking. 场景中的所有光线都忽略了光线和阴影的连接,从而在所有物体上投射阴影
To compare the different Shadow Linking Modes we are going to start off with a baseline example to compare each result to. In the examples below, the only thing that will change is the Shadow Linking Mode, the light linking will remain the same.
为了比较不同的阴影连接模式,我们将从一个基线例子开始比较每个结果。在下面的例子中,唯一会改变的是阴影连接模式,光线连接将保持不变。
The baseline scene makes use of light linking to split the rocks into thirds, each third is linked to one light exactly like the example used in the Light Linking section above.
基线场景利用光线将岩石分割成三分之一,每三分之一的光线与上面光线连接部分的例子完全一样。
Baseline example scene using shadow linking mode: "Use Light Links"
使用阴影连接模式的基线示例场景: “使用光线连接”
In the next example we will start breaking shadow links from the existing light linking.
在下一个例子中,我们将开始打破现有光线链接的阴影链接。
First we need to make sure the Shadow Linking Mode is set to "Use Shadow Links" and then we need to actually break the shadow links for the specific lights. To do so in C4D all you have to do is click the shadow linking button in your Redshift light's "Project" panel. When the shadow linking button gets is clicked it gets greyed out meaning the shadow link with that object has been broken and that light will not cast a shadow for that object.
首先,我们需要确保阴影链接模式设置为“使用阴影链接”,然后我们需要切实打破具体的灯光阴影链接。要做到这一点,在 C4D 所有你必须做的是点击阴影链接按钮在您的红移灯的“项目”面板。当点击阴影链接按钮时,它会变成灰色,这意味着该对象的阴影链接已经被破坏,光线不会为该对象投射阴影。
Example showing shadow links being broken with 4 objects
示例显示4个对象中断的阴影链接
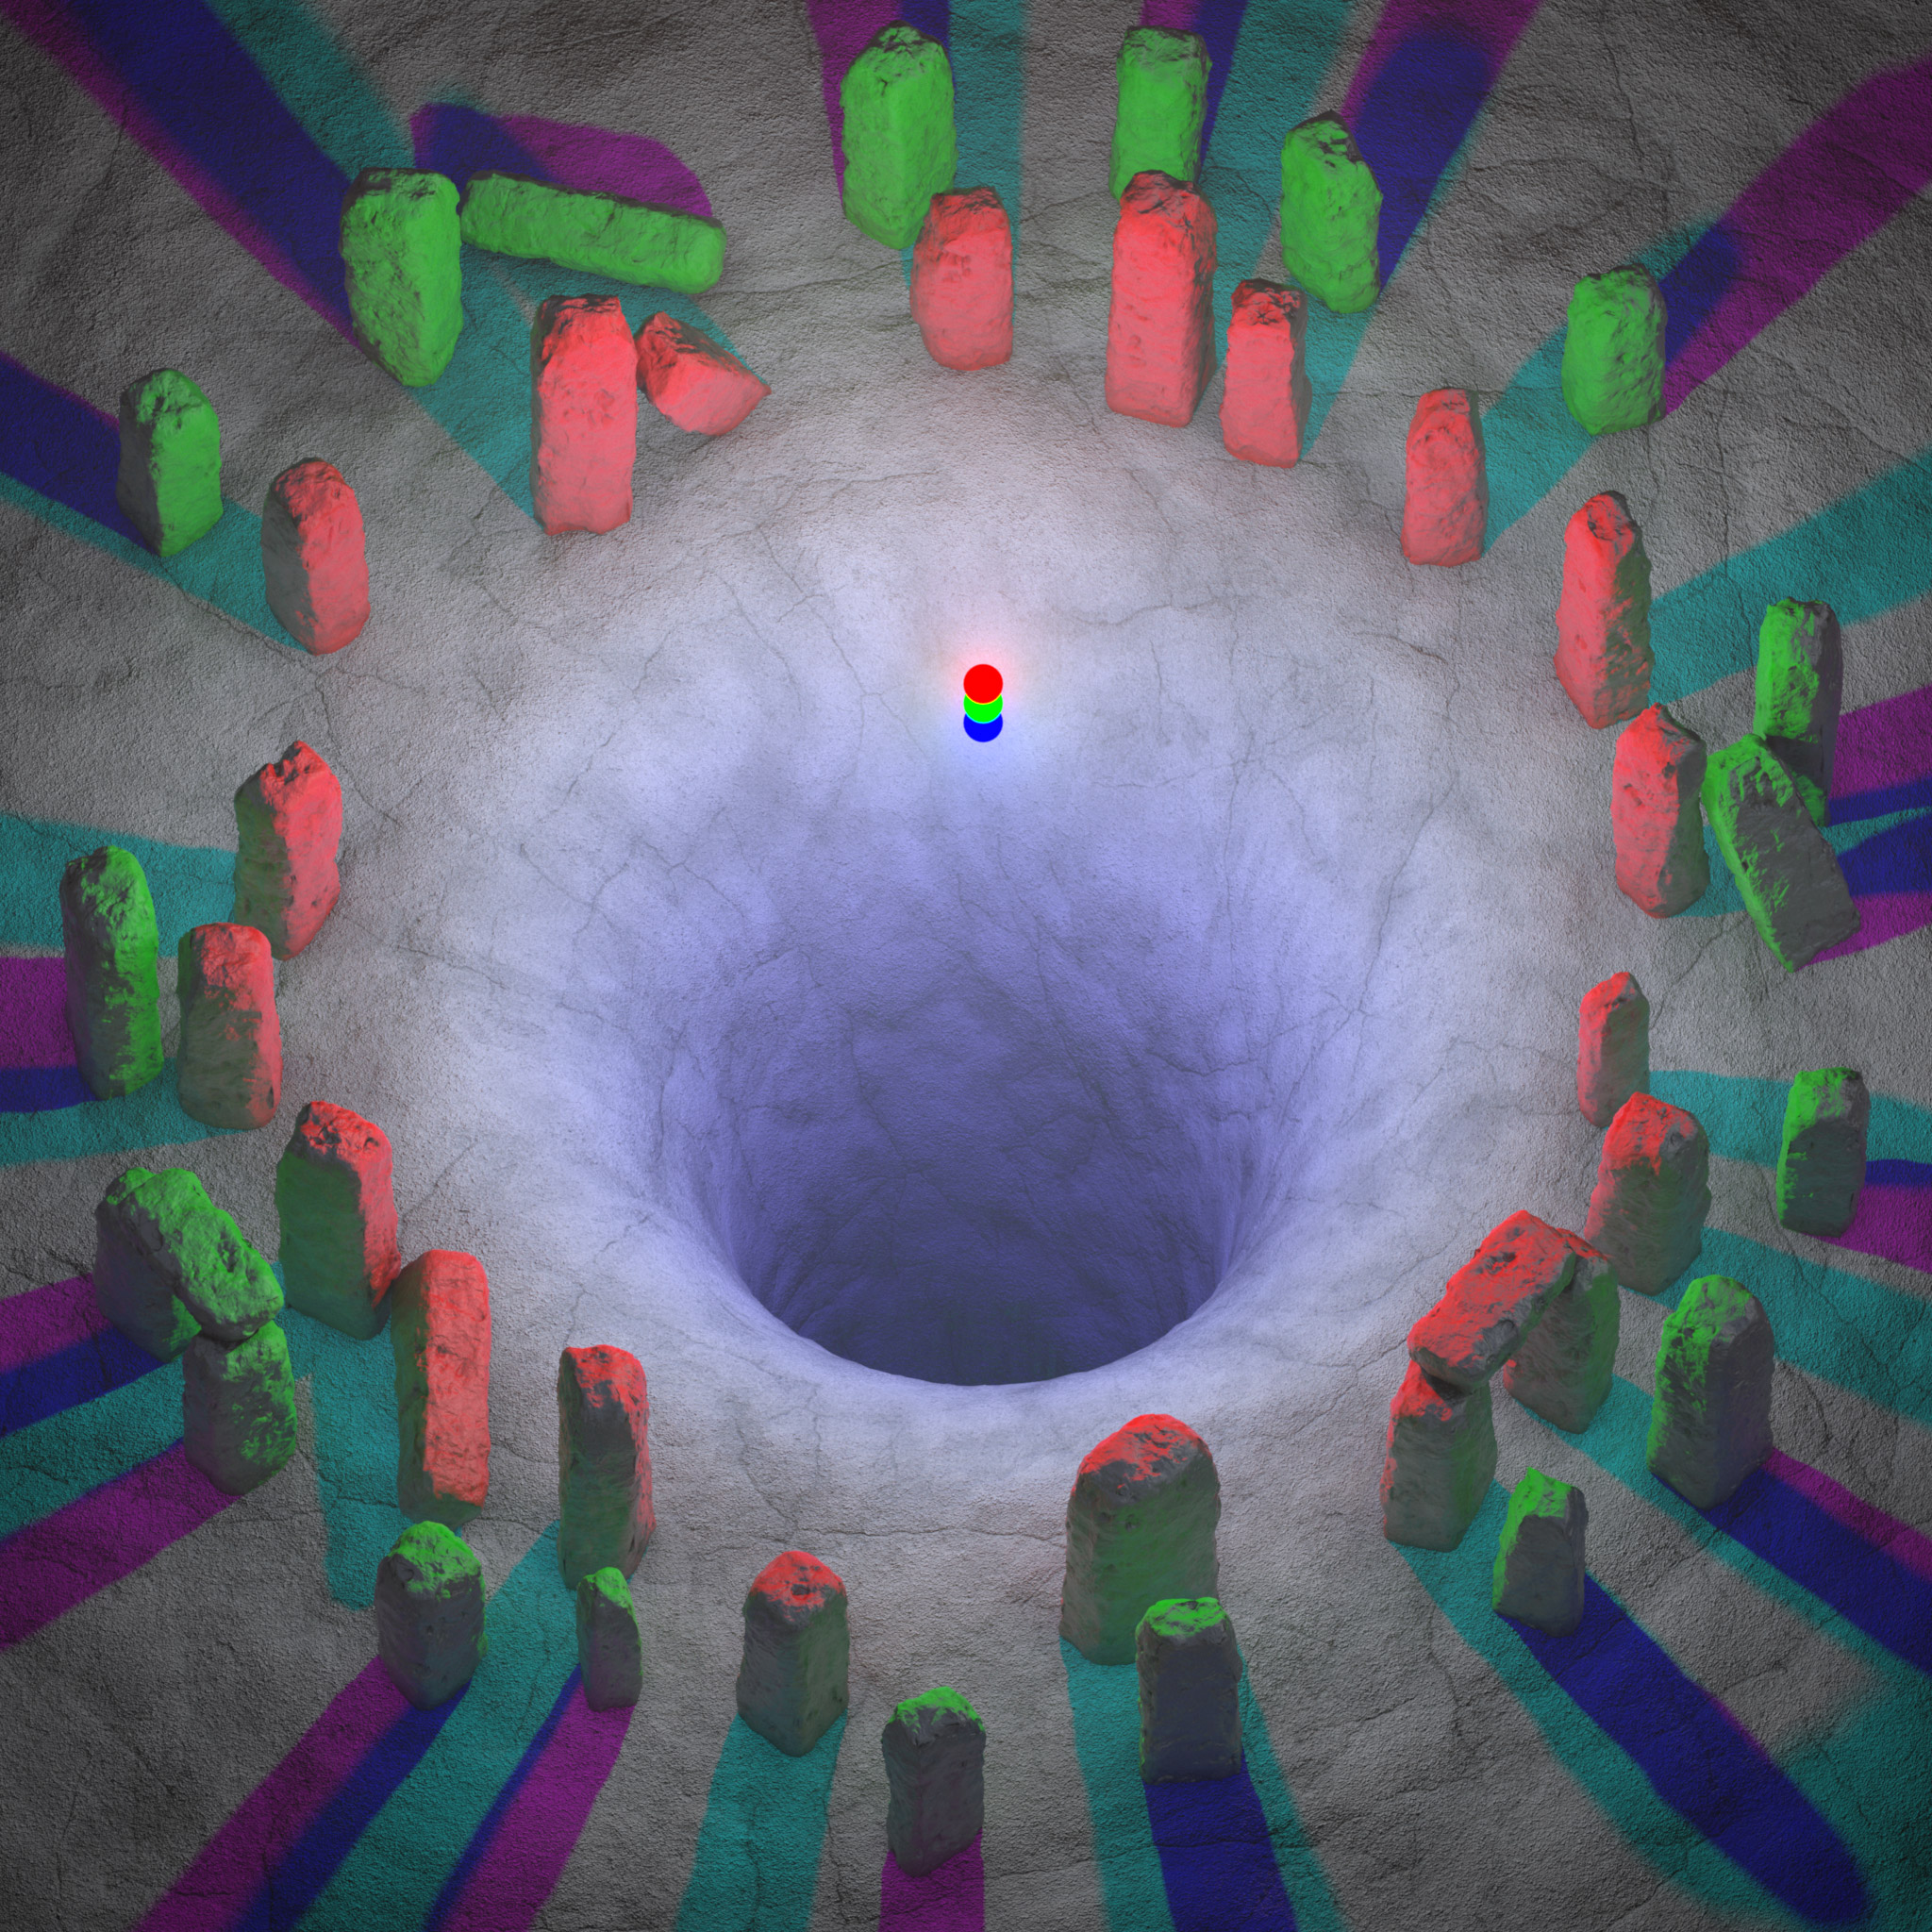
In the example scene below the shadow links have been broken for only the light that provides illumination for that group of rocks. Therefore the light and shadow linking for each group of rocks is as follows:
在示例场景下面的阴影链接已经被打破,只有光线,提供照明的岩石组。因此,每一组岩石的光影连接如下:
|
|
|
|
| Red light linking setup 红灯连接设置 | Green light linking setup 绿灯链接设置 | Blue light linking setup 蓝光链接设置 |
Example scene using shadow linking mode "Use Shadow Links"
示例场景使用阴影链接模式“使用阴影链接”
Since the primary light source for these rocks has had its shadow link broken the shadow color result for these objects is the same color as its diffuse lighting.
由于这些岩石的主要光源的阴影链接被打破,因此这些物体的阴影颜色与其漫射光线的颜色是相同的。
For example, the top group of rocks is being lit just by the red light. However the red light has had its shadow link broken with the red light and since we are using the "Use Shadow Links" Shadow Linking Mode then any light linking is completely ignored when it comes to shadow contribution, this means that both the green and blue lights are still casting shadows for these rocks even though they are not illuminating them. Since the shadow color of a green light is magenta and the shadow color of a blue light is yellow (as scene in the baseline example) they are added together, resulting in the red shadow above.
例如,顶部的岩石群仅仅被红光照亮。然而,红光的阴影链接被红光打破,因为我们使用的是“使用阴影链接”阴影链接模式,那么任何光线链接完全被忽略当谈到阴影贡献,这意味着绿光和蓝光仍然投射阴影这些岩石,即使他们并不照亮他们。由于绿光的阴影颜色是洋红色,而蓝光的阴影颜色是黄色(如基线例子中的场景) ,它们被叠加在一起,导致上面的红色阴影。
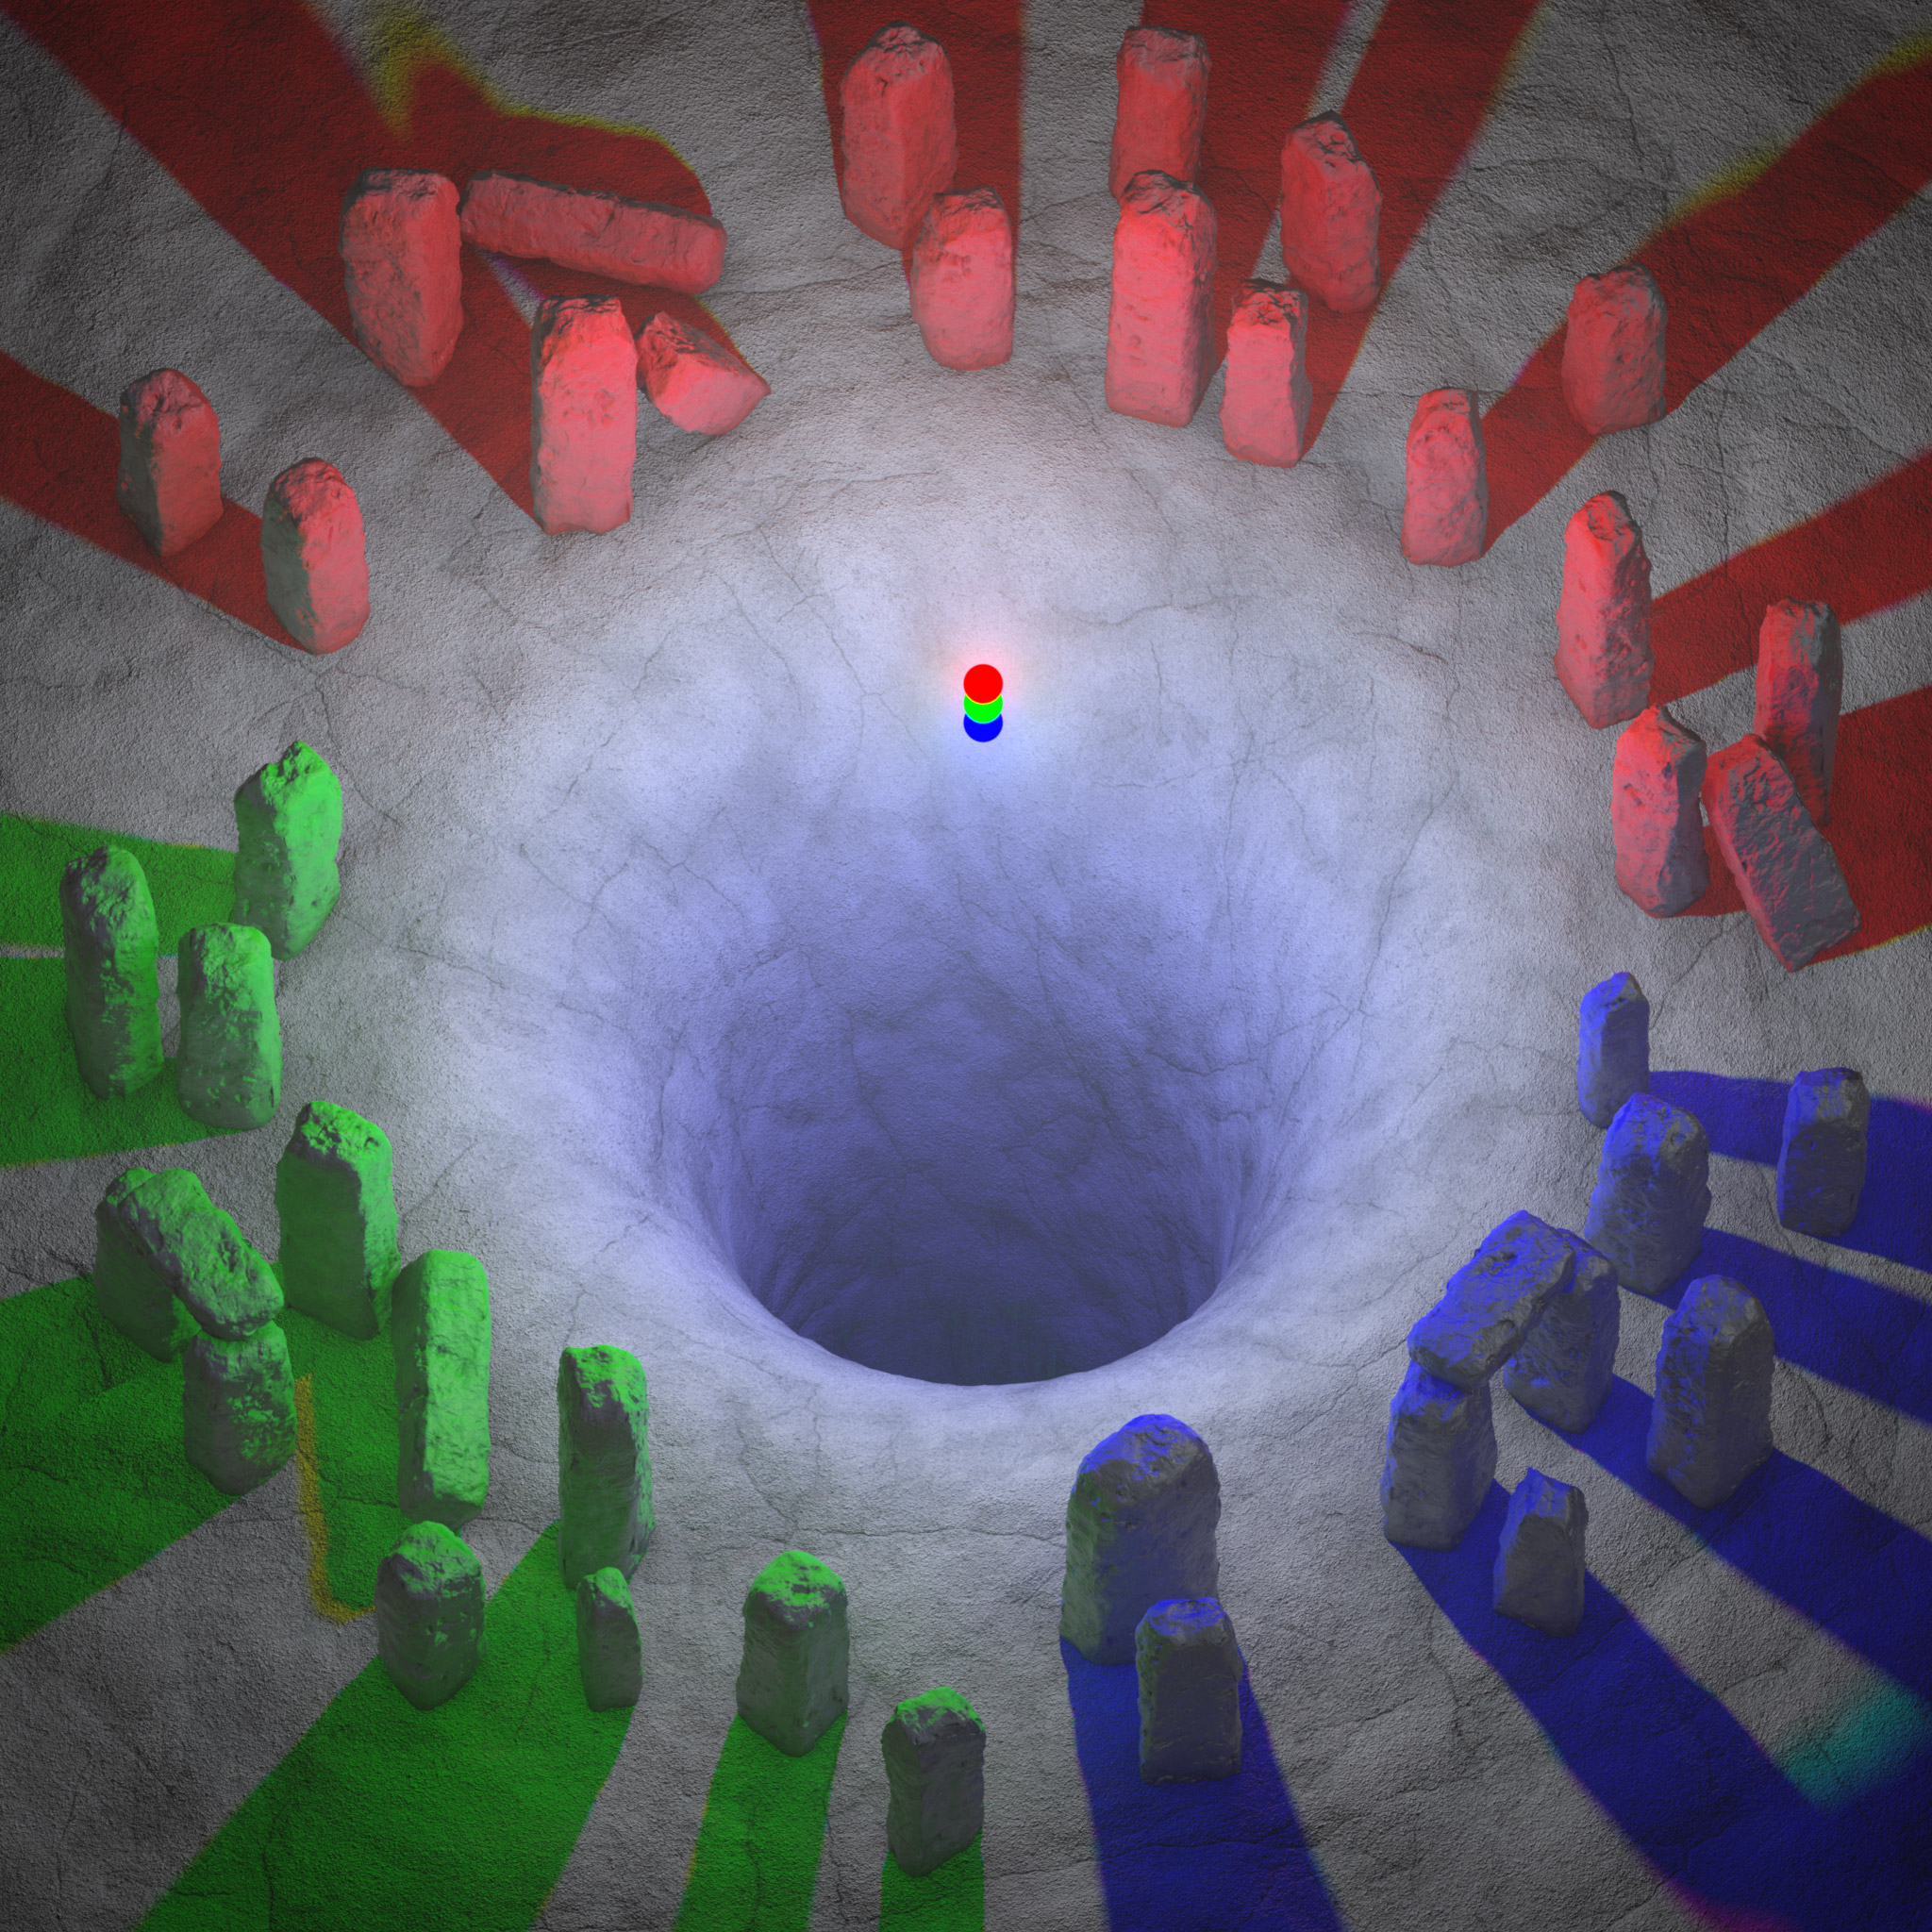
Now in the final example we will completely disable any kind of Shadow Linking by setting the Shadow Linking Mode to "None." This results in the example image below:
现在在最后一个例子中,我们将通过设置阴影链接模式为“无”来完全禁用任何类型的阴影链接这导致了下面的例子图片:
Example scene using shadow linking mode "None"
示例场景使用阴影链接模式“无”
Despite the shadow link breaking that was done in the last example, this mode ignores both shadow and light linking resulting in the red, green, and blue lights all casting shadows for every object in the scene despite the fact that the lights are still only illuminating the three different rock groups respectively.
尽管在上一个例子中已经断开了阴影链接,这种模式忽略了阴影和光线的连接,导致场景中每个物体都投射了红色、绿色和蓝色的光线,尽管事实上光线仍然只照亮了三个不同的岩石群。
As you can see, light and shadow linking allows for complete artistic control when setting up scene lighting allowing you to achieve all sorts of specific and sometimes surreal looks. Below you can see the same 3 examples pictured side by side and just how different the results are when only the Shadow Linking Mode is changed even though the light and shadow links are identical in all examples.
正如你所看到的,光线和阴影的连接允许完全的艺术控制时,设置场景灯光,让你实现各种具体的,有时超现实的外观。下面你可以看到相同的3个例子,并排照片,只是不同的结果时,只有阴影链接模式是改变,即使光线和阴影链接是相同的所有例子。
|
|
|
|
| Shadow Linking Mode: 阴影连接模式:Use Light Links 使用灯光连结 | Use Shadow Links 使用阴影链接 | None 没有 |

赶快留个言打破零评论!~