general settings
In this section we will examine the settings of Octane render. Normally you will see the same result you see in Live Viewer but you can do fine adjustments from here that are not in Live Viewer. Options such as resolution, picture format, aspect ratio, or frame number are in the classic cinema 4D render output section. You already know these.
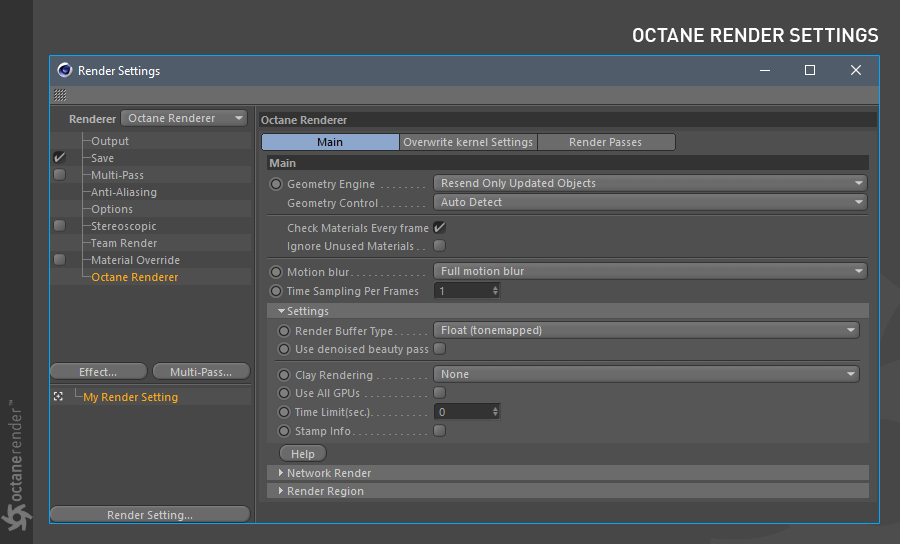
First, open the render settings window of Cinema 4D by pressing CTRL + B. Select "Octane Renderer" from the renderer menu in the upper left corner. Here you will see 3 main tabs: Main, Overwrite Kernel Settings and Render Passes. There is a separate section for Render Passes, you can look at the relevant section for detailed information.
Now let's begin to explain.
通用设置
在本节中,我们将检查Octane渲染的设置。通常,您会看到与在Live Viewer中看到的结果相同的结果,但是您可以从此处进行Live Viewer中没有的微调。分辨率,图片格式,宽高比或帧数等选项位于经典Cinema 4D渲染输出部分中。您已经知道这些。
首先,通过按CTRL + B打开Cinema 4D的渲染设置窗口。从左上角的渲染器菜单中选择“ Octane Renderer”。在这里您将看到3个主要标签:主要,覆盖内核设置和渲染阶段。渲染通道有一个单独的部分,您可以查看相关部分以获取详细信息。
现在让我们开始解释。

main tab settings
主标签设置
geometry engine
There are 2 options here: "Send All Scene Data" and "Resend only Updated Objects". To better understand these options, we recommend that you read the this section about how geometry updates in Octane. Now let's see what the options are:
Send All Scene Data: This is the most reliable and slowest render data sending method. Reset all data and completely send scene on each frames. Do not choose this unless you have to.
Resend Only Updated Objects: This is faster method for single frame/animation rendering. On first frame, all scene data will be sent to Octane Render. Next frames, only updated parts of scene will be updated.
几何引擎
这里有2个选项:“发送所有场景数据”和“仅重新发送更新的对象”。为了更好地理解这些选项,我们建议您阅读本节以了解Octane中几何体的更新方式。现在让我们看看选项是什么:
发送所有场景数据:这是最可靠,最慢的渲染数据发送方法。重置所有数据,并在每个帧上完全发送场景。除非必须,否则不要选择它。
仅重新发送更新的对象:这是用于单帧/动画渲染的更快方法。在第一帧,所有场景数据将发送到Octane Render。在下一帧中,只会更新场景的更新部分。
Geometry Control
Here you can check the behavior of your objects in the scene on the data transfer to the Octane Renderer. We also recommend reading the Octane's geometry update. There are 3 options here. Now let us explain:
Manual: Requires to specify the animated, emissive, etc.. objects with Octane Object Tag by hand.
Auto Detect: Makes some pre-calculation before animation rendering. This method try to find/assign the movable, emissive, etc.. objects for you. In this option, no need to use object tags as manual method. If it can't finish the evaluating the scene in time, all objects will be assumed as movable.
All Objects Movable: This works as LV's "Auto" parameter for geometries. Be aware of limits of "Auto" method. It may cause crash after 10-15k movable objects. So better to use manual or auto detect for heavy scenes.
Important Note: Render defaults are "Resend only updated objects" with "Auto detect" and Renderbuffer=Float(tonemapped). This is best combination for most scenes. Use these default values unless you have to.
几何控制
在这里,您可以在将数据传输到Octane Renderer时检查场景中对象的行为。我们还建议阅读Octane的几何更新。这里有3个选项。现在让我们解释一下:
手动:需要手动指定带有Octane Object Tag的动画,自发光等对象。
自动检测:动画渲染之前进行一些预先计算。此方法尝试为您查找/分配可移动的,发射的等对象。在此选项中,无需将对象标签用作手动方法。如果无法及时完成对场景的评估,则将所有对象视为可移动对象。
所有对象可移动:这用作LV的几何参数``自动''。注意“自动”方法的限制。 10-15k可移动物体后可能会导致崩溃。因此最好使用手动或自动检测较重的场景。
重要说明:渲染默认设置为``仅重新发送更新的对象''和``自动检测''并且Renderbuffer = Float(色调映射)。这是大多数场景的最佳组合。除非必须使用这些默认值。
check materials every frame
This option controls the material on the scene for each frame. Default is recommended.
每帧检查材质
该选项控制场景中每一帧的材质。建议使用默认值。
ignore unused materials
The materials you do not use on the scene are not checked. While you are optimizing your scene before you go to the final render stage, also delete unnecessary material.
忽略未使用的材质
不会检查您不在场景中使用的材质。在进入最终渲染阶段之前优化场景时,还请删除不必要的材质。
motion blur
There are 3 options: Disabled, Camera Motion Blur and Full Motion Blur.
Disabled: Selecting this will not render the motion blur in your scene.
Camera Motion Blur: This option ignores the object motion blur on the scene and only renders the motion blur effect of the camera motion.
Full Motion Blur: This option will render both camera and object motion blur on the scene.
运动模糊
有3个选项:“禁用”,“相机运动模糊”和“全运动模糊”。
禁用:选择此项将不会在场景中渲染运动模糊。
相机运动模糊:此选项将忽略场景上的对象运动模糊,仅渲染相机运动的运动模糊效果。
Full Motion Blur:此选项将在场景中同时渲染相机和对象的运动模糊。
time sampling per frames
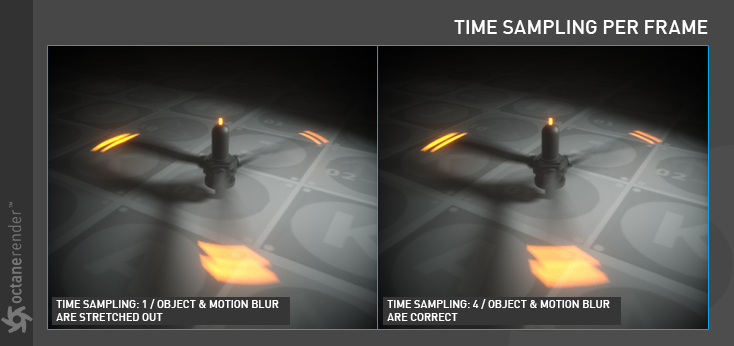
Let's say you have an object that is spinning fast on your scene. When you add motion blur, you may not see the correct result in Live Viewer. Extra data is required for motion blur in fast movements. Here you can do this with the help of this option. It produces sub key frames for motion blur objects. For example the value 4 means that will create 4 sub key frames between the two frames. Thus, you can increase the quality and accuracy of motion blur.
每帧时间采样
假设您有一个在场景中快速旋转的对象。添加运动模糊时,在Live Viewer中可能看不到正确的结果。快速运动中的运动模糊需要额外的数据。在这里,您可以借助此选项进行操作。它为运动模糊对象生成子关键帧。例如,值4表示将在两个帧之间创建4个子关键帧。因此,您可以提高运动模糊的质量和准确性。

render buffer type
Consists of 3 parts: Float (Tonemapped), 8-bit (Deprecated) and Float (Linear). Default is Float (Tonemapped). Float (Linear) is for linear workflow. We explained the "Linear Workflow" here.
渲染缓冲区类型
由3个部分组成:Float(音调映射),8位(不推荐使用)和Float(线性)。 默认值为“浮动”(Tonemapped)。 浮动(线性)适用于线性工作流程。 我们在这里解释了“线性工作流程”。
use denoISED beauty pass
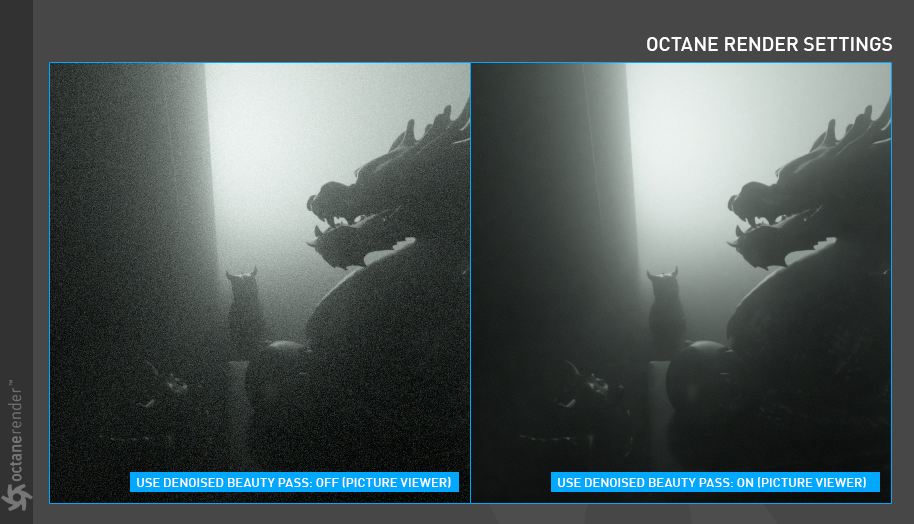
If you say "I don't want to deal with render passes settings", then we have a nice option for you: "Use Denoised Beauty Pass". First, disable Render Passes. Go to Octane Renderer's "Main tab" and check this option. So your final rendering will only be Denoised Picture. You don't need to deal with Passes.
使用降噪完美通道
如果您说“我不想处理渲染过程设置”,那么我们为您提供了一个不错的选择:“使用降噪的完美过程”。 首先,禁用渲染通道。 转到Octane Renderer的“主选项卡”,然后选中此选项。 因此,您最终的渲染将仅是“去噪的图片”。 您不需要处理通道。

clay rendering
It consists of 3 parts as None, Gray and Color. Clay render is useful for fast output, or you can use this option again if you just want to see the animation and light shadow distribution. Return to "None" for Final render.
黏土渲染
它由3个部分组成:无,灰色和彩色。粘土渲染对于快速输出很有用,或者如果您只想查看动画和光影分布,则可以再次使用此选项。返回“无”进行最终渲染。
USE ALL GPUs
If you have more than one GPU and have switched off some GPUs in Octane LV settings, you can use them all for rendering with this option. Default is off.
使用所有GPU
如果您有多个GPU,并且已在Octane LV设置中关闭了某些GPU,则可以使用此选项全部使用它们进行渲染。默认为关闭。
Time limit (sec.)
It's maximum time (second) to rendering for each frames. Default is recommended.
时间限制(秒)
每帧渲染的最长时间(秒)。建议使用默认值。
stamp info
Stamps "render Info" for final render output. This render info includes information such as sample count, Vram usage, duration etc. It is useful for Compare. Do not forget to close it in full final render.
标记信息
标记“渲染信息”以进行最终渲染输出。此渲染信息包括诸如采样计数,Vram使用情况,持续时间等信息。它对于比较非常有用。不要忘记在完整的最终渲染中将其关闭。
Network render
We explained this subject in more detail here.
网络渲染
我们在这里更详细地解释了这个主题。
render Region
You can use this option if you only want to render a certain part of the scene. For example, if you enabled the interactive render region in LV, you can get the render of the region you just specified in LV by pressing the "Get Last Region From LV" button. Or you can set numerically. If you want to read how the Render Region option in Live Viewer works, you can go to this link.
渲染区域
如果只想渲染场景的特定部分,则可以使用此选项。例如,如果在LV中启用了交互式渲染区域,则可以通过按“从LV获取最后一个区域”按钮来获取刚刚在LV中指定的区域的渲染。或者您可以设置数字。如果要阅读Live Viewer中的“渲染区域”选项的工作方式,则可以转到此链接。
overwrite kernel settings TAB
Let's say you finished your scene and you will get the final render. When you created the scene, you set the Kernel settings in the Live Viewer options. If you want, you can cancel the kernel that you are working in LV by pressing the "Enable" Button in this section and you can create new kernel settings. For example, when you are working in LV, you can set the low / mid kernel and then switch to the final render, where you can enable the Overwrite kernel to make a higher kernel setting. This entirely depends on your work style. All the options are the same in LV's kernel settings.
覆盖内核设置TAB
假设您完成了场景,然后将获得最终渲染。创建场景时,可以在“实时查看器”选项中设置“内核”设置。如果需要,可以通过按此部分中的“启用”按钮来取消正在LV中工作的内核,然后可以创建新的内核设置。例如,当您在LV中工作时,可以设置低/中内核,然后切换到最终渲染,在此处可以启用“覆盖内核”以进行更高的内核设置。这完全取决于您的工作风格。 LV的内核设置中的所有选项均相同。
You can read the detailed description of Kernel Settings from here.
Info: Several complaints has been written in the forum that the final render output not the same as Live Viewer. If you want to see the same render as in LV, all you have to do is keep this option off. Default is already off. If you're not sure what you're doing, keep this option turned off.
您可以从此处阅读内核设置的详细说明。
信息:论坛上有很多抱怨说最终的渲染输出与Live Viewer不同。如果要查看与LV中相同的渲染,只需关闭此选项即可。默认设置已关闭。如果不确定自己在做什么,请关闭此选项。
render passes TAB
You can also read the detailed explanations of this section here.
渲染通过TAB
您还可以在此处阅读本节的详细说明。


赶快留个言打破零评论!~