creatIng CLOUds
You can use both "generator" and "vdb" to make a cloud in Octane. In this section we will use both to make clouds. Here you can download the mini tutorial scenes from the link below.
Download the "Cloud_01" scene from here
创造云
您可以同时使用“ generator”和“ vdb”在Octane中创建云。 在本节中,我们将同时使用两者来制作云。 在这里,您可以从下面的链接下载迷你教程场景。
从此处下载“ Cloud_01”场景
Making volumetric cloud from VDB file
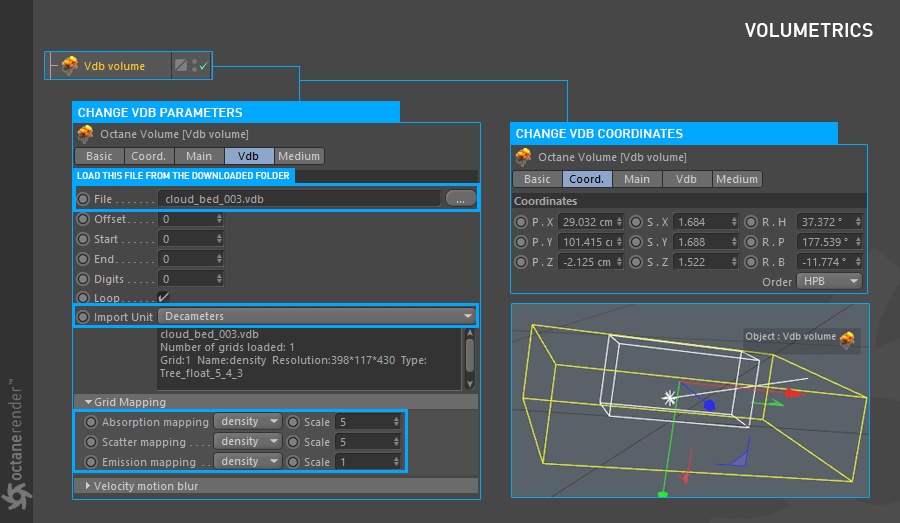
01- Open the "Cloud_01" scene. When you open the scene you will see only the Octane Camera. Do not play with the camera settings for now. Create "Octane VDB Volume" from the Live Viewer Object menu. Load the "cloud_bed_003.vdb" file from the file section. This VDB file should be in the "Tex" folder in the scene you downloaded.
从VDB文件制作卷云
01-打开“ Cloud_01”场景。 当您打开场景时,您只会看到Octane Camera。 现在暂时不要使用相机设置。 从Live Viewer对象菜单中创建“ Octane VDB卷”。 从文件部分加载“ cloud_bed_003.vdb”文件。 此VDB文件应位于您下载的场景中的“ Tex”文件夹中。
Change the parameters as you see in the picture below. If you look in the info box after loading the VDB file, you will see that the "Density" channel is used when creating this cloud. We will then adjust this volume reference for absorption and scatter in the Volume Medium. Density in Emission mapping is not a problem because we will not use emission in volume medium.
Info: The vdb file on this scene is taken from Travis Davids' "Free VDB cloud Package".
更改参数,如下图所示。 如果在加载VDB文件后在信息框中查看,则将看到在创建此云时使用了“密度”通道。 然后,我们将针对体积介质中的吸收和散射调整此体积参考。 发射映射中的密度不是问题,因为我们不会在体积介质中使用发射。
信息:该场景中的vdb文件来自Travis Davids的“免费VDB云软件包”。
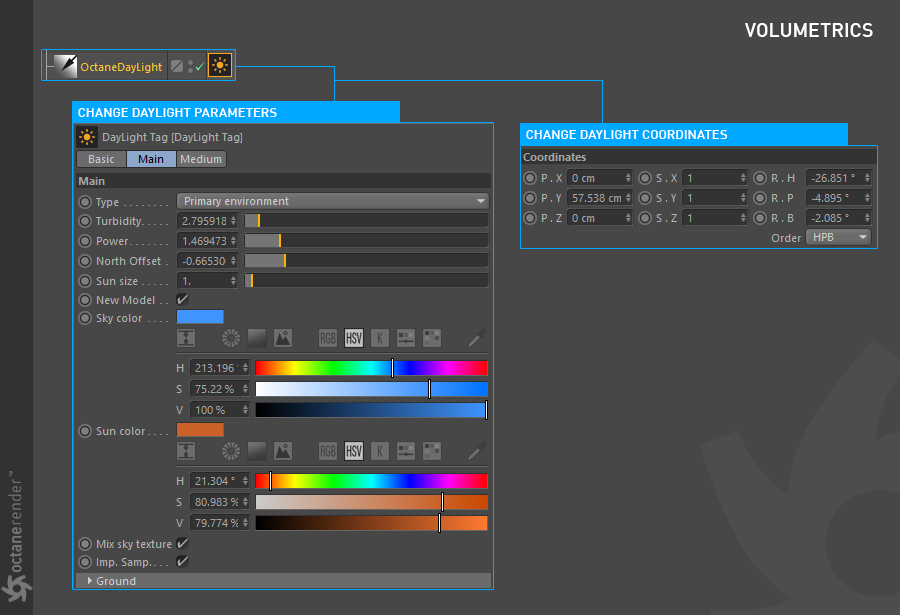
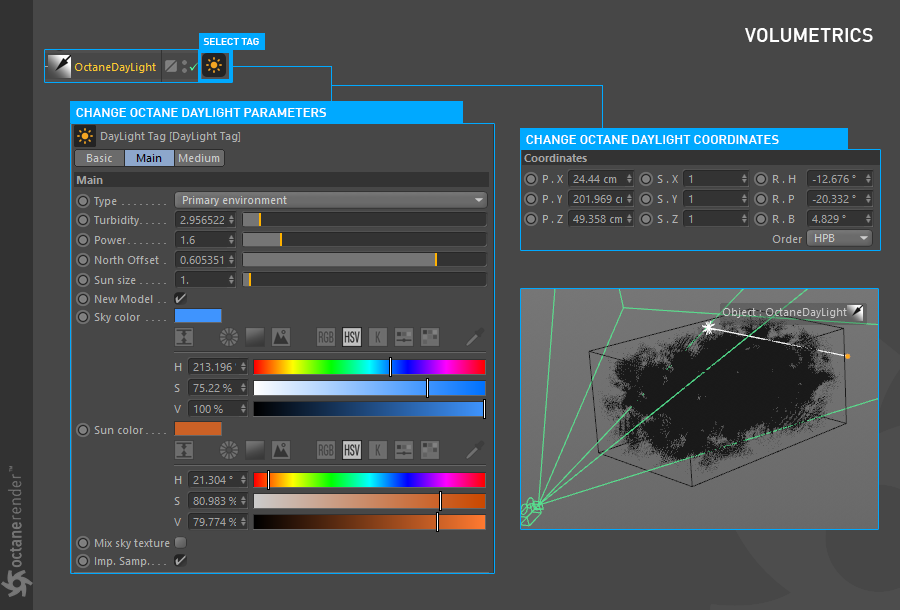
02- Now create an Octane Daylight and change the settings and coordinates as you see in the picture below.
02-现在创建一个Octane日光并更改设置和坐标,如下图所示。
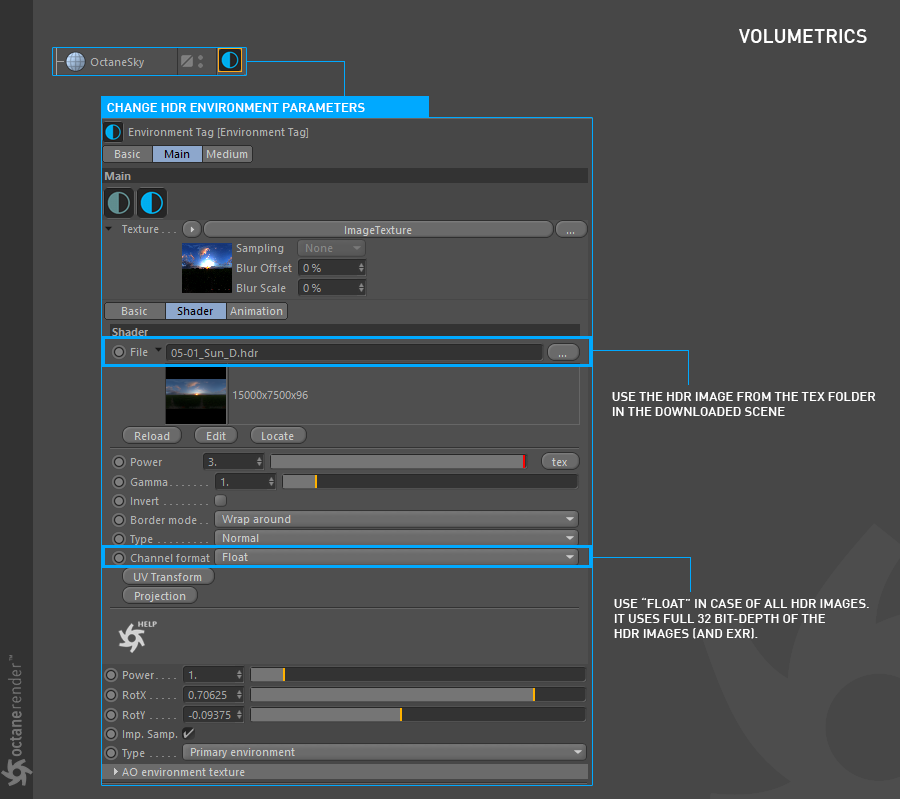
03- Create an HDR environment from Live Viewer/Objects menu. Load the "05-01_Sun_D.hdr" picture in the "Tex" folder of the downloaded scene file and change the settings as you see in the picture below.
03-从“实时查看器/对象”菜单创建HDR环境。 将“ 05-01_Sun_D.hdr”图片加载到下载的场景文件的“ Tex”文件夹中,并如下图所示更改设置。
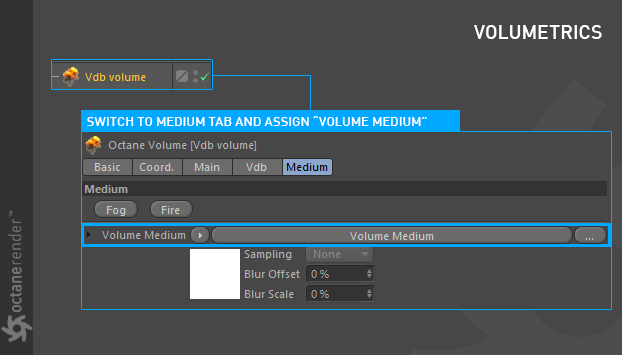
04- Now select VDB Volume from object manager and go to the Medium Tab. Add "Volume medium" from octane textures to Volume Medium slot.
04-现在从对象管理器中选择VDB卷,然后转到“中型”选项卡。 将“体积介质”从Octane纹理添加到“体积介质”插槽。
05- Click on to the Volume Medium and change the volume parameters as shown in the picture below.
05-单击“ Volume Medium”,然后更改音量参数,如下图所示。
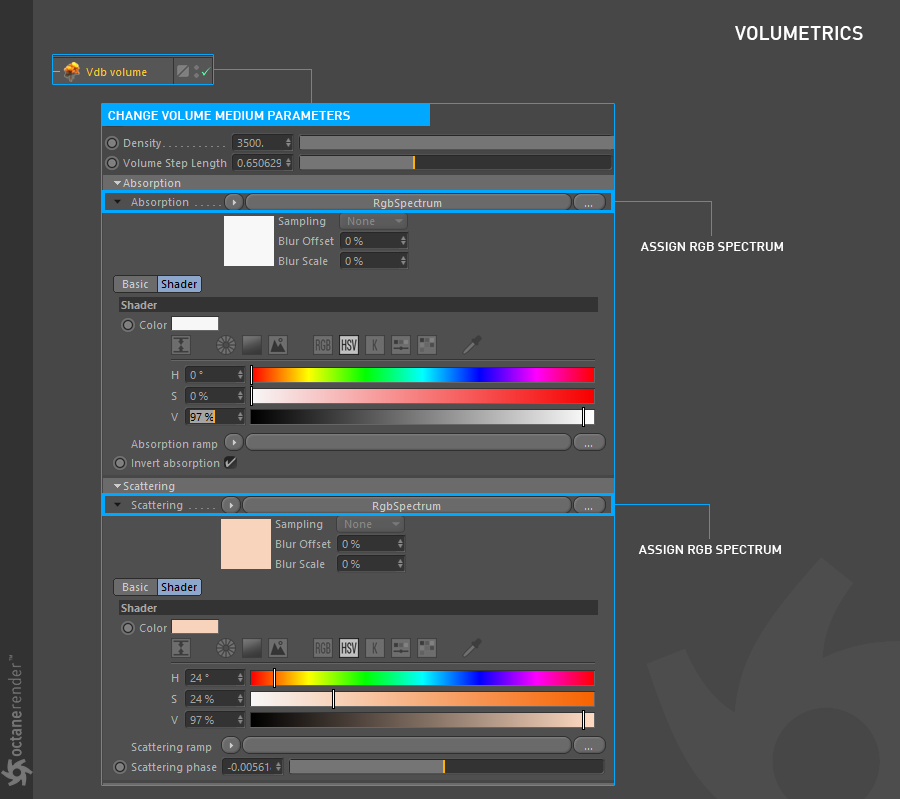
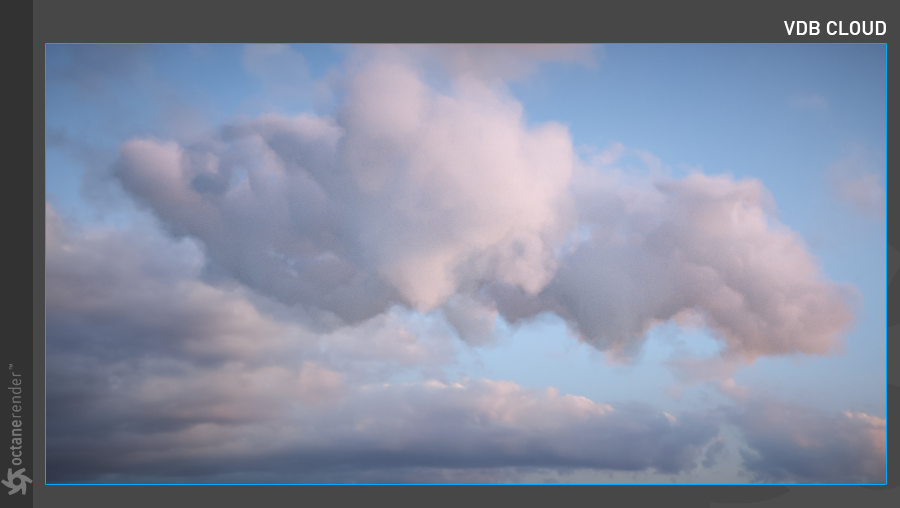
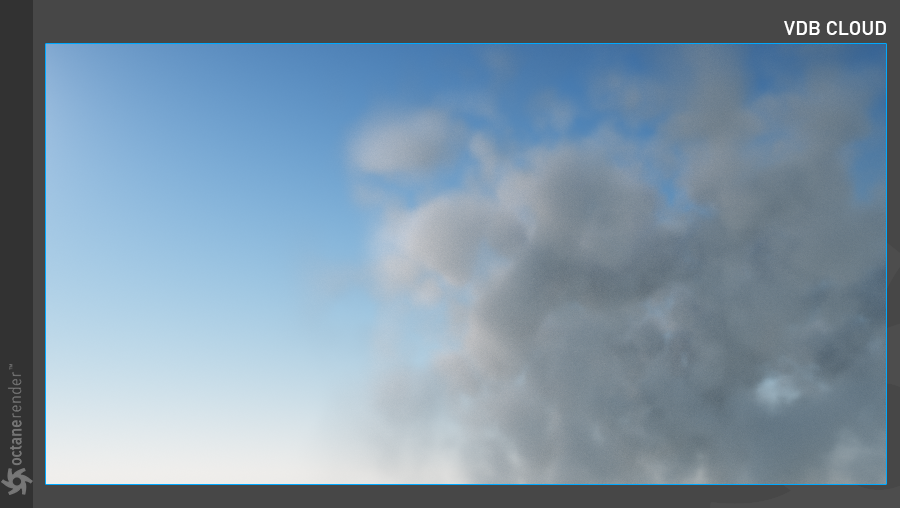
06- Now run Live Viewer. If you have done everything right, you will get the following result. As you can see in the picture, there is a fairly massive cloud in the foreground an it is matched to the HDR image. For such a cloud mass we kept the density high while we decreased Step Length. The important thing here is the Scattering parameter. In reality, even if they are very small, the clouds are optically thick. This will cause the clouds to scatter a significant amount of sunlight; in other words, the probability that the sun will pass through the cloud without being scattered is very weak. Clouds are also weak absorbers of the sunlight at the same time. As a cloud grows, the percentage of sunlight that it reflects increases.
06-现在运行Live Viewer。 如果您做对了所有事情,您将得到以下结果。 如您在图片中所看到的,前景中有一个相当大的云,它与HDR图像匹配。 对于这样的云团,我们在减小步长的同时保持较高的密度。 这里重要的是散射参数。 实际上,即使它们很小,云在光学上也很厚。 这将导致云散射大量的阳光; 换句话说,太阳穿过云层而不会被散射的可能性非常小。 同时,云还是阳光的弱吸收剂。 随着云的生长,其反射的阳光百分比会增加。
The cloud in the picture absorbs little light. By changing this value you can make the cloud darker (you can, for example, make a rain cloud). Octane Daylight was set up to provide the necessary illumination to the cloud with the HDR image.
图片中的云吸收很少的光。 通过更改此值,可以使云更暗(例如,可以制作雨云)。 设置Octane日光以通过HDR图像为云提供必要的照明。
Making volumetric clouds usING GENERATe (not SO realISTIC but fast)
In this mini tutorial we will produce a volumetric cloud that is not so realistic but yields fast results. We will make this using noise from the "Generate Tab" section. We will produce the scene from scratch. So we did not provide a download link. If you're ready, let's start.
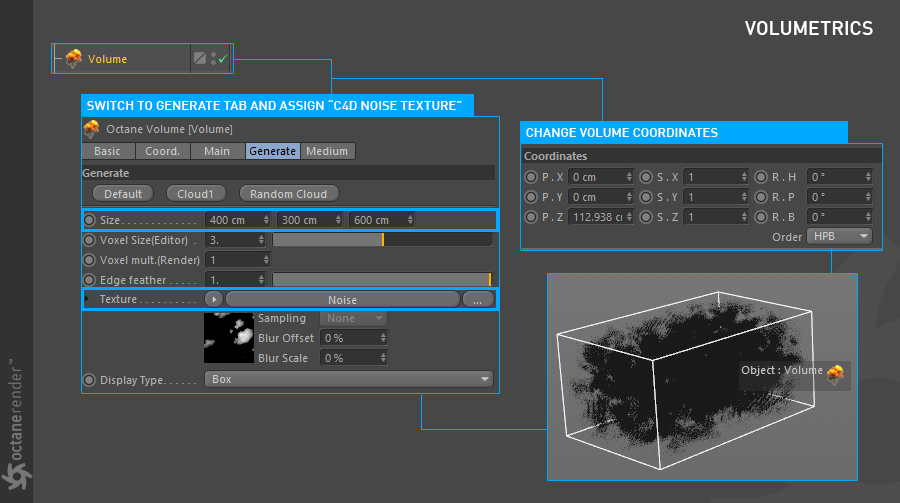
01- Create Objects/Octane Fog Volume from the Live Viewer menu. Then select the volume from the object manager and go to the "Generate" tab. From there, assign Cinema 4D noise to the texture section and change the settings as you see in the picture below.
Info: You can increase your Voxel size (editor) to work comfortably (eg 5). Then you can decrease to 2 or 3 in final render. Be very careful as you enter fewer than 2 and go with very small steps because as you said before, the number of voxels increases considerably and GPU ram is consuming rapidly. Crash probability is increasing.
使用GENERATe制作体积云(不是很真实,但速度很快)
在此迷你教程中,我们将生成一个不太现实的体积云,但可以快速产生结果。 我们将使用“生成选项卡”部分中的噪波来实现此目的。 我们将从头开始制作场景。 因此,我们没有提供下载链接。 如果您准备好了,那就开始吧。
01-从“实时查看器”菜单创建对象/Octane雾体积。 然后从对象管理器中选择卷,然后转到“生成”选项卡。 从那里,将Cinema 4D噪点分配给纹理部分,并如下图所示更改设置。
信息:您可以增加Voxel的大小(编辑器)以舒适地工作(例如5)。 然后,您可以在最终渲染中减少到2或3。 输入少于2个的步幅时要非常小心,因为步幅非常小,因为如前所述,体素的数量大大增加,GPU内存正在迅速消耗。 崩溃的可能性正在增加。
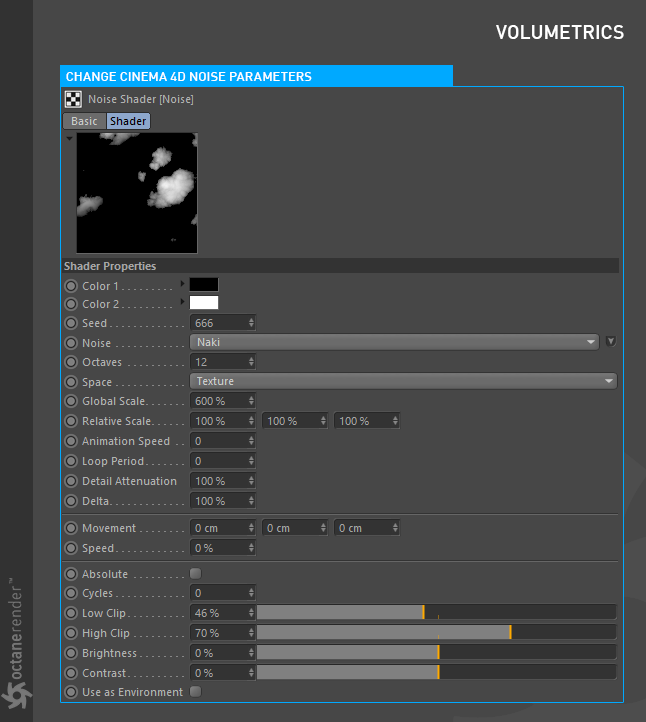
02- Click on Cinema 4D Noise in the Texture slot and change the settings as you see in the picture below. With this noise texture we have created the cloud voxel.
02-单击“纹理”插槽中的Cinema 4D Noise,然后如下图所示更改设置。 利用这种噪波纹理,我们创建了云体素。
04- Now create an Octane Camera and change both the coordinates and parameters as you see in the picture below.
04-现在创建一个Octane Camera,并更改坐标和参数,如下图所示。
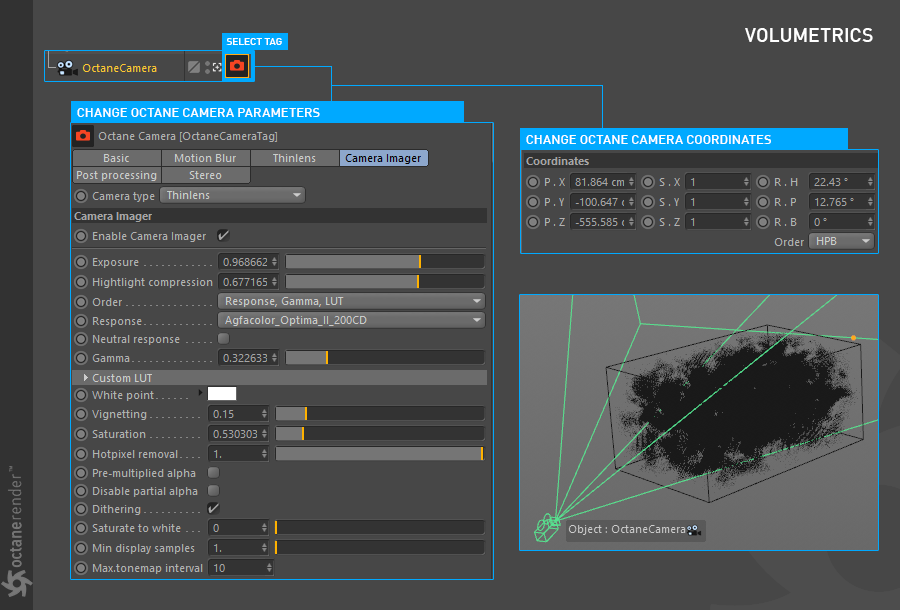
05- Now let's make the lighting for the cloud. To do this, create Objects/Lights/Octane Daylight from the Live Viewer menu and change both the parameters and the coordinates as you see in the picture below.
05-现在让我们为云计算照明。 为此,请从“ Live Viewer”菜单中创建“对象/灯光/Octane日光”,并更改参数和坐标,如下图所示。
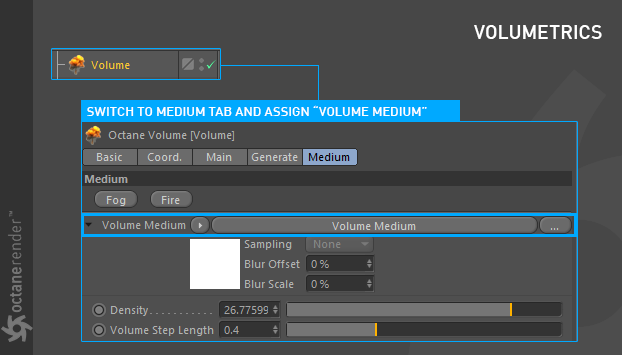
06- From the Object Manager, select the "Volume" object and go to the Medium Tab. Add "Volume medium" from octane textures to Volume Medium slot.
06-从对象管理器中,选择“体积”对象,然后转到“中型”选项卡。 将“体积介质”从Octane纹理添加到“体积介质”插槽。
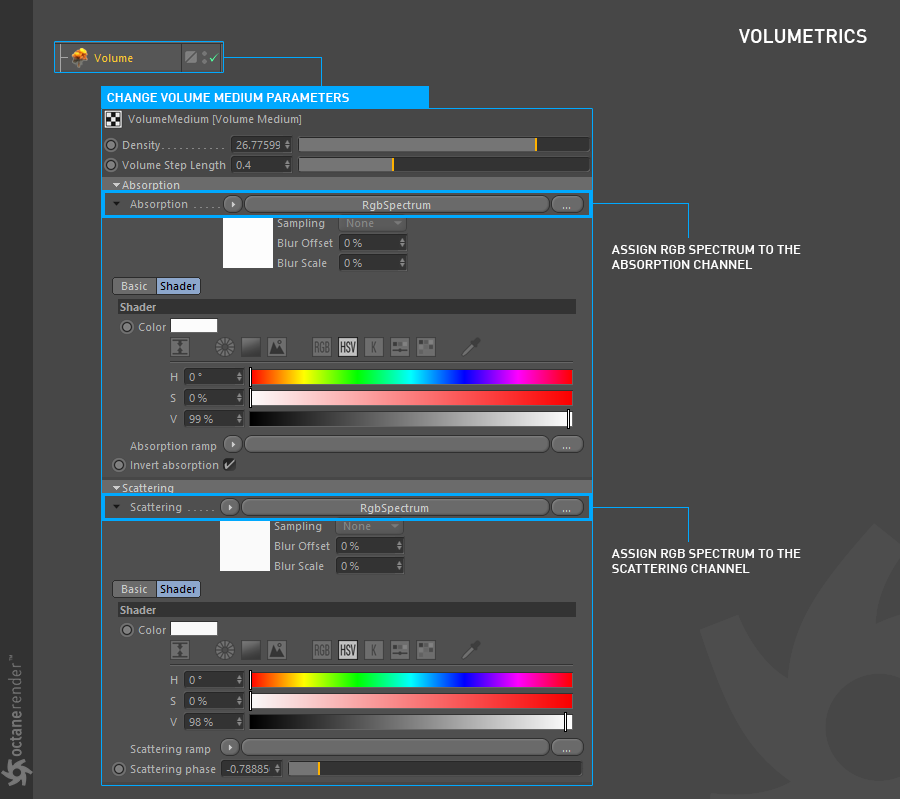
07- Click on "Volume Medium" and change the volume parameters as you see in the picture below.
07-单击“ Volume Medium”,然后更改音量参数,如下图所示。
08- Now run Live Viewer. If you have done everything right, you will get a result similar to the following picture. As you can see in the picture, after we set the noise texture of Cinema 4D as Voxel input, we made shading from Volume Medium. You can animate this cloud by entering "Animation Speed" in the noise settings. Or you can create another type of cloud by changing the Noise Type. The number of cloud types you will create using Generate is endless. If you keep the voxel size at reasonable levels, you will get a quick render.
08-现在运行Live Viewer。 如果您做对了所有事情,您将获得与下图相似的结果。 如您在图片中所见,将Cinema 4D的噪波纹理设置为Voxel输入后,我们从“体积介质”进行了阴影处理。 您可以通过在噪波设置中输入“动画速度”来对此云设置动画。 或者,您可以通过更改噪波类型来创建另一种云。 您将使用“生成”创建的云类型数不胜数。 如果将体素大小保持在合理水平,则将获得快速渲染。


赶快留个言打破零评论!~