Gamma 伽马
Introduction
引言
Gamma correction (also known as "color correction") adjusts the colors of the final image so that they match the typical response of computer monitors. Due to legacy reasons, a computer monitor displays colors on a 2.2 gamma curve. What this means is that the color gray (0.5, 0.5, 0.5) actually shows up as (0.22, 0.22, 0.22), i.e. a darker shade of gray instead of a shade that is exactly between black (0.0, 0.0, 0.0) and white (1.0, 1.0, 1.0) – as one would expect.
伽玛校正(也称为“色彩校正”)调整最终图像的颜色,使其与电脑显示器的典型反应相匹配。由于遗留的原因,计算机显示器在2.2伽马曲线上显示颜色。这意味着灰色(0.5,0.5,0.5,0.5)实际上显示为(0.22,0.22,0.22) ,即更深的灰色,而不是正好介于黑色(0.0,0.0,0.0)和白色(1.0,1.0,1.0)之间的阴影。
Gamma correction fixes that inaccuracy.
伽玛校正修正了这个错误。
When using a color space other than linear in C4D for the Input Color Profile you must ensure that all connections to scalar attributes (non-color attributes like reflection roughness / bump etc) are linearized otherwise the colors will be gamma corrected internally by C4D.
当在 C4D 中使用线性以外的颜色空间作为输入颜色配置文件时,必须确保所有与标量属性(如反射粗糙度/凹凸等非颜色属性)的连接都是线性的,否则颜色将由 C4D 在内部进行 γ 校正。
The following two pictures show a gray diffuse-lit sphere with and without gamma correction:
下面的两张图片展示了一个有和没有伽玛校正的灰色漫射光球体:
|
|
|
|
Gamma 1.0 1.0 |
Gamma 2.2 伽马2.2 |
Sometimes users prefer that the renderer produces a "linear" (gamma 1.0) image so that they can manually perform gamma correction, color curves and other final adjustments using an external editing program. For this reason, Redshift provides separate gamma controls for what is shown in the 3D modeling package ("Display Gamma") and the final image file ("File Output Gamma"). This allows the user to preview with gamma correction while saving out linear (gamma 1.0) images.
有时用户更喜欢渲染器生成一个“线性”(gamma 1.0)图像,这样他们就可以手动执行伽玛校正、颜色曲线和其他最终调整,使用一个外部编辑程序。因此,Redshift 为3D 建模包(“ Display Gamma”)和最终图像文件(“ File Output Gamma”)中显示的内容提供单独的 Gamma 控件。这允许用户在保存线性(伽玛1.0)图像的同时预览伽玛校正。
The "Automatic" setting in the "File Output" gamma works as follows: if the final image file is using an 8-bit format (such as TGA or PNG), the "Display Gamma" value will be applied to it. If the file is using a higher color precision image format (such as OpenEXR), no gamma correction will be applied to it. This is in line with composition packages like Nuke which, by default, assume high color precision images being linear and 8-bit images using an sRGB or Gamma 2.2 color space.
“ File Output”Gamma 中的“ Automatic”设置工作原理如下: 如果最终的图像文件使用8位格式(如 TGA 或 PNG) ,则应用“ Display Gamma”值。如果文件使用更高的颜色精度的图像格式(如 OpenEXR) ,则不会对其应用伽玛校正。这是符合合成包,如核武器,默认情况下,假设高彩色精度图像是线性和8位图像使用 sRGB 或 Gamma 2.2色彩空间。
Gamma Correction And Adaptive Sampling
伽玛校正和适应性抽样
Redshift's adaptive sampling algorithms are gamma-aware as gamma correction can significantly shift the image intensities and, therefore, the relative 'visual importance' of a pixel. All the adaptive sampling algorithms use the "Sampling Gamma" value. We strongly recommend that the "Sampling gamma" value matches your final "intent" with regards to gamma. I.e. if you are planning on either gamma-correcting the image externally or having Redshift correct it for you, please set the sampling gamma to the same value.
的自适应采样算法是伽马感知的,因为伽玛校正可以显著改变图像强度,因此,相对的’视觉重要性’的一个像素。所有的自适应采样算法都使用“采样伽马”值。我们强烈建议“抽样伽马”值与您最终的“意图”相匹配。也就是说,如果你计划从外部进行伽玛校正或者让红移校正,请将伽玛取样设置为相同的值。
In the majority of cases, leaving this setting to its default "same as display gamma" setting will be sufficient.
在大多数情况下,将此设置保留为默认的“与 display gamma 相同”设置就足够了。
Gamma Correction And Textures
伽玛校正和纹理
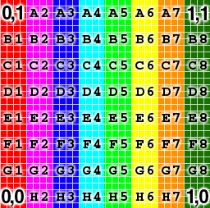
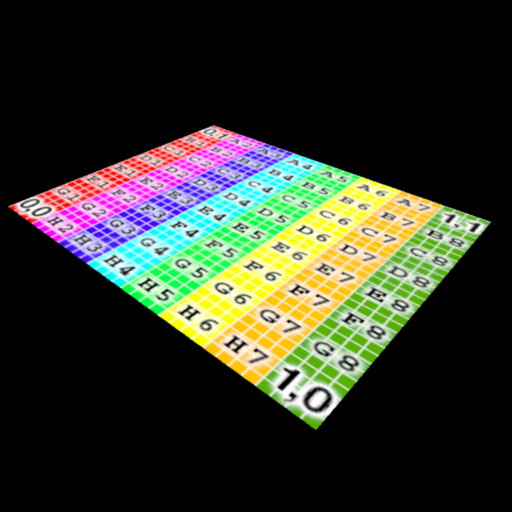
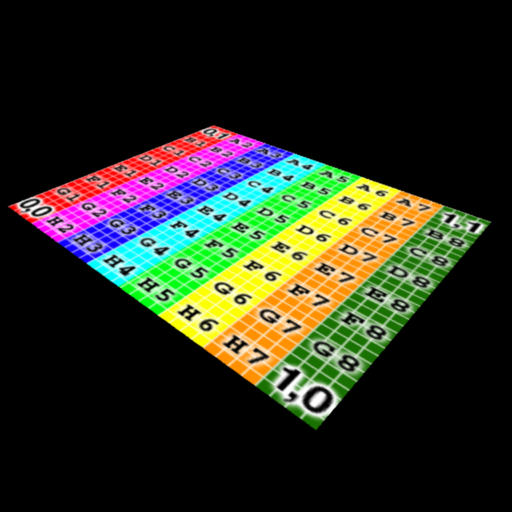
When gamma correction is used, the color profile of your textures has to be set accordingly. Setting it to "Automatic" will work fine for most cases. That mode assumes that any 8-bit image format (such as TGA, BMP, etc) is set to a 2.2 gamma and that higher-color-precision images (such as OpenEXR) are already linear. In most of the cases these assumptions are right. Also please note that you only need to do that for textures that are pictures. BumpMaps, NormalMaps and other kinds of control textures should not be adjusted! The importance of properly setting the texture color profile is shown below.
当使用伽玛校正时,纹理的颜色配置文件必须相应地设置。将其设置为“自动”将在大多数情况下工作良好。该模式假定任何8位图像格式(如 TGA、 BMP 等)都设置为2.2 gamma,并且高彩色精度图像(如 OpenEXR)已经是线性的。在大多数情况下,这些假设是正确的。也请注意,你只需要做的纹理,是图片。不应该调整 BumpMaps、 NormalMaps 和其他类型的控件纹理!正确设置纹理颜色配置文件的重要性如下所示。
The first image, is the texture itself (the default Softimage XSI texture). The second and third images are both rendered with gamma 2.2.
第一个图像,是纹理本身(默认的 softimagxsi 纹理)。第二个和第三个图像都用伽马2.2进行渲染。
Original texture
原始纹理
|
|
|
|
|
|
|
Gamma 2.2 render using an incorrect image clip color profile ("linear"). The texture looks washed out. 伽马2.2渲染使用了不正确的图像剪辑颜色配置文件(“线性”)。纹理看起来被洗掉了。 |
Gamma 2.2 render using the correct image clip color profile ("automatic" – "srgb" would work too). Texture looks like original. 伽马2.2渲染使用正确的图像剪辑颜色配置文件(“自动”-“ srgb”也会工作)。纹理看起来很原始。 |
Gamma Correction And AOVs
伽玛校正和 aov
The rules for gamma correction on AOVs are the same as the main beauty pass: if "File Output Gamma" is set to "Automatic", any AOV that is using an 8-bit format will be written out using the "Display Gamma" value while higher color precision image formats will be written out linear (gamma 1.0).
关于 AOV 的伽玛校正输出规则与主要的美观通道相同: 如果“ File Output Gamma”设置为“ Automatic”,那么任何使用8位格式的 AOV 都将使用“ Display Gamma”值写出,而更高精度的彩色图像格式将写出线性格式(Gamma 1.0)。
So if your "Display Gamma" is set at 2.2, and open the produced AOV image files in an image viewing program, 8-bit file formats like PNG or TGA will look brighter than format like OpenEXR. This is expected behavior. As mentioned previously, most applications assuming files like OpenEXR to be linear (gamma 1.0) and files like PNG to be sRGB.
因此,如果你的“显示伽马”设置为2.2,并在一个图像查看程序中打开生成的 AOV 图像文件,8位文件格式,如 PNG 或 TGA,将看起来比 OpenEXR 格式更明亮。这是意料之中的行为。正如前面提到的,大多数应用程序都假设像 OpenEXR 这样的文件是线性的(gamma 1.0) ,而像 PNG 这样的文件是 sRGB。
We recommend users leaving the "apply color correction" option enabled for any AOV that allows it.
我们建议用户在任何允许的 AOV 中保留“应用色彩校正”选项。


赶快留个言打破零评论!~