how to use
The use of particles in Octane is a bit tricky. Existing native particle engines are initially configured according to the renderer properties of the host program. And they do not progress much. Some 3rd party particle engines, on the other hand, provide limited support to other render engines or are designed according to their own render engines (for example X-particles). There is a very simple rule in Octane: "Octane will render as long as the geometry exist". So you can get very nice particle renders in Octane as long as the geometry is in use. On the other hand, it is also important that you can use the basic properties of particle systems for Octane.
如何使用
在Octane中使用颗粒有些棘手。现有的本机粒子引擎最初是根据主机程序的渲染器属性配置的。他们进步不大。另一方面,某些第三方粒子引擎为其他渲染引擎提供有限的支持,或者根据它们自己的渲染引擎(例如X粒子)进行设计。在Octane中有一个非常简单的规则:“只要几何图形存在,Octane就会进行渲染”。因此,只要使用几何图形,就可以在Octane中获得非常漂亮的粒子渲染。另一方面,使用Octane的粒子系统的基本属性也很重要。
Why partIcle renderING
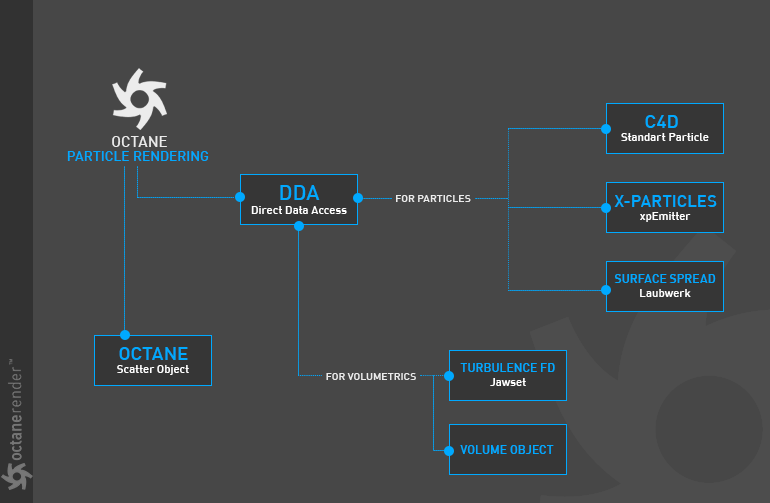
As the Octane evolved, it was inevitable to add a particle rendering system. "Direct Data Access" was needed to overcome the clutter of normal render / instance processing in C4D. By bypassing unnecessary delays in the C4D system and working with a direct data feed, a much more streamlined and interactive working environment was required. That's why Particle Rendering is added. The below diagram shows the progress for those wondering.
为什么要渲染粒子
随着Octane的发展,不可避免地要添加粒子渲染系统。需要“直接数据访问”来克服C4D中正常渲染/实例处理的混乱情况。通过绕过C4D系统中不必要的延迟并使用直接数据馈送,需要更加精简和交互式的工作环境。这就是为什么要添加“粒子渲染”的原因。下图显示了想知道的人的进步。

Setup & settINGS
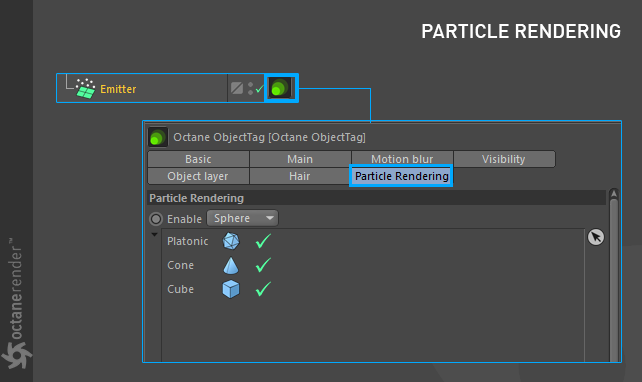
First of all, you need to use Octane Object Tag for Particle Rendering. To do this, you can select the "Emitter" object in any Particle system and right click on the Object manager and add the Octane Object Tag. When you do this, Octane automatically detects that the object is an emitter, so the Particle Rendering Tab is active. In default state this Tab is not active.
设置与设置
首先,您需要使用Octane Object Tag进行粒子渲染。 为此,可以在任何“粒子”系统中选择“发射器”对象,然后右键单击“对象管理器”并添加“ Octane对象标签”。 执行此操作时,Octane会自动检测到该对象是发射器,因此“粒子渲染”选项卡处于活动状态。 在默认状态下,此选项卡不处于活动状态。

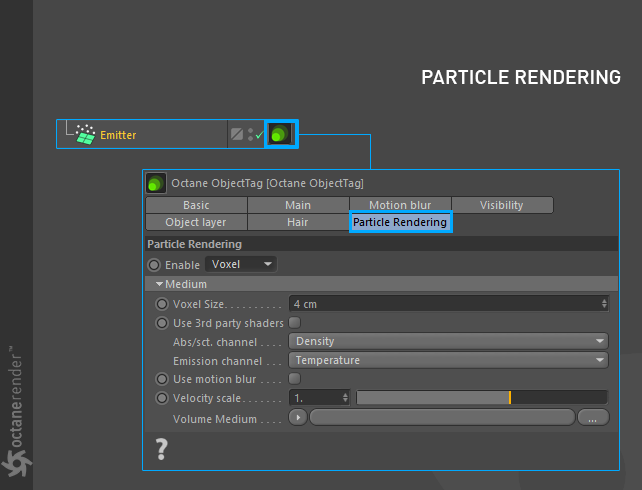
If you click on the button labeled "Enable" in the Particle Tab you will see 3 options: None, Sphere and Voxel. Let's look briefly.
如果单击“粒子”选项卡中标记为“启用”的按钮,您将看到3个选项:“无”,“球体”和“体素”。 让我们简单地看一下。
None:
Temporarily cancels the default particle system of Octane. We say temporarily because the system continues to work if there is actual geometry on the scene according to the emitter system. For example, if you are using X-particles and xpGenerator have the actual geometry as child objects, they are recognized by octane. Or you can apply the same result to the standard emitter of Cinema 4D.
没有:
暂时取消Octane的默认粒子系统。 我们之所以暂时说是因为,根据发射器系统,如果场景中存在实际几何图形,则系统将继续工作。 例如,如果您使用的是X粒子,并且xpGenerator具有实际的几何图形作为子对象,则它们可以被Octane识别。 或者,您可以将相同的结果应用于Cinema 4D的标准发射器。
sphere:
When you choose this, the emitter settings will be preserved, but every object you add to the emitter or child list will be canceled. You only have a particle render that consists of spheres. If your goal is to make only sphere particles you can choose this (very boring!). The important thing here is the "Object List". You can drag and drop objects into this area. We will explain this in detail in the next sections. You can read from there.
球:
选择此选项时,将保留发射器设置,但是将删除添加到发射器或子列表的每个对象。 您只有一个包含球体的粒子渲染器。 如果您的目标是仅制作球体粒子,则可以选择此选项(非常无聊!)。 这里重要的是“对象列表”。 您可以将对象拖放到该区域。 我们将在下一部分中对此进行详细说明。 您可以从那里阅读。

voxel:
When you choose this you will activate the Voxel mode. This option is written to work with TurbulenceFD. Since it deals with "Volumetrics" rather than pure Particles, it will be explained in more detail in the relevant section.
体素:
选择此选项后,将激活体素模式。 编写该选项是为了与TurbulenceFD一起使用。 由于它处理的是“体积”而不是纯粒子,因此将在相关部分中对其进行详细说明。


赶快留个言打破零评论!~