ABSORPTION MEDIUM
Let's briefly recall the absorption concept we talked about in metal material before. When light hits translucent object or a medium, energy carried out by this light is transferred to that medium. That is, the incident light energy can also be transformed into some other forms (such as heat energy); this process is called absorption. And it's wavelength dependent.
All surfaces absorb certain wavelengths of the light. This is due to the energy exchanges of the electron configurations depending on the surface. This is the simplest explanation since the subject is long and technical, you can find very detailed and interesting information if you search online as "Quantum Electrodynamics".
The absorption phenomenon is tightly bound to the the light, wavelength, surface characteristic and the surface thickness. So we will explain this in more detail at the Octane's absorption option.
吸收介质
让我们简要回顾一下我们之前在金属材质中讨论的吸收概念。 当光照射到半透明物体或介质上时,由该光执行的能量将转移到该介质上。 也就是说,入射光能还可以转换成其他形式(例如热能)。 这个过程称为吸收。 而且它与波长有关。
所有表面吸收特定波长的光。 这是由于取决于表面的电子构型的能量交换。 这是最简单的解释,因为该主题涉及的时间长且技术性强,如果您在线搜索“量子电动力学”,则可以找到非常详细和有趣的信息。
吸收现象与光,波长,表面特性和表面厚度紧密相关。 因此,我们将在Octane的吸收选项中对此进行更详细的说明。
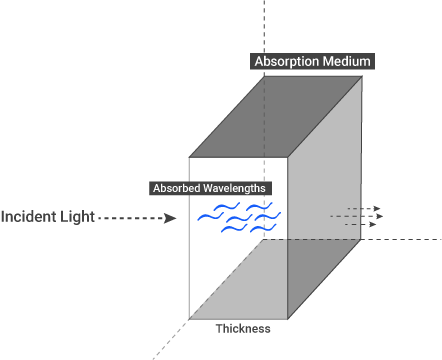
If the medium absorbs certain wavelengths of the white light, we see the remaining wavelengths (colors). Actually when a medium absorbs light of a particular color, we perceive the object as the complementary color, i.e., the color opposite the absorbed color. You can see the main and complementary colors from the color wheel below. For example, when the medium absorb red color, the resulting color we see is blue-green.
如果介质吸收特定波长的白光,我们将看到剩余的波长(颜色)。 实际上,当介质吸收特定颜色的光时,我们将对象视为互补色,即与吸收的颜色相反的颜色。 您可以从下面的色轮中看到主要和互补色。 例如,当介质吸收红色时,我们看到的最终颜色是蓝绿色。
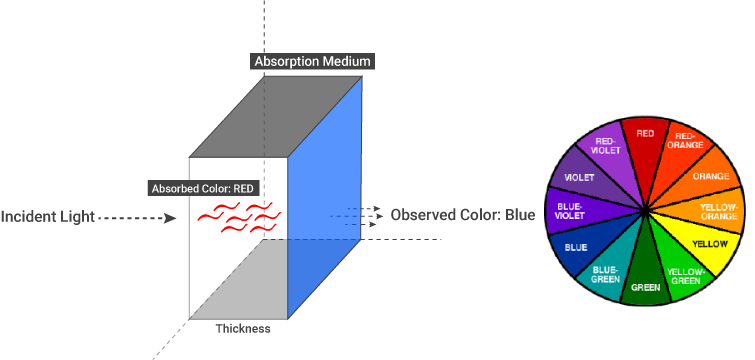
All this information is fully working in Octane. Now let's explain the absorption options in detail.
When you select the Medium channel, options will appear on the right hand side. From these options, click on Absorption Medium.
所有这些信息在Octane中均可正常使用。 现在让我们详细解释吸收选项。
选择“中Medium”频道时,选项将出现在右侧。 从这些选项中,单击“吸收介质Absorption Medium”。
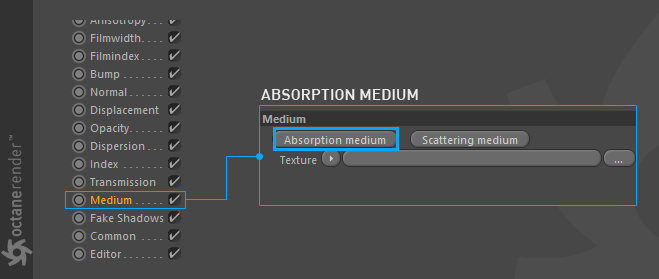
The options of absorption medium will appear after you click on it. Now let's explain these options.
单击后,将出现吸收介质的选项。 现在让我们解释这些选项。
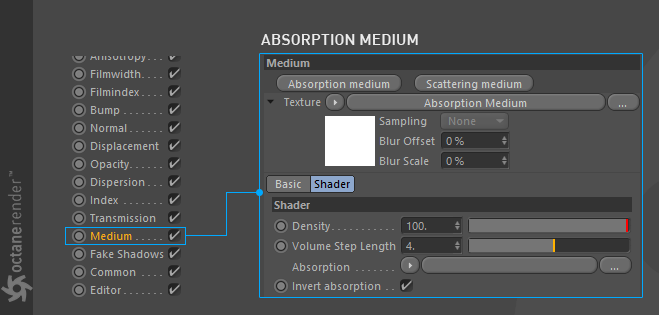
DENSITY
This parameter increases the absorption (and scatter) texture density by multiplying of it. You can change this value depending on the material type you'll create. For example, if you are going to make a candle, you may increase this value. Default value is 100 and this value should not be taken as a reference. Actually, this parameter works in cooperation with other options. You can use it alone, but when you start to create complex material, you will see that all the options are tightly bound together. The following picture shows various density settings.
Info: You can think of Density as the amount of particles in a medium. If there is no particle, there is no absorption and most importantly no scattering.
We suggest you keep this analogy in mind.
密度
此参数乘以它可以增加吸收(和散射)纹理的密度。 您可以根据要创建的材质类型更改此值。 例如,如果您要制作蜡烛,则可以增加此值。 默认值为100,该值不应作为参考。 实际上,此参数与其他选项配合使用。 您可以单独使用它,但是当您开始创建复杂的材质时,您会看到所有选项都紧密地结合在一起。 下图显示了各种浓度设置。
信息:您可以将密度视为介质中颗粒的数量。 如果没有颗粒,则没有吸收,最重要的是没有散射。
我们建议您牢记这个类比。

VOLUME STEP LENGTH
Need to be adjusted depending on the surface. The default value for the step length is 4m. Should the volume be smaller than this, you will likely need to decrease the step length. Please note that decreasing this will reduce the render speed. Increasing this value will cause the ray marching algorithm to take longer steps. Should the step length far exceed the volume’s dimensions, then the ray marching algorithm will take a single step through the whole volume. Most accurate results are obtained when the step length is as small as possible.
体积步长
需要根据表面进行调整。步长的默认值为4m。如果体积小于此值,则可能需要减小步长。请注意,减少此速度会降低渲染速度。增加该值将导致光线行进算法采取更长的步骤。如果步长远超过体积的尺寸,则光线行进算法将在整个体积中迈出一步。当步长尽可能短时,可以获得最准确的结果。
简单的说就是你模型是10m,你就设置为10,如果你设置成100,就会浪费很多不必要的渲染时间。
ABSORPTION
With this parameter you can determine the absorption value of the material by assigning texture. It would be better if we explain this two separate part:
1- Use of gray scale texture,
2- Use of RGB texture.
USE OF GREY SCALE TEXTURE
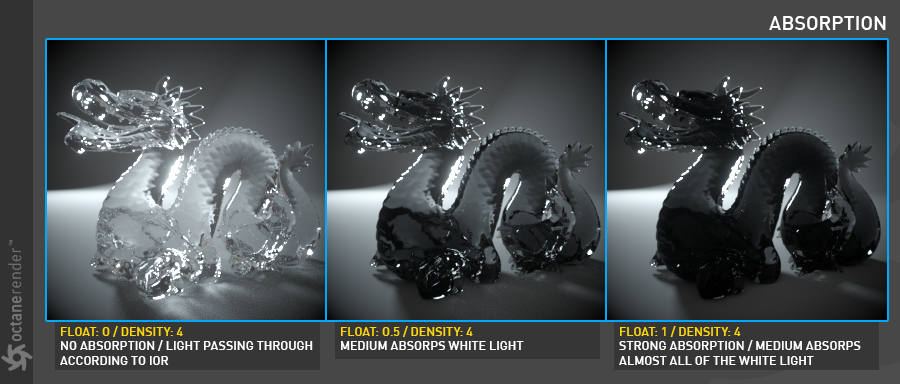
When you use grey scale values, 0 (black) means that there is no absorption. Values greater than zero means that how quickly the medium is absorbs the white light. For example, when you assign "floattexture" to texture slot, you can easily observe this situation. In the image below, you can see the absorption results in different float values. The density is also taken into consideration. The use of FloatTexture value is between 0 and 1. You can increase this value if you want.
Info: Of course, this value alone does not make sense, in fact it will produce the correct result when used with scattering and other options
吸收性
使用此参数,可以通过指定纹理来确定材质的吸收值。如果我们解释这两个单独的部分,那就更好了:
1-使用灰度纹理,
2-使用RGB纹理。
使用灰度纹理
使用灰度值时,0(黑色)表示没有吸收。值大于零表示介质吸收白光的速度。例如,当您将“ floattexture”分配给纹理插槽时,您可以轻松地观察到这种情况。在下图中,您可以看到不同浮点值的吸收结果。还考虑了密度。 FloatTexture值的使用介于0和1之间。如果需要,可以增加此值。
信息:当然,仅此值是没有意义的,实际上,当与散射和其他选项一起使用时,它将产生正确的结果
USE OF RGB texture
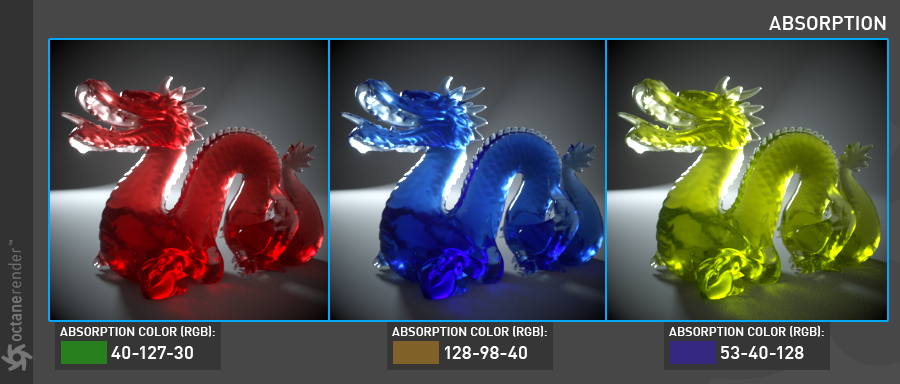
You can specify the absorption color using RGB values. The information we mentioned at the beginning of the chapter here will be practically seen. Assign "RGB spectrum" to the texture slot this time. And now turn off the "invert absorption" to better observe what we will explain. Depending on the color value you enter here, the color "that is absorbed" and the color "that is observed" will be different. Entering a color value you will actually see the result after what color "medium" absorbs (or which wavelength is absorbed if you want to physically identify it). The observed color is the complementary color (opposite color) of the value you entered. In this case, you can use the "Color Wheel" to determine the actual absorption values while setting the absorption color. You can easily search for it by Google "Complementary Color Wheel".
In the examples below you can see the result of various colors after "absorbed color". The density value is 20 for all samples, the roughness value is 0.02 and the Index value is 1.3. Specular was used as material.
使用RGB纹理
您可以使用RGB值指定吸收颜色。我们在本章开头提到的信息实际上是可以看到的。这次将“ RGB光谱”分配给纹理插槽。现在关闭“反转吸收”以更好地观察我们将解释的内容。根据您在此处输入的颜色值,“被吸收”的颜色和“被观察”的颜色将有所不同。输入一个颜色值,您实际上会在吸收“颜色”什么颜色(如果要物理识别它,吸收哪个波长)之后看到结果。观察到的颜色是您输入的值的互补色(相反的颜色)。在这种情况下,可以在设置吸收颜色时使用“色轮”来确定实际吸收值。您可以通过Google“互补色轮”轻松地进行搜索。
在下面的示例中,您可以看到“吸收颜色”之后各种颜色的结果。所有采样的密度值为20,粗糙度值为0.02,指数值为1.3。高光用作材质。
INVERT ABSORPTION
Inverts the absorption value. In this case you will see the absorbed color. For example in the above picture RGB 40-127-30 is absorbed color. If you click invert, this time you will see the green color. If you do not want to deal with color wheel and things like that, you can keep the value on and adjust the colors you want.
反转吸收
反转吸收值。 在这种情况下,您将看到吸收的颜色。 例如,在上图中,RGB 40-127-30是吸收的颜色。 如果单击反转,这一次您将看到绿色。 如果您不想处理色轮等问题,则可以保持该值不变并调整所需的颜色。


赶快留个言打破零评论!~