Cinema 4D ShaderGraph C4D着色器
Introduction
引言
The Shader Graph allows you to create and personalize complex materials inside of Redshift, these materials are composed of Shader Nodes. The Redshift ShaderGraph defines the structure and the processing flow of the shading process.
着色器图允许你在红移中创建和个性化复杂的材质,这些材质由着色器节点组成。Redshift shadgraph 定义着色过程的结构和处理流程。
The ShaderGraph Editor UI
图形编辑器界面
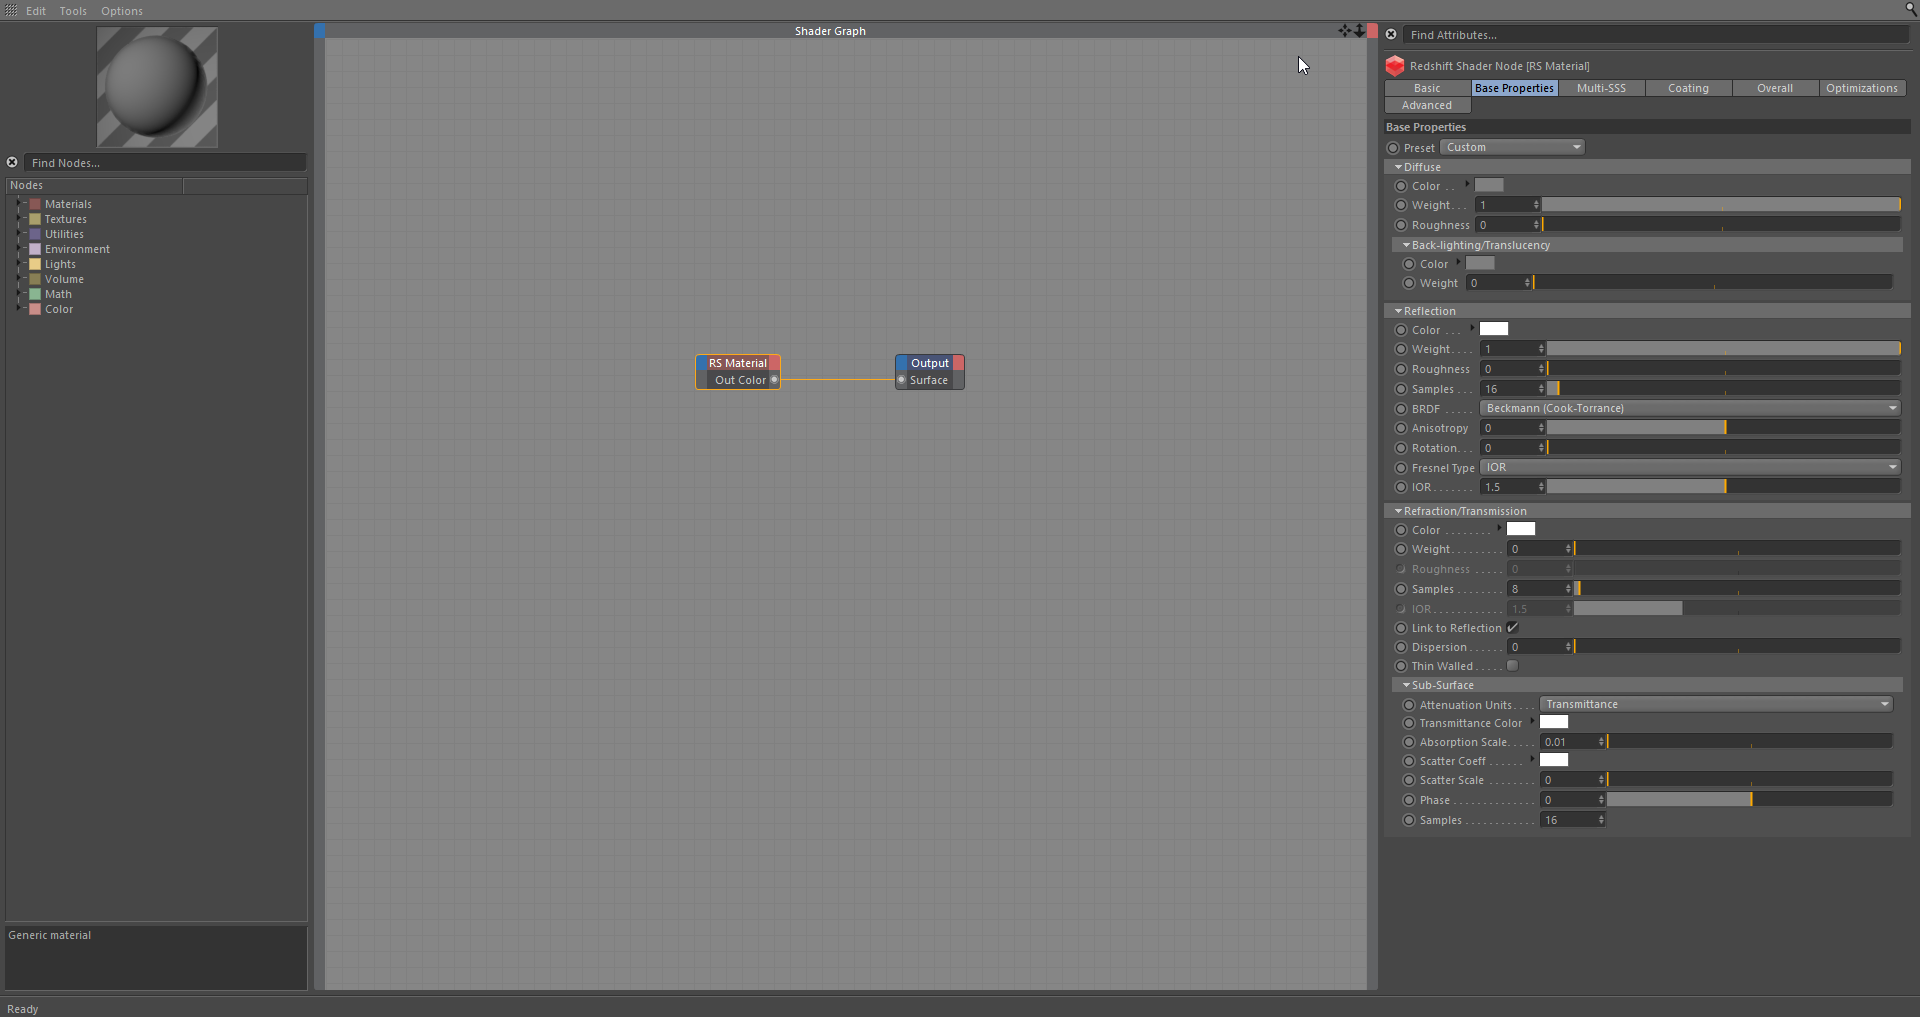
The Shader Graph Editor is broken up into a couple sections, the Node Tree which includes the Material Preview above, the Shader Graph Area, and the Attribute Manager which includes the Parameter Search box above.
着色图形编辑器分为几个部分,包括上面的材质预览的节点树、 Shader Graph Area 和包括上面的参数搜索框的属性管理器。
Shader Graph Editor
着色器图形编辑器
The Node Tree
节点树
The Node Tree located on the far left, contains all the Redshift Shader Nodes that can be added to our Graph Area. The nodes are organized into Categories depending on the type of node or its functionality.
节点树位于最左边,包含所有红移着色节点,可以添加到我们的图形区域。根据节点的类型或其功能将节点组织成类别。
Categories
类别
There are 8 different Categories of nodes to choose to from that include; Materials, Textures, Utilities, Environment, Lights, Volume, Math, and Color. Nodes inherit the color from their respected Categories once brought into the Graph Area.
有8种不同类型的节点可供选择,包括: 材质、纹理、实用工具、环境、灯光、体积、数学和颜色。节点继承颜色从他们的尊重类别一旦进入图形区域。
Search Box
搜索框
The Search Box allows you to search for specific nodes in the Node Tree for easier navigation.
搜索框允许您搜索节点树中的特定节点,以便于导航。

Node Tree
节点树
Material Preview
材料预览
Redshift uses the material preview scenes that are provided with Cinema 4D. Redshift only allows for a single rendering session at any given time, so the material preview will update after any active render has finished or is suspended.
红移使用的材质预览场景与电影4D 提供。红移只允许在任何给定时间的单个渲染会话,所以材质预览将在任何活动渲染完成或暂停后更新。

Material Preview
材料预览
Double clicking the preview will trigger a refresh, if no other render job is in progress.
如果没有其他呈现作业正在进行,双击该预览将触发刷新。
Graph Area
图形区域
The Graph Area, which is based off of Cinema 4D's Xpresso system, is located in the center of our Shader Graph window. This is where we can drag & drop nodes from our Node Tree to build our shader structures.
图形区域,基于 Cinema 4D 的 Xpresso 系统,位于我们的着色器图形窗口的中心。在这里,我们可以从节点树中拖放节点来构建着色器结构。

Graph Area
图形区域
Attribute Manager
属性管理器
The Attribute Manager located on the far right, holds an attribute editor, for editing the parameters of nodes currently selected inside the Graph Area. The attribute editor has all the same functions as the C4D built in attribute editor, including setting key frames, takes overrides etc.
属性管理器位于最右边,拥有一个属性编辑器,用于编辑当前在图形区域中选择的节点的参数。属性编辑器具有与 C4D 内置属性编辑器相同的功能,包括设置关键帧、重写等。
Parameter Search
参数搜索
The Parameter Search allows us to search for specific Attributes, in our selected node. To enable the search box click on the magnifying glass icon located at the top right.
“参数搜索”允许我们在选定的节点中搜索特定的属性。为了启用搜索框,点击右上角的放大镜图标。

Attribute Manager
属性管理器
Menu Bar
菜单栏
The Menu Bar located at the top of our Shader Graph window include; Edit, Tools, and Options.
位于着色图窗口顶部的菜单栏包括: 编辑、工具和选项。
Edit Menu
编辑菜单
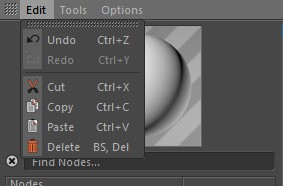
The Edit Menu includes some basic workflow options, along with their shortcuts.
编辑菜单包括一些基本的工作流选项,以及它们的快捷方式。
Tools Menu
工具菜单
The Tools Menu includes a number of options to help you inside of the Shader Graph, described below:
工具菜单包括一些选项,以帮助您在内的着色图,描述如下:
Create Texture Node
创建纹理节点
Opens up your File Explorer and after selecting a texture, Redshift will automatically create a texture node inside our Shader Graph.
打开你的文件资源管理器,选择一个纹理后,红移将自动创建一个纹理节点在我们的着色器图形。

Create Texture Node
创建纹理节点
Connect Node to Output
连接节点到输出
This command will connect the output of the currently selected node to the Surface output. This is useful in conjuction with the IPR, for quickly previewing the output of any shader in the graph
此命令将当前选定节点的输出连接到 Surface 输出。这在 IPR 中很有用,可以快速预览图中任何着色器的输出

Connect Node to Output
连接节点到输出
Tip: Binding this tool to a custom key can help speed up workflow.
提示: 将这个工具绑定到一个自定义键可以帮助加快工作流。
Connect Node to Viewport
连接 Node 到 Viewport
This command will connect the output of the currently selected node to the Viewport output. This is useful when editing the UVs for a specific texture in the graph.
此命令将当前选定节点的输出连接到 Viewport 输出。 这在为图形中的特定纹理编辑 uv 时非常有用。

Connect Node to Viewport
连接 Node 到 Viewport
To adjust the texture resolution in the viewport, go to the editor tab in the materials attribute manager, demonstrated here.
要调整视区中的纹理分辨率,请转到材质属性管理器中的编辑器选项卡,如下所示。
Optimize All Nodes 优化所有节点
Resizes nodes and deletes any inputs that don't have any connections.
调整节点大小并删除任何没有任何连接的输入。

Optimize All Nodes
优化所有节点
Colorize Graph 彩色图形
Changes node's Title Color based on its category.
根据类别更改节点的标题颜色。

Colorize Graph
彩色图形
Options Menu
选项菜单
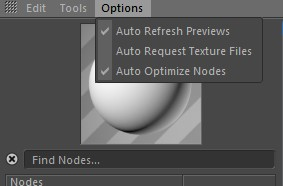
The Options Menu contains Auto settings that can be turned toggled on/off to help with workflow.
选项菜单包含自动设置,可以打开/关闭,以帮助工作流。
Auto Refresh Preview
自动刷新预览
Redshift will attempt to refresh all materials in your scene whenever you make changes to them.
红移将尝试刷新所有材料在您的场景时,你对他们作出更改。
Auto Request Texture Files
自动请求纹理文件
Whenever a texture node is dragged into the Shader Graph, Redshift will open the File Explorer by default.
无论何时将纹理节点拖动到着色器图形中,默认情况下红移都会打开文件资源管理器。
Auto Optimize Nodes
自动优化节点
Redshift will automatically optimize nodes inside your shader Graph while you work.
红移将自动优化节点内的着色图,而你的工作。


赶快留个言打破零评论!~