octane DAYlIght
Octane has a very powerful and detailed daylight system. It is a type of light you will use very often for your outdoor render. From here you can adjust the sun and sky and give various effects. It also works very efficiently as integrated with other environment lighting "HDR / Texture Environment".
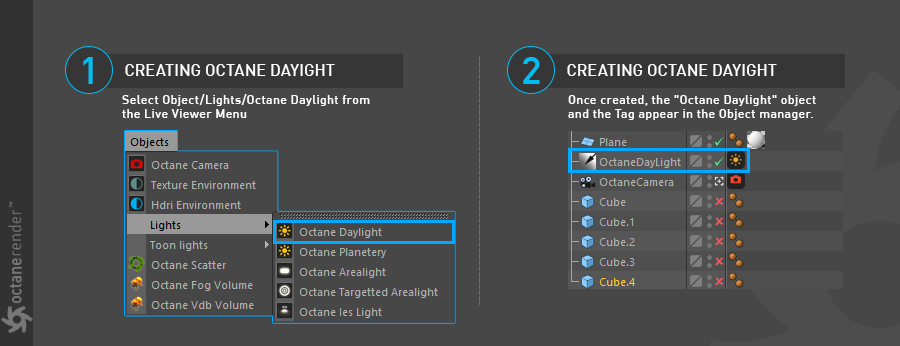
You can also create Daylight by selecting "Light / Octane Daylight" from the object menu of Live Viewer. If you select Daylight, "Octane Daylight" object and "Daylight Tag" appear in Object Manager.
Octane日光
Octane具有非常强大且详细的日光系统。 这是一种非常常用于室外渲染的光。 从这里您可以调整太阳和天空并产生各种效果。 与其他环境照明“ HDR /纹理环境”集成时,它也非常有效地工作。
您还可以通过从Live Viewer的对象菜单中选择“光/Octane日光”来创建日光。 如果选择“日光”,则“ Octane Daylight”对象和“ Daylight Tag”将出现在“对象管理器”中。
transform operatIons of the DAYlIght
日光的转换操作
Transform from the viewport or FROM THE CINEMA 4D's ROTATION COORDINATION TAB
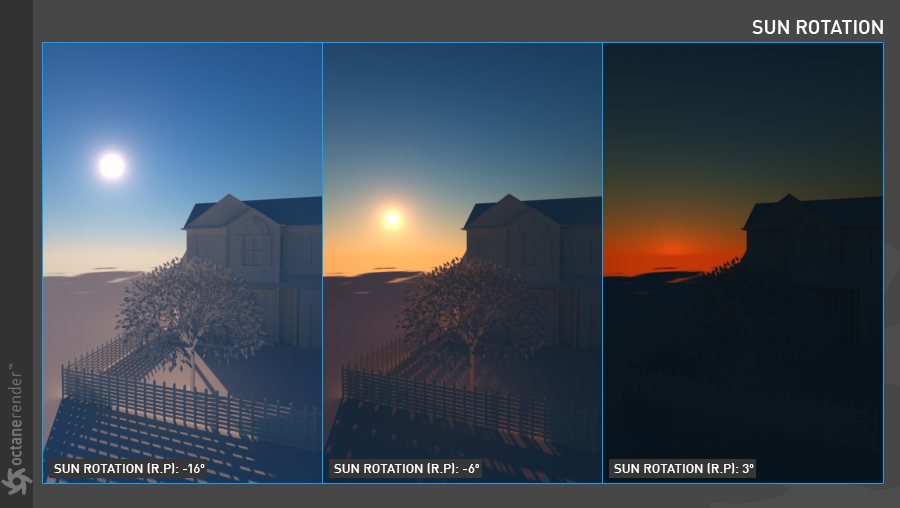
After you create Daylight, you may want to transform the light according to the nature of your scene or your purpose. Probably the first default transformation will not work. First of all, when we say Transform, we mean only Rotation value. In daylight, position and scale have no function. Octane Daylight actually uses Cinema 4D's "Infinite Light", but with use of Daylight Tag, the features of the infinite light are canceled. However, you can change the light as desired because the rotation on the scene is a global value. To do this, first choose Octane Daylight and rotate your light object using the Cinema 4D rotate tool from the viewport or from the "Coord." tab. What is important here is the rotation value "R.P". You can use this to change the elevation of the sun. Thus you can create all other time intervals with day and night. You can also use the value "R.H" value but it is recommended that you leave the default because this value also corresponds to the "North Offset" option in Daylight and we will explain this option in the Daylight Settings.
从视口或从CINEMA 4D的旋转协调选项卡进行转换
创建“日光”后,您可能要根据场景的性质或目的来变换灯光。可能第一个默认转换将无效。首先,当我们说“变换”时,我们仅指“旋转”值。在白天,位置和刻度不起作用。 Octane Daylight实际上使用了Cinema 4D的“ Infinite Light”,但是通过使用Daylight Tag,取消了Infinite Light的功能。但是,您可以根据需要更改灯光,因为场景上的旋转是全局值。为此,首先选择Octane Daylight,然后使用Cinema 4D旋转工具从视口或“坐标”中旋转灯光对象。标签。此处重要的是旋转值“ R.P”。您可以使用它来更改太阳的仰角。因此,您可以创建白天和黑夜的所有其他时间间隔。您也可以使用值“ R.H”,但是建议您保留默认值,因为该值也对应于“日光”中的“北偏移”选项,我们将在“日光设置”中对此选项进行说明。
settIng up SUN's latItude & LONGITUDE from the SUN TAG
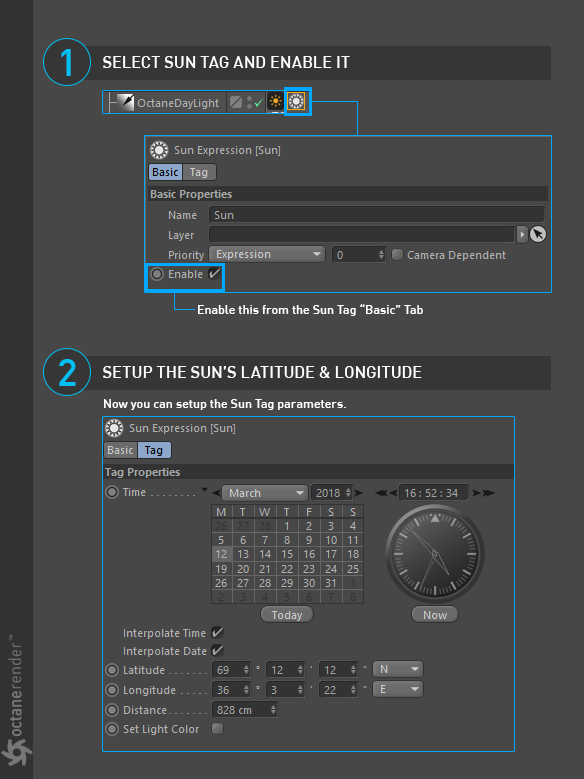
Daylight's location can also be done with the help of Sun Tag. So you will be using more realistic lighting settings of your sun. Sun Tag is off when you first create Daylight. To change this, go to the basic tab and check "Enable". You can then adjust the Latitude & Longitude settings from the Tag Tab.
从太阳标签设置太阳的经纬度
也可以在Sun Tag的帮助下从SUN TAG Daylight的位置设置SUN的纬度和经度。 因此,您将使用更逼真的阳光照明设置。 首次创建日光时,Sun Tag已关闭。 要更改此设置,请转到基本标签,然后选中“启用”。 然后,您可以从“标签”标签调整“纬度和经度”设置。
DAYLIGHT & ENVIRONMENT PRIORITIES
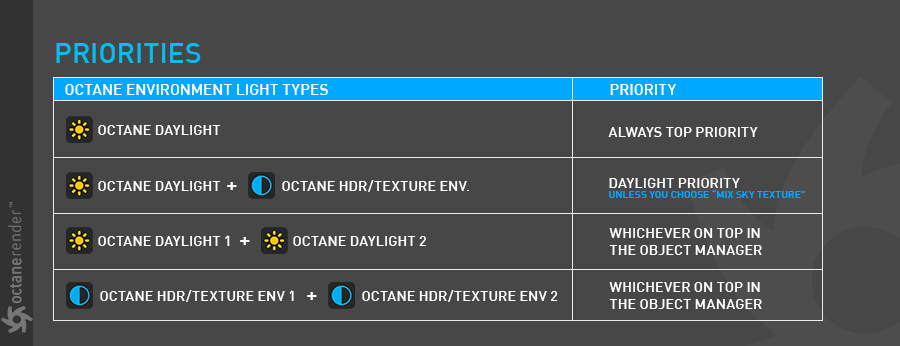
If you create a Daylight or Environment light (HDR or Texture) at the same time in Octane, the Plugin has some priorities. For example, let's say you created one Daylight and then you created one HDR environment. In such case, the priority on the scene will always be Daylight. However, HDR will not be used unless you enter the Daylight settings and select "mix sky texture". Or, if you create 2 separate HDRs and Texture Environments, the priority will be "Object Manager" based on the sorting (eg HDR environment over Texture Environment). The following table shows the priorities of the lights.
日光与环境优先级
如果在Octane中同时创建“日光”或“环境光”(HDR或“纹理”),则插件具有某些优先级。 例如,假设您创建了一个Daylight,然后创建了一个HDR环境。 在这种情况下,场景上的优先级始终是“日光”。 但是,除非您输入“日光”设置并选择“混合天空纹理”,否则将不会使用HDR。 或者,如果您创建2个单独的HDR和纹理环境,则基于排序的优先级将为“对象管理器”(例如,HDR环境优于纹理环境)。 下表显示了指示灯的优先级。
OCTANE DAYlIght settIngs
Now let's take a closer look at the options of the Daylight Tag
Octane日光设置
现在,让我们仔细看看Daylight Tag的选项
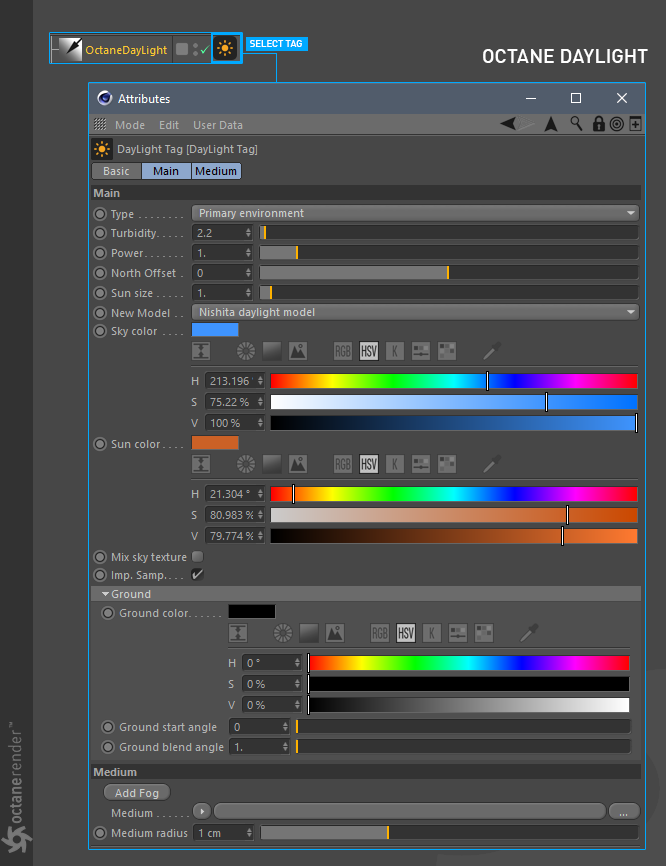
TYPE
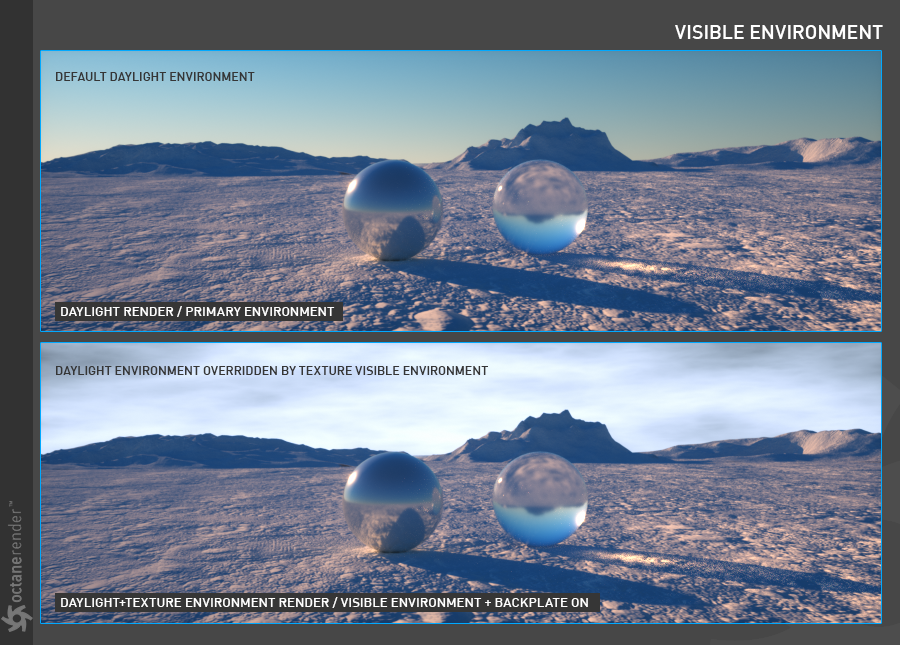
There are 2 options here: "Primary Environment" and "Visible Environment". If you want to use two separate environments in Octane, you can set one backplate and use "Visible Environment" in this menu. What does it do? Let's say you want to change the default environment of Daylight (we will not be using HDR for now). For example, instead of the blue sky, you think of a procedural sky. First of all, create a Texture Environment light from LV other than the existing Daylight. Select "Visible Environment" from "Type" of Texture environment options and select "Backplate" from the options. Immediately the Daylight Environment becomes invisible. Instead, you will see the default white color of your Texture Environment.
It is easy to define the texture for the backplate. You can go to the Texture menu and assign the type of texture you want. When the Visible Environment is active, three options are set. Now let's explain these options:
类型
这里有2个选项:“主要环境”和“可见环境”。如果要在Octane中使用两个单独的环境,则可以设置一个背板并在此菜单中使用“可见环境”。它有什么作用?假设您要更改Daylight的默认环境(我们暂时不会使用HDR)。例如,您想到的不是程序天空,而是蓝天。首先,除了现有的Daylight之外,还用LV创建一个Texture Environment光源。从“纹理”环境选项的“类型”中选择“可见环境”,然后从选项中选择“背板”。立即,日光环境变得不可见。相反,您将看到纹理环境的默认白色。
定义背板的纹理很容易。您可以转到“纹理”菜单并指定所需的纹理类型。可见环境处于活动状态时,将设置三个选项。现在让我们解释这些选项:
Backplate
You can see the texture you defined as Visible Environment by activating this option. In the picture below you can see the normal and Visible Environment difference. As you can see, when the Backplate is active, the normal daylight environment is replaced by a texture environment.
Info: The Visible Environment only functions as a backplate and the contribution to overall illumination is minimal. You need to use HDR for this.
背板
通过激活此选项,可以看到定义为“可见环境”的纹理。在下面的图片中,您可以看到正常和可见环境之间的差异。如您所见,当背板处于活动状态时,正常的日光环境将替换为纹理环境。
信息:可见环境仅用作背板,对整体照明的贡献很小。您需要为此使用HDR。
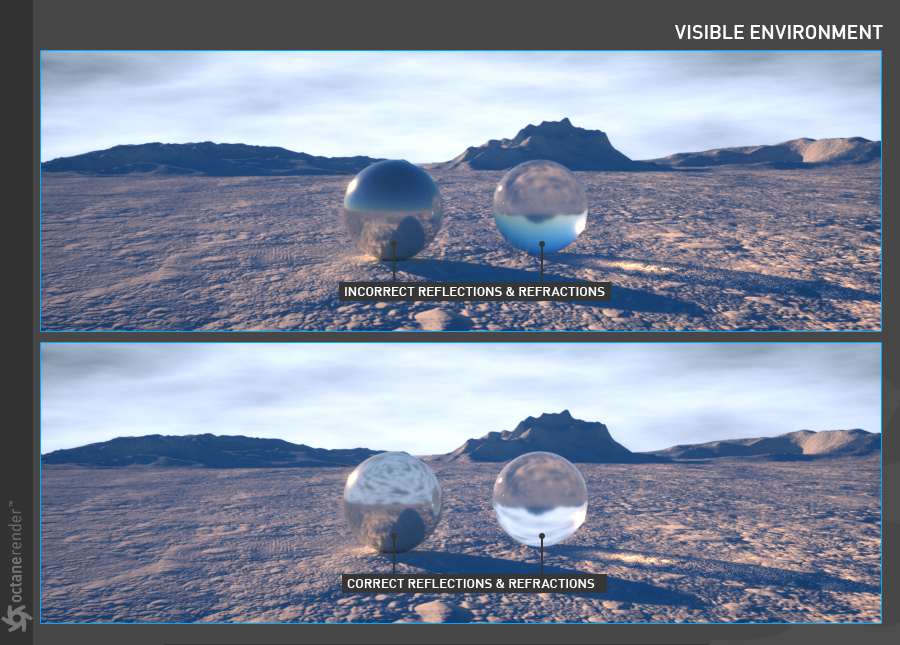
REFLECTIONS & REFRACTIONS
The visible environment will override the daylight environment when calculating reflections for specular and glossy materials.
反射和折射
计算镜面和光泽材质的反射时,可见环境将覆盖日光环境。
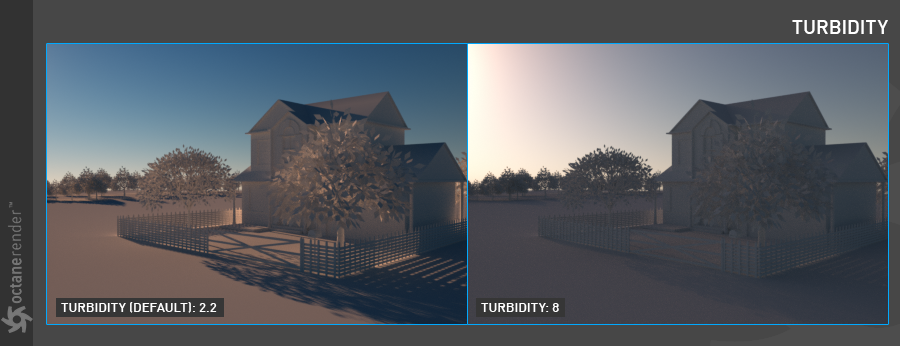
TURBIDITY
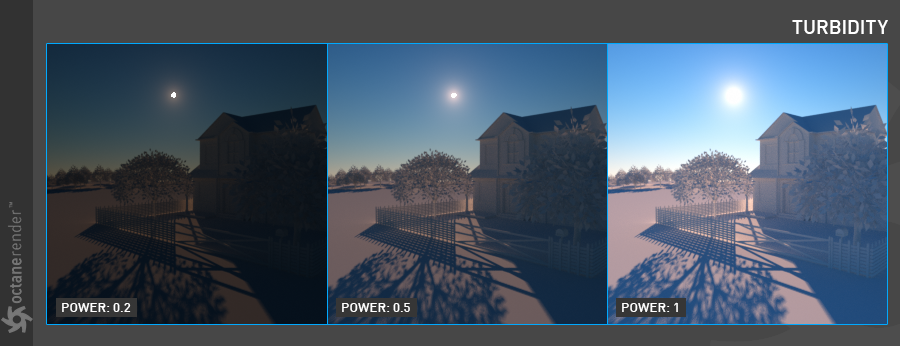
The full name is "Atmospheric Turbidity" and it's an environmental term, which is the appearance of the atmosphere as hazy or turbid, due to condensed micron-sized solid and liquid particles (aerosols) in the air of a particular area. In Octane, it changes the distribution of sunlight and the sharpness of the shadows. A low value creates sharp shadows (like on a sunny day) and a higher value diffuses the shadows similarly to a cloudy day. You can also create a beautiful clear sky or a pessimistic atmosphere with this option. Turbidity differences shown in the picture below.
浊度
全称是“大气浊度”,它是一个环境术语,是由于特定区域空气中的微米级固体和液体颗粒(气溶胶)冷凝而导致的大气浑浊或浑浊。 在Octane中,它会改变阳光的分布和阴影的清晰度。 较低的值会产生锐利的阴影(例如在晴天),较高的值会类似于阴天使阴影漫射。 您也可以使用此选项创建美丽的晴空或悲观气氛。 浊度差异如下图所示。
power
The Power slider can be used to adjust the strength of the light. This can affect overall contrast and exposure level of the render.
功率
电源滑块可用于调整光的强度。 这会影响渲染的总体对比度和曝光水平。
north offset
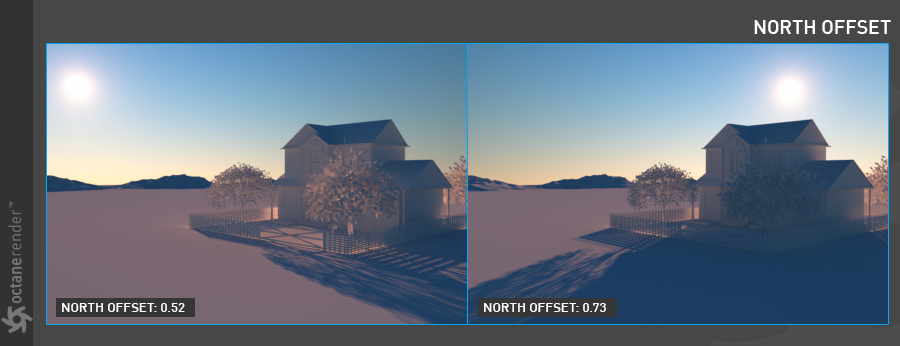
The North offset can be used to adjust the actual North direction of the scene. This is useful for Architecture Visualization to ensure the direction of the sun is accurate to the scene. You can also change the North Offset by playing the "R.H" rotation of the light from the viewport.
北偏移
北偏移可用于调整场景的实际北方向。 这对于“架构可视化”很有用,以确保太阳的方向与场景准确。 也可以通过播放视口中的灯光的“ R.H”旋转来更改“北偏移”。
SUN SIZE
From here you can set the radius of the sun. If the radius is big, the shadows appear soft. Or vice versa.
太阳大小
从这里可以设置太阳的半径。 如果半径较大,阴影将显得柔和。 或相反亦然。

new model
This specifies which daylight model to be used as the current environment. The old daylight model lights a scene with basic spectral radiance as the sun moves over the horizon at a relative distance from the object. The new daylight model is used to simulate full spectrum daylight providing more sky color variation as the sun moves along and bearing shorter rays as the sun moves closer to the normal plane. The Nishita Light Mode implements atmospheric scattering based on the Nishita Sky Model and displays the variations of color which are optical effects caused by the particles in the atmosphere.
Info: You can't change the color of the sun and sky in Nishita Model. Since it is a physical model, both sun and sky colors depend on the sun's rotation and atmosphere scattering. The reason for changing the colors of both the sun and the sky is because the particles in the atmosphere (such as air molecules, aerosols) scatters the sunlight.
新模型
这指定将哪个日光模型用作当前环境。 当太阳在距对象相对距离的水平线上移动时,旧的日光模型会以基本光谱辐射照亮场景。 新的日光模型用于模拟全光谱日光,当太阳沿着时移动时会提供更多的天空颜色变化,并且当太阳靠近法线平面时会发出较短的光线。 西田光模式基于西田天空模型实现大气散射,并显示颜色变化,这些变化是由大气中的粒子引起的光学效应。
信息:您无法在Nishita Model中更改太阳和天空的颜色。 由于它是一个物理模型,所以太阳和天空的颜色都取决于太阳的旋转和大气散射。 改变太阳和天空的颜色的原因是因为大气中的颗粒(例如空气分子,气溶胶)会散射阳光。

sky & SUN COLOR
Here you can adjust the sky and sun colors.
天空和太阳的色彩
在这里您可以调整天空和太阳的颜色。
mIX sky texture
This option is for using Daylight Sky with HDR / Texture. When activated, your other HDR / Texture environment begins to illuminate the scene, but your daylight sun keep its location and other features. Now let's explain how this option works in a few
examples.
混合天空纹理
此选项用于将Daylight Sky与HDR /纹理配合使用。 激活后,您的其他HDR /纹理环境开始照亮场景,但是日光保持其位置和其他功能。 现在,在几个示例中说明该选项的工作方式。
Mix Daylight Sky with HDR/Texture Environment
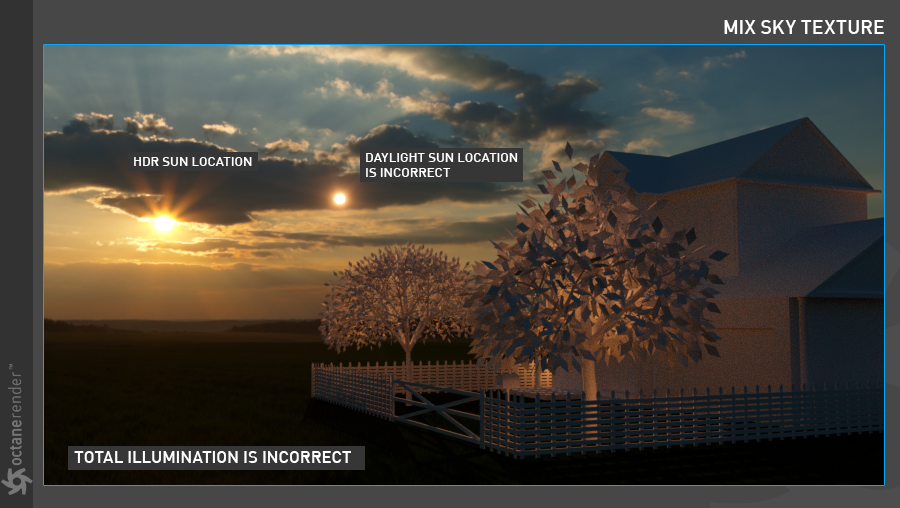
Create one HDR or Texture Environment. Define the image for HDR or Texture and play with the settings if necessary (you can look at the next section for the HDR / Texture Environment topic). Activate "Mix Sky Texture" from Daylight. As you can see in the picture, the HDR environment now works with the Daylight system. But in the picture it is necessary to match the daylight sunshine with the HDR sun, because the current lighting is totally wrong. In the next section we will explain how to fix this situation.
将日光天空与HDR /纹理环境混合
创建一个HDR或纹理环境。 定义HDR或Texture的图像,并在必要时使用设置进行播放(您可以在HDR / Texture Environment主题的下一部分中查看)。 从日光激活“混合天空纹理”。 如您在图片中看到的,HDR环境现在可以与Daylight系统一起使用。 但是在图片中,必须使日光与HDR太阳匹配,因为当前的照明完全错误。 在下一节中,我们将说明如何解决这种情况。
FIX & MATCH Daylight SUN ACCORDING TO THE HDR SUN
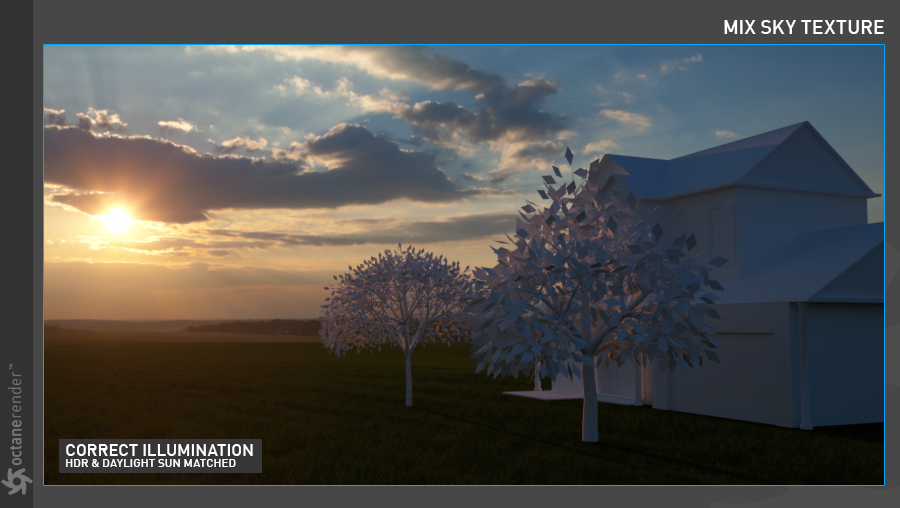
The way to match the daylight sun with the HDR sun you see in the picture above is to manual adjust by playing Daylight with both from the viewport rotation (H.P. and R.P) and the north offset. Once you do this, you can child the Daylight to the HDR environment. So the your daylight rotates with in every rotation of the Sky object. This is the most practical way.
根据HDR太阳修正和匹配日光太阳
使日光与上图中显示的HDR日光匹配的方法是通过在视口旋转(水平和垂直)和向北偏移的同时播放日光来进行手动调整。 完成此操作后,您可以将Daylight设置为HDR环境。 因此,您的日光随着“天空”对象的每次旋转而旋转。 这是最实用的方法。
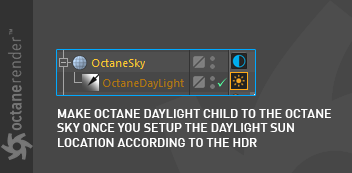
As you can see in the picture below, daylight sky sun is in a match with the HDR sun. There is no incorrect lighting as in the previous picture. Daylight Sun will follow in every rotation of the HDR sky. You can also play with the Daylight Tag settings (such as power and turbidity) to better match the light.
如下图所示,白天的太阳与HDR的太阳相匹配。 没有上图所示的错误照明。 日光太阳将跟随HDR天空的每一次旋转。 您还可以使用“日光标签”设置(例如功率和浊度)来更好地匹配灯光。
Importance samplIng
Enables quicker convergence (noise reduction) for certain areas so the sample rays that resolve to the important areas more often than unimportant areas. This means the ray tracing is more efficient as it is not wasting time on rays that do not contribute much to the overall image quality. Due to the added complexity this will reduce the Ms/sec of rendering, but each Ms will be more effective, therefore resulting in a higher image quality in less time. Importance sampling is enabled by default.
重要采样
在某些区域实现更快的收敛(降噪),因此与不重要的区域相比,采样射线更容易分辨重要区域。 这意味着光线追踪更为有效,因为它不会浪费时间在对整体图像质量没有多大贡献的光线上。 由于增加的复杂性,这将降低渲染的毫秒/秒,但每个毫秒将更有效,因此可以在更短的时间内获得更高的图像质量。 默认情况下会启用重要性采样。
ground color, Ground start angle & ground blend angle
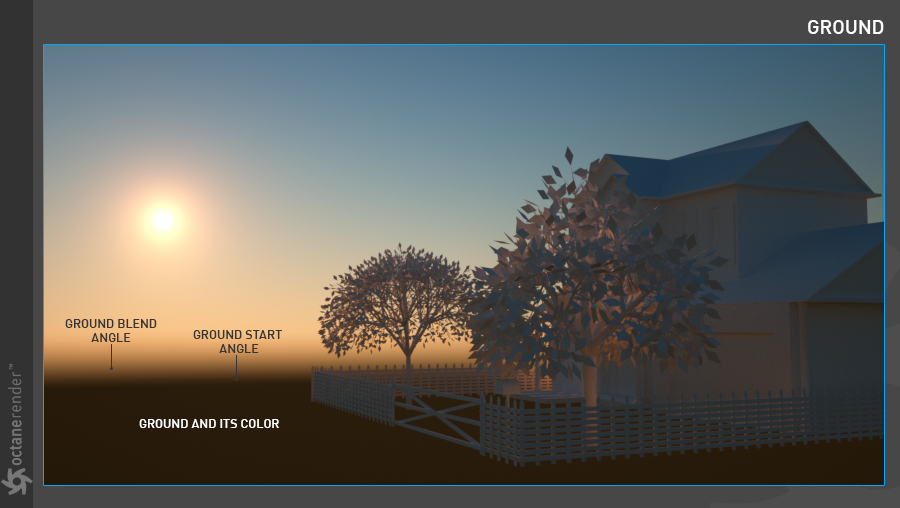
When you first create daylight, the color of the ground is black. You can set the color of the ground. Ground Start indicates where to start. Ground Blend Angle is used to mix the sky with the ground.
地面颜色,地面起始角度和地面混合角度
首次创建日光时,地面的颜色为黑色。 您可以设置地面的颜色。 地面启动指示从哪里开始。 地面混合角度用于将天空与地面混合。
DAYlIght MEDIUM settIngs
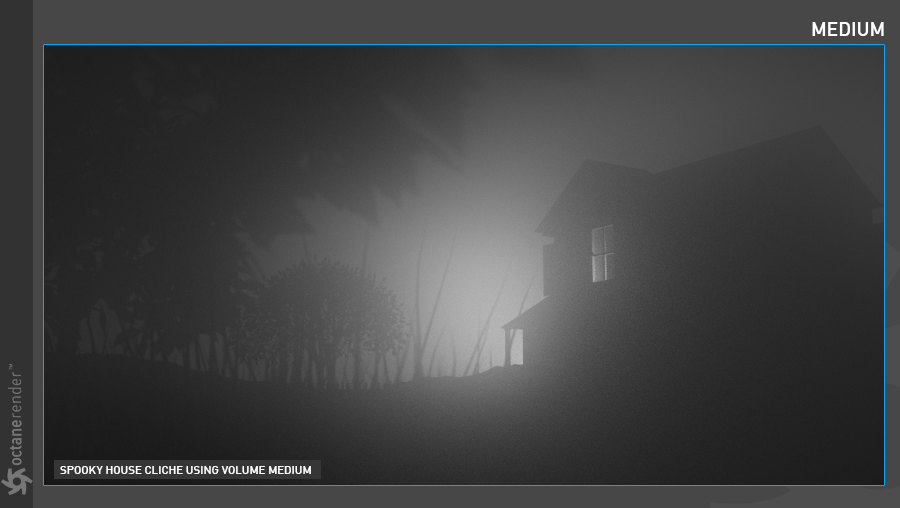
It is used to give a fog to the daylight system. You can create very nice atmospheric fog because it applies to the scene in general. This fog is not a fake fog but Volume Medium. It interacts directly with any lighting in the scene. Since this topic is wide, we will explain more detail in the "Volumetrics" section.
日光介质设置
它用于使日光系统起雾。 您可以创建非常好的大气雾,因为它通常适用于场景。 这种雾不是假雾,而是中等体积。 它与场景中的任何灯光直接交互。 由于本主题涉及广泛,因此我们将在“体积”一节中解释更多详细信息。


赶快留个言打破零评论!~