BAKING TEXTURE
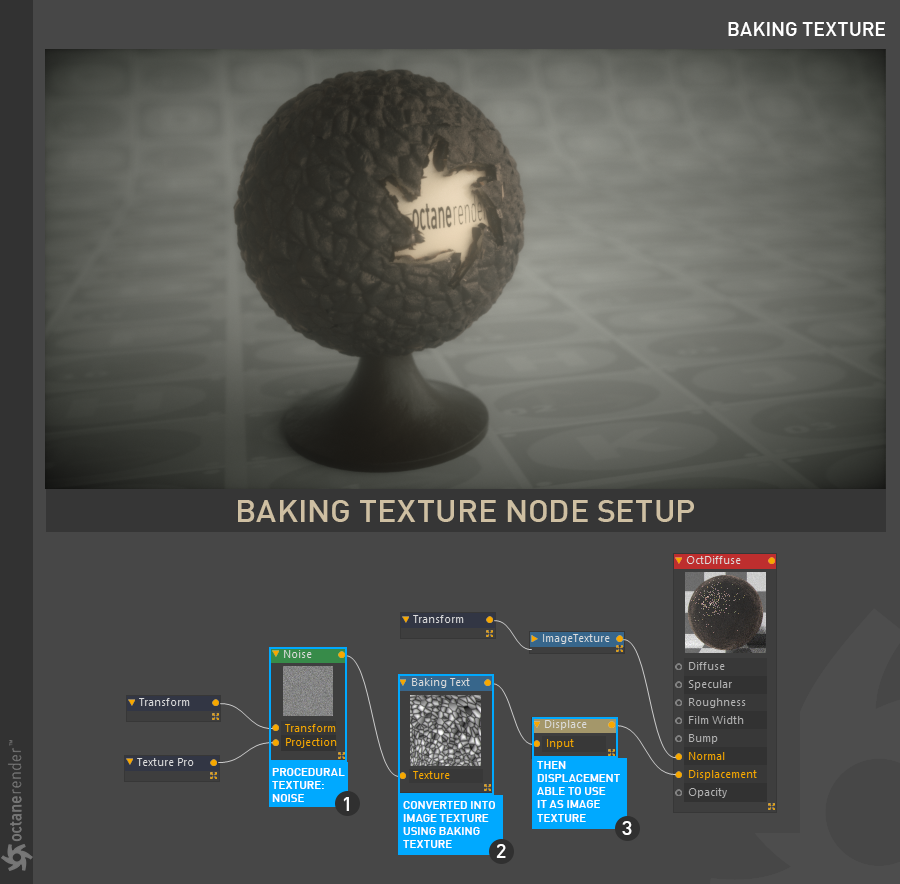
This tool converts any procedural texture to image texture. So you can use the full potential of procedural textures. It is a very useful tool. For example, if you want to use Displacement in Octane, you could only do this with image texture. With this tool, however, it is possible to convert the procedural texture to the image texture and use it in the displacement channel.
烘培纹理
该工具将任何程序纹理转换为图像纹理。 因此,您可以充分利用程序纹理的潜力。 这是一个非常有用的工具。 例如,如果要在Octane中使用“置换”,则只能对图像纹理进行处理。 但是,使用此工具可以将程序纹理转换为图像纹理,并在置换通道中使用它。

how to use: BAKING PROCEDURAL TEXTURE FOR DISPLACEMENT
It is very simple to use and the best part it's real time. You can change anything you want and see the result immediately. First enter the Node editor and prepare the setup as you see in the picture below. If you have not read the section on Node editor we recommend reading this section first. Because you need to know some fundemental working principles about the Node editor. The setup is quite simple as you can see in the picture. All you have to do is connect the procedural texture (Noise) to the "baking texture" node first and then connect the "baking texture" to the Displacement node. Once you have set all this connection, you can connect Displacement to the "Displacement Channel" of the main material.
如何使用:烘焙程序纹理以进行置换
它非常易于使用,而且最好的部分是实时的。您可以更改所需的任何内容并立即查看结果。首先进入节点编辑器并准备设置,如下图所示。如果您尚未阅读关于节点编辑器的部分,我们建议您先阅读此部分。因为您需要了解有关Node编辑器的一些基本工作原理。如图所示,设置非常简单。您所要做的就是首先将程序纹理(Noise)连接到“烘焙纹理”节点,然后将“烘焙纹理”连接到“置换”节点。一旦设置了所有此连接,就可以将“置换”连接到主要材质的“置换通道”。
If you do not want to deal with this, you can download this scene from the link below. After downloading, you can open the scene and examine it. For example, you can play with noise texture settings and get completely different results. Do not bother with other nodes used on the editor. We will explain each one in the next chapters individually. For now, just focus on "Baking textures".
如果您不想处理此问题,可以从下面的链接下载此场景。下载后,您可以打开场景并进行检查。例如,您可以使用噪波纹理设置来获得完全不同的结果。不要打扰编辑器上使用的其他节点。我们将在下一章中分别解释每一个。现在,仅关注“烘焙纹理”。
Download the scene from here
Info: Texture Baking is part of a texture groups. It should not be confused with camera or object baking. These last two will explain in the next chapters.
从这里下载场景
信息:纹理烘焙是纹理组的一部分。请勿将其与照相机或物体烘焙混淆。这最后两个将在下一章中进行解释。
BAKING TEXTURE SETTINGS
烘焙纹理设置
Texture
From here you can define any procedural texture. Octane's procedural textures work more efficiently than those of Cinema 4D. For example, if you use noise texture, it is recommended that you use Octane Noise.
贴图
在这里,您可以定义任何程序纹理。 Octane的程序纹理比Cinema 4D更有效。例如,如果使用噪波纹理,则建议使用Octane噪波。
enable bakIng
This option explains itself.
启用bakIng
此选项自行说明。
RESOLUTION
From here you can determine the resolution of the texture to be converted. Higher resolutions require more RAM and GPU power. If you are going to look closely at your object, it is recommended that you keep the resolution high. On the contrary, if you have objects with certain distance, you can keep the resolution low. Use completely based on your scene structure and your purpose.
分辨率
从这里可以确定要转换的纹理的分辨率。更高的分辨率需要更多的RAM和GPU功能。如果要仔细看物体,建议保持较高的分辨率。相反,如果您有一定距离的物体,则可以保持较低的分辨率。完全根据您的场景结构和目的使用。
samples per pIxel
Here you can determine how many samples you will use per pixel. 32 is the default value. You can increase it gradually when it's not enough.
每个像素的采样
在这里,您可以确定每个像素要使用多少个采样。默认值为32。您可以在不够时逐渐增加它。
TYPE
You can think of this option as the bit-depth of the bake texture. LDR stands for 8 bit. HDR Linear Space can be used if the image you have uploaded has 32 bit-depth.
类型
您可以将此选项视为烘焙纹理的位深度。 LDR代表8位。如果您上传的图像具有32位深度,则可以使用HDR线性空间。
RGB BakIng
Here you can convert RGB values according to the type of procedural texture. If your procedural texture has RGB values, enable this option. If you are using a greyscale values like in the example above, leave this option off.
RGB BakIng
在这里,您可以根据程序纹理的类型来转换RGB值。如果您的程序纹理具有RGB值,请启用此选项。如果您使用的是上面示例中的灰度值,请关闭此选项。
Power
Here you can adjust the intensity value of the baked texture.
功率
在这里,您可以调整烘焙纹理的强度值。
GAMMA
Here you can adjust the gamma value of the baked texture.
伽玛
在这里,您可以调整烘焙纹理的伽玛值。
INVERT
Inverts the baked texture.
反相
反转烘焙的纹理。
uvw transform
We explained the UVW Transform under the title of "Transform/Projection"
UVW 变换
我们以“变换/投射”为标题解释了UVW变换
ProjectIon
We explained the Projection under the title of "Transform/Projection"
投射
我们以“变换/投射”为标题解释了投影
border mode
We will explain this option in detail in the "Image Texture" section.
边界模式
我们将在“图像纹理”部分中详细说明此选项。

赶快留个言打破零评论!~