SETUP
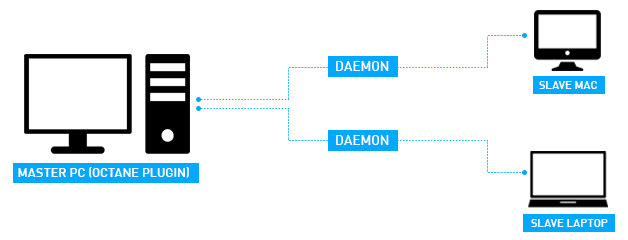
As you can see in the diagram, we have one Master PC and two Slave computers, one of them is MAC and the other is Laptop. We want to use these 2 slave's GPU(s) in our renders. The scenario is simple.
Info: To benefit from Network Rendering, the master machine must have the Combo license (Octane Standalone + C4D Plugin) and only the Octane Standalone License on slave machines.
Info: Ensure that the master and the slave are not blocked by the Operating System firewall or any firewalls in the network. This can be done, for example, by turning off the firewall for home/work networks on the master. If that does not help, also try switching off the firewall on the slave computer for home/work networks.
设定
从图中可以看到,我们有一台主PC和两台从计算机,其中一台是MAC,另一台是笔记本电脑。 我们要在渲染中使用这两个从属的GPU。 场景很简单。
信息:要从网络渲染中受益,主计算机必须具有Combo许可证(Octane Standalone + C4D插件),而从计算机则仅具有Octane Standalone许可证。
信息:确保主机和从机未被操作系统防火墙或网络中的任何防火墙阻止。 例如,可以通过关闭主服务器上家庭/工作网络的防火墙来完成此操作。 如果这样做没有帮助,请尝试关闭用于家庭/工作网络的从属计算机上的防火墙。
1. INSTALLING DAEMON(s)
Now we will install daemon utility to the slave machines. The daemon is the little program that starts a slave process on the machine (on request by a master), monitors it and stops it (on request by a master). Monitoring means making sure that a running slave sends a regular “heartbeat” to the daemon and if that doesn’t happen it will try to stop the slave gracefully and if that does not work, it kills the process. The daemon runs all the time and starts/stops a slave process if a master requests it. The daemon also listens for the “heartbeat” of the slave to check if the slave process is still running at all. This slave daemon eliminates the need to launch the slave process manually on each computer each time rendering is required on the slave.
To install the Slave Daemon, first go to the standalone install folder. In this folder, run the command line utility named "_install_daemon.bat". The Command line window will appear and there will be some options. Let us briefly explain these.
Info: You must perform the Daemon Install process described below for each slave machine separately.
Port Setting
From here you can specify which port the Daemon will listen to. If you are a good network specialist enter the required port here, but leave it as default if you have regular network knowledge. The default port is 48000. Use this default value by pressing Enter.
1.安装DAEMON
现在,我们将daemon实用程序安装到从属计算机上。守护程序是一个小程序,用于启动计算机上的从属进程(根据主机的请求),对其进行监视并停止它(根据主机的请求)。监视意味着确保运行中的从属设备向守护程序发送常规的“心跳”,如果没有发生,它将尝试优雅地停止该从属设备,如果不起作用,则将终止该进程。守护程序始终运行,并在主服务器请求时启动/停止从属进程。守护程序还侦听从属服务器的“心跳”,以检查从属进程是否仍在运行。从属守护程序消除了每次需要在从属计算机上渲染时在每台计算机上手动启动从属进程的需要。
要安装从属守护程序,首先进入独立的安装文件夹。在此文件夹中,运行名为“ _install_daemon.bat”的命令行实用程序。命令行窗口将会出现,并且会有一些选项。让我们简要地解释这些。
信息:您必须分别为每台从属计算机执行以下描述的后台驻留程序安装过程。
端口设定
在这里,您可以指定守护程序将监听的端口。如果您是优秀的网络专家,请在此处输入所需的端口,但是如果您具有常规的网络知识,则将其保留为默认端口。默认端口是48000。按Enter键使用此默认值。

gpu(s) Setting
From here you can see a list of GPU(s) on the slave machine and choose which one to use. For example, if you have 3 GPUs and you want to use only 2 of them, you just need to write the following line: "1, 2" (without quatos). If you press Enter, you default to using all GPUs.
GPU设置
在这里,您可以看到从机上的GPU列表,并选择要使用的GPU。 例如,如果您有3个GPU,而您只想使用其中2个,则只需编写以下行:“ 1、2”(不包含quatos)。 如果按Enter,则默认使用所有GPU。

out of core textures setup
From here you can specify whether you want to use the Octane out of Core texture on the slave machine. If your VRAM amount is sufficient, you can skip this feature by entering "0". Also you can get detailed information about Out of core feature from this link.
超出核心纹理设置
在这里,您可以指定是否要在从属计算机上使用“Octane超出核心”纹理。 如果您的VRAM数量足够,您可以通过输入“ 0”来跳过此功能。 您也可以从此链接获取有关核心外功能的详细信息。

confIRM & FINISH INSTALLATION
A confirmation text will appear after you have made all the settings. If all your settings are correct, say "yes" and complete the installation. Then you can turn off the command line utility by pressing any key.
确认并完成安装
进行所有设置后,将出现确认文本。 如果所有设置正确,请说“是”并完成安装。 然后,您可以通过按任意键来关闭命令行实用程序。

2. STARTING DAEMON(s)
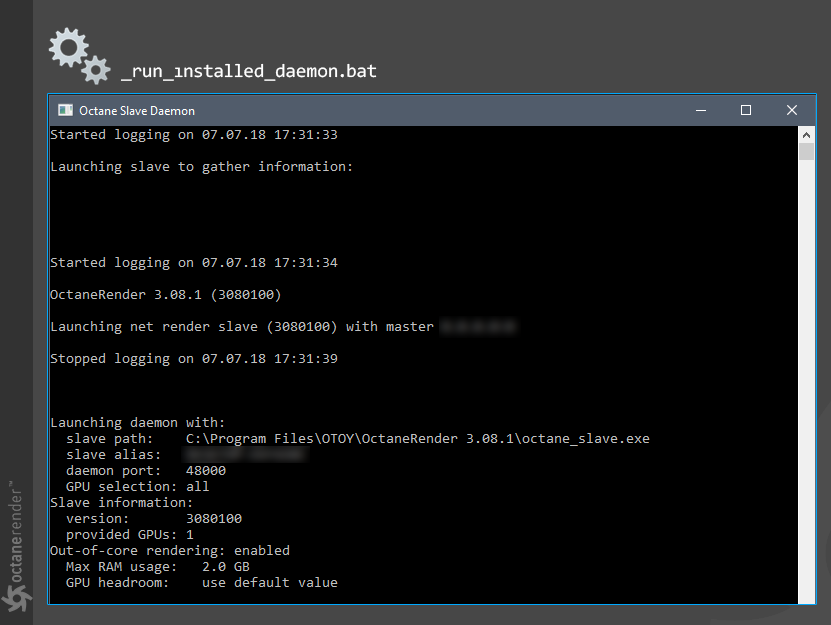
Now you need to run Slave Daemon in slave machines. Thus Daemon will keep and ready to using slave machines every time for rendering requests from Master machine. For this, go to the folder where Standalone is installed and run "_run_installed_daemon.bat". Daemon will run the command "octane_slave.exe" automatically. You can see the properties of the slave machine in the command line window that appears on the screen. Now the slave machine is ready for the network render.
Info: This window must be opened at all times. Daemon will run automatically when you restart the computer.
2.启动DAEMON
现在您需要在从属计算机中运行Slave Daemon。 因此,Daemon每次都会保留并准备使用从属计算机来呈现来自主计算机的请求。 为此,请转到安装了Standalone的文件夹,然后运行“ _run_installed_daemon.bat”。 守护程序将自动运行命令“ octane_slave.exe”。 您可以在屏幕上显示的命令行窗口中查看从机的属性。 现在,从机已准备好进行网络渲染。
信息:必须始终打开此窗口。 重新启动计算机时,守护程序将自动运行。
3. USING NETWORK RENDER (IN LIVE VIEWER)
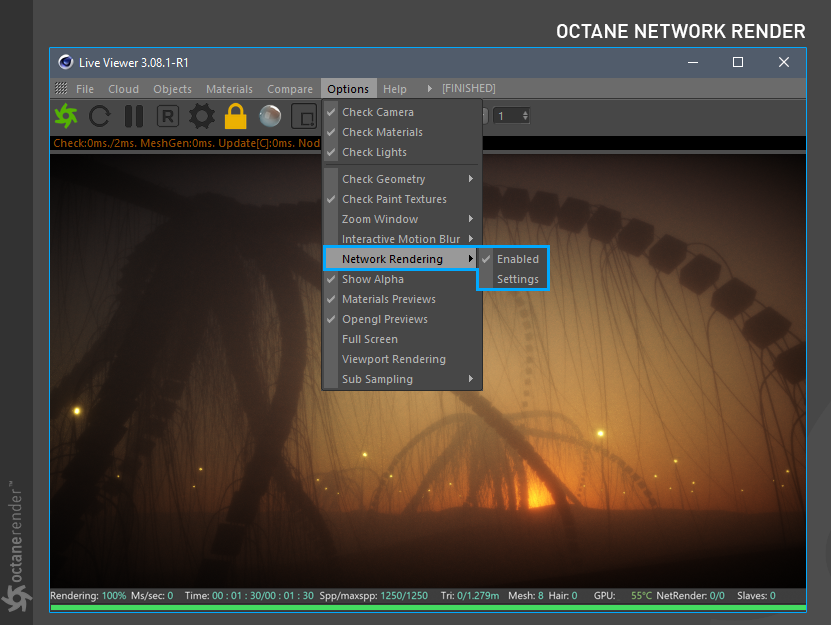
Now you are done with the setup of slave machines. Now it's time to use these machines' GPUs in your render. To do this, open Cinema 4D, upload any project, and launch Live Viewer. From the LV menu go to "Options/Network Rendering" and select "Enabled". Then go to the Settings.
3.使用网络渲染器(在实时查看器中)
现在,您已完成从机的设置。 现在是时候在渲染中使用这些机器的GPU了。 为此,请打开Cinema 4D,上传任何项目,然后启动Live Viewer。 从LV菜单转到“选项/网络渲染”,然后选择“启用”。 然后转到设置。
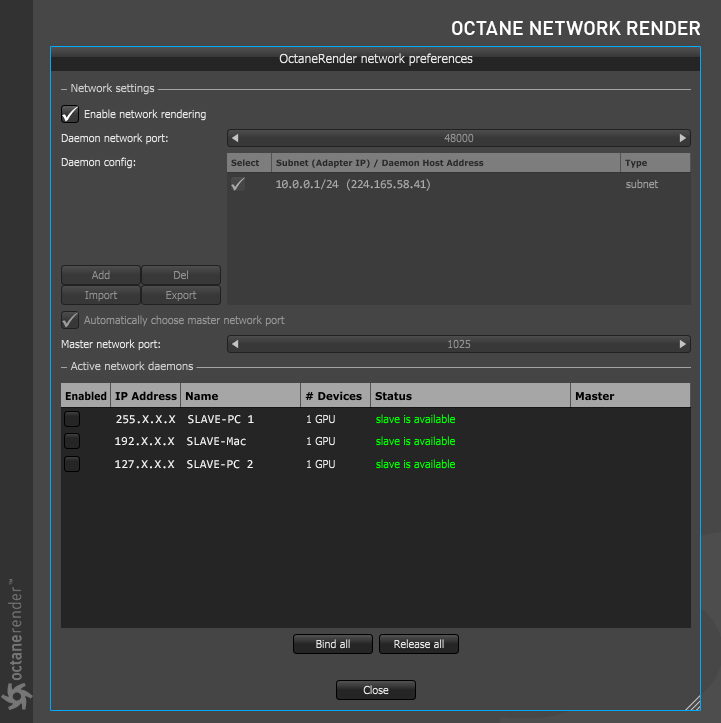
When the Settings window appears, you can see the network settings and the slave machines in general. Daemon utility running on other machines plays a key role in communication with both master and slave machines. The Subnet (Adapter Ip) and Daemon Host Address you see in the Daemon Config window are the physical address of your modem (or Network Hub). If more than one address appears in this section, you need to know the physical address of the network hub or modem to choose the correct one. The correct IP you need to find is the Daemon Host address. Finding the IP address is quite easy. If you are working in the Windows operating system, open a command line (cmd.exe) window and type "ipconfig" (without quatos) on the command line. Your ip address will appear. If you are working on a Macintosh, press the apple icon from the "Finder" and select "system preferences". Click on the network and select the ethernet on the left. In the middle you will see the Mac IP address. These IPs are the physical IPs of your machine and are listed in the Daemon Config. Select and mark the correct IP.
After you have correctly identified your Subnet IP, a list of your slave machines will appear in "Active Network Daemons". When you see the "slave is available" in the status section, the slave machines are now ready for network rendering. When you check the boxes next to these machines you will see the "slave is running" shortly. Alternatively you can click "Bind all" to activate all slave machines. After all these settings you can close the Network window. Now it's time to render.
出现“设置”窗口时,通常可以看到网络设置和从属计算机。在其他计算机上运行的Daemon实用程序在与主计算机和从计算机通信中起着关键作用。您在“守护程序配置”窗口中看到的子网(适配器Ip)和守护程序主机地址是调制解调器(或网络集线器)的物理地址。如果本节中出现多个地址,则需要知道网络集线器或调制解调器的物理地址以选择正确的地址。您需要找到的正确IP是守护程序主机地址。查找IP地址非常容易。如果您使用Windows操作系统,请打开命令行(cmd.exe)窗口,然后在命令行上键入“ ipconfig”(不包含quatos)。您的IP地址将出现。如果您使用的是Macintosh,请从“ Finder”中按苹果图标,然后选择“系统偏好设置”。单击网络,然后选择左侧的以太网。在中间,您将看到Mac IP地址。这些IP是计算机的物理IP,并在Daemon Config中列出。选择并标记正确的IP。
正确标识子网IP后,从属计算机列表将出现在“活动网络守护程序”中。当您在状态部分中看到“从属设备可用”时,从属计算机现在就可以进行网络渲染了。当您选中这些机器旁边的框时,您很快就会看到“从机正在运行”。或者,您可以单击“全部绑定”以激活所有从属计算机。完成所有这些设置后,您可以关闭“网络”窗口。现在是时候渲染了。
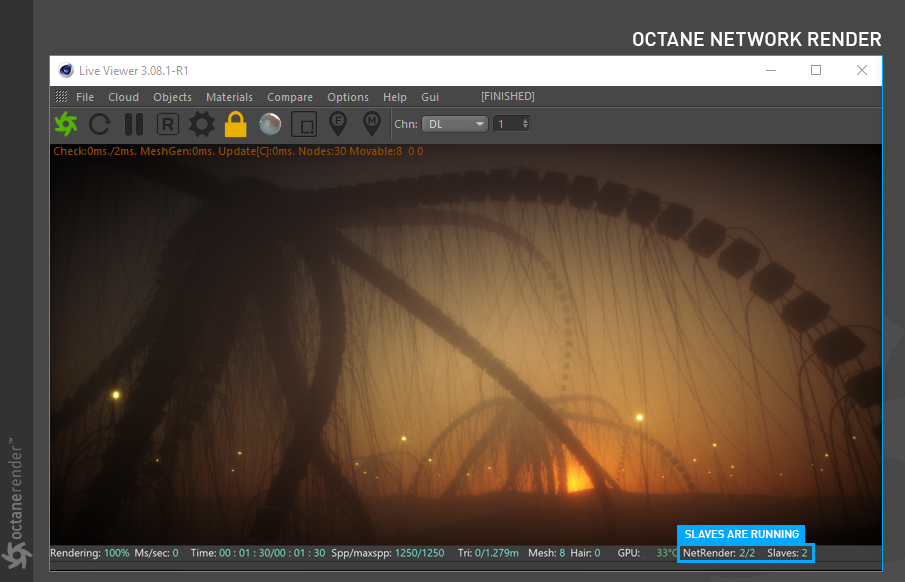
Restart Live Viewer. If you have done all the settings correctly, you can see in the LV window that "NetRender" and "Slaves" are active (in the lower info section). These 2 options mean that network render works. Likewise, you can find continuously updated log info for the slave machines in the Daemon Command Line window. If you want a more advanced log, you can choose "Console (Shift + F10)" from the "Script" menu of Cinema 4D.
重新启动Live Viewer。 如果正确完成所有设置,则可以在LV窗口中看到“ NetRender”和“ Slaves”处于活动状态(在下部信息部分)。 这两个选项表示网络渲染有效。 同样,您可以在“守护程序命令行”窗口中找到从机的持续更新的日志信息。 如果需要更高级的日志,可以从Cinema 4D的“脚本”菜单中选择“控制台(Shift + F10)”。
3. USING NETWORK RENDER (IN PICTURE VIEWER)
If you want to use the network render for the picture viewer, first open the Cinema 4d render settings (CTRL + B). From there, go to the Network Render section in the Octane Renderer Main settings. Check the "Enable Network Rendering" and "Bind all" options. If you want, you can switch or change your network settings again by pressing the "Network Preferences" button.
3.使用网络渲染器(在图片查看器中)
如果要将网络渲染用于图片查看器,请首先打开Cinema 4d渲染设置(CTRL + B)。 从那里转到Octane Renderer Main设置中的Network Render部分。 选中“启用网络渲染”和“全部绑定”选项。 如果需要,可以通过按“网络首选项”按钮再次切换或更改网络设置。

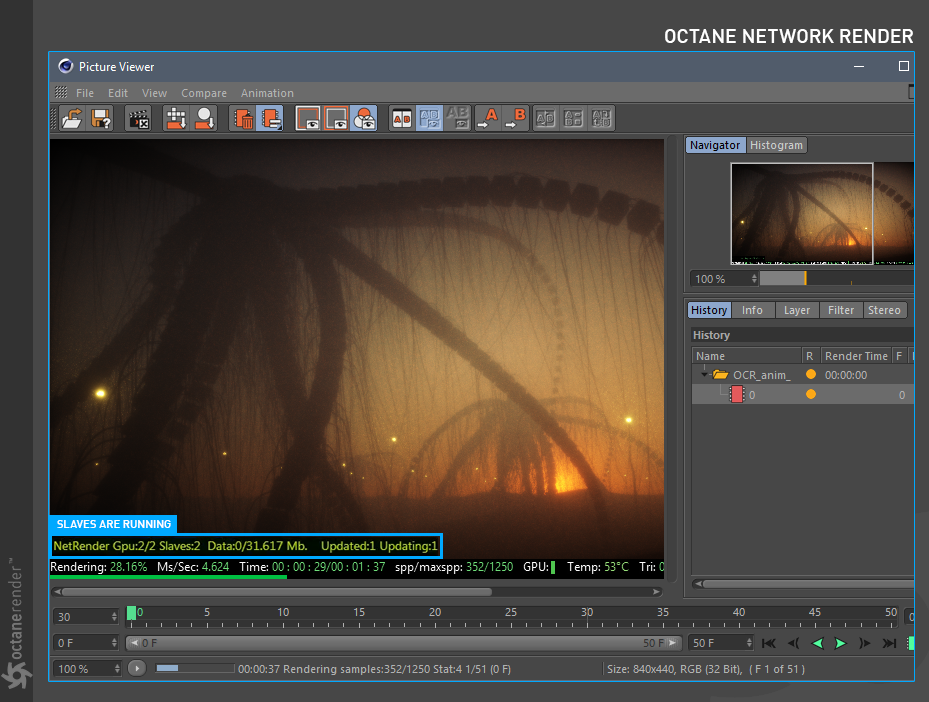
After making these settings, start PV render. After a while, you can see info about network render usage in the picture viewer as you can see in the picture below.
进行这些设置后,启动PV渲染。 一段时间后,您可以在图片查看器中看到有关网络渲染使用情况的信息,如下图所示。


赶快留个言打破零评论!~