Texture Options 纹理选项
Introduction
引言
The Redshift Texture Options give you better control over texture filtering and MIP-mapping on a per-texture basis.
Unless absolutely necessary, it is recommended the Texture Options be left at the default settings, otherwise rendering and texture out-of-core performance can suffer.
红移纹理选项可以让你更好地控制每个纹理的纹理滤镜和 mip 映射。除非绝对必要,建议将纹理选项保留在默认设置,否则渲染和纹理外核的性能会受到影响。
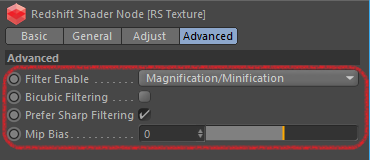
In C4D, the options are found under the 'Advanced' tab of the Redshift Texture Sampler node:
在 C4D 中,可以在红移纹理采样节点的高级选项卡下找到这些选项:
Options
选择
Filter Enable
启用过滤器
Selects the filtering enable mode of the texture sampler;
选择所述纹理采样器的过滤启用模式;
- None ( 没有(no MIP-mapping, point-sampled for 'minification' and 'magnification' 没有 mip 映射,点采样用于“缩小”和“放大”)
- Magnification ( 放大倍数(no MIP-mapping, point-sampled for 'minification' 没有 mip 映射,点采样“缩小”)
- Magnification/Minification ( 放大/缩小(recommended default. MIP-mapped, with full filtering 推荐的缺省值.mip 映射,带有完整的过滤)
Sometimes a texture may require special filtering treatment, where the global texture sampling mode (found under the Optimization tab) might not be adequate.
For example, this can be the case when a texture has an alpha cut-out and the color part of the texture is not configured to take texture filtering into consideration. When this is the case, filtering and MIP-mapping will result in undesirable color bleeding artifacts that can manifest as a halo around the cut-out texture. If correcting your texture in this kind of situation is not an option, then it is recommended you change the 'Filter Enable' property to 'Magnification', so you still get soft, filtered results when magnifying the texture, but no filtering and thus bleeding when 'minifying' the texture.
有时,纹理可能需要特殊的过滤处理,其中全局纹理采样模式(在优化选项卡下找到)可能不够。例如,当一个纹理有一个 alpha 裁剪,而且纹理的颜色部分没有被配置为考虑纹理滤镜时,就会出现这种情况。在这种情况下,过滤和 mip 映射将导致不良的颜色出血伪影,可以表现为一个晕轮周围的切出纹理。如果在这种情况下纠正你的纹理不是一个选项,那么建议你把滤镜启用属性改为放大,这样你在放大纹理的时候仍然可以得到柔和的,过滤的结果,但是没有过滤,因此在缩小纹理的时候会流血。
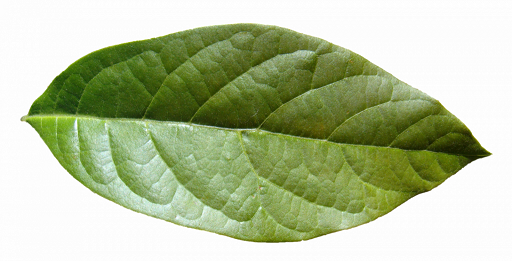
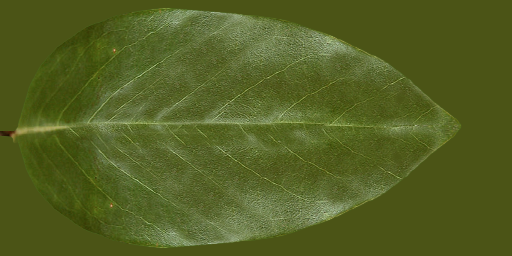
Below is an example of a poorly configured texture and a correctly configured texture:
下面是一个配置不当的纹理和一个配置正确的纹理的例子:
|
|
|
| Poorly configured, problematic texture, with white fill around the leaf 配置不良,纹理有问题,叶子周围有白色填充物 | Properly configured texture with leaf color fill around the leaf 正确配置的叶子颜色填充叶子周围的纹理 |
Below shows zoomed in examples of the rendered results with differently configured textures and different filtering modes:
下面的例子显示了不同配置的纹理和不同的过滤模式的渲染结果:
|
|
|
|
| Poorly configured, problematic texture, with filtering. Notice the greyish outline 配置不良,纹理有问题,过滤。注意灰色轮廓 | Poorly configured, problematic texture with no 'minification' filtering or MIP-mapping 配置不良,纹理有问题,没有“缩小”过滤或 mip 映射 | Properly configured texture with default filtering 使用默认过滤正确配置纹理 |
Another situation when you might need to disable filtering is when a texture contains non-color information, such as rotation, which could be used to drive the anisotropy rotation of reflection. When this is the case, filtering and MIP-mapping will result in 'in-between' values that might not make sense for the rotation texture to function properly. So, setting the 'Filter Enable' option to 'None' is recommended to remove any undesired artifacts due to filtering.Below are example renders showing the undesired artifact that arises from the texture being poorly configured, with the solutions. Note the images are slightly blurred here because they have been enlarged from their original rendered size to better show the halo effect present when the texture has been poorly configured and is filtered. You can also clearly see the properly configured texture on the right has no halo effect, even with default texture filtering:
另一种可能需要禁用过滤的情况是当纹理包含非颜色信息时,比如旋转,这可以用来驱动反射的各向异性旋转。在这种情况下,过滤和 mip 映射将导致“中间”值,这对旋转纹理正常工作可能没有意义。因此,建议将“ Filter Enable”选项设置为“ None”,以删除由于过滤而产生的任何不需要的工件。下面的例子显示了由于纹理配置不当而产生的不需要的工件,以及解决方案。注意这里的图像有点模糊,因为它们是从原始渲染大小放大的,以便更好地显示当纹理配置不当和过滤时出现的晕轮效应。你也可以清楚地看到右边正确配置的纹理没有晕轮效果,即使默认的纹理滤镜:
Bicubic Filtering
双三次滤波
Enables bicubic filtering on textures that are magnified. This produces much softer looking textures than regular bilinear filtering, but at the expense of slower rendering.
在放大的纹理上启用双三次滤波。这样产生的纹理看起来比普通的双线性过滤要柔软得多,但是代价是渲染速度较慢。
Prefer Sharp Filtering
更喜欢尖锐的过滤
By default Redshift will attempt to bias texture filtering to produce the sharpest results. However, for very noisy tiled textures, sometimes this can produce interference patterns. Un-checking this option will disable the sharpness biasing, producing softer results that remove these interference patterns.
Note this option only takes effect when the 'Filter Enable' mode is set to 'Magnification/Minification'.
默认情况下,红移会尝试偏移纹理滤镜,以产生最清晰的结果。然而,对于非常嘈杂的瓷砖纹理,有时会产生干涉图案。取消此选项将禁用锐度偏置,产生柔和的结果,消除这些干扰模式。请注意,此选项仅在“允许过滤”模式设置为“放大/缩小”时生效。
Mip Bias
Allows you to bias the MIP level, such that values less than 0 result in sharper quality, but slower texture sampling. Values greater than 0 result in blurrier lower quality, but faster texture sampling.
Note this option only takes effect when the 'Filter Enable' mode is set to 'Magnification/Minification'.
允许你设置 MIP 等级,这样小于0的数值会产生更清晰的质量,但是纹理采样会更慢。大于0的值会导致模糊质量更低,但纹理采样更快。请注意,此选项仅在“允许过滤”模式设置为“放大/缩小”时生效。
When MIP-mapping is enabled Redshift will load and sample pre-filtered multi-resolution texture data that is optimal for how large the texture appears in the render. For example, when a texture is very far away from the camera, less texture detail is required, so a lower resolution MIP level can be loaded without any loss of quality or perceived detail. Conversely, when a texture is very close to the camera, more texture detail is required, so the highest, native resolution MIP level is typically loaded. MIP-mapping is a necessary performance optimization that is commonly used in rendering.
当 mip 映射启用红移时,将加载和采样预过滤的多分辨率纹理数据,这对于纹理在渲染中出现的大小是最优的。例如,当一个纹理离相机很远的时候,纹理细节的需求就会减少,所以一个低分辨率的 MIP 级别可以被加载而不会损失任何质量或者感知细节。相反,当纹理非常接近相机时,需要更多的纹理细节,因此通常会加载最高的、本机分辨率的 MIP 级别。Mip 映射是渲染中常用的一种性能优化方法。
There are some situations, however, when the algorithm to select the appropriate MIP level may not produce perfectly detailed results due to a non-perfect combination of the MIP-level pre-filtering and the AA settings. In this case, setting the MIP Bias to negative values will bring forward higher resolution MIP levels and thus sharpen the texture. Or, there may be a situation when you want to purposely soften the texture, so setting the MIP Bias to positive values will bring forward lower resolution blurrier MIP levels.
For example, a value of -1 will result in 2x the resolution of the MIP-level being used, while a value of -2 will result in 4x the resolution of the MIP-level, up to the maximum/native resolution of the texture. A value of 1 will result in 0.5x the resolution of the MIP-level, and a value of 2 will result in 0.25x the resolution of the MIP level being used, etc.
Be careful to not use too large negative values for the MIP Bias, as texturing and out-of-core performance can suffer, impacting render times.
The MIP Bias option has no effect when the 'Filter Enable' option is not the default 'Magnification/Minification'.
然而,在某些情况下,选择合适的 MIP 级别的算法可能由于 MIP 级别的预过滤和 AA 设置的不完美组合而不能产生完美的详细结果。在这种情况下,将 MIP 偏置设置为负值会提高 MIP 的分辨率,从而使纹理更加清晰。或者,可能有这样一种情况,你想要有目的地柔化纹理,因此将 MIP 偏置设置为正值会导致较低的分辨率模糊 MIP 级别。例如,值-1将导致使用的 mip 级别的分辨率为2倍,而值-2将导致分辨率为 mip 级别的4倍,直到纹理的最大/本机分辨率。数值为1时,分辨率会提高0.5倍,数值为2时,分辨率会提高0.25倍,等等。小心不要使用太大的负值作为 MIP Bias,因为纹理和核心外性能会受到影响,从而影响渲染时间。当“允许筛选”选项不是默认的“放大/缩小”选项时,MIP 偏置选项没有效果。


赶快留个言打破零评论!~