creatING render job
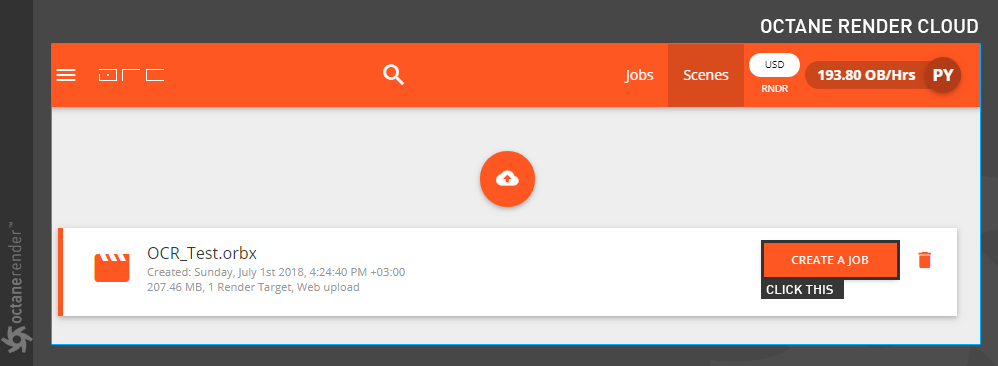
Once your scene has finished uploading, you need to create a "Render Job". You can not use the ORC without creating this render job, but your scenes will stay on the system until you delete them. You will now see the scene you uploaded in the "Scenes" section. Click on the "scene section" and click on the "Creat Job" you see on the right. If you click on Creta Job, you will automatically go to the "Jobs" screen. You will set Orc settings for your scene there. Now let's look at those settings.
创建渲染作业
场景上传完成后,您需要创建一个“渲染作业”。 在不创建此渲染作业的情况下不能使用ORC,但是场景将保留在系统上,直到将其删除。 现在,您将在“场景”部分中看到上载的场景。 单击“场景部分”,然后单击在右侧看到的“创建作业”。 如果单击Creta Job,您将自动进入“作业”屏幕。 您将在那里设置场景的兽人设置。 现在,让我们看看这些设置。
SETTING UP RENDER job
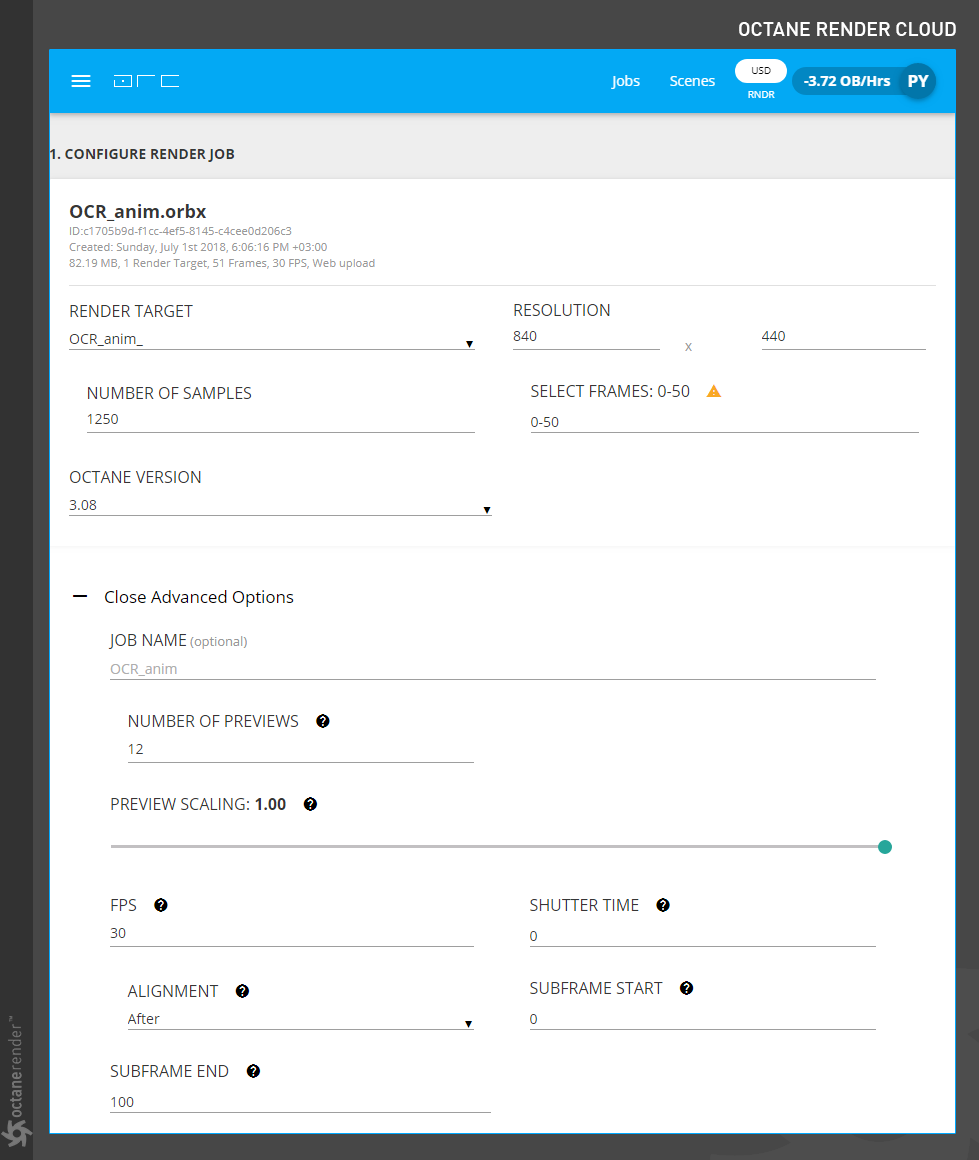
After creating a "render job", you can reconfigure the scene settings when you are in the jobs screen. This is your last chance to check everything or make new adjustments before starting Cloud render. Let's now explain the options on this screen assuming you created a "render job".
1. Configure Render Job
From here you can check or modify the general settings of your scene. Let's explain some options here.
设置渲染作业
创建渲染作业后,可以在作业屏幕中重新配置场景设置。 这是您在开始Cloud Rendering之前检查所有内容或进行新调整的最后机会。 现在,假设您创建了渲染作业,将说明此屏幕上的选项。
1.配置渲染作业
您可以在此处检查或修改场景的常规设置。 让我们在这里解释一些选项。
render target
At first glance it can be seen as a strange name, but this is the same name of the file you exported from Cinema 4D. It is usually related to the "Render Target" Node in Standalone. If you have created scenes in Standalone and set different "Render Target" nodes, you can choose from here. If you made the adjustment in Cinema 4D, you do not have to worry about this.
resolutIon
You can specify the render resolution. Any settings you make in Cinema 4D "render settings" will appear here. Especially if you are going to test render in small resolution, you can change the resolution here. Do not forget to bring back the original resolution when you make the final render.
number of samples
In Cinema 4D, the sample count you made from Octane settings appears here. You can increase or decrease ıf you want.
select frames
The frame setting you make in the "render settings" in C4d will appear here. However, we recommend that you make 10-15 frames test render before going to final render. From here you can specify which frame range you want to test or final render. You can also specify and render different frames from a sequence. For example, if you enter "15-25-35" in a 50-frame render, you will have rendered 15, 30 and 35th frame, respectively. Or if you enter "25-50, 15" you will first render frames 25 to 50 and then only the 15th frame.
octane versIon
You can choose from which Octane version you are working on. There are no older versions than 3.06.
job name (optIonal)
You can enter any name here other than the name on the Render Target.
number of prevIews
Previews are updated based on the number of previews and the total frames your job has. Here you can designate how often it display your job's progress
prevIew scalING
This controls the resolution of your previews. By default the resolution is set to be the same as your job but it can be scaled down to save on storage.
FPS
Your project FPS (frame per second) will appear here.
shutter tIme
The Shutter Time field determines the duration of the shutter. Specifically it is the time percentage relative to the duration of a single frame. you can keep the default value if you set Motion Blur in Cinema 4D or if Motion blur is off.
alIgnment
Shutter Alignment specifies how the shutter interval is aligned to the current time. This determines when the camera shutter is triggered. Which can be set to Before, Symmetrical or After, and is applicable to each frame relative to the given frame rate. you can keep the default value if you set Motion Blur in Cinema 4D or if Motion blur is off.
subframe start & END
The Subframe Start and Subframe End fields allows you to reduce the rendered shutter interval to a sub-interval. This is useful if there is a need to increase the frame rate without having to re-compile the scene. you can keep the default value if you set Motion Blur in Cinema 4D or if Motion blur is off.
2. SELECT AN OUTPUT TYPE
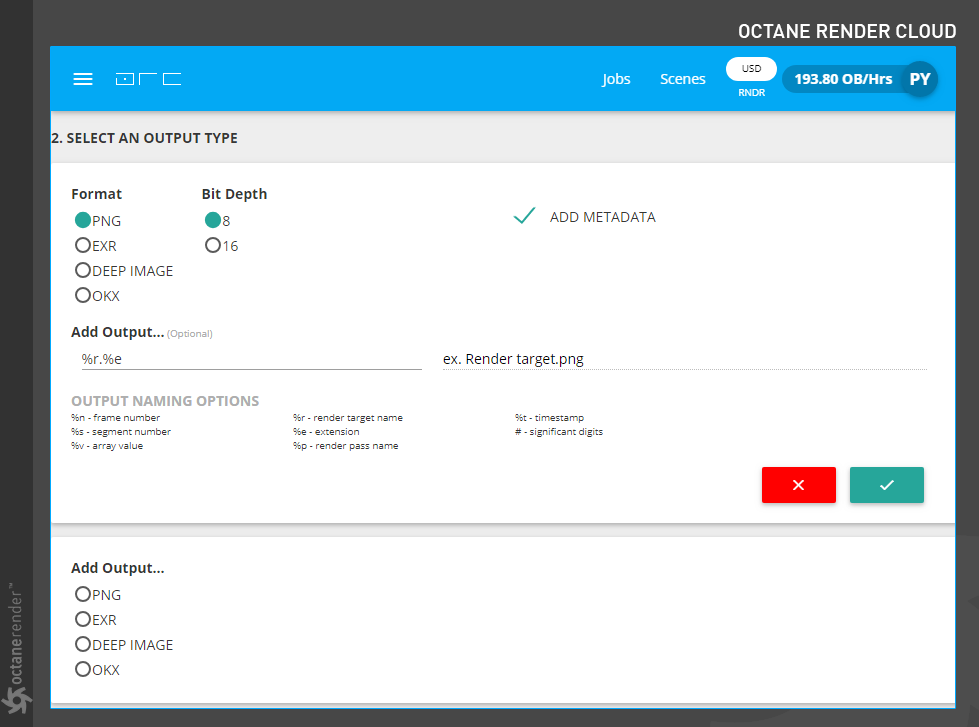
From here you can specify the output format. Bit depth options vary according to the image format. For example, you can choose 8 and 16 bit depth in PNG, or 16 and 32 bit depth options in EXR. It also appears in other options depending on the image format. If you want to assign an alternate file name and image format, you can use the options immediately below. Do not forget to click on the green check mark icon when you are done.
渲染目标
乍一看,它可以看作一个奇怪的名称,但这与您从Cinema 4D导出的文件的名称相同。它通常与独立服务器中的“渲染目标”节点有关。如果已在独立环境中创建场景并设置了不同的“渲染目标”节点,则可以从此处进行选择。如果您在Cinema 4D中进行了调整,则不必为此担心。
分辨率
您可以指定渲染分辨率。您在Cinema 4D“渲染设置”中所做的任何设置都会显示在此处。特别是如果您要以较小的分辨率测试渲染,则可以在此处更改分辨率。进行最终渲染时,请不要忘记恢复原始分辨率。
采样数
在Cinema 4D中,您从Octane设置获得的采样计数将显示在此处。您可以增加或减少所需的数量。
选择框架
您在C4d的“渲染设置”中进行的帧设置将显示在此处。但是,我们建议您在进行最终渲染之前进行10到15帧的测试渲染。在这里,您可以指定要测试或最终渲染的帧范围。您还可以指定和渲染序列中的不同帧。例如,如果在50帧渲染中输入“ 15-25-35”,则将分别渲染第15、30和35帧。或者,如果输入“ 25-50,15”,则将首先渲染25至50帧,然后仅渲染第15帧。
Octane
您可以选择正在使用的Octane版本。没有比3.06更旧的版本。
职位名称(可选)
您可以在此处输入除“渲染目标”上的名称以外的任何名称。
上载数量
预览会根据预览的数量和作业的总帧数进行更新。您可以在此处指定显示工作进度的频率
前缩放
这可以控制预览的分辨率。默认情况下,分辨率设置为与您的工作相同,但是可以按比例缩小以节省存储空间。
第一人称射击
您的项目FPS(每秒帧数)将显示在此处。
快门时间
“快门时间”字段确定快门的持续时间。具体来说,它是相对于单个帧持续时间的时间百分比。如果您在Cinema 4D中设置了运动模糊或关闭了运动模糊,则可以保留默认值。
对准
快门对齐指定快门间隔如何与当前时间对齐。这确定何时触发相机快门。可以设置为“之前”,“对称”或“之后”,并且适用于相对于给定帧速率的每个帧。如果您在Cinema 4D中设置了运动模糊或关闭了运动模糊,则可以保留默认值。
子帧开始和结束
“子帧开始”和“子帧结束”字段允许您将渲染的快门间隔减小为一个子间隔。如果需要在不重新编译场景的情况下提高帧速率,这将很有用。如果您在Cinema 4D中设置了运动模糊或关闭了运动模糊,则可以保留默认值。
2.选择一种输出类型
在这里,您可以指定输出格式。位深度选项根据图像格式而有所不同。例如,您可以在PNG中选择8位和16位深度,在EXR中选择16位和32位深度。它还会根据图像格式显示在其他选项中。如果要分配备用文件名和图像格式,可以使用下面的选项。完成后,不要忘记单击绿色的复选标记图标。


赶快留个言打破零评论!~