CRYPTOMATTE
Cryptomatte is a tool created at Psyop. It creates ID mattes automatically with support for motion
blur, transparency, and depth of field, using organizational information already available at render
time. Read the following in this link.
密码学
Cryptomatte是Psyop创建的工具。它会自动创建ID遮罩并支持运动
使用渲染时已经可用的组织信息来模糊,透明和景深
时间。阅读此链接中的以下内容。
AI UP-SAMPLER
Octane 2019.1 now includes a built-in AI up-sampler in Octane Imager. The AI up-sampler works similar to the AI denoiser first introduced in Octane 4, with a progressive and a one-stop up-sampling mode. You can now specify multiple sampling modes (2x2, 4x4) up-sampling for your rendered image, and the AI up-sampling would automatically render at a lower resolution in less time and up-scale to the resolution you specified.
AI上采样器
Octane 2019.1现在在Octane Imager中包含一个内置的AI上采样器。 AI上采样器的工作方式类似于Octane 4中首次引入的AI降噪器,具有渐进式和一站式上采样模式。现在,您可以为渲染的图像指定多种采样模式(2x2、4x4)上采样,并且AI上采样会自动以较低的分辨率在更少的时间内以较高的分辨率渲染,并放大到您指定的分辨率。
See this link
看到这个链接
Spectron Volumetric spotlights
We have improved the rendering of scattering in participating media using the new step length parameter.Reducing the step length in the light medium now reduces the amount of samples per pixel you can render in a given time budget, and it also reduces the noise in the fog.
Spectron体积射灯
我们使用新的步长参数改进了参与介质中散射的渲染。减少光介质中的步长现在可以减少在给定的时间预算内可以渲染的每个像素的采样数量,并且还可以减少多雾路段。
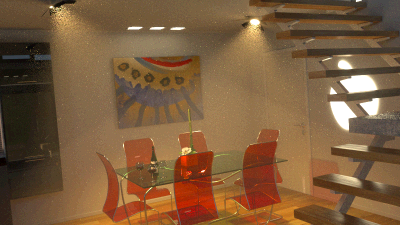
Below are examples of results with varying volumetric step length and samples per pixel:
以下是具有变化的体积步长和每个像素采样的结果示例:
Volumetric step length: 20
Samples per pixel: 450
体积步长:20
每个像素的采样数:450
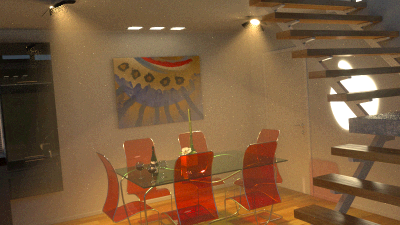
Volumetric step length: 50
Samples per pixel: 700
体积步长:50
每个像素的采样数:700
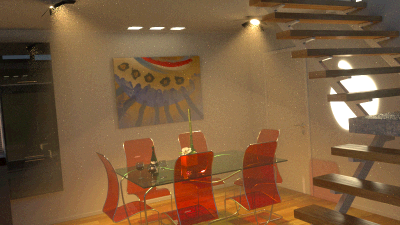
Volumetric step length: 999
Samples per pixel: 1200
体积步长:999
每个像素的采样数:1200
Improved volume AI Denoiser
The AI Denoiser has been upgraded with significant improvements especially in volume render. Below are a couple of examples, with the non-denoised image first, with the old denoiser output in the center, and
the new denoiser on the right. Please click to enlarge.
改进的AI降噪器
AI Denoiser已进行升级,具有显着改进,尤其是在体积渲染方面。下面是几个示例,首先是未去噪的图像,中间是旧的去噪器,然后
右边的新降噪器。请点击放大。

OSL and procedural vertex displacement (vector and height)
New nodes: Vertex displacement, and Vertex displacement mixer
OSL和程序顶点置换(矢量和高度)
新节点:顶点置换和顶点置换混合器
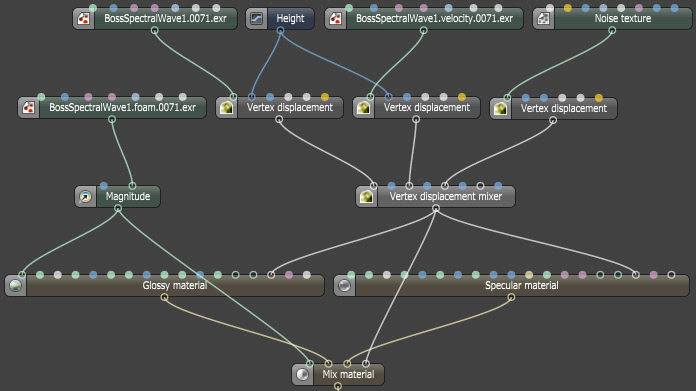
You can now render procedural and OSL vertex displacement (either height or vector displacement) before rendering. This is a robust displacement system which doesn't suffer the same limitations as the old displacement system (which is now known as Texture Displacement). Octane also allows you to mix/layer vector/height displacement maps using the new displacement mixer node.
现在,您可以在渲染之前渲染程序和OSL顶点置换(高度或矢量置换)。这是一个强大的置换系统,与旧的置换系统(现在称为“纹理置换”)没有相同的限制。 Octane还允许您使用新的置换混合器节点来混合/分层矢量/高度置换图。
Vertex displacement will take any texture you provide, whether it's a procedural texture, OSL texture, or images. All projections are supported also. For image textures, set the gamma to 1.0. To avoid holes in the geometry the vertices should be shared between adjacent faces.
顶点置换将采用您提供的任何纹理,无论是程序纹理,OSL纹理还是图像。还支持所有投影。对于图像纹理,将灰度系数设置为1.0。为了避免在几何图形中出现孔,应在两个顶点之间共享顶点
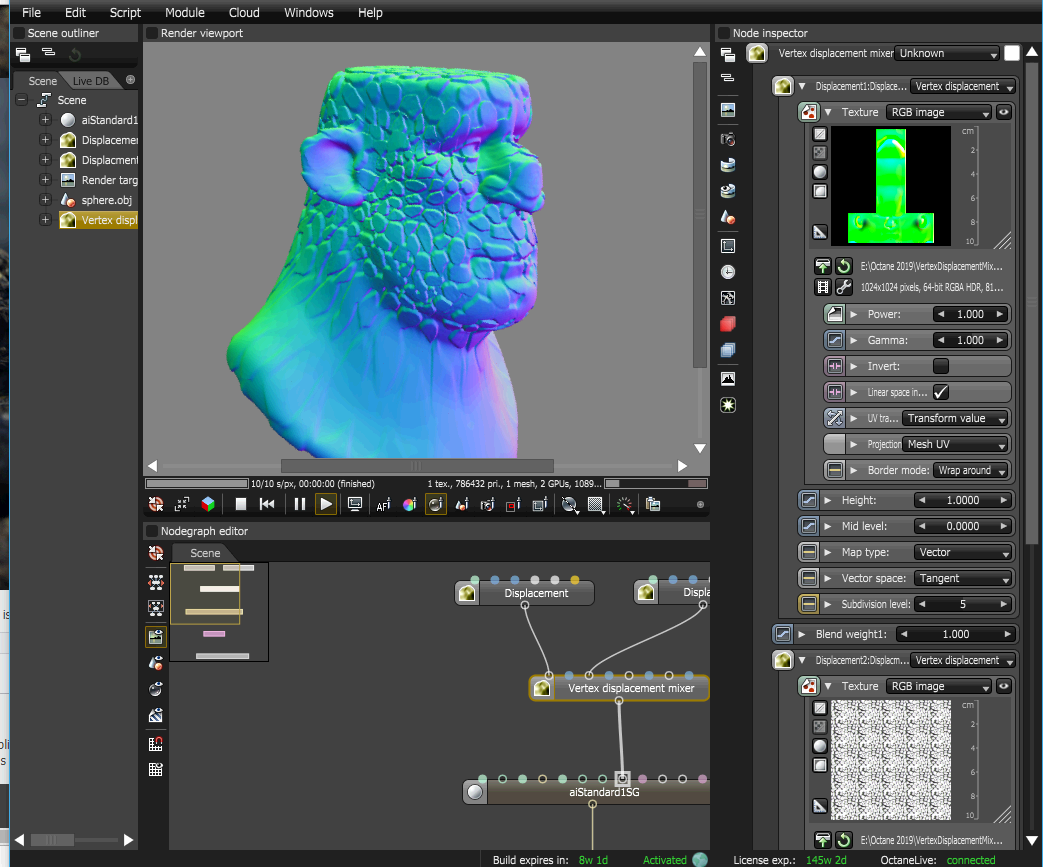
In the example below, we have three layers of displacement. The first two are vector displacement maps, and the third is a detailing height map.
在下面的示例中,我们具有三层置换。 前两个是矢量置换图,第三个是详图高度图。
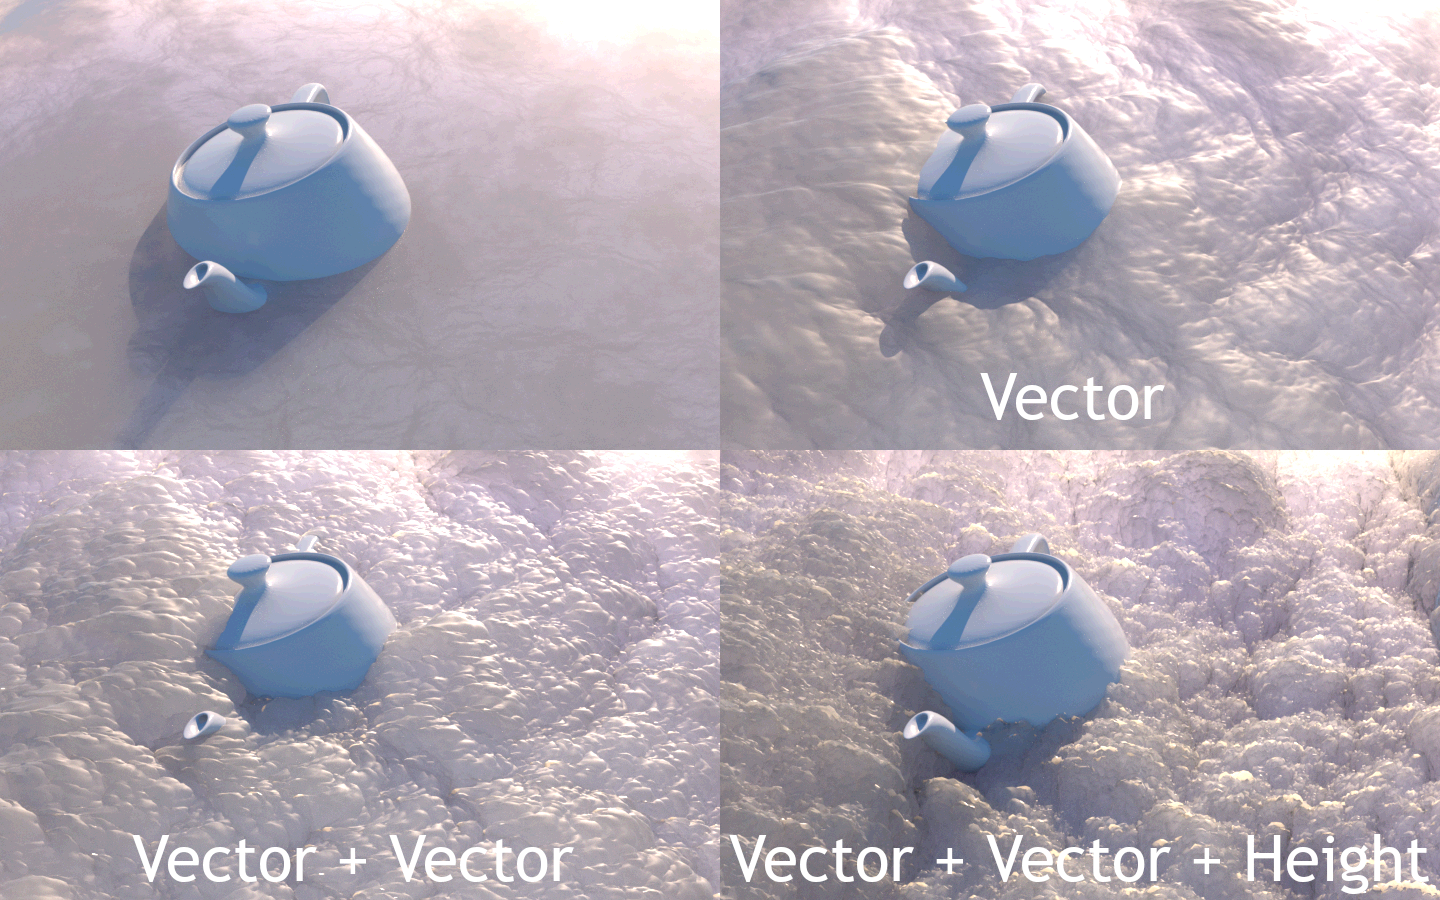
This gives you a lot of control over the final look.
这使您可以更好地控制最终外观。
Proper Mudbox vector displacement maps can also be used, which work in tangent space:
也可以使用适当的Mudbox矢量置换图,该图在切线空间中起作用:
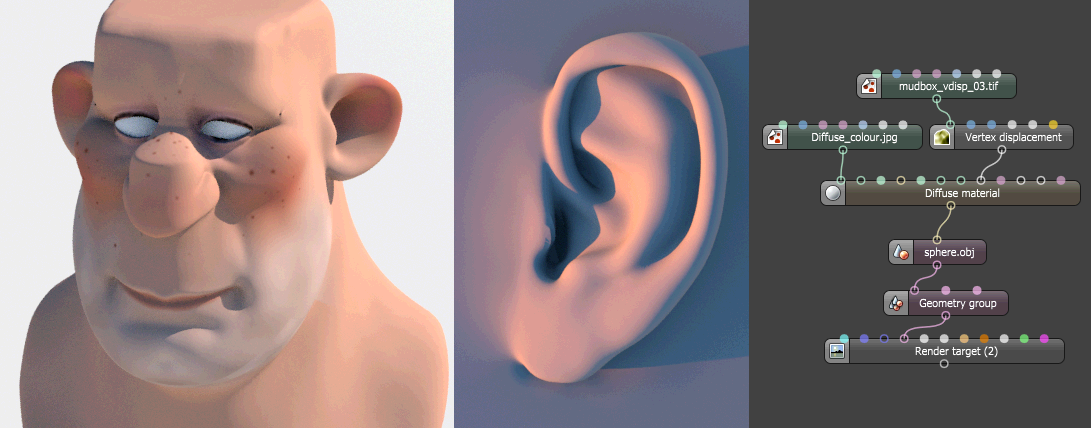
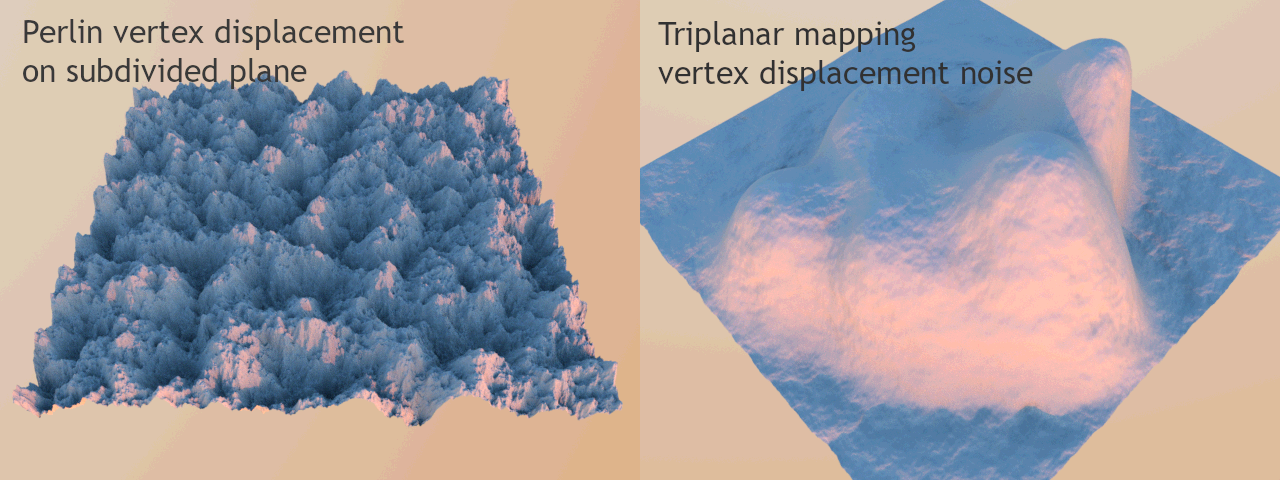
For the example on the left, a small subdivided sphere was used as the base mesh for displacement, and on the right just a subdivided plane.
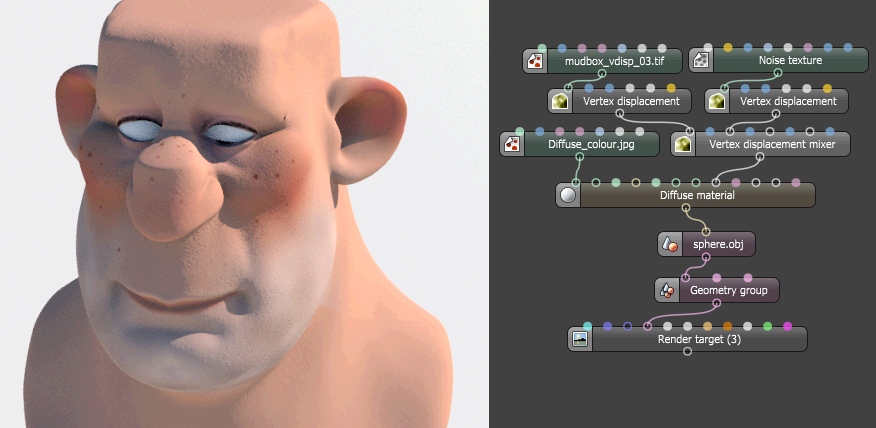
Using the displacement mixer is quite simple. You can add a height map onto the vector displacement to give great surface detail:
在左边的示例中,一个小的细分球体用作置换的基础网格,而在右边的示例中,只是细分平面。
使用排量混合器非常简单。 您可以在矢量置换上添加高度图以提供出色的表面细节:
Vertex Displacement and AUTOBUMP
The vertex displacement feature now includes an autobump option (for height map displacement only currently) to introduce more detail into the mesh without requiring high subdivision levels at all times. As we know, high subdivision levels introduces higher mesh complexity into the scene, and thus increases render time and pre-processing time per subdivided mesh.
顶点置换和AUTOBUMP
顶点置换功能现在包括一个自动凹凸选项(当前仅适用于高度图置换),可将更多细节引入到网格中,而始终不需要很高的细分级别。 众所周知,较高的细分级别将更高的网格复杂度引入了场景,从而增加了每个细分网格的渲染时间和预处理时间。
We have introduced autobump feature for vertex displacement so that details within a triangle is preserved without excessively subdivide a triangle continuously to get the displacement details you want. Basically the extra detail of a triangle is moved into shading space by generating a bump map from the displacement map, and the normals inside a triangle is perturbed from this automatically generated bump map during render time, similar to the normal workflow of bump map in Octane.
我们为顶点置换引入了自动凹凸特征,这样就可以保留三角形内的细节而不会连续地过度细分三角形以获得所需的置换细节。 基本上,通过从置换贴图生成凹凸贴图,可以将三角形的多余细节移到阴影空间中,并且在渲染期间,三角形内的法线会从此自动生成的凹凸贴图中受到干扰,类似于Octane中凹凸贴图的正常工作流程 。
Below are some examples of the feature:
以下是该功能的一些示例:
Subdivision level 6 vs Subdivision level 6 + autobump
细分级别6与细分级别6 +自动跳转
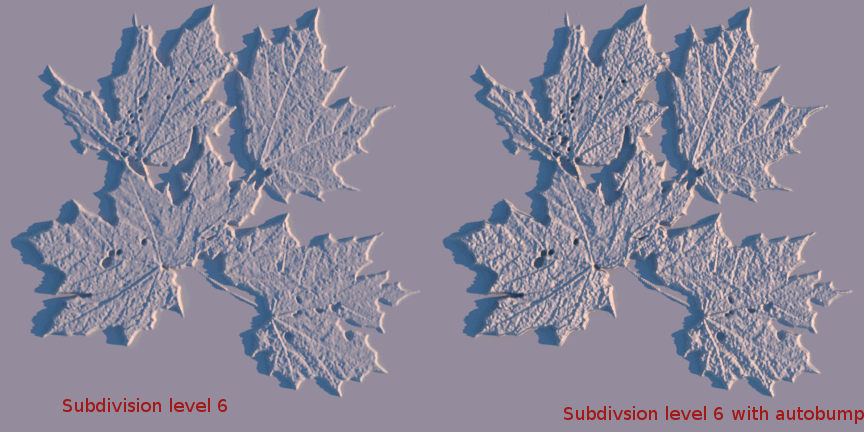
As shown above, the autobump can introduce extra details for a subdivision level that the particular subdivision cannot provide sufficiently.
如上所示,自动凹凸可以为特定细分无法充分提供的细分级别引入额外的详细信息。
Subdivision level 6 vs Subdivision level 3 vs Subdivision level 3+ autobump
细分级别6与细分级别3与细分级别3+自动碰撞
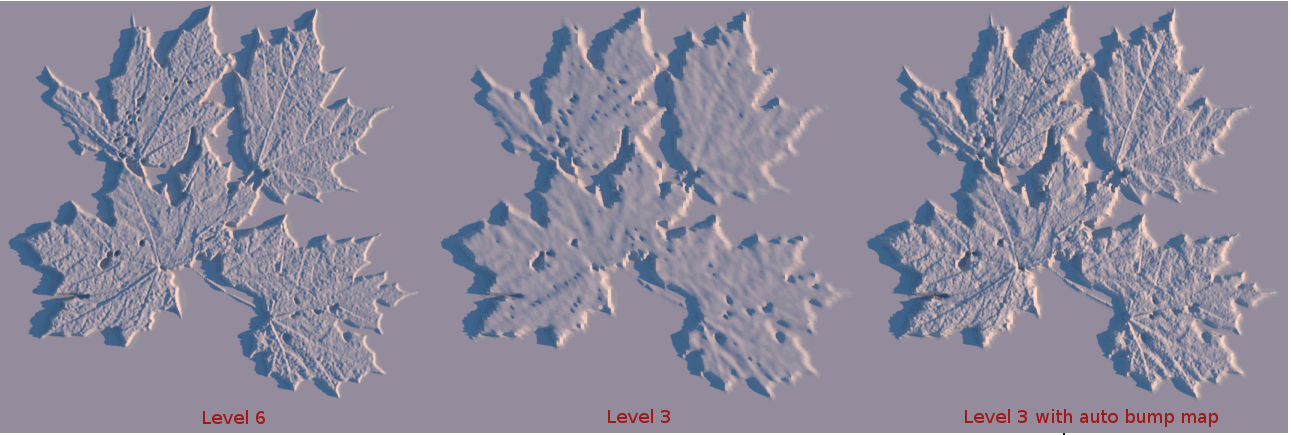
In this second image, we can see that a lower subdivision level (level 3) shows poor detail compared to a higher subdivision level (level 6), but the discrepancy can be made up by the autobump feature without introducing a higher subdivision level.
在第二张图片中,我们可以看到较低的细分级别(级别3)与较高的细分级别(级别6)相比显示的细节较差,但是可以通过自动凹凸功能弥补差异,而无需引入较高的细分级别。
OSL Shaders for volume textures
Up until recently you could only use static colors for absorption, scattering and emission in volumes. You can now use any textures for volumes (not for mesh geometry however).
用于体积纹理的OSL着色器
直到最近,您只能将静态颜色用于体积的吸收,散射和发射。现在,您可以将任何纹理用于体积(但是不能用于网格几何体)。

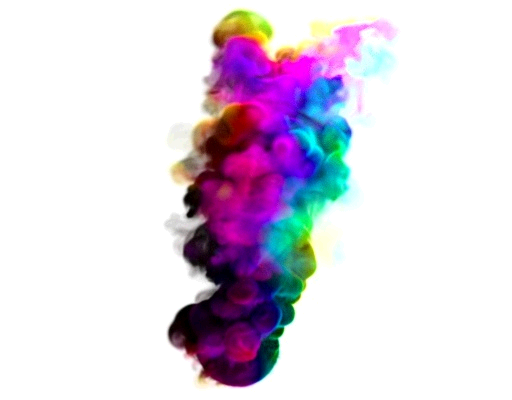
To see this example in action for yourself, here is the orbx for the above:
要亲自查看该示例,这是上面的orbx:

volume-osl-shaders.orbx
Layered material
New nodes: layered material, diffuse layer, specular layer, sheen layer, metallic layer, layer group nodes.
分层材质
新节点:分层材质,漫射层,镜面层,光泽层,金属层,层组节点。
The new layered material system allows you to construct a complex material that consists of a base layer, with a maximum of 8 layers which can be inserted on top of the base layer. We separated and exposed a set of layers (Diffuse layer, Specular layer, Metallic layer, Sheen layer) that made up the complex materials from previous Octane versions (Diffuse material, Glossy material, Specular material, Metal material, Universal material). Using this set of unique layers, Octane 2019.1 now empowers users to recreate complex materials in a physically-based manner as opposed to manually mix materials together.
新的分层材质系统使您可以构造由基础层组成的复杂材质,最多可以将8层插入基础层的顶部。我们分离并暴露了一组图层(漫反射层,镜面反射层,金属层,光泽层),这些层由以前的Octane构成的复杂材质(漫反射材质,光面材质,镜面反射材质,金属材质,通用材质)组成。使用这组独特的图层,Octane 2019.1现在使用户能够以基于物理的方式重新创建复杂的材质,而不是手动将材质混合在一起。
From 2019.1 XB2 we will also allow adding layers on existing materials, without using the Layered Material node.
从2019.1 XB2开始,我们还将允许在现有材质上添加图层,而无需使用``分层材质''节点。
As an example of a diffuse emission layer with a specular layer on top with a phone. The specular reflection can be seen on top of the emission from the screen. The material specifies a base diffuse material with an emission node attached to it, while a specular layer is set for layer 1:
作为带有电话的顶部具有镜面层的漫射发射层的示例。可以在屏幕发射的顶部看到镜面反射。该材质指定了附加了发射节点的基础漫射材质,而第1层设置了镜面反射层:
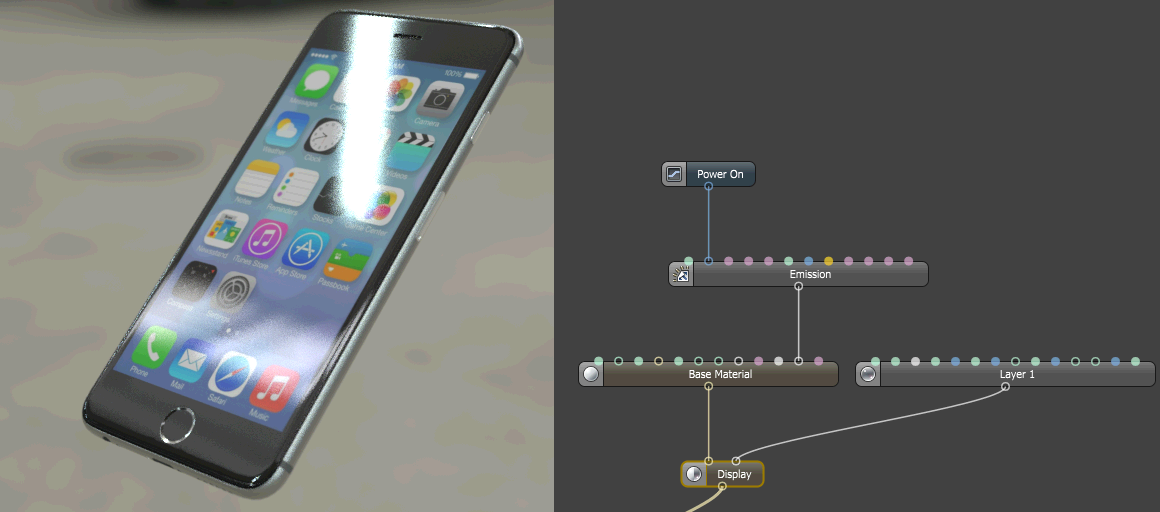
The phone display scene is available here for reference:
电话显示场景可在此处参考:iphone.orbx

iphone.orbx
Another example, you can achieve a raindrop effect using per layer bump map and normal map perturbation. This example consists of two specular layers, with the top specular layer using a custom raindrop normal map while the bottom (the base specular layer) uses the geometry's normal:
另一个示例,您可以使用每层凹凸贴图和法线贴图扰动来实现雨滴效果。此示例包含两个镜面反射层,其中顶部镜面反射层使用自定义的雨滴法线贴图,而底部(基本镜面反射层)使用几何体的法线:
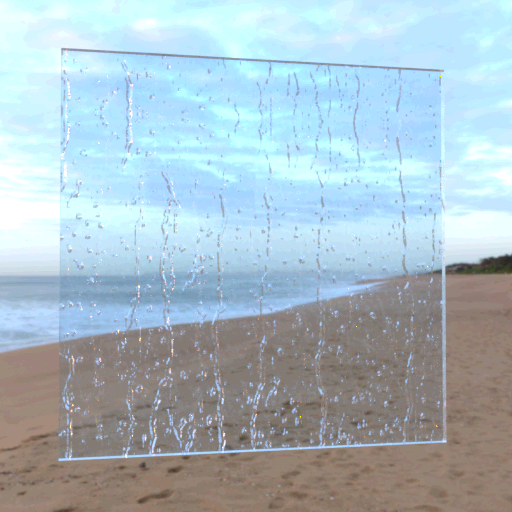
To see it in action, here is an ORBX of the above shader.
若要查看它的实际效果,这是上述着色器的ORBX。 layered_normal_map_rain.orbx

layered_normal_map_rain.orbx
A simple example with a diffuse base layer, and a specular layer makes a realistic looking LCD panel. This effectively recreates the glossy material, with the exception of allowing you to specify an emission below the specular layer:
一个简单的示例,其中包含一个漫反射基层和一个镜面反射层,使LCD面板看起来逼真。这有效地重新创建了光泽材质,但允许您在镜面层以下指定发射:
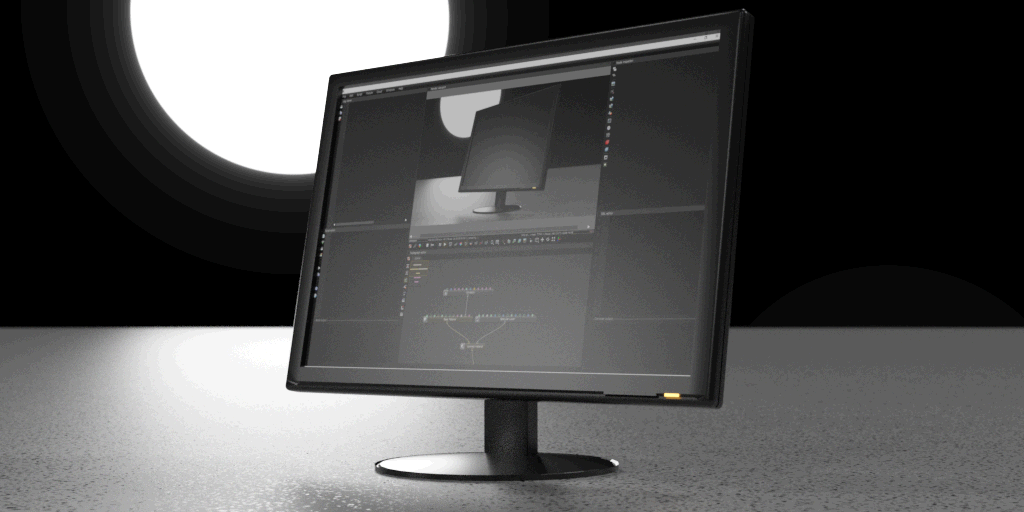
A sample ORBX:
一个示例ORBX:monitor.orbx

monitor.orbx
With layered material, you can layer decals on top of your base material. An example use case is terrain rendering, where the terrain is composed of 4 layers. Sitting at the bottom layer are the rocks with glossy material, then a diffuse material with leaves texture is layered on top of the rocks, and finally two additional specular layers on top for simulating specular reflection on the leaves and the low roughness specular reflection to simulate wet surface at the very top:
使用分层材质,您可以在基础材质上分层贴花。一个示例用例是terrain渲染,其中terrain由4层组成。坐在最底层的是具有光亮材质的岩石,然后在叶子的顶部层叠了具有叶子纹理的漫反射材质,最后在顶部再增加了两个镜面层,以模拟叶子上的镜面反射,并模拟低粗糙度镜面反射。最上面的湿表面:
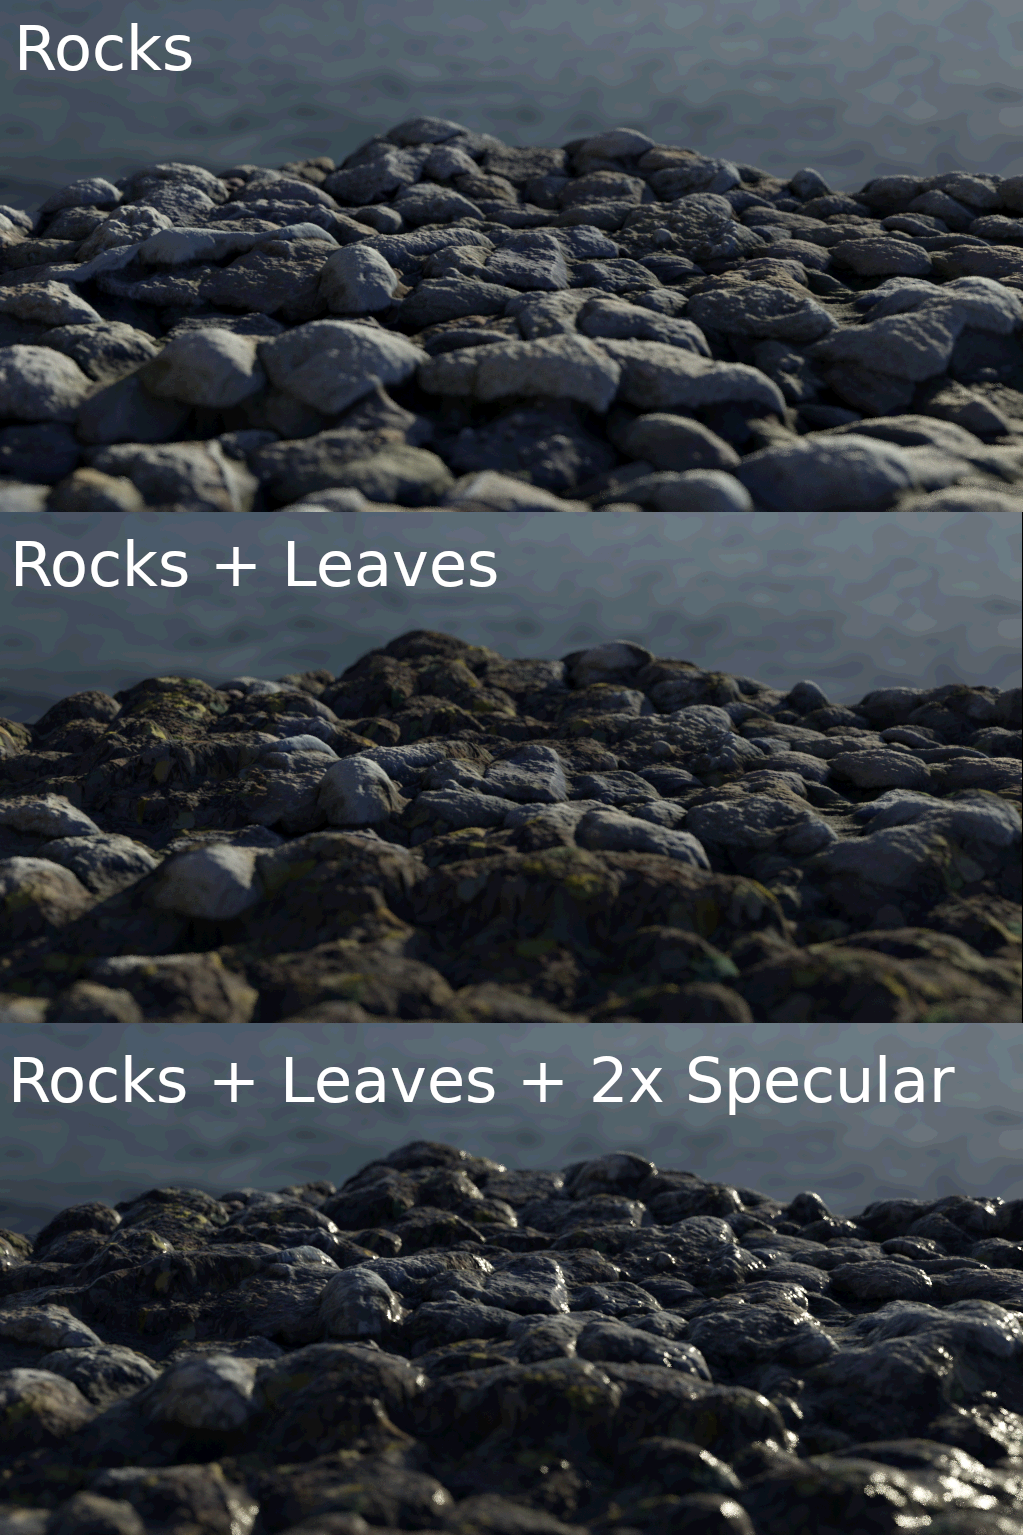
An example of the multilayered terrain is available here:
此处提供了一个多层地形的示例:multiple.orbx

multilayer.orbx
In this example, we show a more complicated layered material that involves the use of a layer group node. We have created a layer group node that works together with the layered material for simpler grouping of material layers to help sharing of layers between materials. You'll see a mesh that has a diffuse base material, with a dirt texture. It has 3 layers on top of it, first a semi-opaque metallic layer, followed by a rough specular layer with green reflectance, then finally a rough red sheen. The layer group groups the metallic and specular layer, and follows the order of layers in the same order as a layer material.
在此示例中,我们显示了涉及使用图层组节点的更复杂的分层材质。我们创建了一个图层组节点,该图层组节点与分层材质一起使用,可以更简单地对材质图层进行分组,以帮助在材质之间共享图层。您会看到一个网格,该网格具有散布的基础材质和污垢纹理。它的顶部有3层,首先是半透明的金属层,然后是具有绿色反射率的粗糙镜面层,最后是粗糙的红色光泽。层组对金属层和镜面层进行分组,并按照与层材质相同的顺序遵循层的顺序。
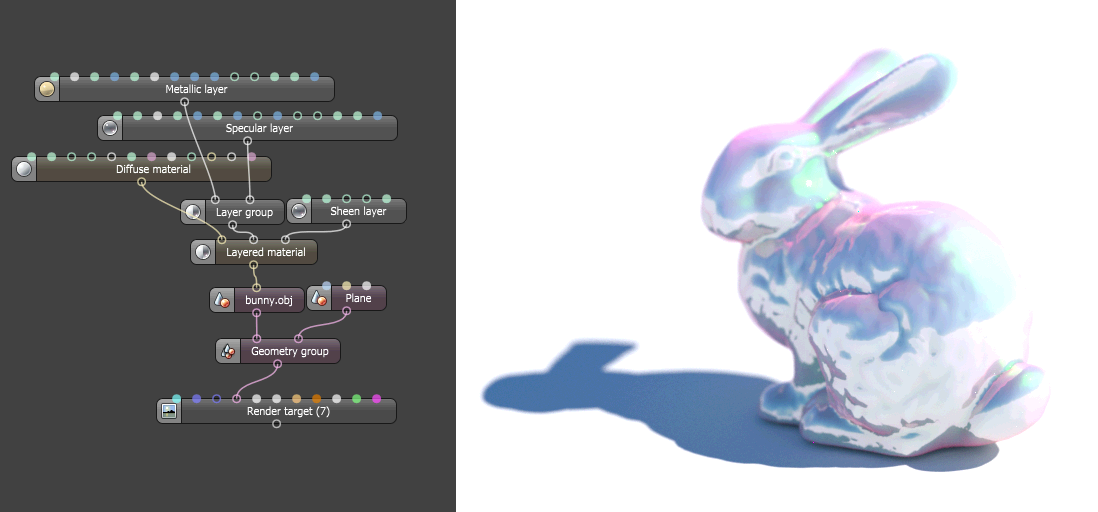
With the layered material, you are given all layers that are used in Octane, allowing you to reconstruct your own uber material with different permutations of base material and top layers, this allows you to recreate your complex material that suits your need.
使用分层材质,将为您提供Octane中使用的所有层,从而允许您使用基础材质和顶层的不同排列来重建自己的超级材质,从而可以重新创建适合您需要的复杂材质。
For example, you can recreate the glossy material in Octane using a diffuse material and a specular layer:
例如,您可以使用漫反射材质和镜面反射层在Octane中重新创建光泽材质:
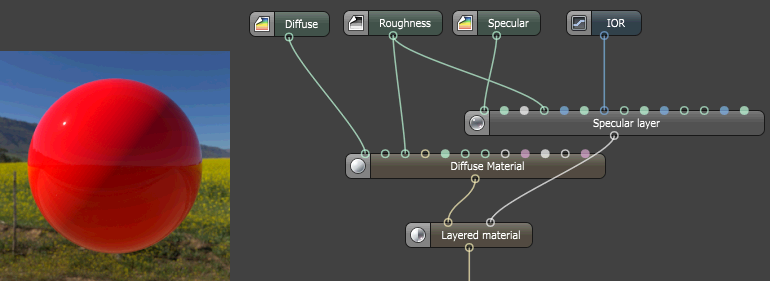
The orbx for this example is available here:
此示例的orbx可以在这里找到:glossy_layered_material.orbx

glossy_layered_material.orbx
You can also recreate the metal material that became available in Octane since 3.08, using diffuse material + metal layer:
您还可以使用漫射材质+金属层来重新创建自3.08起在Octane中可用的金属材质:
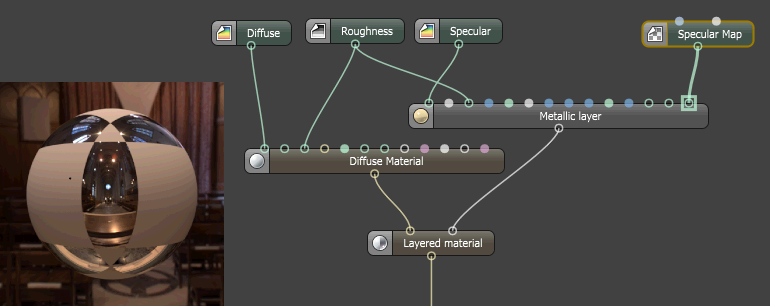
The orbx for metal material created with layered material is available here:
使用分层材质创建的金属材质的Orbx在此处可用:metal_layered_material.orbx

metal_layered_material.orbx
Furthermore, you can create the PBR material used in game engines and other tools, an example of this is the simple PBR metallic/roughness workflow recreated using the layered material:
此外,您可以创建用于游戏引擎和其他工具的PBR材质,例如使用分层材质重新创建的简单PBR金属/粗糙度工作流程:
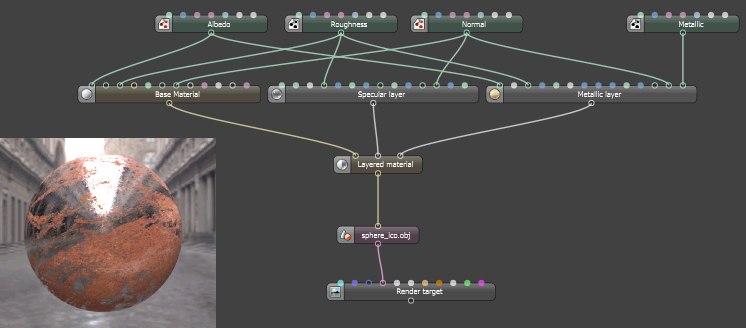
Here is a sample ORBX of this shader:
这是此着色器的示例ORBX:Principled_brdf.orbx

principled_brdf.orbx
Another example of this is the recreation of a fully featured Principled BSDF shader:
另一个示例是重新创建功能齐全的Principled BSDF着色器:
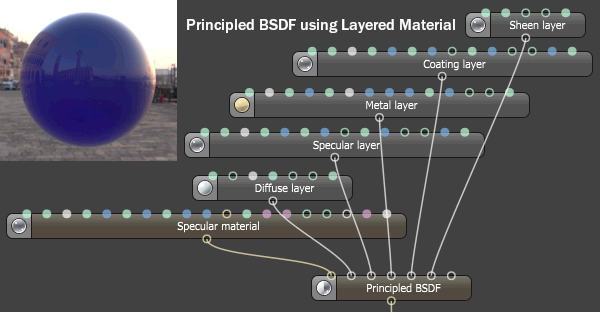
Here is a sample ORBX of this shader:
这是此着色器的示例ORBX:Principled_bsdf.orbx

principled_bsdf.orbx
Car paint becomes quite easy to do. Below is a render of a base metallic material, with a metallic layer used for the flakes, and then a specular layer on top.
汽车油漆变得很容易做到。下面是基础金属材质的渲染图,该金属材质具有用于薄片的金属层,然后是顶部的镜面层。

This is the ORBX of the material: https://render.otoy.com/downloads/7d/f7/e8/5e/carpaint.orbx
这是材质的ORBX:https://render.otoy.com/downloads/7d/f7/e8/5e/carpaint.orbx
Composite material node
New node: Composite material
复合材质节点
新节点:复合材质
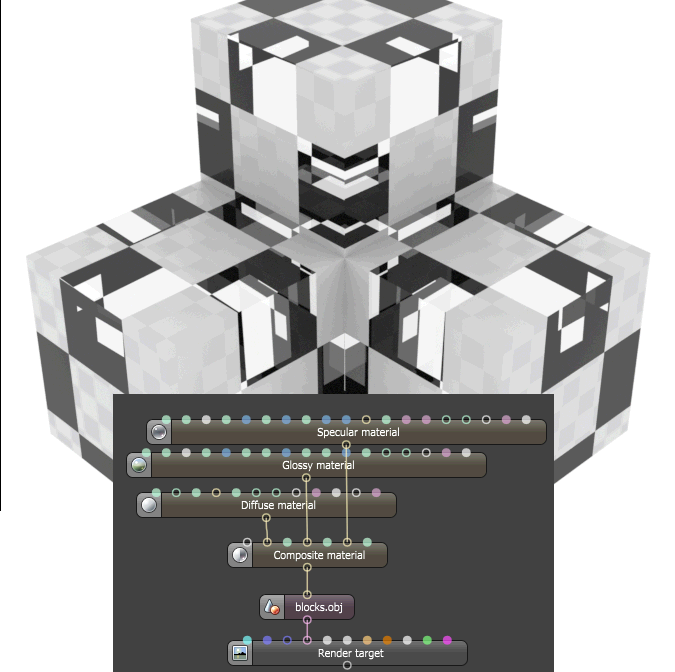
The new Composite Material node allows you to mix materials using a mask. This example shows what it looks like when you layer together diffuse, glossy and specular materials each using a checks mask with a different UVW transform. This is much easier and cleaner than a long string of mix materials, and if the mask is not given, then it will use the material's opacity map, if any. The first layer pin is the base layer.
新的“复合材质”节点允许您使用遮罩混合材质。此示例显示了使用分散的,有光泽的和高光的材质将它们分别使用具有不同UVW变换的检查蒙版将其分层时的外观。这比一长串混合材质要容易和干净得多,如果未提供遮罩,则它将使用材质的不透明度贴图(如果有)。第一层引脚是基础层。
Universal material
New option: Thin wall
通用材质
新选择:薄壁
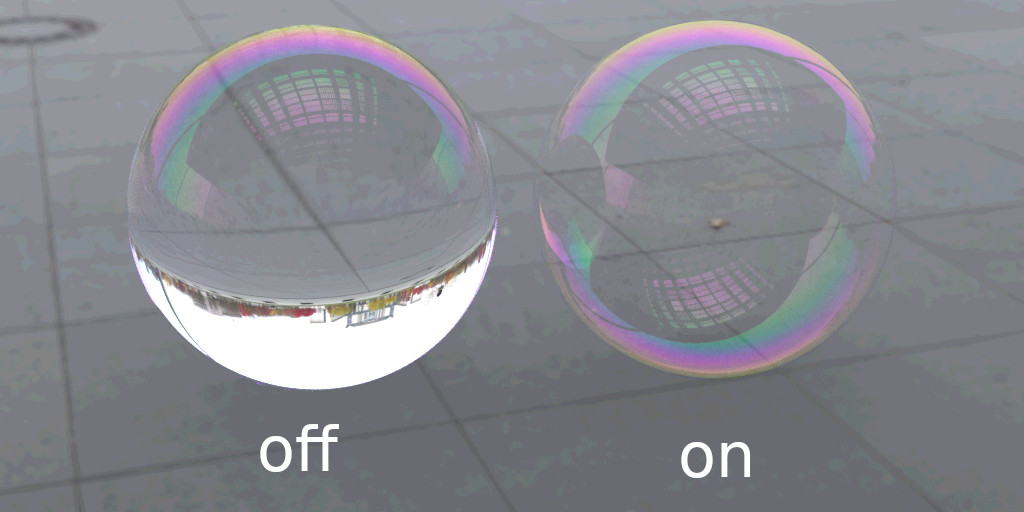
New thin-wall option allow you to use a plane as specular material. Thin wall assumes the surface is infinitesimally thin and so the entry and exit point of the ray occurs at the same position, so there is no refraction rays happening upon the intersection of ray with the surface, and instead the ray shoots straight through the surface and exit in the same direction:
新的薄壁选项允许您将平面用作镜面材质。薄壁假定表面无限薄,因此光线的入射点和出射点都在同一位置,因此在光线与曲面的相交处不会发生折射光线,而是光线直接穿过曲面并通过朝同一方向退出:
New rounded edges
The new rounded edges system gives you much more robust rounded corners, and more options on controlling the effect. The rounded edges settings have been replaced by a group of settings that include roundness, and different modes to apply the effect.
新的圆角边缘
新的倒圆角系统为您提供了更坚固的圆角,并提供了更多控制效果的选项。圆角边缘设置已被一组包括圆度和应用效果的模式的设置所代替。
You have the option of using Fast rounded edges, and an Accurate mode, which is also available in concave-only and convex-only modes.
新的圆角边缘
新的倒圆角系统为您提供了更坚固的圆角,并提供了更多控制效果的选项。圆角边缘设置已被一组包括圆度和应用效果的模式的设置所代替。
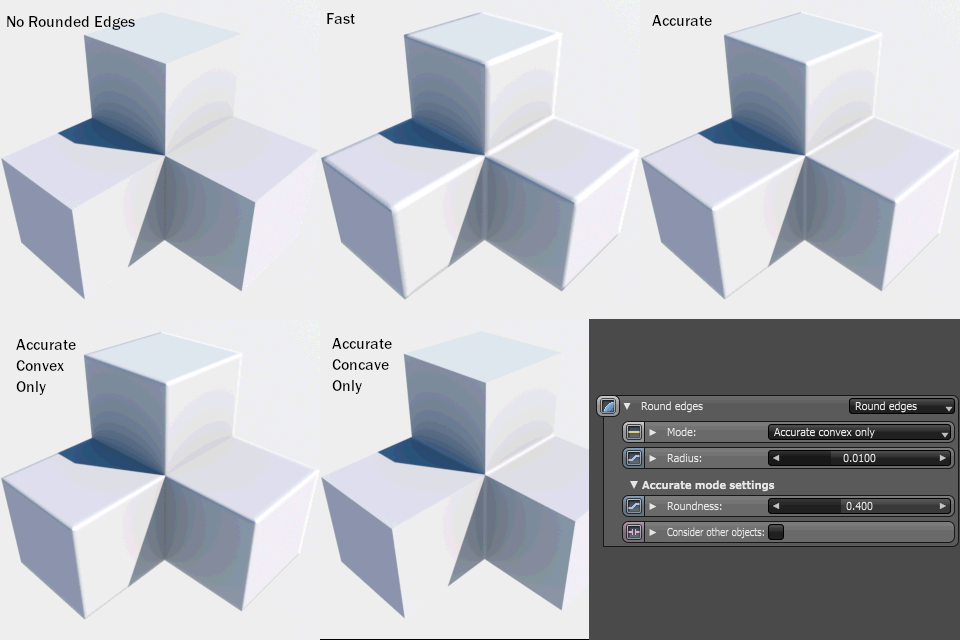
A new option Consider other objects allows you to apply rounded edges between instances.
一个新选项考虑其他对象允许您在实例之间应用圆角边缘。
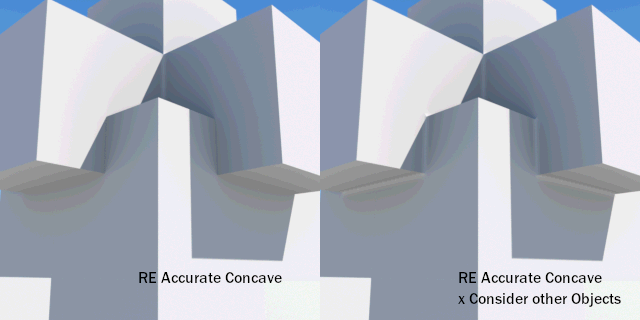
The Roundness option allows you to control the sharpness of the edges.
圆度选项使您可以控制边缘的清晰度。

Bloom/glare threshold
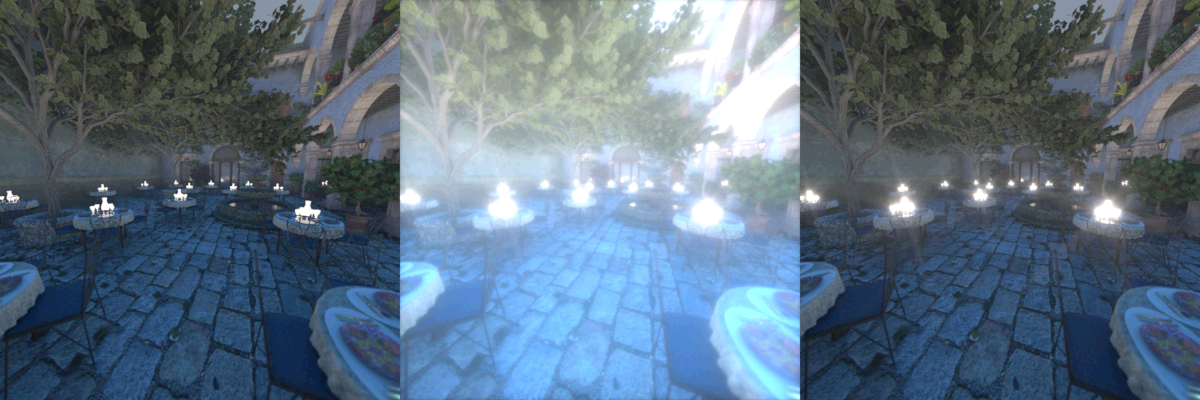
You now have better control over how to apply bloom/glare, with a Cutoff setting on the post processing node. When you want to highlight lights using a bloom or glare, and have a hidden emitter
that lights the scene, quite often bloom/glare washes out the scene before you can highlight the emitters you want. In the example below, the center shows the issue, and on the right this is corrected by setting
the Cutoff to 0.4.
绽放/眩光阈值
现在,您可以在后处理节点上使用“截止”设置来更好地控制如何应用光晕/眩光。当您想要使用绽放或眩光来突出显示灯光并具有隐藏的发射器时
可以照亮场景,通常会在场景中绽放/眩光,然后突出显示所需的发射器。在下面的示例中,中心显示了问题,而在右侧,通过设置
截止到0.4。
Universal camera
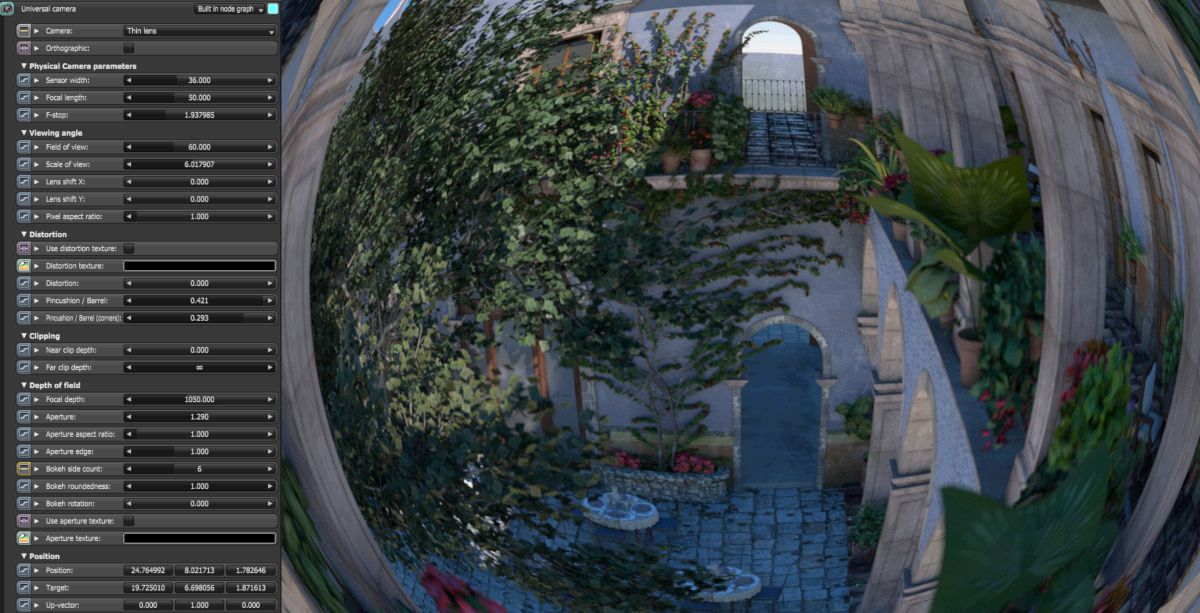
We added a fully featured universal camera, with support for distortion, DOF, thin lens / fisheye / abberation+distortion.
通用相机
我们添加了功能齐全的通用相机,支持失真,景深,薄镜头/鱼眼镜头/像差+失真。
Geometric primitives
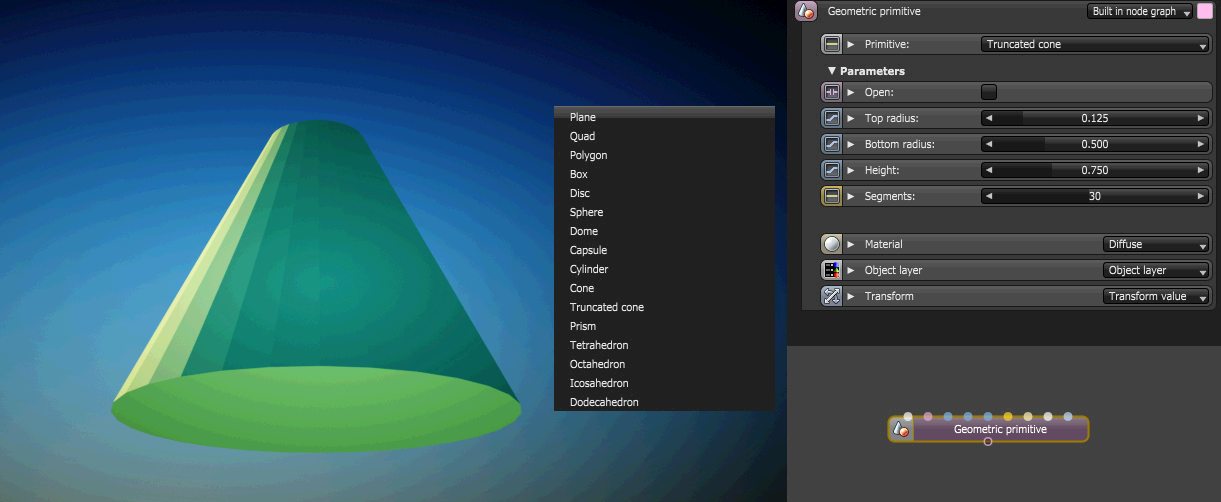
Sometimes you just need some simple geometric primitives for various purposes. We have added a set of easily accessible primitives:
几何图元
有时,您仅需要一些简单的几何图元即可用于各种用途。我们添加了一组易于访问的原语:


评论已关闭。
1 条评论