DIRT
The Dirt Texture can be used to create different shading effects based on ambient occlusion calculations. This texture is useful for simulating dirt, dust, or wear and tear, as well as for blending textures based on the recesses of a surface. You can use it for many scenarios.
污垢
``污垢纹理''可用于基于环境光遮挡计算创建不同的阴影效果。 该纹理可用于模拟污垢,灰尘或磨损,以及用于基于表面的凹陷混合纹理。 您可以在许多情况下使用它。
how to use: sImple and advanced
You can use the Dirt in many situations and in many ways. So it is not easy to explain. Here we show you two examples of use: simple and advanced. Node setup is simple as you would expect from a simple one. Advanced has a complex node setup. We will talk a bit about this setup later.
用法:简单和高级
您可以在许多情况下以多种方式使用“污垢”。 因此不容易解释。 在这里,我们向您展示两个使用示例:简单和高级。 节点设置非常简单,就像您期望的那样。 Advanced具有复杂的节点设置。 稍后我们将讨论此设置。
The sImplest usage
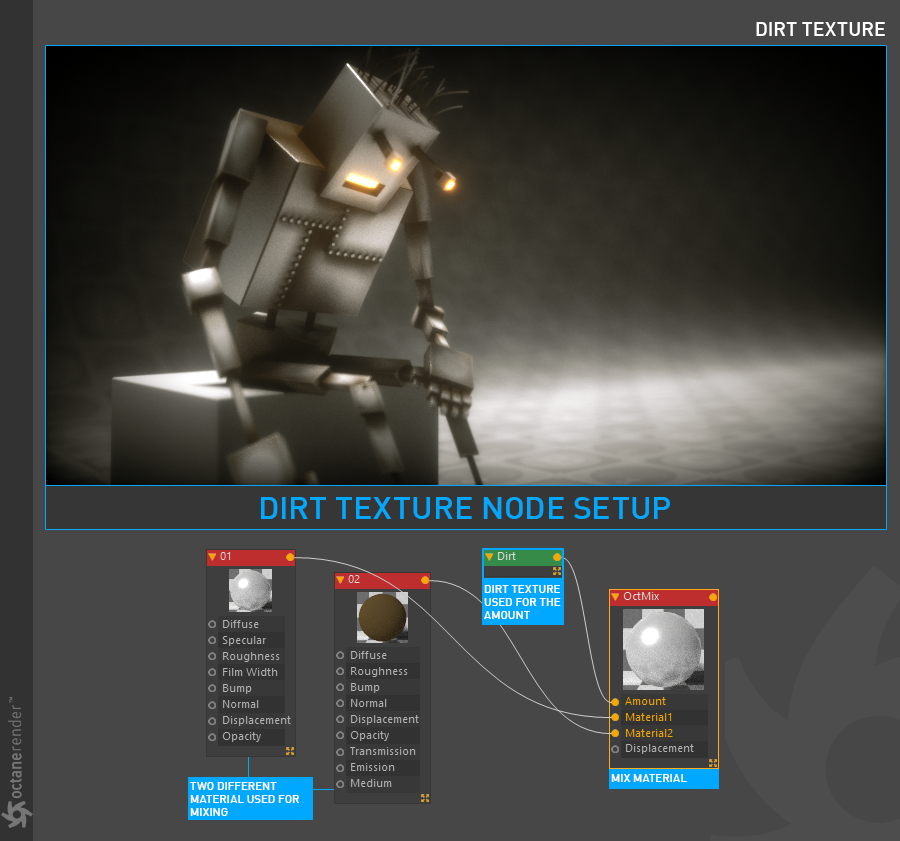
Open the Node editor and prepare the setup as you see in the picture below. Cerate two different materials and one Octane mix material. Connect two materials into the mix material slots respectively. For the amount channel create dirt node and change the settings. This is the simplest use of "Dirt Texture" node.
最简单的用法
打开节点编辑器并准备设置,如下图所示。 Celate两种不同的材质和一种Octane的混合材质。 将两种材质分别连接到混合材质插槽中。 对于数量通道,请创建“土”节点并更改设置。 这是“污垢纹理”节点的最简单用法。
ADVANCED usage
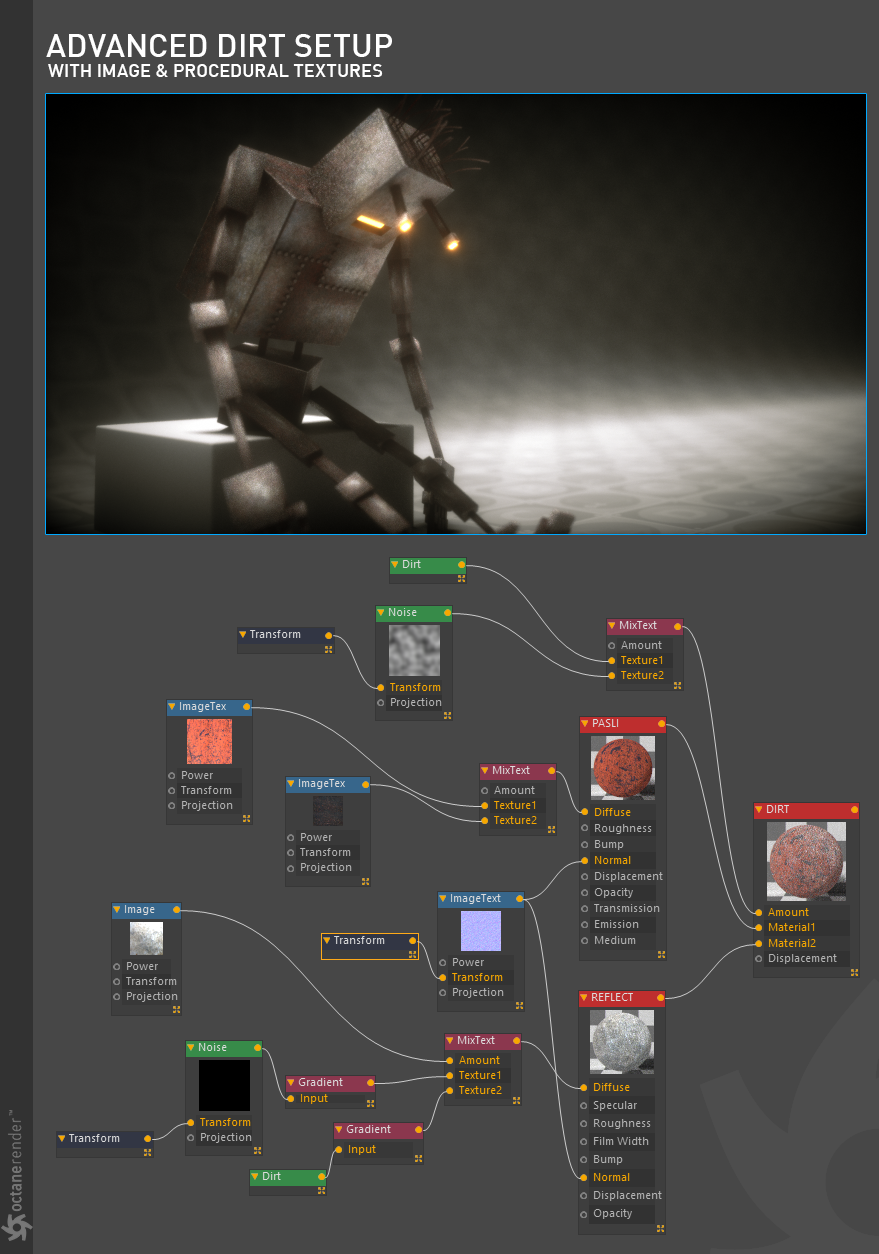
This is a complicated setup you can see in the picture. We will not be able to go into the details, but if you look carefully, "Dirt" is used in 2 places. For both local and global influence. 2 separate material setups were merged using Mix Material and Dirt was added to the amount channel again. The "Noise" node is used to reduce the pattern of dirt textures. Other image textures are to mix the old and worn image of the robot with dirt. Do not worry after seeing this setup. In fact, you will always be doing these types of setups as you experience texture and material creation. In the meantime, let's not forget that if we had done this setup in Cinema 4d's classic material manager, we would have lost a lot of time. In many places we would have to go back and forth between windows, change settings and do a lot of tedious work. Here is the node editor's beauty comes into play here.
高级用法
您可以在图片中看到这是一个复杂的设置。 我们将无法详细介绍,但是如果您仔细看,“污垢”将在2个地方使用。 对于本地和全球的影响。 使用混合材质合并了2个单独的材质设置,并且将污垢再次添加到数量通道。 “噪波”节点用于减少污垢纹理的图案。 其他图像纹理是将机器人的旧旧图像与污垢混合在一起。 看到此设置后,请不要担心。 实际上,当您经历纹理和材质创建时,您将始终进行这些类型的设置。 同时,请不要忘记,如果我们在Cinema 4d的经典材质管理器中完成了此设置,那将会浪费很多时间。 在许多地方,我们将不得不在窗口之间来回切换,更改设置并进行许多繁琐的工作。 这是节点编辑器的美在这里发挥作用。
DIRT TEXTURE SETTINGS
污垢纹理设置
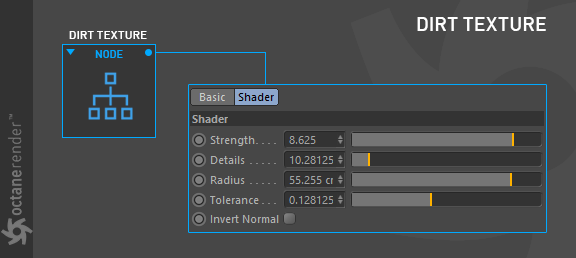
STRENGTH
This setting controls the intensity of the dirt effect across the surface of the geometry.
强度
此设置控制整个几何图形表面上污垢效果的强度。
detaIls
This setting controls the intensity of details revealed in the dirt texture. You can better observe this effect if your object in the scene has detailed and sharp edges.
细节
此设置控制污垢纹理中显示的细节强度。 如果场景中的对象具有详细且清晰的边缘,则可以更好地观察这种效果。
radIus
This setting controls the spread of the dirt across the surface from the recessed parts of the model outward towards the more exposed parts of the model. Also you can increase the dirt effects accross your geometry. More radius the more dirt will be.
半径
此设置控制污垢从模型的凹入部分向外漫射到模型的更裸露部分的整个表面。 此外,您还可以增加整个几何图形上的污垢效果。 半径越大,污垢就越多。
Tolerance
This setting can be used to reduce the appearance of black edges on roughly tessellated meshes.
公差
此设置可用于减少在大致细分的网格上出现黑色边缘的情况。
Invert normal
This is a toggle which reverses the effect of the Dirt texture based on the normal direction of the surface.
反转正常
这是一个切换开关,可根据表面的法线方向反转“污垢”纹理的效果。


赶快留个言打破零评论!~