USING x-partIcles emItter
We have already reviewed this topic in Instance Color. That's why we decided to explain it here again. In the mini Tutorial below you will see how Octane works with X-particles emitter.
1- First create a Platonic object and change its properties as shown in the picture.
使用x-partIcles仿真器
我们已经在“实例颜色”中检查了此主题。 这就是为什么我们决定在这里再次解释。 在下面的迷你教程中,您将看到Octane如何与X粒子发射器一起工作。
1-首先创建一个柏拉图对象并更改其属性,如图所示。

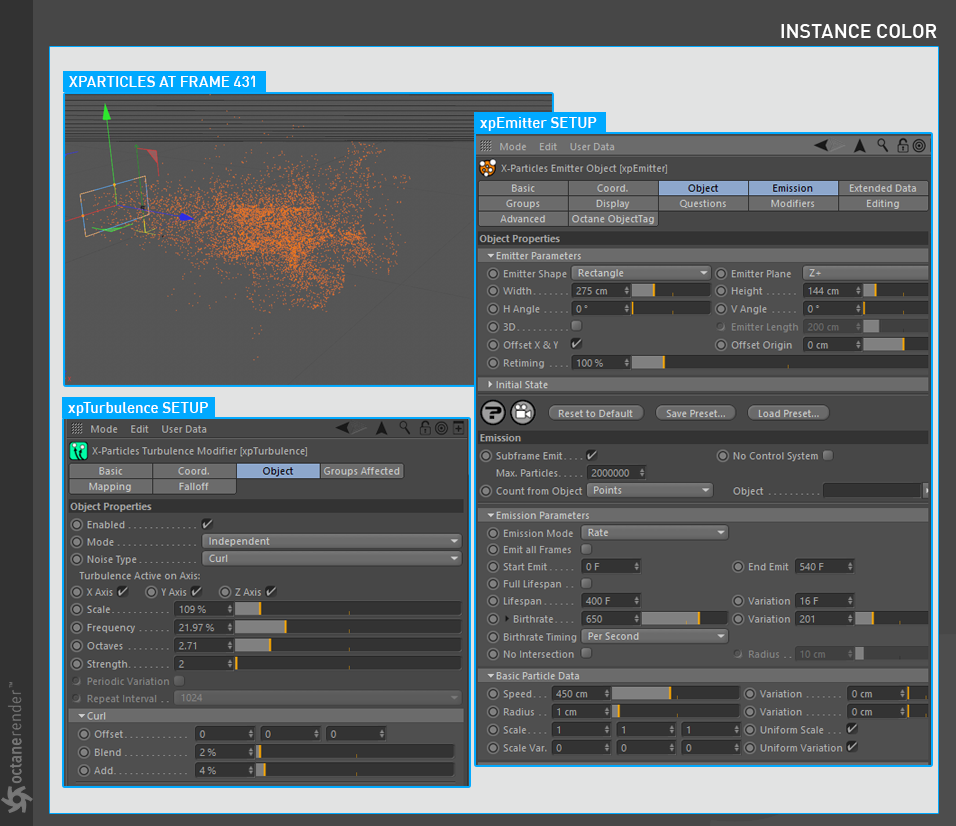
2- Now create a “xpEmitter” from the X-Particles menu and also create a “xpTurbulence” from the Xparticles/Modifiers/Motion Menu. Make the “xpEmitter” child to “xpTurbulence”. Change their properties as shown in the picture. After you finish the setup, set your animation timeline to 500 and press the play button in the Viewport. Allow the particles to flow up to the 430-450 frames.
2-现在从X-Particles菜单创建一个“ xpEmitter”,并从Xparticles / Modifiers / Motion菜单创建一个“ xpTurbulence”。 使“ xpEmitter”子级变为“ xpTurbulence”。 如图所示,更改其属性。 完成设置后,将动画时间轴设置为500,然后在视口中按“播放”按钮。 让颗粒流到430-450帧。

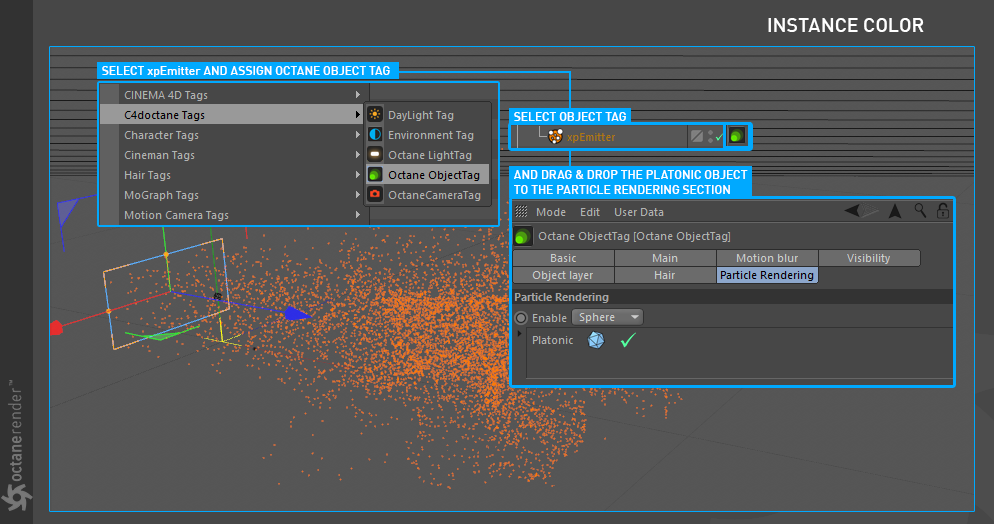
3- Now we need to identify the xpEmitter object as a particle to Octane. We will use the “Octane Object Tag” for this. Right-click on the xpEmitter object and select "Octane Object Tag" from the pop-up menu. Then select the Object Tag and drag & drop the "Platonic" object to Particle Rendering Tab. Complete the setup as shown in the following image.
Info: You can use many objects here. Just drag & drop to the object area.
3-现在,我们需要将xpEmitter对象标识为Octane的粒子。 为此,我们将使用“Octane标签”。 右键单击xpEmitter对象,然后从弹出菜单中选择“Octane对象标签”。 然后选择“对象标签”,然后将“ Plateonic”对象拖放到“粒子渲染”选项卡上。 完成安装,如下图所示。
信息:您可以在这里使用许多对象。 只需拖放到对象区域。

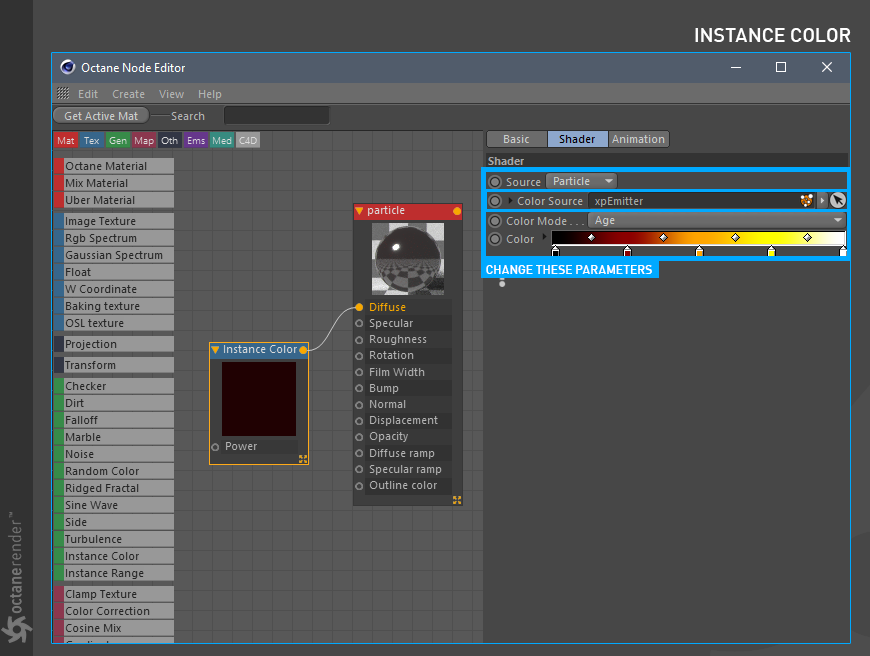
4- Next is the Material setup. We use Instance Color for this. Create any material you want and open the Node editor. Create an Instance Color node and connect it to the diffuse channel. After that, drag and drop the "xpEmitter" object in the "Color Source" section of the Instance Color settings. Enter the settings you see in the picture and complete the setup. After complete the setup assign the material to the “Platonic” object (or to other object if you have them).
4-接下来是材质设置。 为此,我们使用“实例颜色”。 创建所需的任何材质,然后打开“节点”编辑器。 创建一个“实例颜色”节点并将其连接到漫反射通道。 之后,将“ xpEmitter”对象拖放到“实例颜色”设置的“颜色源”部分中。 输入您在图片中看到的设置,然后完成设置。 完成设置后,将材质分配给“ Plateonic”对象(或如果有的话,分配给其他对象)。

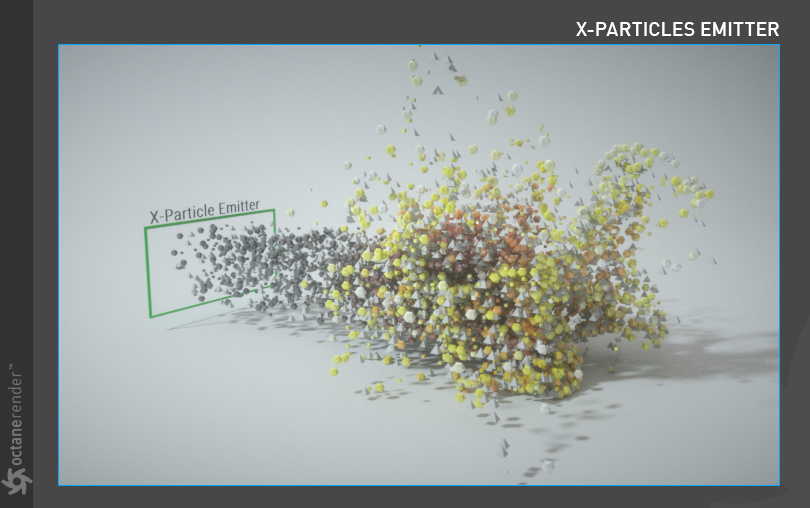
5- As you can see in the picture, we created the simple particles from platonic objects and define them to Octane. You can also create Instance Color from the particles' age, speed, etc or assign any material for your platonic objects. For example you can use "Random Color" and "Gradient node" for various particle colors. You can also use any X-particles parameters as long as you have actual geometry.
Another way is to use the xpGenerator node of X-Particles without using the Octane Object list. If you add the objects to the xpGenerator, you will get a similar result. This time with a different method.
5-如您在图片中看到的,我们从柏拉图物体创建了简单粒子,并将它们定义为Octane。 您还可以根据粒子的年龄,速度等来创建“实例颜色”,或为柏拉图对象分配任何材质。 例如,您可以将“随机颜色”和“渐变节点”用于各种粒子颜色。 只要您具有实际的几何图形,也可以使用任何X粒子参数。
另一种方法是使用X-Particle的xpGenerator节点而不使用Octane Object列表。 如果将对象添加到xpGenerator,则会得到类似的结果。 这次使用了不同的方法。


赶快留个言打破零评论!~