Denoising 降噪
The Denoising feature exists only in the Redshift 2.6+ versions!
去噪功能只存在于红移2.6 + 版本中!
Introduction
引言
Rendering effects like depth of field, motion blur, global illumination, area lighting and others require the renderer to shoot multiple rays into the scene. If a low number of rays ("samples") are shot, the final result can appear noisy ('grainy'). The typical solution to this is increasing the number of samples (as explained here), but that means longer render times.
渲染效果如景深、动态模糊、全局光源、区域照明等需要渲染器在场景中拍摄多条光线。如果拍摄少量的光线(“样品”) ,最终结果可能会显得嘈杂(“颗粒状”)。典型的解决方案是增加样本数量(如本文所述) ,但这意味着更长的渲染时间。
An alternative (and faster) solution is to use denoising instead. "Denoising" refers to a rendering technique that removes noise from an image. The process can be fast (in the case of NVidia's OptiX, it's near real-time) or can take a good few seconds. In both cases, though, it should take less time than what Redshift would need to render the scene if samples were significantly higher.
另一种(也是更快的)解决方案是使用去噪。“去噪”是指一种从图像中去除噪声的渲染技术。这个过程可以很快(就 NVidia 的 OptiX 而言,几乎是实时的) ,也可以持续几秒钟。不过,在这两种情况下,如果样本显著地高于红移渲染场景所需的时间,则需要更少的时间。
Redshift supports two different denoisers: Innobright's Altus and NVidia's OptiX AI denoiser.
红移支持两种不同的外延机制: 创新公司的 Altus 和 NVidia 的 OptiX AI 外延机制。
Innobright's Altus uses a traditional and production-proven techniques to achieve its denoising effect. On the other hand, NVidia's OptiX AI denoiser uses a deep learning algorithm that has been trained with tens of thousands of images.
Innobright 的阿尔图斯使用传统和生产证明的技术,以实现其去噪效果。另一方面,NVidia 的 OptiX AI 降噪器使用了一种深度学习算法,这种算法已经训练了成千上万张图像。
Each of these two denoising solution has pros and cons:
这两种去噪方法各有优缺点:
Altus pros and cons
阿尔特斯的优缺点
![]() Uses production-proven algorithms so results can be more predictable
Uses production-proven algorithms so results can be more predictable
使用经过生产验证的算法,因此结果可以更加可预测
![]() Denoising takes several seconds to compute so it's not possible to use in an interactive fashion
Denoising takes several seconds to compute so it's not possible to use in an interactive fashion
去噪需要几秒钟的计算,所以它不可能在一个交互式的方式使用
OptiX pros and cons
正反两方面
![]() Is very fast and can be used in interactive rendering while editing the scene
Is very fast and can be used in interactive rendering while editing the scene
非常快速,可用于交互式渲染,同时编辑场景
![]() Sometimes it can't detect noise as noise because it hasn't been trained with that particular case, so it has trouble cleaning it
Sometimes it can't detect noise as noise because it hasn't been trained with that particular case, so it has trouble cleaning it
有时它不能检测噪音作为噪音,因为它没有经过特殊情况下的训练,所以它有麻烦清洗它
It should be noted that denoising is not a silver bullet! If the rendered image is excessively noisy, denoising can fail in multiple different ways:
应该注意的是,去噪不是一个银弹!如果渲染图像过于嘈杂,去噪可能会以多种不同的方式失败:
- The denoise might simply fail to denoise the image to a sufficientl degree (i.e. noise will still be present after denoising) 去噪可能仅仅不能将图像去噪到足够的程度(即去噪后仍然存在噪声)
- It might 'oversmooth' certain parts of the image and lose considerable amounts of detail, especially in textures or small geometry details 它可能会“过分平滑”图像的某些部分,并失去相当多的细节,特别是在纹理或小几何细节
- It might produce weird visual artifacts. In the case of OptiX, these artifacts might look like brush paintstrokes 它可能会产生奇怪的视觉效果,在 OptiX 的例子中,这些效果可能看起来像画笔画
- In animations, the noise might appear as ugly 'flickering splotches' which can be more visually distracting that the original noise! 在动画中,噪音可能会以丑陋的“闪烁斑点”的形式出现,这会比原来的噪音在视觉上更容易分散注意力
For the above reasons, we recommend that denoising is primarily used to clean "the last few percent" of noise. In other words, the user should still tune their settings for an 'ok' level of noise and then employ denoising to make the frame perfect. This workflow is particularly important to follow when rendering animations.
基于以上原因,我们建议去噪主要是用来清除“最后几个百分点”的噪音。换句话说,用户仍然应该调整他们的设置为一个“ ok”水平的噪音,然后采用去噪,使帧完美。这个工作流程在呈现动画时尤其重要。
|
|
|
|
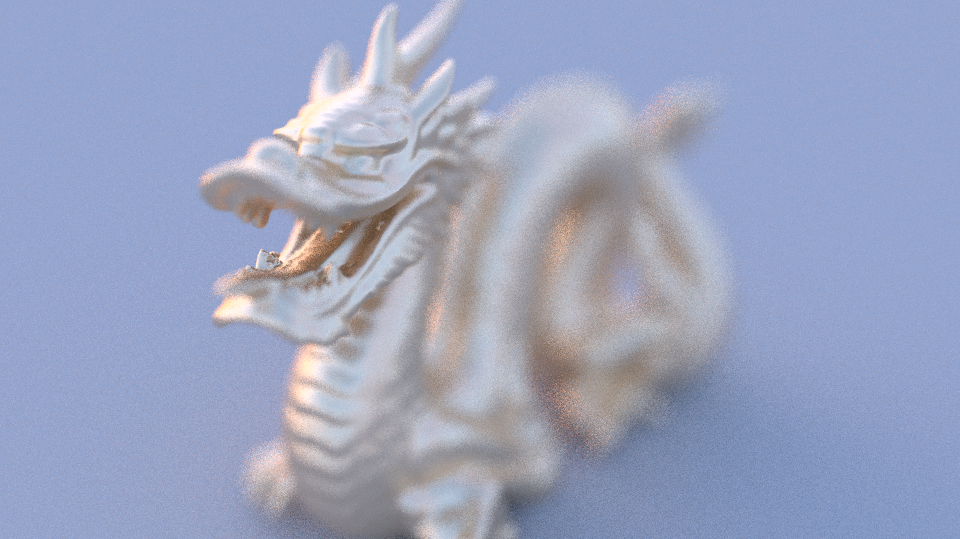
Before denoising 在去噪之前 |
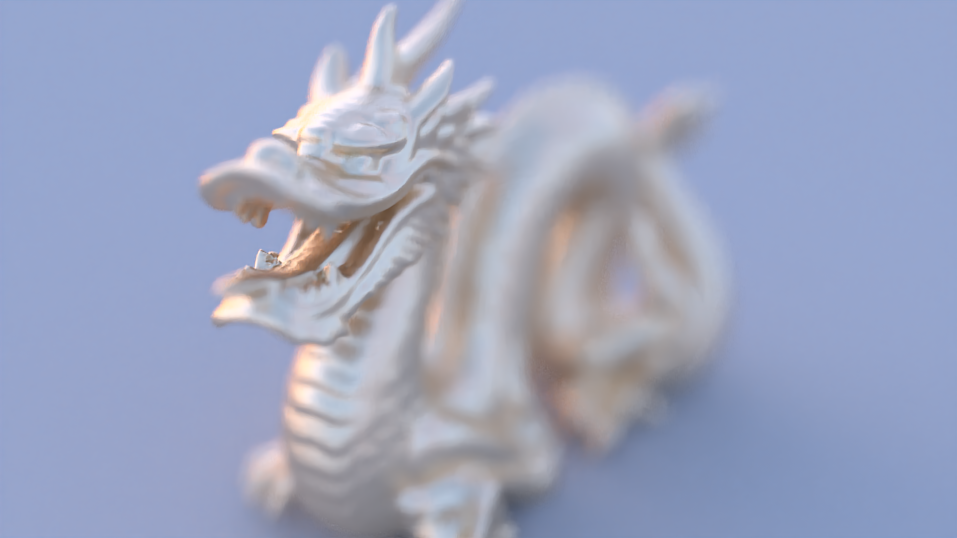
After denoising (with OptiX) 去噪后(用 OptiX) |
Altus
男名男子名
The Altus denoiser options can be found in Redshift's Output tab.
可以在 Redshift 的 Output 选项卡中找到 Altus denoiser 选项。
To enable denoising with Altus simply select "Altus Single Pass" or "Altus Dual Pass" for the denoise engine and then do bucket rendering (Altus does not work in progressive!) using the Render View.
为了使阿尔图斯去噪,只需选择“阿尔图斯单通道”或“阿尔图斯双通道”的降噪引擎,然后做桶渲染(阿尔图斯不工作在渐进!)使用渲染视图。
"Altus Single Pass" means that the frame will be rendered once and then Altus will execute denoising. "Altus Dual Pass" means that the frame will be rendered twice before denoising.
“阿尔图斯单通道”的意思是,该框架将被渲染一次,然后阿尔图斯将执行去噪。“阿尔特斯双通道”的意思是框架将被渲染两次之前去噪。
In the early days of the Altus-Redshift integration, there was no Single Pass mode available in Altus so the only option available to users was the Dual Pass approach. Altus required two separate rendered frames to determine where the noise is. The drawback of this approach is that the frame takes twice as long to render because it gets rendered two times! Some users got around this by tweaking their unified sampling settings and increasing the error threshold right before denoising. This lowered render times but also meant that both frames would be noiser - but that was ok because Altus would clean the noise.
在阿尔图斯-红移集成的早期,在阿尔图斯没有单通道模式可用,所以用户唯一可用的选择是双通道方法。阿尔特斯需要两个独立的渲染帧来确定噪声的位置。这种方法的缺点是,渲染帧需要两倍的时间,因为它需要渲染两次!一些用户通过调整他们的统一采样设置和增加误差阈值权之前去噪来解决这个问题。这降低了渲染时间,但也意味着这两个帧将没有-但这是好的,因为阿尔特斯会清理噪音。
At a later point in the Altus-Redshift integration, Innobright introduced their Single Pass technique which can determine per-pixel noise in a single render pass. This approach is much more natural as it doesn't double the frame time and doesn't involve the user having to do any tricks like the above tweaking of the unified sampling settings.
在稍后的 Altus-Redshift 集成中,Innobright 介绍了他们的单通道技术,这种技术可以在一次渲染过程中确定每个像素的噪声。这种方法更加自然,因为它不会使帧时间增加一倍,也不需要用户做任何技巧,比如上面调整统一的采样设置。
We recommend using the "Altus Single Pass" denoise engine, especially if you are a new Altus user!
我们建议使用“阿尔图斯单通道”降噪引擎,特别是如果你是一个新的阿尔图斯用户!
Altus can achieve more accurate results with the use of additional Redshift AOVs. When "Automatically Create AOVs" is enabled, Redshift will automatically add any AOVs that Altus needs to achieve its denoising results. Unticking that option means that the user will manually add the necessary AOVs. The AOVs used by Altus are: Diffuse Albedo, World Position and Bumped Normal
阿尔特斯可以实现更准确的结果,使用额外的红移 aov。当“自动创建 aov”启用,红移将自动添加任何 aov,阿尔特斯需要实现其去噪结果。取消该选项意味着用户将手动添加必要的 aov。阿尔特斯使用的 AOVs 是: 漫反射率,世界位置和颠簸正常
While Redshift is rendering, it generates some aditional images ("buffers") which are essential for the denoising process. These buffers are normally hidden from Redshift's Render View but if you check "Show additional buffers in RenderView", those buffers will appear in the Render View's AOV list and will be previewable. This can be sometimes useful when diagnosing denoising.
在红移渲染的同时,生成一些辐射图像(“缓冲区”) ,这些图像对于去噪处理是必不可少的。这些缓冲区通常隐藏在红移的渲染视图中,但是如果你选中“在渲染视图中显示额外的缓冲区”,这些缓冲区将出现在渲染视图的 AOV 列表中,并且是可预览的。这在诊断去噪时有时是有用的。
The kc1, kc2, kc4 and kf settings allow the user to control the quality and "denoising strength" of Altus.
Kc1,kc2,kc4和 kf 设置允许用户控制的质量和“去噪强度”的 Altus。
- kc1 controls how much high-frequency detail will be retained (i.e. sharp image features) Kc1控制多少高频细节将被保留(即锐利的图像特征)
- kc2 controls how much medium-frequency detail will be retained Kc2控制多少中频细节将被保留
- kc3 controls how much low-frequency detail will be retained (i.e. chunky image features) Kc3控制保留多少低频细节(即图像特征)
Lower kc values will retain more detail while higher values will make the denoising stronger. I.e. it will produce smoother results but it might lose details
较低的 kc 值将保留更多的细节,而较高的值将使去噪更强。例如,它会产生更平滑的结果,但可能会丢失细节
The kf parameter controls AOV influence. I.e. determines how much AOVs affect the denoising results. Smaller values make the AOVs affect the denoising result more. So, for example, if you have a bump map and you see Altus smoothing the lighting on it too much, lowering the kf value will help. However this will also constrain the denoiser which means that, if the image is very noisy, it will not be able to denoise it too much around the "bumpy areas" (in this example).
Kf 参数控制 AOV 影响。决定了 aov 对去噪结果的影响程度。较小的值使 aov 对去噪效果的影响更大。所以,例如,如果你有一个凹凸贴图,你看到阿尔图斯平滑的灯光太多,降低 kf 值将有所帮助。然而,这也将限制降噪器,这意味着,如果图像非常嘈杂,它将不能降噪周围的“颠簸地区”(在这个例子中)太多。
After the frame has rendered and Altus has denoised it, you can toggle it on or off (to better see its effect) in the Render View by pressing the button of the Render View.
当画面渲染完毕,并且 Altus 对其进行了去噪处理之后,你可以在渲染视图中通过按下渲染视图的按钮来打开或者关闭它(以便更好地看到它的效果)。
OptiX
The OptiX denoiser options can be found in Redshift's Output tab.
可以在 Redshift 的 Output 选项卡中找到 OptiX 降噪选项。
To enable denoising with Optix, simply select "Optix" for the denoise engine and render either in progressive rendering or bucket rendering with the Render View.
要使用 Optix 实现去噪,只需为降噪引擎选择“ Optix”,然后使用渲染视图进行渐进渲染或桶式渲染。
OptiX can achieve more accurate results with the use of additional AOVs. When "Automatically Create AOVs" is enabled, Redshift will automatically add any AOVs that OptiX needs to achieve its denoising results. Unticking that option means that the user will manually add the necessary AOVs. The AOVs used by OptiX are: Diffuse Albedo
使用附加的 AOVs 可以获得更准确的结果。当“自动创建 AOVs”启用,红移将自动添加任何 AOVs,OptiX 需要实现其去噪结果。取消该选项意味着用户将手动添加必要的 aov。使用的 AOVs 是: 漫反射率
While Redshift is rendering, it generates some aditional images ("buffers") which are essential to the denoising process. These buffers are normally hidden from Redshift's Render View but if you check "Show additional buffers in RenderView", those buffers will appear in the Render View's AOV list and will be previewable. This can be sometimes useful when diagnosing denoising.
在红移渲染的同时,生成一些辐射图像(“缓冲区”) ,这些图像对去噪处理是必不可少的。这些缓冲区通常隐藏在红移的渲染视图中,但是如果你选中“在渲染视图中显示额外的缓冲区”,这些缓冲区将出现在渲染视图的 AOV 列表中,并且是可预览的。这在诊断去噪时有时是有用的。
As mentioned above, OptiX is a very fast denoiser however, even with its speed, it can still "steal away" a percentage of the frame's total render time. That's especially true when rendering large-resolution images in bucket rendering because Redshift denoises the entire frame after each bucket. For this reason, Redshift supports a "denoise overhead" setting for bucket and progressive rendering. These settings control how often OptiX is executed. A setting of 10 means "execute OptiX as often as needed but ensure that it doesn't take more than 10% of the entire frame time". A setting of 100 means "execute it after every single pass (in progress) or bucket (in bucket rendering)". A setting of zero tells Redshift that it should only OptiX-denoise only once at the end of the render.
正如上面所提到的,OptiX 是一个非常快的重现器,然而,即使以它的速度,它仍然可以“偷走”帧的总渲染时间的一个百分比。在桶式渲染中呈现大分辨率图像时尤其如此,因为每次桶式渲染后,红移都会降低整个帧的噪音。因此,Redshift 支持对 bucket 和渐进呈现进行“降噪开销”设置。这些设置控制 OptiX 执行的频率。设置为10意味着“根据需要经常执行 OptiX,但要确保它不会占用整个帧时间的10% 以上”。设置为100表示“在每次传递(进行中)或桶(在桶呈现中)之后执行它”。零的设置告诉红移,它只应该在渲染结束时使用 optix 降噪一次。
Please note that the functionality of "denoise overhead" is based on estimate so it does not guarantee that OptiX will take exactly the specified percentage of frame time.
请注意,“降噪开销”的功能是基于估计的,因此它不能保证 OptiX 将采取精确的帧时间百分比。
The benefit of lower "overhead" settings is that OptiX processing will take less time. The drawback is that, because OptiX only gets executed even few passes (in progressive mode) or every few buckets (in bucket rendering), some "visual lag" might be noticeable. That's the main reason why Redshift detaults denoise overhead to 10% for bucket rendering (where lag matters less and rendering performance more) and 100% for progressive rendering (where the opposite is true).
较低的“开销”设置的好处是 OptiX 处理将花费较少的时间。缺点是,由于 OptiX 只执行很少的传递(在渐进模式下)或者每隔几个桶(在 bucket 呈现中) ,一些“可视延迟”可能会显而易见。这就是为什么 Redshift 将 bucket 渲染的去噪开销降低到10% 的主要原因(延迟的影响较小,渲染性能更好) ,而对于渐进渲染的去噪开销降低到100% (反之亦然)。
After the frame has rendered and OptiX has denoised it, you can toggle it on or off (to better see its effect) in the Render View by pressing the button of the Render View.
在渲染完毕并且 OptiX 对其进行了去噪处理之后,你可以在渲染视图中通过按下渲染视图的按钮来打开或者关闭它(以便更好地看到它的效果)。
Animation Considerations
动画方面的考虑
When rendering an animation, we recommend disabling Redshift's "Randomize Pattern on Each Frame"!
当渲染一个动画时,我们建议禁用红移的“每帧的随机模式”!
Doing so will make the noise effect be "stuck on the camera" instead of "dancing around like TV static". While the "stuck on camera" noise effect is undesirable in regular rendering, .it can really help denoising because it maximizes the possibility that the noise shape will remains consistent around a pixel between adjacent animation frames. This, in turn, reduces the possibility for flickering "splotchiness" on the final denoised results (which can be really distracting).
这样做会使噪音效果“卡在相机上”,而不是“像电视静电一样跳来跳去”。在常规渲染中,“卡在相机上”的噪声效果是不受欢迎的。它可以真正有助于去噪,因为它最大化的可能性,噪音形状将保持一个像素左右相邻的动画帧一致。这反过来减少了最终去噪结果上闪烁的“斑点”的可能性(这可能真的会让人分心)。


赶快留个言打破零评论!~