creatIng fOG
There are various ways of making fog in Octane, and all of these are volumetric fogs. Here we will explain the ways of making volumetric fog in this section. Fog is a less complex nature phenomenon than fire. Nevertheless, making a realistic fog is always a hard job and since there is no emission like a fire, the most important things here is the Light and Volume medium setups. If you want to follow the tutorials we discuss in this section, you can download the scenes from the link below.
Download "Fog_01" scene from here
Download "Fog_02" scene from here
制作雾
在Octane中产生雾的方法有多种,所有这些都是体积雾。在这里,我们将在本节中说明产生体积雾的方法。雾是自然现象,没有火那么复杂。尽管如此,要使逼真的雾始终是一项艰巨的任务,并且由于没有像火一样的发射,所以这里最重要的是光和体积介质设置。如果要遵循我们在本节中讨论的教程,可以从下面的链接下载场景。
从这里下载“ Fog_01”场景
从这里下载“ Fog_02”场景
creatIng local fOG usIng volume fog object
In Octane you can create both local and global fog. Now open the "Fog_01" scene. This scene is the classic indoor scene and obtained from the content browser of Cinema 4D. If you're ready, let's start.
01- Go to the Objects menu from the Live Viewer and create an "Octane Fog Volume". Then change the coordinates and parameters of this volume object as you see in the picture below.
使用体积雾对象创建局部烟雾
在Octane中,可以创建局部雾和全局雾。现在打开“ Fog_01”场景。该场景是经典的室内场景,可从Cinema 4D的内容浏览器获得。如果您准备好了,那就开始吧。
01-从实时查看器转到“对象”菜单,然后创建“Octane雾体积”。然后更改该体积对象的坐标和参数,如下图所示。
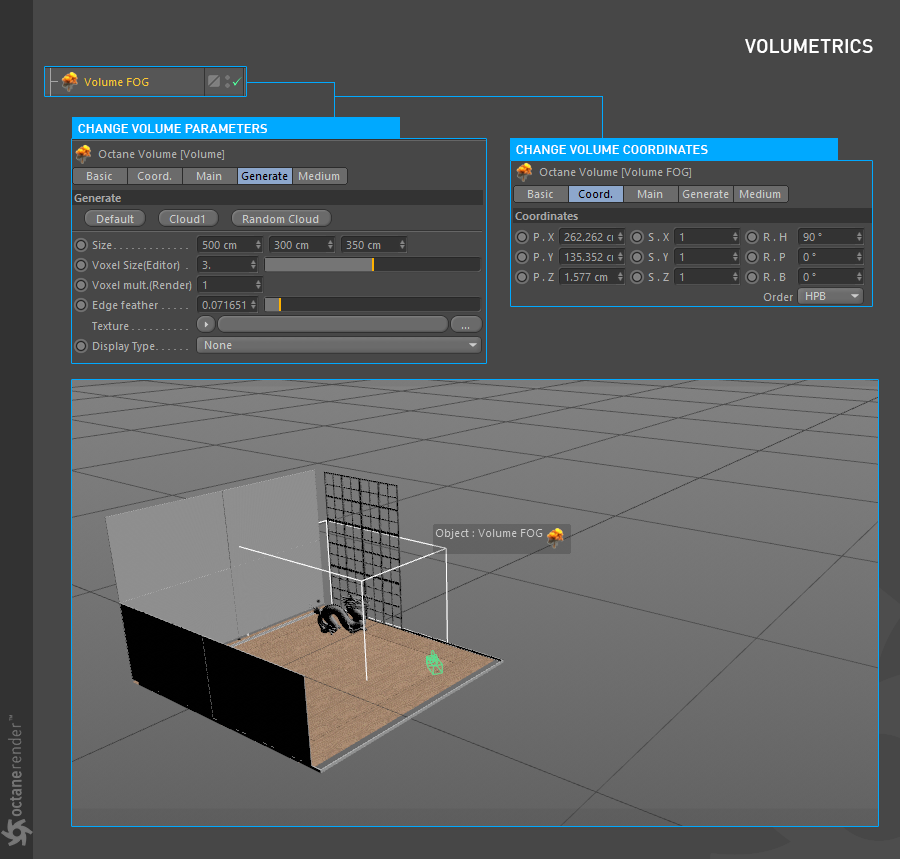
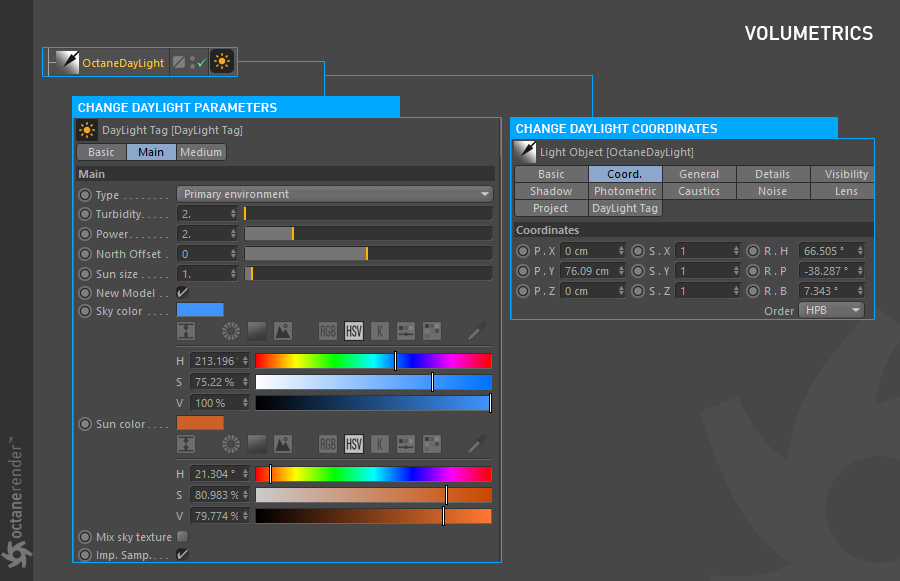
02- Now from the Live Viewer go to the Objects menu and create an "Octane Daylight" from the Lights sub-menu. Then change this Daylight's coordinates and parameters as you see in the picture below. This light will interact with the Fog object on the scene.
02-现在,从Live Viewer转到“对象”菜单,然后从“灯光”子菜单创建“ Octane Daylight”。 然后,如下图所示更改此Daylight的坐标和参数。 该灯光将与场景中的雾对象相互作用。
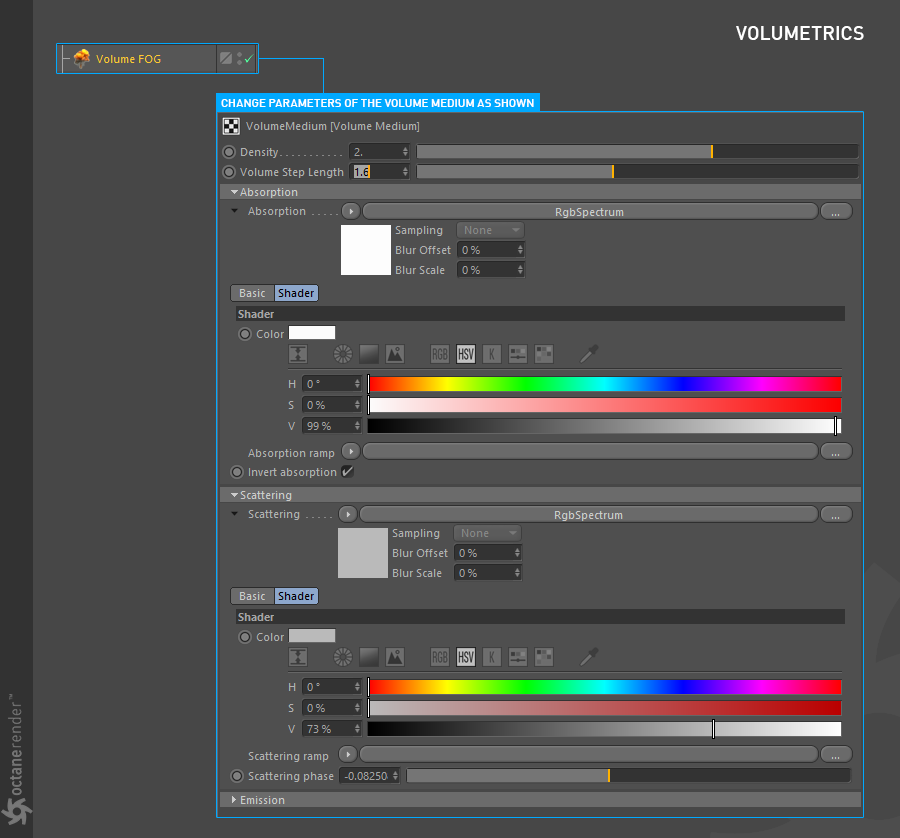
03- Now we can do Volume medium settings for the Fog. To do this, select "Volume Fog" from the Object Manager and go to the Medium Tab. Change the settings as you see in the picture below.
03-现在我们可以对雾进行音量中等设置。 为此,请从对象管理器中选择“体积雾”,然后转到“中型”选项卡。 如下图所示更改设置。
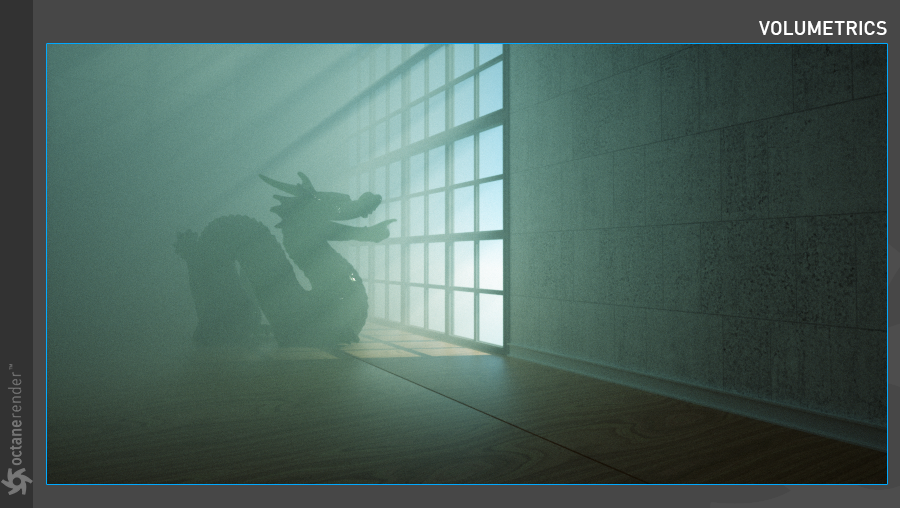
05- Now run Live Viewer. If you have done everything right, you will get the result you see in the picture below. As you can see, the volume fog object you have placed in a certain part of the scene has created the desired effect. You can add a completely different atmosphere to the scene by playing with the position of the light and the Density and Step Length settings of the Volume object.
05-现在运行Live Viewer。 如果您做对了所有事情,您将获得下图所示的结果。 如您所见,放置在场景的特定部分中的体积雾对象已创建所需的效果。 通过播放灯光的位置以及“体积”对象的“密度”和“步长”设置,可以为场景添加完全不同的气氛。
Or you can add some variation to Fog using noise. To do this, go to the Generator Tab and assign Cinema 4D noise to the texture slot. You can select the noise type you want from the Noise settings. In the picture below, Naki noise is used, and as you can see, the scene is appeared with another atmosphere. If you animate this noise, you can create a moving foggy smoke effect. Options are endless.
或者,您可以使用噪波为雾添加一些变化。 为此,请转到“生成器”选项卡,然后将Cinema 4D噪波分配给纹理插槽。 您可以从“噪波”设置中选择所需的噪波类型。 在下面的图片中,使用了Naki噪波,并且您可以看到,场景在另一种气氛下出现。 如果为该噪波设置动画,则可以创建移动的模糊烟雾效果。 选择是无止境的。
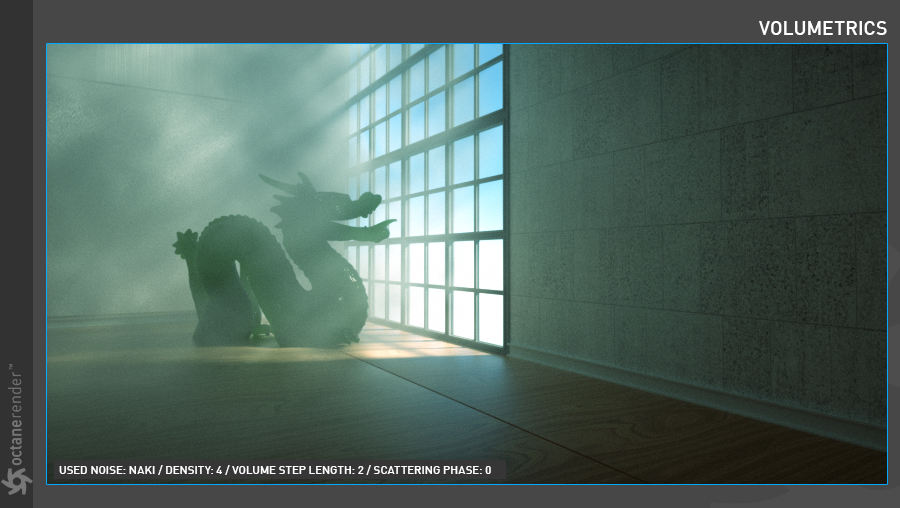
creatIng global fOG usIng envIronment medIUM
In this tutorial we will show how to make an environment fog. The difference from Local Fog is that it covers the whole scene. Now install the "Hot4D" plugin for Cinema 4D before opening the "fog_02" scene. This plugin creates a realistic ocean (not material, only mesh). It's a pretty nice plugin and free. You can download it from here. / Of course you can also use houdini for the sea/ocean simulation (which is much more advanced).
创建全球环境媒介
在本教程中,我们将展示如何使环境模糊。 与本地雾的不同之处在于它覆盖了整个场景。 现在,在打开“ fog_02”场景之前,为Cinema 4D安装“ Hot4D”插件。 这个插件创建了一个逼真的海洋(不是材质,只有网格)。 这是一个非常不错的插件,并且是免费的。 你可以在这里下载。 /当然,您也可以使用houdini进行海洋模拟(这要先进得多)。
01- Open the "Fog_02" scene. First create an Object / Lights / Octane Daylight from the Live viewer menu and change both the settings and the coordinates as you see in the picture below. We will make the main fog setup within this light later.
01-打开“ Fog_02”场景。 首先,从“实时”查看器菜单中创建一个“对象” /“灯光” /“Octane”日光,并更改设置和坐标,如下图所示。 稍后我们将在此灯光下进行主雾设置。
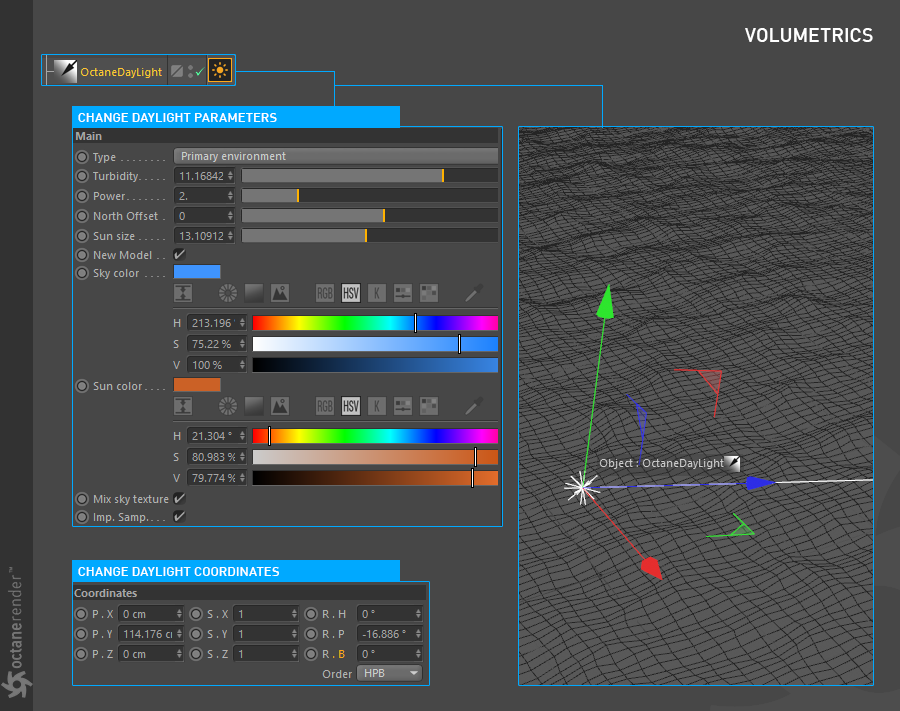
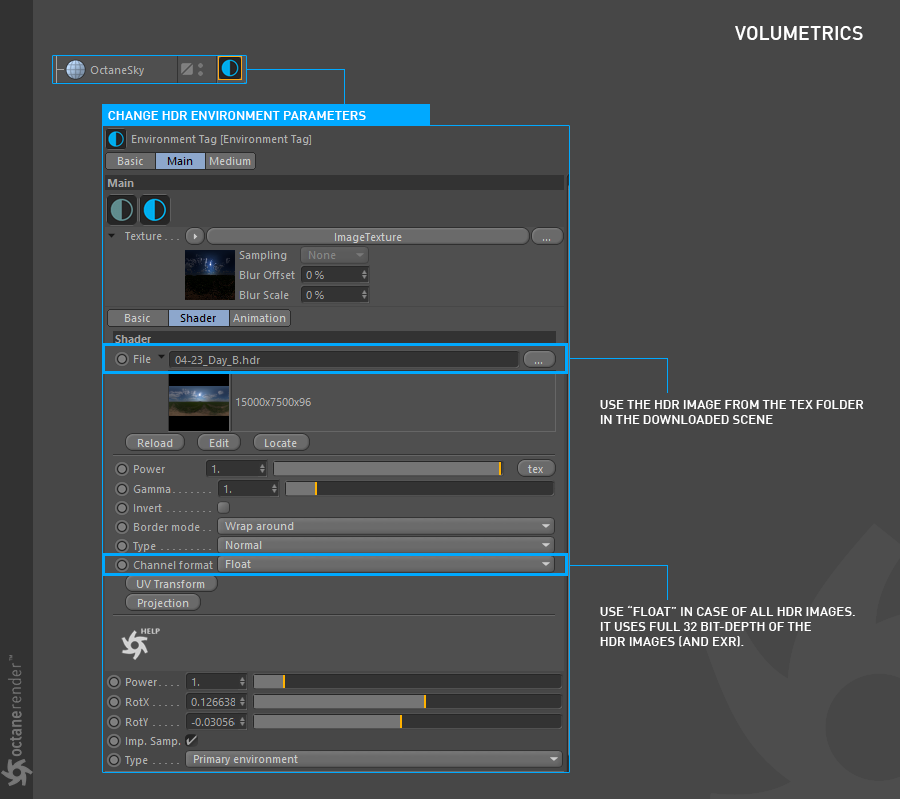
02- Now create the Object/HDR Environment again from the Live viewer menu and change the settings as you see in the picture below. The reason we use this HDR is because it contributes to general illumination and local shadows.
02-现在,从“实时查看器”菜单中再次创建“对象/ HDR环境”,并如下图所示更改设置。 我们使用此HDR的原因是,它有助于一般照明和局部阴影。
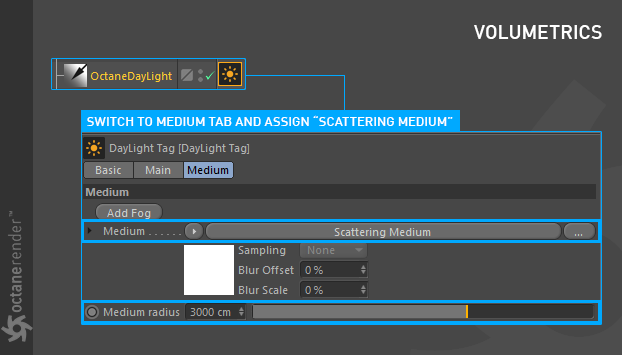
03- Now select Octane Daylight Tag from Object manager. Go to the Medium tab and assign "Scattering Medium" to the medium slot. Make the medium radius 3000 cm.
03-现在从对象管理器中选择Octane Daylight Tag。 转到“介质”选项卡,然后将“分散介质”分配给介质插槽。 使中等半径3000厘米。
04- Click Scattering medium. Here you assign "RGB Spectrum" to the Absorption and Scattering channels and change the settings as you see in the picture below.
Info: Volume Step Length has no effect on Environment Medium.
04-单击分散介质。 在这里,您将“ RGB光谱”分配给吸收和散射通道,并如下图所示更改设置。
信息:音量步长对环境中等没有影响。
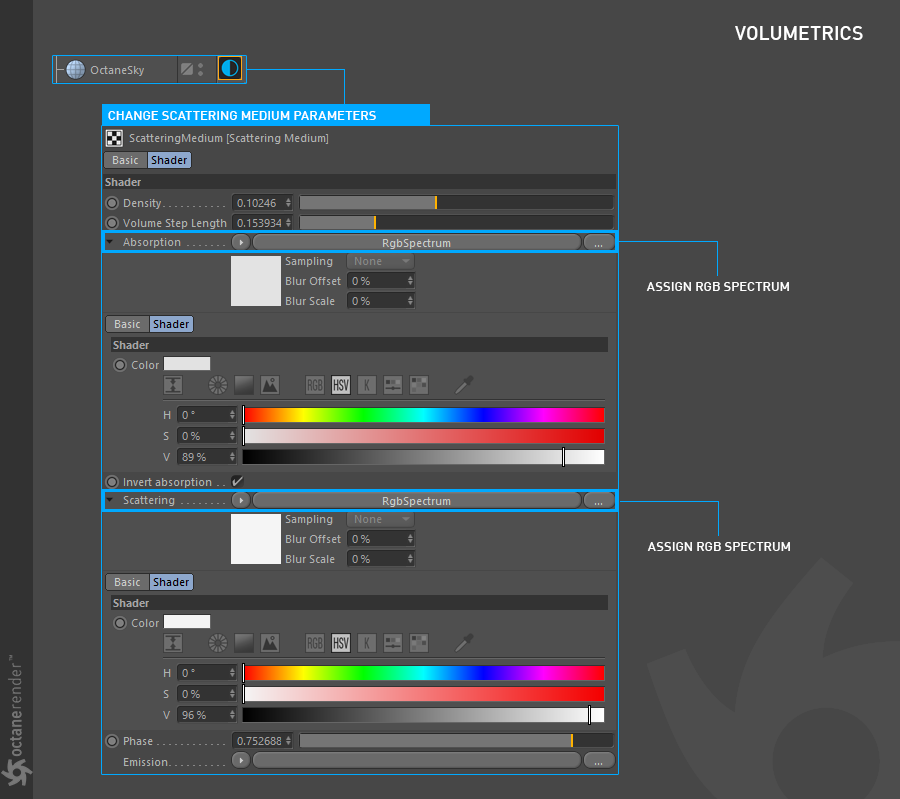
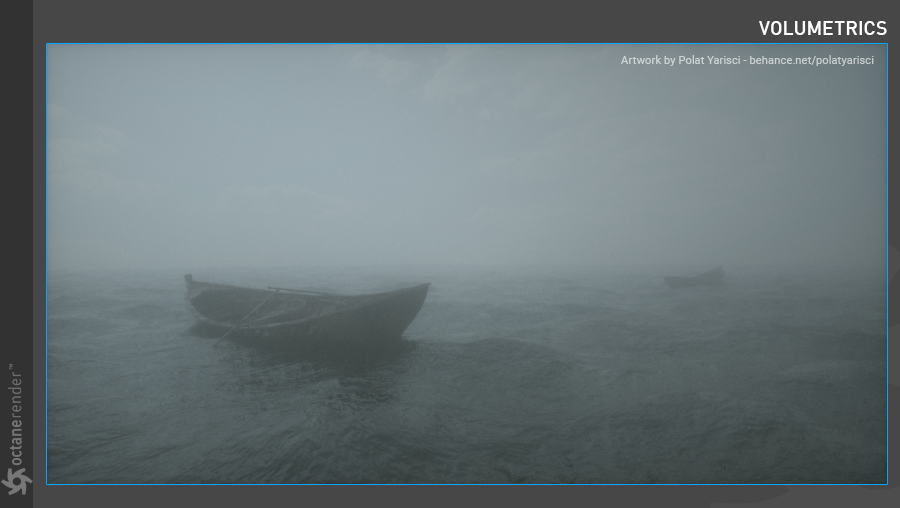
04- Now run Live Viewer. If you have done everything right, you will get the result you see in the picture below. As you can see, we created a global fog using Daylight's medium channel. Because of the high absorption and scatter in the fog phenomenon, we made our adjustments accordingly. For example, in the absorption channel, the higher the "V" value, the more it is forced to absorb the rays quickly. As in reality, the rays will quickly absorb in any dense fog. Also the scatter phase plays a very important role in the scene. The rays scattering towards the source of light ensure that the scene looks like this. That's why we see the front rowboat a little clearer. You can play with the settings and create the atmosphere you want.
04-现在运行Live Viewer。 如果您做对了所有事情,您将获得下图所示的结果。 如您所见,我们使用Daylight的中等通道创建了一个全局雾。 由于雾现象的吸收和散射较高,因此我们进行了相应的调整。 例如,在吸收通道中,“ V”值越高,被迫迅速吸收射线的程度就越大。 实际上,光线会在浓雾中迅速吸收。 分散阶段在场景中也起着非常重要的作用。 朝向光源散射的光线可确保场景看起来像这样。 这就是为什么我们看到前排划艇更加清晰的原因。 您可以进行设置并创建所需的气氛。


赶快留个言打破零评论!~