UNIVERSAL MATERIAL
In previous versions of Octane, there were some restrictions on the type of material you selected when creating material. For example, you could not use the "emission" feature when using glossy or specular material, or not to use "specular" and "glossy" at the same time. We had to create them separately and use them with mix or blend material. Universal Material eliminates all of these restrictions and provides us with a highly flexible and creative solution for material creation. There's no material you can't do anymore with Universal Material. Moreover, you can create extremely complex materials here. We're not just talking about the materials we all see each day. Sometimes you come across such a material that you find yourself thinking about how to do it in Octane. These situations are no longer a problem due to Universal Material. As you work with this material and gain experience, you will feel almost like no other type of material is needed.
通用材质
在以前的Octane版本中,创建材质时对您选择的材质类型有一些限制。例如,在使用光泽或镜面材质时,您不能使用“发射”功能,或者不能同时使用“镜面”和“光泽”。我们必须分别创建它们,并将它们与混合或混合材质一起使用。通用材质消除了所有这些限制,并为我们提供了一种高度灵活和创新的材质创建解决方案。使用通用材质,您再也无法做任何材质。此外,您可以在此处创建极其复杂的材质。我们不仅在谈论我们每天都会看到的材质。有时您会遇到这样的材质,发现自己正在考虑如何在Octane中进行操作。由于通用材质,这些情况不再是问题。当您使用这种材质并获得经验时,您会感觉几乎不需要任何其他类型的材质。
As a use, you might overwhelm at first, but when you take some time, you'll see that most options are not any different from other types of material. The beauty of the universal material is to combine all the other material options together efficiently and work accurately with the new options. That's why it's easy to create a material with Dielectric and Conductor properties. The use of "Metallic (conductor)" or "Specular (dielectric) in Universal material has a special subject, which will be described later in this topic.
作为一种用法,您一开始可能会不知所措,但是当您花费一些时间时,您会看到大多数选项与其他类型的材质没有任何不同。通用材质的优点在于将所有其他材质选项有效地结合在一起,并且可以与新选项精确地协同工作。这就是为什么创建具有介电和导体特性的材质很容易的原因。在通用材质中使用“金属(导体)”或“镜面(电介质)”有一个特殊的主题,稍后将在本主题中对其进行介绍。
We will try to explain most options for this material. However, we will not explain the "parameters" described in detail in previous material types. You can read the relevant explanations in the topic section of the material. We will explain in detail the new options that come with Universal material.
作为一种用法,您一开始可能会不知所措,但是当您花费一些时间时,您会看到大多数选项与其他类型的材质没有任何不同。通用材质的优点在于将所有其他材质选项有效地结合在一起,并且可以与新选项精确地协同工作。这就是为什么创建具有介电和导体特性的材质很容易的原因。在通用材质中使用“金属(导体)”或“镜面(电介质)”有一个特殊的主题,稍后将在本主题中对其进行介绍。
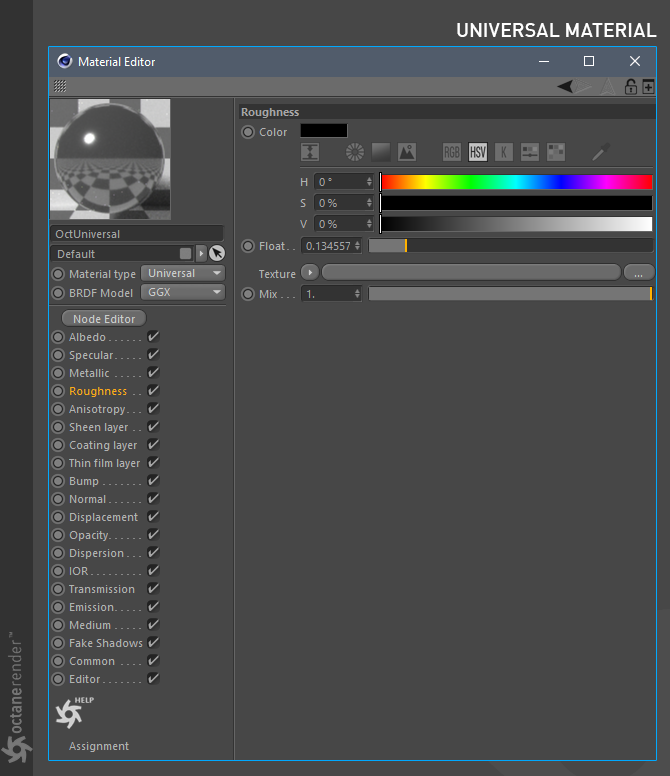
Albedo
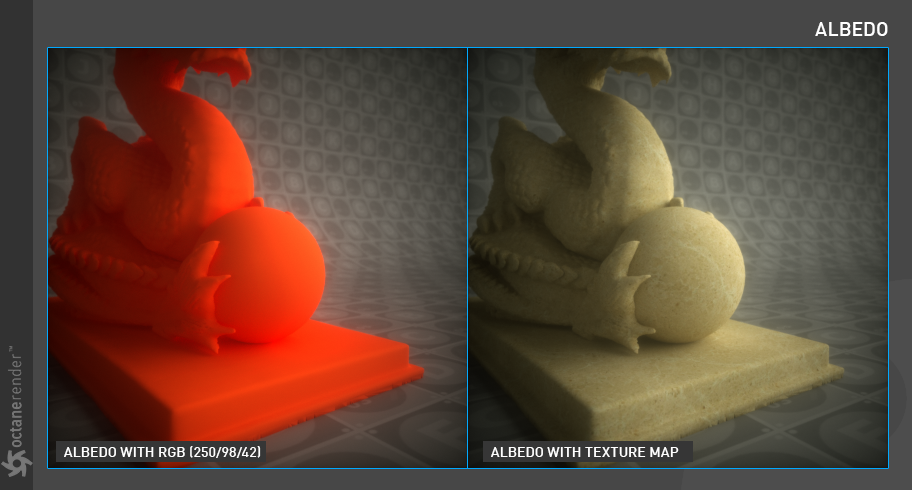
Albedo is often synonymous with Diffuse. Here you can enter the base color or texture input for the material. You can use RGB/Greyscale and Float input. If you are going to use Albedo texture, or if you are going to create it, make sure that it is not in albedo texture, such as shadow, direction light or AO. Just work like a Diffuse texture.
反照率
Albedo通常是Diffuse的同义词。 在这里,您可以输入材质的基础颜色或纹理输入。 您可以使用RGB /灰度和浮点输入。 如果要使用反照率纹理,或者要创建它,请确保它不处于反照率纹理中,例如阴影,方向光或AO。 就像漫反射纹理一样工作。
SPECULAR
This option is not different from "Specular Material". Therefore, you can get more detailed information from the relevant section. When working with Universal Material, you should pay more attention to the distinction of Conductor and Dielectric. Because since Metallic material came to Octane, this distinction has become more visible. For the clarification of concepts and ease of use, we can make the following 2 classifications:
镜面
此选项与“镜面材质”没有区别。因此,您可以从相关部分中获取更多详细信息。使用通用材质时,您应更加注意导体和电介质的区别。因为自从金属材质进入Octane以来,这种区别变得更加明显。为了澄清概念和易于使用,我们可以进行以下2种分类:
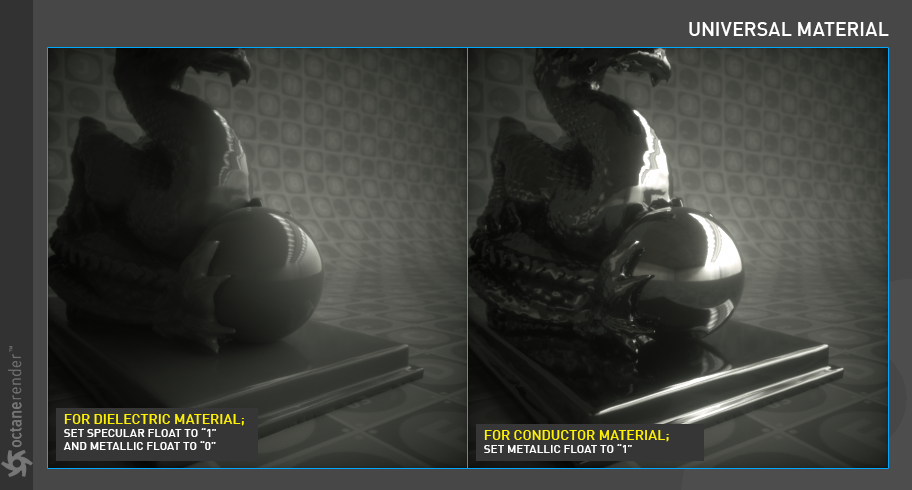
1- If you are going to use "Specular" when working in Universal Material, this means that you will create "Dielectric" material. In this case, you must set the "Float" value in Metallic to zero.
1-如果在通用材质中使用“镜面”,则意味着将创建“介电”材质。在这种情况下,必须将“金属”中的“浮点”值设置为零。
2- if you are going to use "Metallic" when working in Universal Material, this means you will create "Conductor" material. In this case, when you set Metallic Float 1, the specular (Dielectric) parameter is automatically overridden.
2-如果要在“通用材质”中使用“金属”,则意味着将创建“导体”材质。在这种情况下,当您设置“金属浮点1”时,镜面(电介质)参数将自动被覆盖。
Well if you ask what is Conductor and Dielectric you can look at internet, you will find a lot of info about this subject. Or you can look at the short description in this manual.
Info: In real world, Dielectric and Conductor materials have very complex features. In Octane, the use of these concepts actually means that the core engine calculates the "Fresnel" values realistically and accurately.
好吧,如果您问什么是“导体和电介质”,您可以看一下互联网,您会发现很多有关此主题的信息。或者您可以查看本手册中的简短说明。
信息:在现实世界中,电介质和导体材质具有非常复杂的功能。在Octane中,使用这些概念实际上意味着核心引擎将真实,准确地计算“菲涅耳”值。
And finally, let's show a list of some Conductor and Dielectric materials:
Conductors: Aluminum, Copper, Gold, Iron, Lithium, Mercury, Silver, Sodium, Lithium, Titanium, etc.
Dielectrics: Water, All kind of Plastics, All kind of Glasses, Asphalt, Diamond, Emerald, Grass, Ruby, Milk, etc.
最后,让我们显示一些导体和电介质材质的列表:
导体:铝,铜,金,铁,锂,汞,银,钠,锂,钛等
介电材质:水,各种塑料,各种玻璃,沥青,钻石,翡翠,草,红宝石,牛奶等
MetallIc
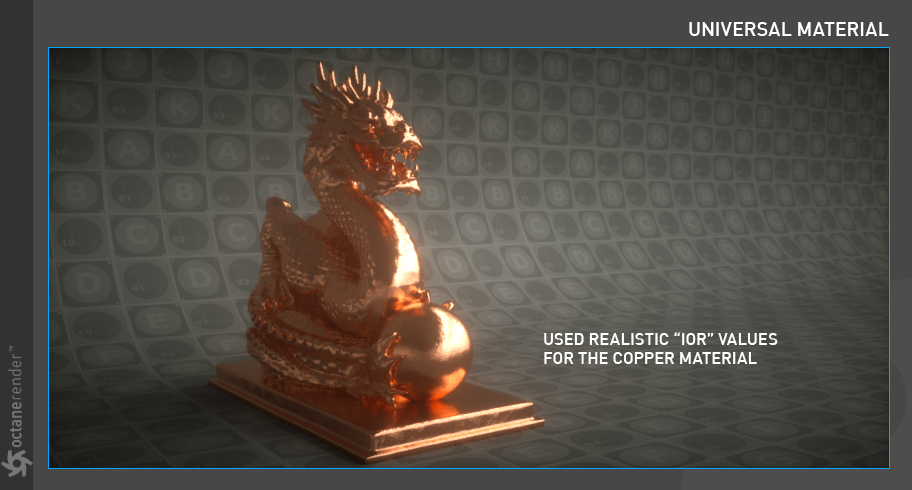
With this feature you can use your material to make completely realistic metal surfaces. In addition to the "specular" section above, the material you create will be classified as "conductor". By default, there is a "Float" value. If you make this Float value 1, the material will be Conductor. In this case, the "Specular" parameter will be disabled automatically. If you click the "tex" button next to the Float, you can add a metallic feature to the material with many other inputs. For example, you can use any RGB/Greyscale texture or Octane's procedural textures. When you start using Metallic, the most important parameter is the "IOR" parameter. With this parameter you can create realistic metallic surfaces using real IOR values. Metallic parameter is a very good addition to Universal material. In this section you can find detailed information about the "Metallic Material".
Info: Realistic IOR data of the real world surfaces or materials can be found at this site.
金属
使用此功能,您可以使用材质制作完全逼真的金属表面。 除了上面的“镜面”部分之外,您创建的材质将被分类为“导体”。 默认情况下,有一个“浮点数”值。 如果将此“浮动”值设为1,则材质将是“导体”。 在这种情况下,“ Specular”参数将被自动禁用。 如果单击“浮点”旁边的“纹理”按钮,则可以使用许多其他输入将金属特征添加到材质中。 例如,您可以使用任何RGB /灰度纹理或Octane的程序纹理。 当您开始使用Metallic时,最重要的参数是“ IOR”参数。 使用此参数,您可以使用实际IOR值创建逼真的金属表面。 金属参数是通用材质的很好的补充。 在本节中,您可以找到有关“金属材质”的详细信息。
信息:可以在此站点上找到真实世界表面或材质的真实IOR数据。
roughness
This parameter works as in other material types. Especially after the implementation of the new BRDF feature, Roughness has gained more importance. It is almost essential to use it in many material types. A detailed description of this parameter can be found in the Glossy material section.
粗糙度
此参数与其他材质类型一样工作。特别是在实施新的BRDF功能之后,粗糙度变得越来越重要。在许多材质类型中使用它几乎是必不可少的。有关此参数的详细说明,请参见“光泽材质”部分。
ANISOTROPY
This parameter is explained in detail in the "Glossy Material" section. You can use this quick link.
各向异性
该参数将在“光泽材质”部分中详细说明。您可以使用此快速链接。
sheen layer
This parameter came in version 3.08, especially for making fabric material. You can achieve pretty good results. This parameter is also explained in detail in the "Glossy Material" section. You can use this quick link.
光泽层
此参数来自3.08版,特别是用于制作织物材质。您可以获得很好的结果。此参数还将在“光泽材质”部分中进行详细说明。您可以使用此快速链接。
coatIng layer
This new feature, which comes with Universal Material, brings a very satisfactory solution to the Coating Layer, which is missing in the older versions. In previous versions of Octane, we were forced to use this "Coating" layer either by using mix material or blend material. Now we can easily use in universal material. This is a nice surprise especially for those who want to make a car paint materials. Now let's explain some of the options here:
涂层层
通用材质随附的这一新功能为涂层提供了非常令人满意的解决方案,而旧版本中没有。在以前版本的Octane中,我们被迫使用混合材质或混合材质来使用“涂层”层。现在我们可以轻松地在通用材质中使用。这是一个很好的惊喜,特别是对于那些想要制造汽车油漆材质的人。现在,让我们在这里解释一些选项:
FLOAT (OPTIONAL), COATING ROUGHNESS & COATING IOR
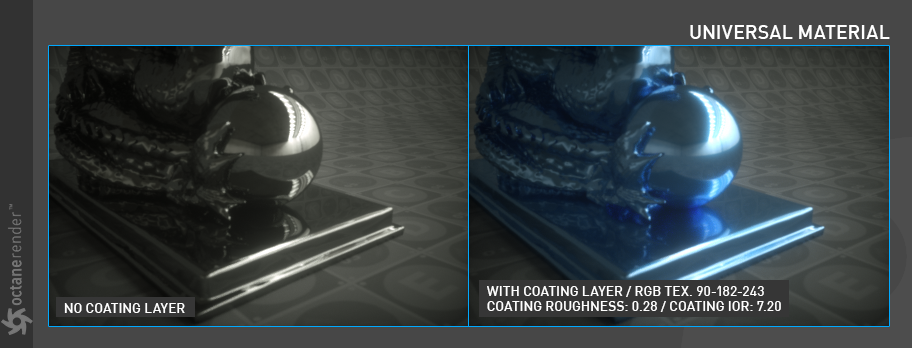
When you first select this parameter, you will see the Float option. This option is default and you can select any of the options that will appear when you press the "tex" button instead. For example, you can use any RGB/Greyscale texture or Octane's procedural texture. To get the effect you see in the picture below, go to the "tex" menu and select "RGB" from the available options. Now set any color. The color you set will assign a color layer to the top of the material depending on the use of specular, albedo or metallic parameters. The options Coating Roughness and Coating IOR works together. Coating Roughness actually determines the coat distribution level of the coat layer. Coating IOR is used to determine the strength of the same layer by increasing or decreasing the refractive index. Both options have nothing to do with Universal Material's roughness and IOR settings.
浮法(可选),涂层粗糙度和涂层
首次选择此参数时,将看到“浮动”选项。该选项是默认选项,您可以选择按下“ tex”按钮时出现的任何选项。例如,您可以使用任何RGB /灰度纹理或Octane的程序纹理。要获得下图所示的效果,请转到“ tex”菜单,然后从可用选项中选择“ RGB”。现在设置任何颜色。您设置的颜色将根据镜面反射,反照率或金属参数的使用将颜色层分配给材质的顶部。涂层粗糙度和涂层IOR选项可以一起使用。涂层粗糙度实际上决定了涂层的涂层分布水平。涂层IOR用于通过增加或减小折射率来确定同一层的强度。两种选择都与Universal Material的粗糙度和IOR设置无关。
THIN FILM LAYER
This parameter explained in detail in the "Glossy Material" section. You can use this quick link.
光泽图层
此参数在“光泽材质”部分中详细说明。您可以使用此快速链接。
BUMP
This parameter explained in detail in the "Diffuse Material" section. You can use this quick link.
凹凸
该参数将在“漫射材质”部分中详细说明。您可以使用此快速链接。
normal
This parameter explained in detail in the "Diffuse Material" section. You can use this quick link.
法线
该参数将在“漫射材质”部分中详细说明。您可以使用此快速链接。
DISPLACEMENT
This parameter explained in detail in the "Texture Types" section. You can use this quick link.
置换
该参数在“纹理类型”部分中详细说明。您可以使用此快速链接。
OPACITY
This parameter explained in detail in the "Diffuse Material" section. You can use this quick link.
不透明
该参数将在“漫射材质”部分中详细说明。您可以使用此快速链接。
DISPERSION
This parameter explained in detail in the "Specular Material" section. You can use this quick link.
分散
该参数将在“特殊材质”部分中详细说明。您可以使用此快速链接。
IOR
We have explained this parameter in "Metallic Material" section but there are some changes in the use of Universal Material. Let's explain them now. First of all, at the beginning of this chapter, we would like to remind you of the topics of "Conductor" and "Dielectric" and follow the subject.
IOR
我们已经在“金属材质”部分解释了此参数,但是通用材质的使用有所变化。现在让我们解释一下。首先,在本章开始时,我们想提醒您“导体”和“电介质”的主题,并紧跟着这个主题。
DIelecTRIC IOR
This parameter only works when you activate the specular (dielectric) parameter. It is used to enter a simple IOR value. There is no difference between the index parameter in Glossy material. You can enter a value that pleases your eye.
介电层
仅当激活镜面反射(介电)参数时,此参数才起作用。用于输入一个简单的IOR值。光泽材质中的index参数之间没有差异。您可以输入一个令您满意的值。
DIelecTRIC 1 IOR/map
This parameter allows you to control the IOR value with an RGB / Greyscale or Procedural texture. When you define any texture to the Texture slot, the "Dielectric IOR" parameter is disabled and only controlled by the texture parameter. For example, if you define Octane Noise in the texture field here and play with its settings, you can get different results.
DIelecTRIC 1 IOR /地图
此参数使您可以使用RGB /灰度或程序纹理控制IOR值。在“纹理”插槽中定义任何纹理时,“介电IOR”参数将被禁用,并且仅由该纹理参数控制。例如,如果您在此处的纹理字段中定义“Octane噪波”并使用其设置进行播放,则可以获得不同的结果。
MetallIc refleCTION MODE & MetallIC IOR
These two parameters are the same as the IOR options described in the Metallic Material section. We already explained in detail there. To read, you can use this quick link.
金属反射模式和金属IOR
这两个参数与“金属材质”部分中描述的IOR选项相同。我们已经在那里详细解释了。要阅读,您可以使用此快速链接。
TRANSMISSION
This parameter explained in detail in the "Specular Material" section. You can use this quick link.
传输
该参数将在“特殊材质”部分中详细说明。您可以使用此快速链接。
EMISSION
This parameter explained in detail in the "Blackbody Emission" section. You can use this quick link.
发光
该参数在“黑体发光”部分中进行了详细说明。您可以使用此快速链接。
MEDIUM
This parameter explained in detail in the "Mediums" section. You can use this and this quick links.
介质
此参数在“媒体”部分中详细说明。您可以使用此链接和此快速链接。
fake shadows
This parameter explained in detail in the "Specular Material" section. You can use this quick link.
假阴影
该参数将在“特殊材质”部分中详细说明。您可以使用此快速链接。
COMMON
This parameter explained in detail in the "Diffuse Material" section. You can use this quick link.
通用
该参数将在“漫射材质”部分中详细说明。您可以使用此快速链接。
SUBSTance paInter / UNIVERSAL MATERIAL workflow
If you are using Substance Painter, you can now work more comfortable with Universal material. Previously, when importing texture from Substance Painter, you had to use specific material types for some channels (such as Diffuse + Specular). Then you had to mix these material types. Now you don't have to worry about it anymore, thanks to the Universal Material. Let's talk about Substance Universal workflow.
物质画家/通用材质工作流程
如果您正在使用Substance Painter,现在可以使用Universal材质更舒适。以前,从Substance Painter导入纹理时,必须为某些通道使用特定的材质类型(例如“漫反射+高光”)。然后,您必须混合使用这些材质类型。现在有了通用材质,您不必再为它担心。让我们谈谈Substance Universal工作流程。
Info: The following mini tutorial does not describe how Substance Painter is used or how the texture is produced. This is beyond our scope. Both free and professional tutorials are available on the Internet about Substance Painter.
信息:以下迷你教程未介绍如何使用Substance Painter或如何产生纹理。这超出了我们的范围。 Internet上提供了有关Substance Painter的免费和专业教程。
Info: The following Mini Tutorial does not include complex Substance texture setups. It is aimed to explain the universal material connection with a setup as simple as possible.
信息:以下迷你教程不包含复杂的Substance纹理设置。目的是通过尽可能简单的设置来说明通用材质连接。
1- Scene preparatIon (C4d)
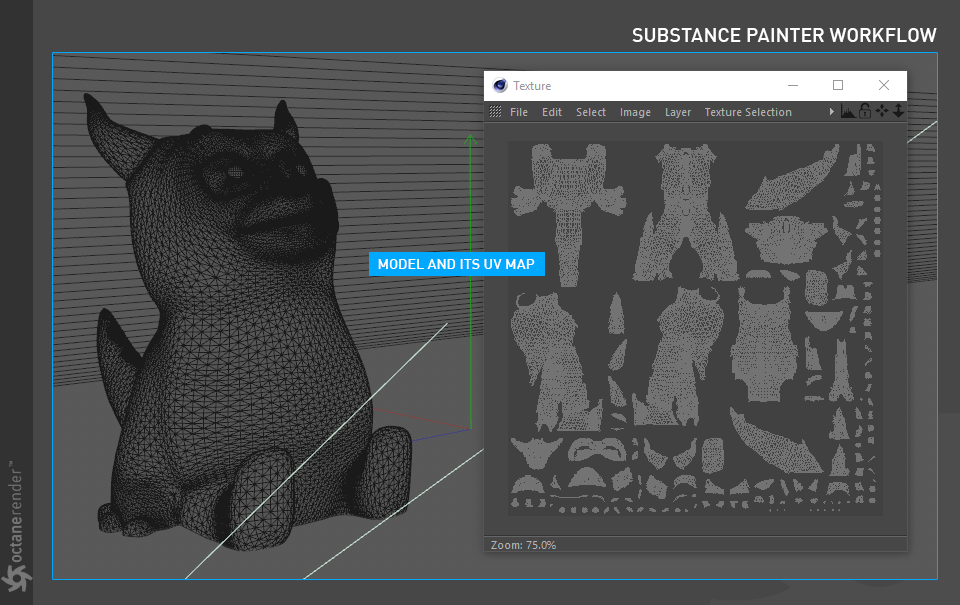
First of all, your model must be ready on the Cinema 4D side. Especially UV maps must be made properly or you can not work efficiently in Substabce. If you are having difficulty in the UV map part of Cinema 4D, there are suitable alternatives in the market. As a model we will use the Mini Dragon, which we use in various parts of this manual. The following UV setup are automatically made in C4D. It works for our Tutorial.
1-场景准备(C4d)
首先,必须在Cinema 4D一侧准备好模型。特别是必须正确制作UV贴图,否则您将无法在Substabce中高效工作。如果您在Cinema 4D的UV贴图部分遇到困难,可以在市场上找到合适的选择。作为模型,我们将使用本手册各部分中使用的Mini Dragon。以下UV设置在C4D中自动进行。它适用于我们的教程。
2- Export Your Mesh for Subtance
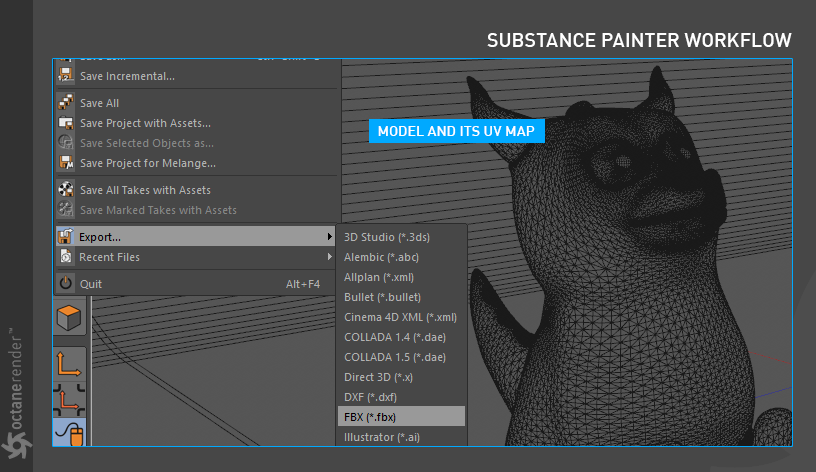
If you have properly managed your UV Map of your Model, it is now ready for Subtance. From the File menu, select the Export/FBX format and save with the default options.
2-导出您的网格物体
如果已经正确管理了模型的UV贴图,则现在可以进行Subtance了。 从文件菜单中,选择导出/ FBX格式,并使用默认选项进行保存。
3- IMPORT Your Mesh to Subtance PAINTER
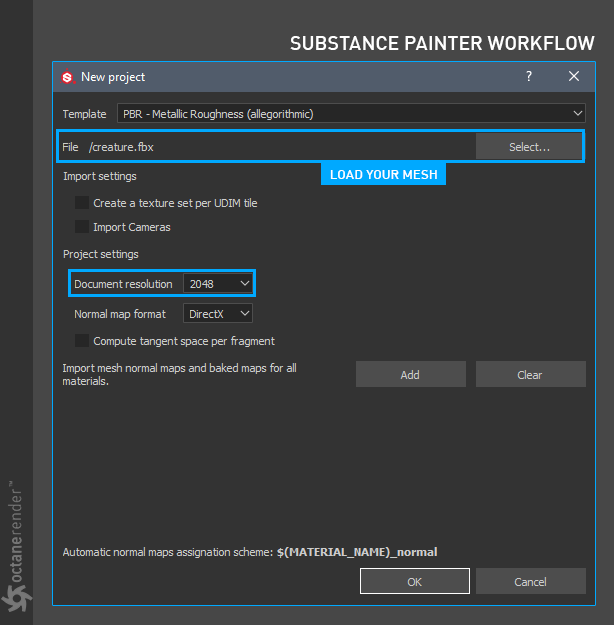
Now switch to Substance painter. From the File menu, choose "New Project" and load your object. Also, make Document Resolution 2048. You can do it in "1024" to work more comfortably. When exporting the final output in Substance, you can save it at higher resolution. Due to its procedural nature, there is no loss of quality in processes such as texture enlargement or reduction in Substance Painter.
3-将您的网格物体导入物质打印机
现在切换到物质画家。 从文件菜单中,选择“新建项目”并加载对象。 另外,将文档分辨率设置为2048。可以在“ 1024”中进行操作,以使工作更舒适。 在物质中导出最终输出时,可以将其保存为更高的分辨率。 由于其过程性质,因此在诸如纹理放大或减少Substance Painter等过程中不会降低质量。
4- A FEW SMALL STEPS...
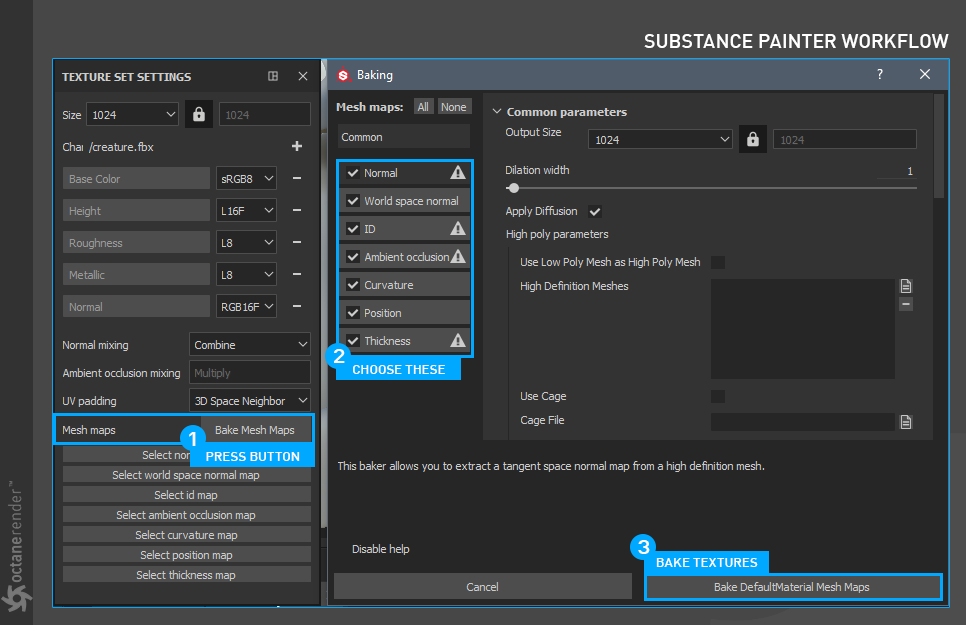
There are a few more steps before you go into the production of textures. First go to the "Texture Set Settings" window and click "Bake Mesh Maps" right next to "Mesh Maps". So we will have a texture set for every process on our Mesh. This is like "bake texture" in C4D. Those who unfamiliar with the subject can look at both the Substance and the Cinema 4D help file.
4-几个小步骤...
在开始制作纹理之前,还有几个步骤。 首先转到“纹理集设置”窗口,然后单击“网格图”旁边的“烘焙网格图”。 因此,我们将为网格上的每个过程设置一个纹理。 这就像C4D中的“烘焙纹理”。 那些不熟悉该主题的人可以同时查看Substance和Cinema 4D帮助文件。
5- TexTure creatIon
You can now start texture/paint production. Substance Painter has a complex Layout/UI/UX design for beginners. Therefore, it is recommended that you spend some time in the software. As we said at the beginning, there are both free and professional tutorials on the Net.
5-天然肌酸
现在可以开始纹理/绘画生产。 Substance Painter为初学者提供了复杂的Layout / UI / UX设计。 因此,建议您花一些时间在软件中。 正如我们在一开始所说的,网上有免费和专业的教程。
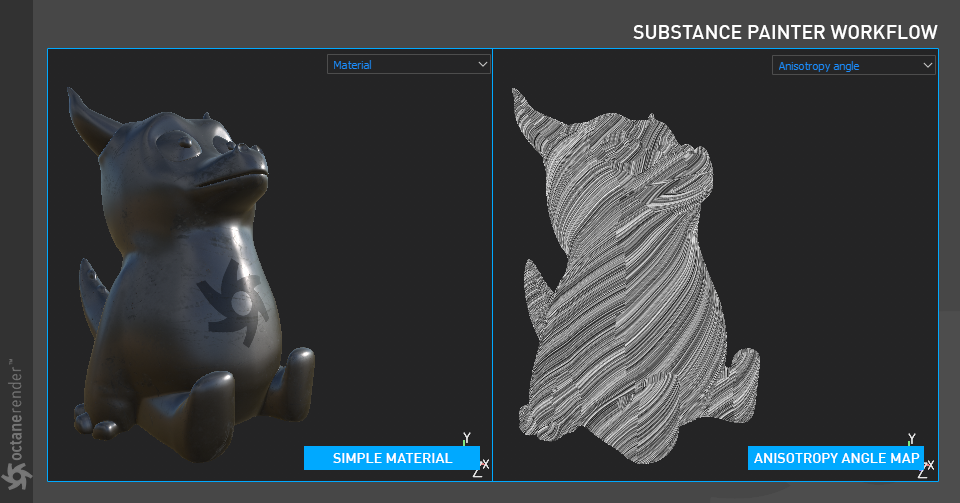
Anyway, let's get back to our Mini Dragon. For this tutorial we have created a simple material as you can see in the picture below. Our aim is to connect the maps with universal material directly to the relevant nodes. In the picture below, you can see the material we created on the lef side. This material consist of four maps: Albedo, Metallic, Roughness and Anisotropy Angle. In Substance, you can see the Anisotropy Angle not in conjunction with the material but in a separate way. We will use it in Octane universal material. 。
无论如何,让我们回到迷你龙吧。 对于本教程,我们创建了一个简单的材质,如下图所示。 我们的目标是将具有通用材质的地图直接连接到相关节点。 在下面的图片中,您可以看到我们在lef侧创建的材质。 该材质包含四个贴图:反照率,金属,粗糙度和各向异性角。 在“物质”中,您可以看到各向异性角不与材质关联,而是以单独的方式。 我们将在Octane通用材质中使用它。
6- EXPORT YOUR TexTureS
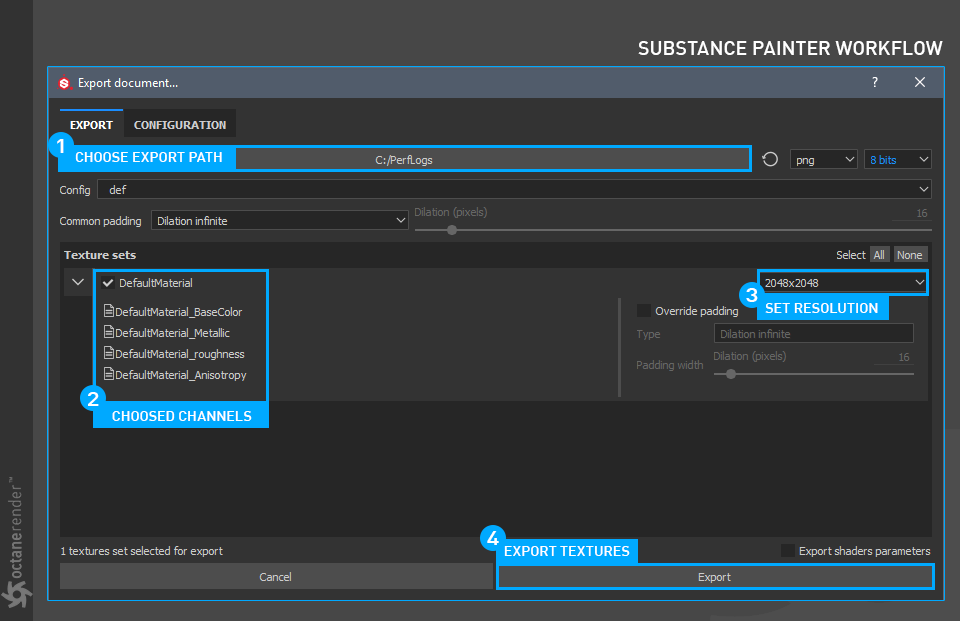
You can now export the texture after it has finished. To do this, select "Export Textures (CTRL+SHIFT+E)" from the File menu. After making the appropriate settings in the export window, press the "Export" button. So your job at Substance is over now.
6-导出您的财宝
现在,您可以在纹理完成后将其导出。 为此,请从“文件”菜单中选择“导出纹理(CTRL + SHIFT + E)”。 在导出窗口中进行适当的设置后,按“导出”按钮。 因此,您在Substance的工作现在结束了。
6- USE TEXTURES IN OCTANE UNIVERSAL MATERIAL
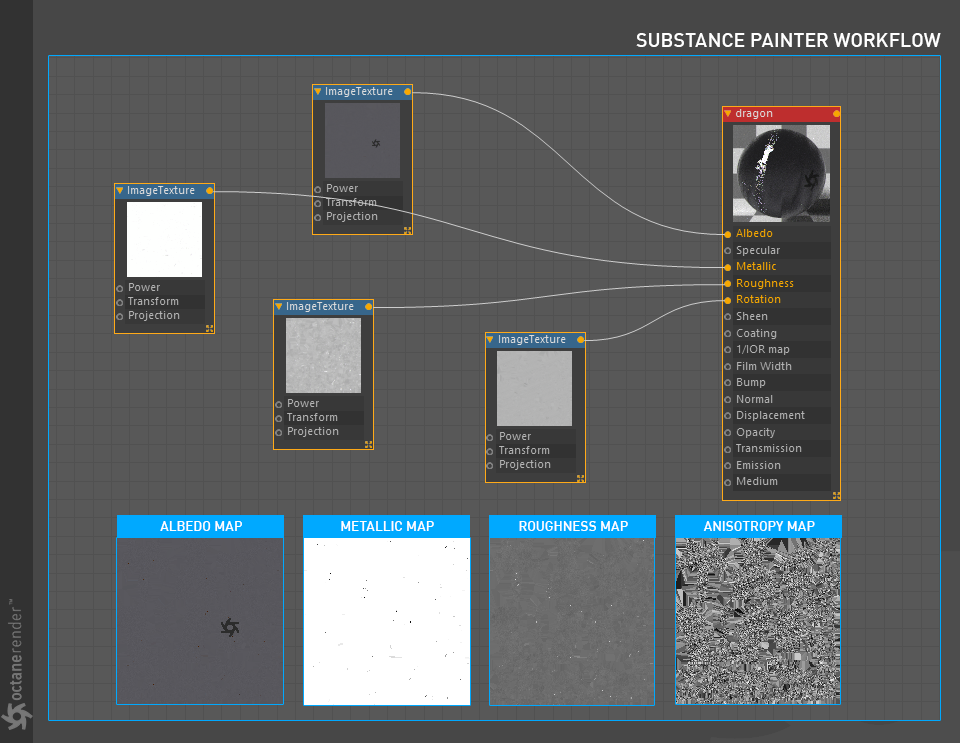
Now connect your exported texture to the Octane universal Material. First, create a Universal material. Make the GGX Brdf. Then open the material in Node editor and make a Node setup as in the picture below. If you do not know how to work in Node editor, we have explained in detail here. You can also look at this section for the image texture operations.
6-在Octane通用材质中使用纹理
现在,将导出的纹理连接到Octane通用材质。 首先,创建通用材质。 制作GGX Brdf。 然后在“节点编辑器”中打开材质并进行节点设置,如下图所示。 如果您不知道如何在节点编辑器中工作,我们将在此处进行详细说明。 您也可以在本节中查看图像纹理操作。
Info: In order for the anisotropy angle map to work, first change the Anisotropy to "1" from the main material parameters. In addition, Anisotropy is strictly dependent on roughness. So in Substance, you should map the anisotropy channel to roughness. In Octane, you can easily control both the metallic appearance and the anisotropy level with the Power and gamma settings.
信息:为了使各向异性角图起作用,首先将主要材质参数的各向异性更改为``1''。 另外,各向异性严格取决于粗糙度。 因此,在“物质”中,您应将各向异性通道映射到粗糙度。 在Octane中,您可以通过Power和gamma设置轻松控制金属外观和各向异性水平。
Info: There is no direct "Anisotropy Rotation" name in the main material node. İt's only named "Rotation". Strange design decision. Octane is full of strange design decisions.
信息:主材质节点中没有直接的``各向异性旋转''名称。 它仅命名为“ Rotation”。 奇怪的设计决定。 Octane充满了奇怪的设计决定。
7- FINALIZING YOUR RENDER
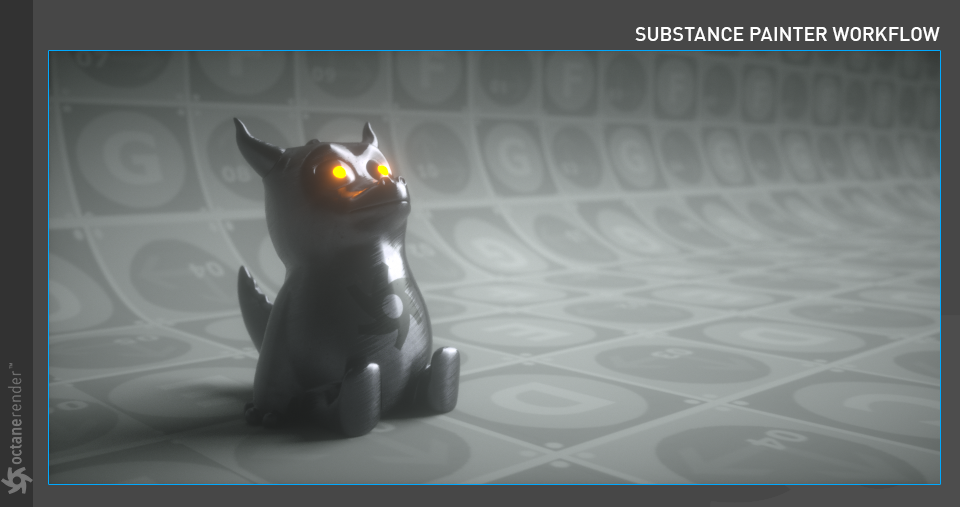
After connecting the textures to Universal material, run the Live Viewer. Do the camera and light setups on your scene. Since the material you see in Substance's viewport is for reference purposes only, the light setups in your scene determine the main appearance of your texture.
7-完成您的渲染
将纹理连接到Universal材质后,运行Live Viewer。 在场景上进行摄影机和灯光设置。 由于您在Substance视口中看到的材质仅供参考,因此场景中的灯光设置决定了纹理的主要外观。
After making Node setup above Universal material, our final picture done. As you can see, we made a very simple "diffuse + anisotropy + metallic" material with the textures we produce in Substance painter.
在将“节点”设置设置为“通用”材质之上之后,完成了我们的最终图片。 如您所见,我们使用在Substance Painter中生成的纹理制作了非常简单的“漫反射+各向异性+金属”材质。


赶快留个言打破零评论!~