COMPOSITE MATERIAL
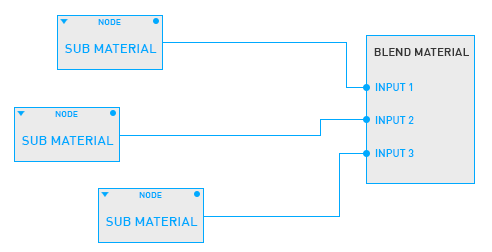
It is a much more advanced version of Mix material and is an extremely useful material utility tool written to get rid of its limitations. You can mix multiple and create complex materials by using "Composite". However, its usage is not like the mix material. You can not use any material directly in this. You need to use the "Sub Material". Note that old Blend material has been renamed as Composite material due to having native type in the renderer.
复合材质
它是Mix材质的高级得多的版本,并且是为摆脱其局限性而编写的极其有用的Material Utility工具。 您可以使用“复合”混合多种材质并创建复杂的材质。 但是,其用法与混合材质不同。 您不能在此直接使用任何材质。 您需要使用“子材质”。 请注意,由于渲染器中具有本机类型,因此旧的Blend材质已重命名为Composite材质。
So if you want to use Composite material, you will create materials from the "Sub material". Sub material is still a classic material creation tool. You can create the type of material you want (eg specular, glossy) using "Sub material" from the Node editor or from the material manager. Now, briefly, let's create a simplest "Composite Material".
因此,如果要使用复合材质,则可以从“子材质”中创建材质。 子材质仍然是经典的材质创建工具。 您可以使用“节点”编辑器或材质管理器中的“子材质”来创建所需的材质类型(例如,镜面,光泽)。 现在,简单地,让我们创建一个最简单的“复合材质”。

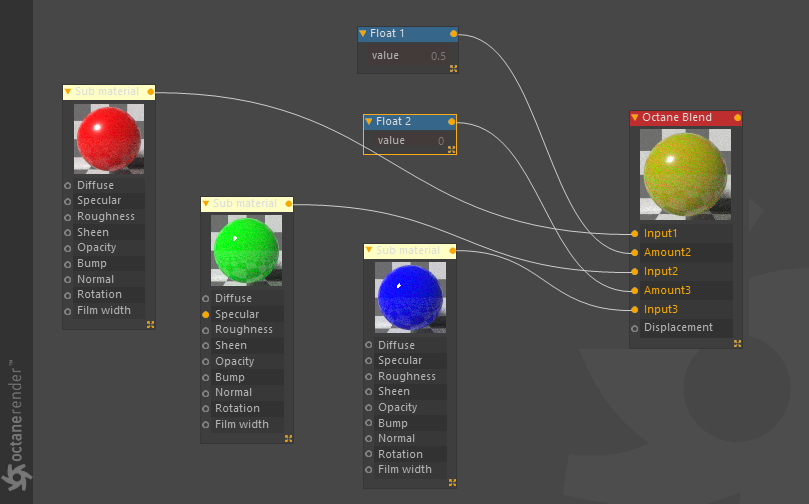
First go to materials in the LV menu and open the Node editor. Prepare a setup as you see in the picture below (you can go to "this" section for the Node Editor details). Create 3 sub materials right from the node menu at the top left. Select these sub nodes and go to the basic tab in the settings window and set the material types to glossy. From the Diffuse Tab, set the colors you want.
首先转到LV菜单中的资料,然后打开Node编辑器。 如下图所示准备一个设置(您可以转到“此”部分以获取节点编辑器详细信息)。 从左上方的节点菜单中创建3个子材质。 选择这些子节点,然后转到设置窗口中的“基本”选项卡,然后将材质类型设置为“光面”。 在“漫反射”选项卡中,设置所需的颜色。

In the above picture, first the "Input 1" and "Input 2" materials are mixed with the "Float 1" texture. If a value is given to the "Float 2" texture, it will be mixed with "Input 1" and "Input 2" and the result will be remixed with "Input 3" material. You can adjust which material will be mixed by "Float" texture nodes assigned to Amount slots.
在上图中,首先将“输入1”和“输入2”材质与“浮点1”纹理混合。 如果将值赋予“浮点2”纹理,则将其与“输入1”和“输入2”混合,并将结果与“输入3”材质重新混合。 您可以调整将分配给“数量”插槽的“浮动”纹理节点混合的材质。
Of course you can define many texture types in the amount slot. The "float texture" node shown in the picture above is just used to describe the mechanic of the amount process. The amount slots have an extremely important role in using Blend Material.
当然,您可以在数量槽中定义许多纹理类型。 上图中显示的“浮动纹理”节点仅用于描述金额处理的机制。 数量槽在使用“混合材质”时具有极其重要的作用。
Composite Material Settings
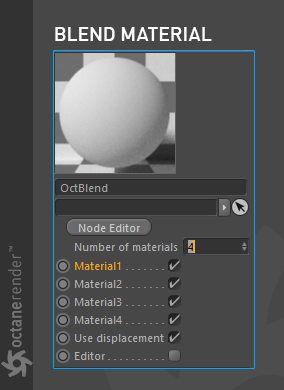
To use Composite Material, select "Composite Material" from the Live Viewer's Materials menu. You can then play with options from the node editor or from the Material window. Now let's see what these options are.
复合材质设置
要使用复合材质,请从Live Viewer的“材质”菜单中选择“复合材质”。 然后,您可以使用节点编辑器或“材质”窗口中的选项进行播放。 现在,让我们看看这些选项是什么。

number of materials
From here you can determine how many materials to mix.
材质数量
从这里您可以确定要混合多少材质。
Material Slots
If you click any material from here, the "add material" button will appear. When you press this button, Octane automatically creates a "Sub material". You can then play as you like with the options of this sub material. Remember, you must use "Sub Material" to benefit from Blend material. You can also use the blend material by creating the corresponding Nodes from the Node editor.
材质槽
如果您单击此处的任何材质,将出现“添加材质”按钮。 当您按下此按钮时,Octane会自动创建一个“子材质”。 然后,您可以根据需要使用此子材质的选项进行演奏。 请记住,必须使用“子材质”才能从混合材质中受益。 您还可以通过从“节点”编辑器创建相应的节点来使用混合材质。
USE DISPLACEMENT
With this parameter you can use displacement map with the Blend Material. Any gray scale image or procedural texture can be used from the "add displacement" option on the right. We will describe the detailed description of the Displacement Map in the chapter "Using Textures / Displacement"
使用置换
使用此参数,可以将置换贴图与“混合材质”一起使用。 可以从右侧的“添加置换”选项使用任何灰度图像或程序纹理。 我们将在“使用纹理/置换”一章中描述置换图的详细描述。


赶快留个言打破零评论!~