OCTANE SCATTER
You have a very powerful tool for instancing or cloning: Octane Scatter. With this tool you can produce instance and clone up to millions of numbers. And it's pretty fast.
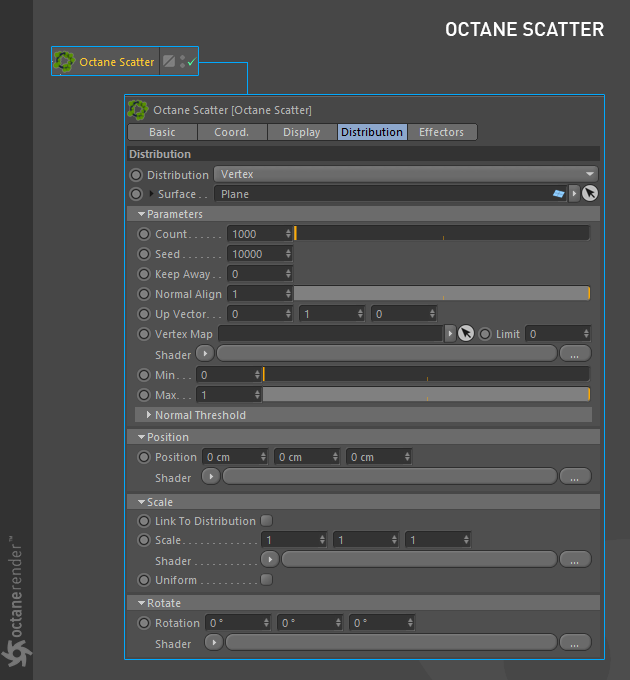
To access the Octane Scatter simply select Objects/Octane Scatter from the Live Viewer menu. Later, when you select Scatter object from the Object Manager, you will see 5 tabs. Only three of them concern us: Display, Distribution and Effectors.
Octane克隆
您有一个非常强大的实例化或克隆工具:Octane Scatter。 使用此工具,您可以生成实例并克隆多达数百万个数字。 而且速度非常快。
要访问Octane Scatter,只需从Live Viewer菜单中选择Objects / Octane Scatter。 稍后,当您从“对象管理器”中选择“散布对象”时,将看到5个选项卡。 他们中只有三个与我们有关:展示,发行和效应。
LIMITATIONS
* Octane Scatter is not designed to work with animated surfaces. Scatter adjusts the number and position of copies by looking at the ratio of a single polygon face to the overall area. So if any polygon area changes, the distribution is also seriously affected. Objects do not stick on the surface like Cinema 4D's Cloner. If the Polygon area does not change dramatically, you can try scattering on animated surfaces. There is no working guarantee.
* This tool does not replace Cinema 4D's Cloner and does not have extensive and advanced features like Cloner. You can produce grass, trees or simple geometries more quickly.
局限性
* Octane Scatter不适用于动画曲面。 散点图通过查看单个多边形面与整个区域的比率来调整副本的数量和位置。 因此,如果任何多边形面积发生变化,分布也会受到严重影响。 对象不会像Cinema 4D的Cloner一样粘在表面上。 如果“多边形”区域变化不大,则可以尝试在动画曲面上进行散射。 没有工作保证。
*此工具不能替代Cinema 4D的Cloner,并且不具有Cloner等广泛的高级功能。 您可以更快地生产草,树或简单的几何图形。
SIMPLE USAGE
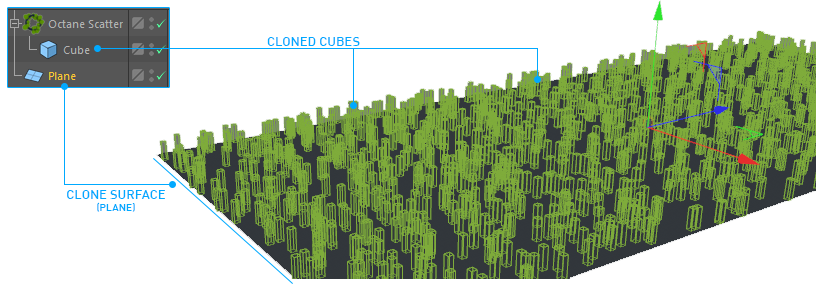
In most scenarios you will child any object to the Octane Scatter. In the Surface section you will determine where your object will be cloned. In Octane Scatter you can scatter any object, it does not matter whether it is Parametric or Geometry. However, we advise you to be careful because if there are too many polygons in the object to be cloned, Scatter may slow down. In this case, always optimize the object to be cloned. You can also include multiple objects into the scatter.
简单的用法
在大多数情况下,您会将子对象归为Octane散点。 在“表面”部分,您将确定对象的克隆位置。 在Octane Scatter中,您可以散射任何对象,无论是Parametric还是Geometry。 但是,我们建议您要小心,因为如果要克隆的对象中有太多多边形,散点图可能会变慢。 在这种情况下,请始终优化要克隆的对象。 您还可以将多个对象包括在分散图中。
DISTRIBUTION SETTINGS
分布设置
DISTRIBUTION
From here you can control how the objects clone/instance will be distributed. There are 3 options: Vertex, Surface and "Use Csv File". Let's look briefly:
分配
在这里,您可以控制对象克隆/实例的分布方式。 有3个选项:“顶点”,“曲面”和“使用Csv文件”。 让我们简单地看一下:
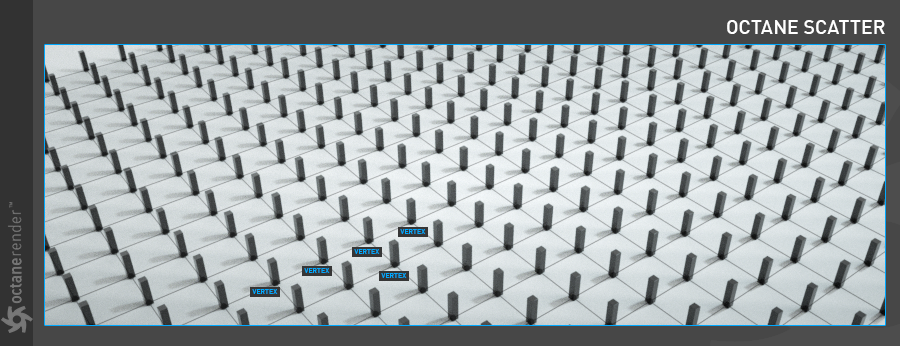
VERTEX
It is distributed according to the vertices of the object to be cloned. For example, you have a Plane object, and you will clone the cube object onto it. If you select the vertex, the cube objects are cloned according to the vertex number and distribution of the plane object. Just like Cinema 4D's Cloner.
顶点
根据要克隆的对象的顶点进行分布。 例如,您有一个Plane对象,然后将多维数据集对象克隆到该对象上。 如果选择顶点,则会根据顶点编号和平面对象的分布来克隆多维数据集对象。 就像Cinema 4D的Cloner一样。
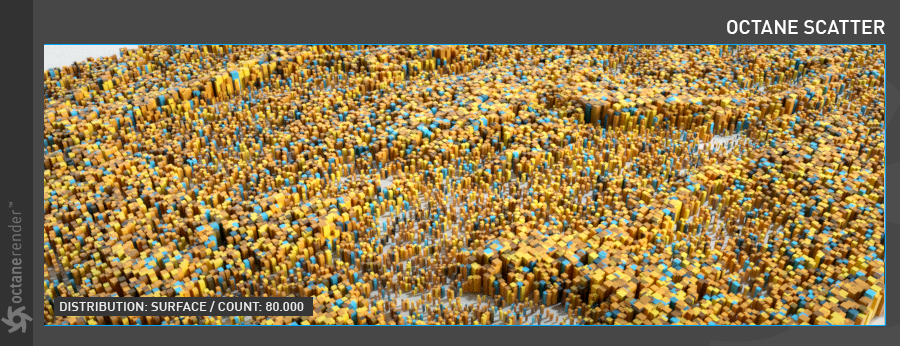
surface
It is distributed over the entire surface of the object to be cloned. In this case, you can set the number of clones (Count parameter) as you want without depending on the number of vertices.
表面
它分布在要克隆的对象的整个表面上。 在这种情况下,您可以根据需要设置克隆数(Count参数),而无需依赖于顶点数。
USE CSV FILE
You can distribute your clones using matrix data from a software that generates Csv (eg Houdini, Maya). Csv is actually a matrix list. In this list, there are Position/Rotation/Scale data, and clones are distribute according to this data. Scatter's PSR values do not work while in Csv mode.
使用CSV文件
您可以使用来自生成Csv的软件(例如Houdini,Maya)中的矩阵数据来分发克隆。 CSV实际上是一个矩阵列表。 在此列表中,有“位置/旋转/比例”数据,并且根据此数据分发克隆。 在Csv模式下,Scatter的PSR值不起作用。
SURFACE
From here you can determine which objects to clone will be cloned to. Like the native C4D's Cloner.
表面
从这里可以确定要克隆到的对象。 就像本地C4D的克隆器一样。
COUNT
You can determine the number of clones here. Since Octane Scatter is a fairly fast tool you can enter large numbers. Of course, if you keep the polygon numbers of the objects you clone as small as possible, you can work much more efficiently.
计数
您可以在此处确定克隆数。 由于Octane Scatter是一种相当快速的工具,因此您可以输入大量数字。 当然,如果将克隆对象的多边形数保持尽可能小,则工作效率将大大提高。
seed
From here you can change the distribution variations of the clones.
种子
在这里,您可以更改克隆的分布变化。
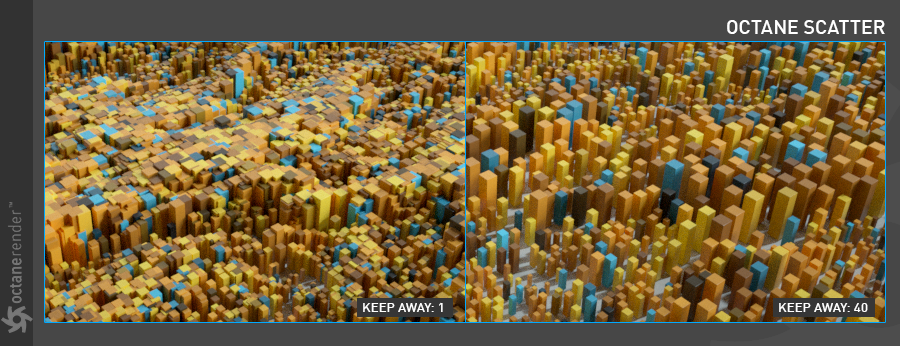
keep away
From here you can increase the distance between clones. What you need to be aware of is that the objects you clone should not have complex topologies. If you are going to scatter such complex objects, increase this value in small steps. Otherwise you can crash the plugin.
远离
从这里可以增加克隆之间的距离。 您需要了解的是,克隆的对象不应具有复杂的拓扑。 如果您要散布这些复杂的对象,请逐步增加此值。 否则,您可能会使插件崩溃。
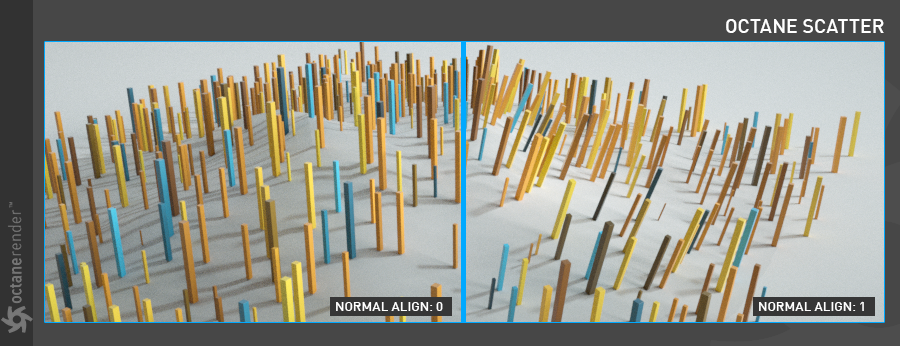
normal alIGN
Clone objects are positioned by default regarding to the surface normals. From here you can change their angle between 0 and 1.
正常alIGN
默认情况下,克隆对象的位置与表面法线有关。 从这里可以在0到1之间更改它们的角度。
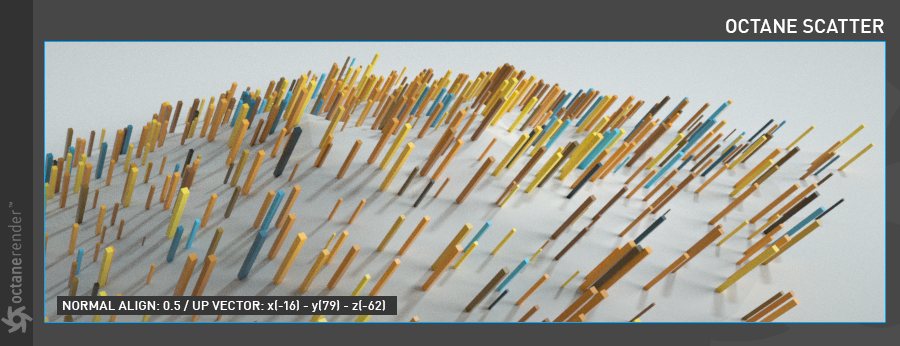
up vector
It is an option that you can set the direction of clones. Each of the 3 columns indicates x, y, z directions from left to right. Works with Normal Align.
向上矢量
您可以选择设置克隆方向。 3列中的每列从左到右指示x,y,z方向。 与法线对齐一起使用。
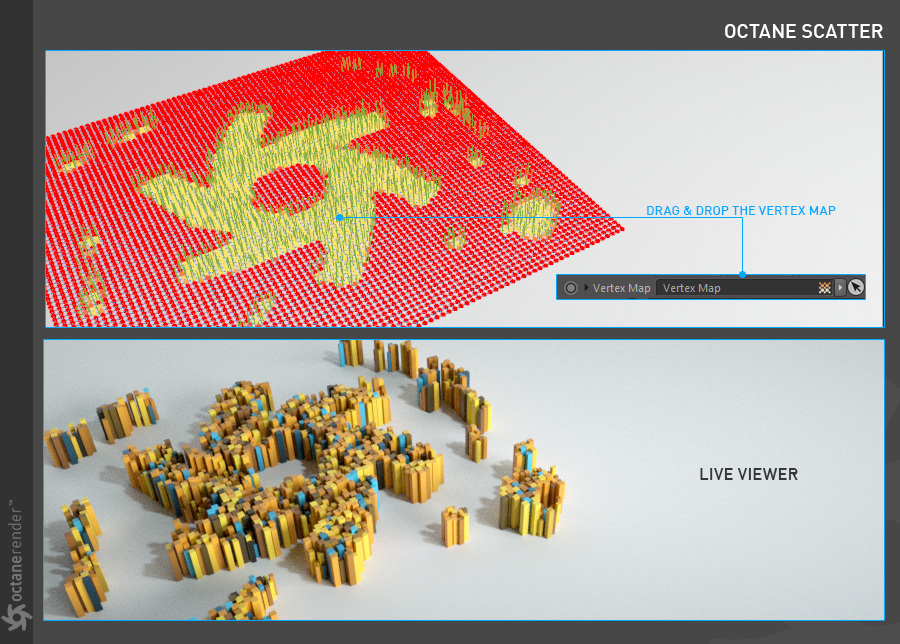
VERTEX MAP
From here you can define clone objects according to the vertex map. Once you have vertex paint on the object to be cloned, and you drag and drop the vertex tag into this area, your objects will be cloned according to the vertex map. You can learn how to create Vertex Map by looking at Cinema 4D's help file. The "Limit" parameter next to this option specifies the expansion area of the vertex map. You can narrow the vertex map to a value between zero and one.
顶点地图
在这里,您可以根据顶点图定义克隆对象。 在要克隆的对象上具有顶点绘制并将顶点标签拖放到此区域后,将根据顶点图克隆对象。 您可以通过查看Cinema 4D的帮助文件来学习如何创建Vertex Map。 此选项旁边的“限制”参数指定顶点贴图的扩展区域。 您可以将顶点图的范围缩小到零到一之间。
You can also go to this link for the mini tutorial about the vertex map usage.
您也可以转到此链接以获取有关顶点图用法的迷你教程。
shader
Unlike vertex map, you can clone your objects according to greyscale values by defining procedural or image texture here. You can think of Cinema 4D's shader effector. Now let's look at how the "shader" feature works over 2 samples.
着色器
与顶点贴图不同,可以在此处定义过程或图像纹理,根据灰度值克隆对象。您可以想到Cinema 4D的着色器效果器。现在,让我们看一下“着色器”功能在2个示例中的工作方式。
Important note: Do not use Octane textures (eg Octane noise, turbulence) when defining procedural texture because all texture types are "Gpu Shader" in Octane. Octane Scatter only work in "Cpu Shaders" at the moment. So you can use some of the Cinema 4D textures (eg Noise, gradient).
重要说明:定义程序纹理时请勿使用Octane纹理(例如,Octane噪波,湍流),因为所有纹理类型在Octane中均为``Gpu Shader''。目前,Octane Scatter仅在“ Cpu Shaders”中起作用。因此,您可以使用某些Cinema 4D纹理(例如,噪波,渐变)。
USING PROCEDURAL TEXTURE
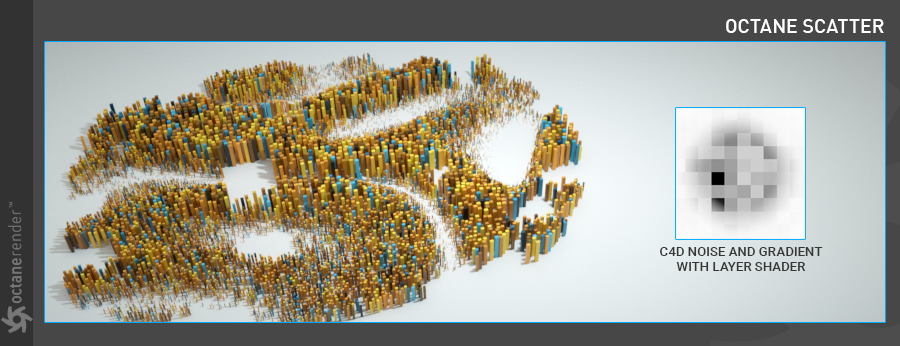
You can define Cinema 4D procedural textures to the Shader Slot. In the picture below, Noise and Gradient are used in C4D Layer Shader.
使用程序纹理
您可以为Shader Slot定义Cinema 4D程序纹理。在下图中,“ C4D图层着色器”中使用了“噪波”和“渐变”。
For procedural or Image texture, you should change the min. and max values. With these, you can determine which range of values to use clone distribution. For example, "min: 0.21" and "max: 0.93" are used in the following picture; that is, where the pixel intensity values of the shader are in the range of 0,21 and 0,93. It varies according to the pixel intensities of the shader
对于程序或图像纹理,应更改最小值。和最大值。通过这些,您可以确定使用克隆分布的值范围。例如,下图使用“最小:0.21”和“最大:0.93”;也就是说,着色器的像素强度值在0.21和0.93的范围内。它根据着色器的像素强度而变化。
.
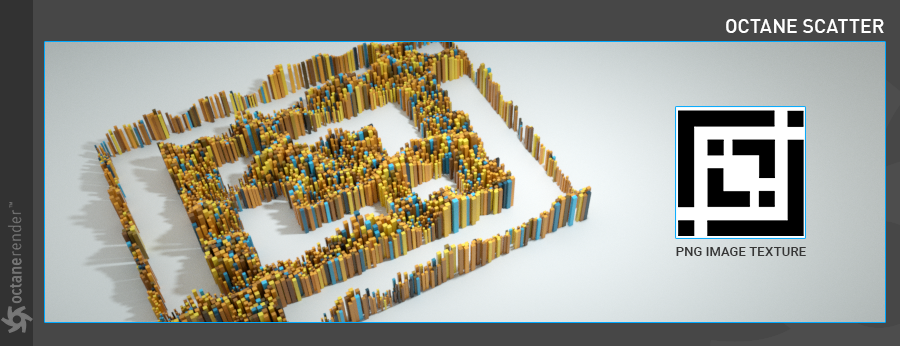
USING greyscale Image
When you load any greyscale image into the shader slot, your clones will distribute according to the values of black and white and gray of this image.
使用灰度图像
当您将任何灰度图像加载到着色器插槽中时,您的克隆将根据该图像的黑白和灰度值进行分布。
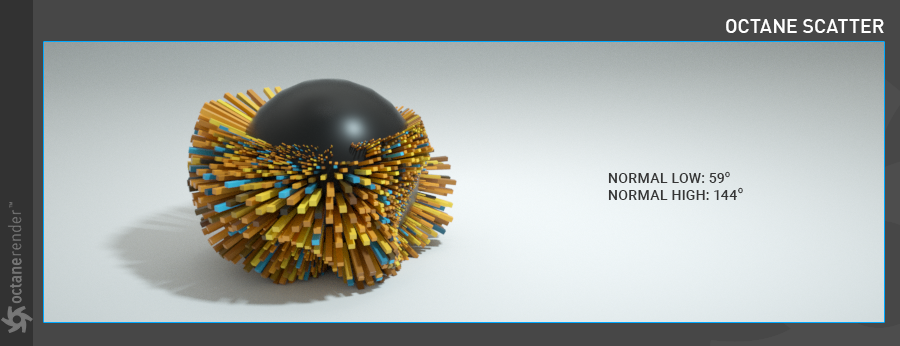
normal threshold
You can distribute the clones according to the normals of the cloned surface. It is a value between 0 and 180 degrees. When it is zero, the clones distribute parallel to the object's "y" axis.
法线阈值
您可以根据克隆表面的法线分布克隆。 它是介于0到180度之间的值。 当它为零时,克隆平行于对象的“ y”轴分布。
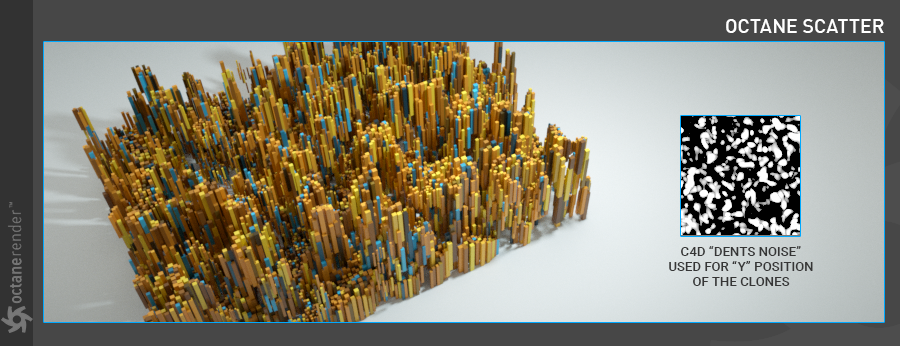
posITION
It's to adjust the position of your clones. You can also distribute the positions of the clones using greyscale shader/texture. As you can see in the picture below, the "y" position of the clones has been changed using Cinema 4D's "Dents" noise type. The white areas in the texture are the areas that influence the position.
位置
这是为了调整克隆的位置。 您还可以使用灰度着色器/纹理分布克隆的位置。 如下图所示,已使用Cinema 4D的“凹痕”噪波类型更改了克隆的“ y”位置。 纹理中的白色区域是影响位置的区域。
Info: For now, only "y" axis works. Other axes are reserved for future updates.
信息:目前,仅“ y”轴有效。 其他轴则保留以供将来更新。
scale
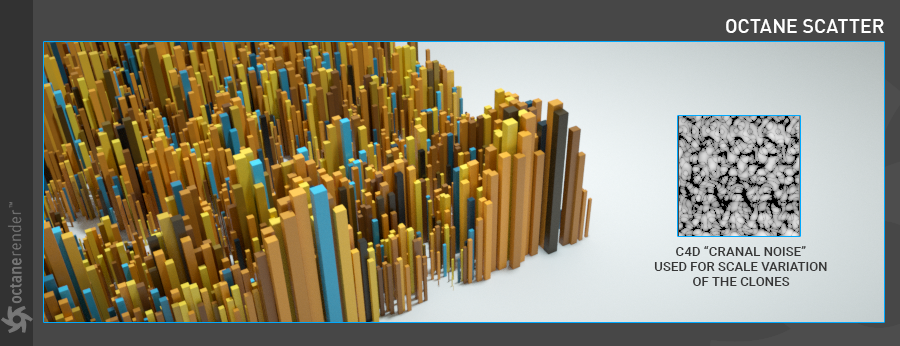
Used to set the scales of your clones. You can also add variations to the clone's scale using the greyscale shader/texture. The "Cranal" noise is used for the scale variation you see in the picture below and the scale values has been changed to "x: 2 / y: 6 / z: 2".
比例
用于设置克隆的比例。 您还可以使用灰度着色器/纹理为克隆的比例添加变化。 “颅”噪波用于下图所示的比例变化,并且比例值已更改为“ x:2 / y:6 / z:2”。
rotatIon
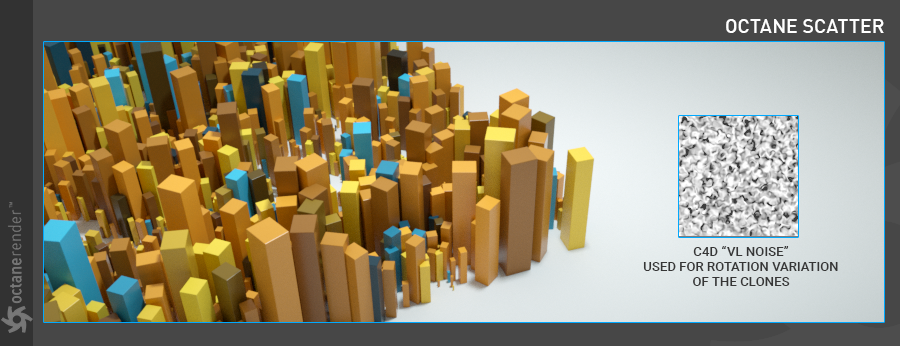
Used to set the rotations of your clones. You can also add variations to clone rotations using greyscale shader/texture. In the following picture, "VL Noise" is used for the rotation variation of the clones and the "x" value is changed to 258.
旋转
用于设置克隆的旋转。 您也可以使用灰度着色器/纹理为克隆旋转添加变体。 在下图中,“ VL Noise”用于克隆的旋转变化,“ x”值更改为258。
Info: For now, only "x" axis works. Other axes are reserved for future updates.
信息:目前,仅“ x”轴有效。 其他轴则保留以供将来更新。


赶快留个言打破零评论!~