The Photon Mapping GI Engine 光子映射 GI 引擎
Introduction 引言
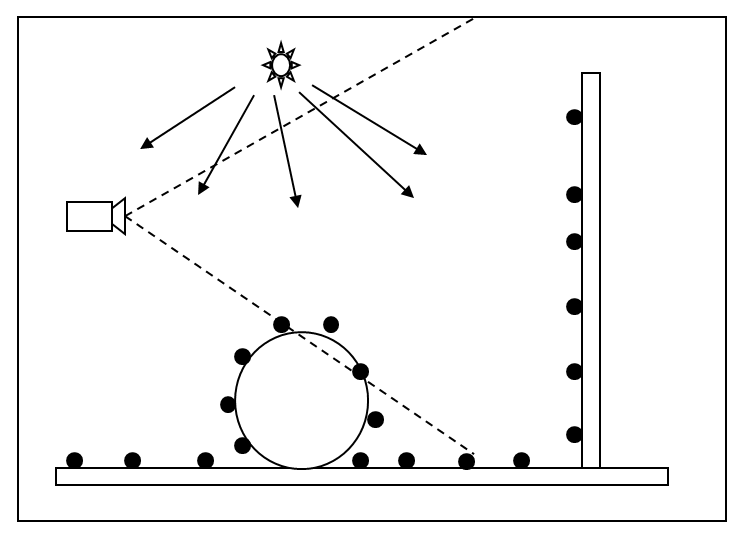
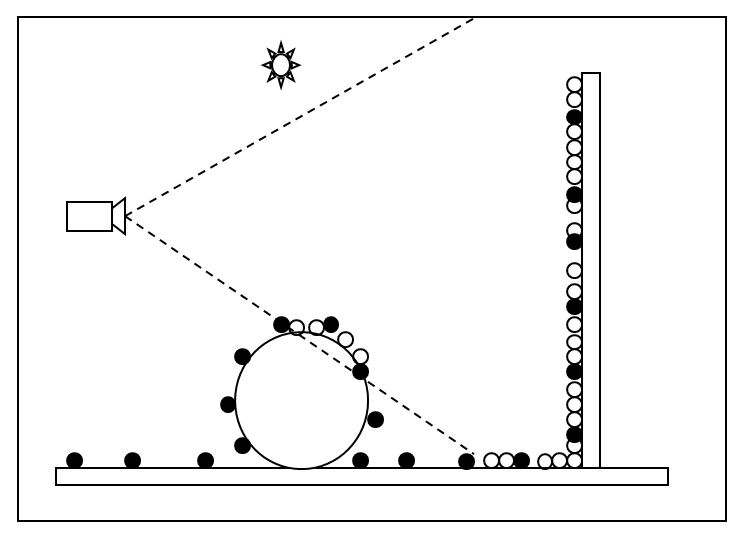
All GI Engines, except the Photon Mapping one, work by shooting rays from the camera. Photon Mapping, on the other hand, works by shooting photons from the lights. For certain kinds of effects (like caustics), this has important quality advantages. The figures below show how this works.
所有的 GI 引擎,除了光子映射引擎,都是通过照相机发射光线来工作的。另一方面,光子映射则是通过从光源中发射光子来实现的。对于某些类型的效果(如焦散) ,这有重要的质量优势。下面的数据显示了这是如何工作的。
Photons emitted from the light source bounce around the scene and are finally stored on surface
从光源发出的光子在场景中反弹,最后被存储在表面上
During rendering, final shaded pixels (white) are GI-lit by extrapolating the previously computed photons on the surfaces
在渲染过程中,最终的阴影像素(白色)是通过外推先前计算出的光子在表面上得到的 GI-lit
The figures also reveal one of the Photon Mapping's weaknesses: it can store photons on parts of the scene that might not be visible to the camera and are, therefore, irrelevant to the final shaded pixels. While certain graphics algorithms exist for improving that situation, Redshift uses the more traditional photon mapping technique which, unfortunately, suffers from this problem. For studio-like scenes (where there is little geometry beyond what the camera can see directly) this might not be an important issue, since most geometry will be visible anyway. But for more complicated scenes (e.g. flythrough through a house containing several rooms and lights), many photons could be required which could be a memory and processing burden.
这些图片也揭示了光子映射的一个弱点: 它可以将光子存储在场景中摄像机可能看不到的部分,因此与最终的阴影像素无关。虽然有一些图形算法可以改善这种情况,但是红移使用的是更传统的光子映射技术,不幸的是,这种技术存在这个问题。对于类似工作室的场景(除了摄像机可以直接看到的几何图形之外,几何图形很少) ,这可能不是一个重要的问题,因为大多数几何图形无论如何都是可见的。但是对于更复杂的场景(例如穿过一个有几个房间和几盏灯的房子) ,可能需要许多光子,这可能成为内存和处理负担。
Photon mapping can recreate both Diffuse GI and Caustics effects. "Diffuse GI" refers to global illumination that is due to rough surfaces while "caustics" are caused by highly reflective or refractive surfaces (like mirrors and glass). All the other GI engines can only capture Diffuse GI. Only Photon Mapping can reproduce caustics.
光子映射可以重现漫射消化道和焦散效应。“漫射 GI”是指由于粗糙表面造成的全局光源,而“焦散”是由高反射或折射表面(如镜子和玻璃)造成的。所有其他的 GI 引擎只能捕捉漫反射 GI。只有光子映射才能再现焦散线。
Photon Mapping Caustics are always enabled! You don't need to set the primary or secondary GI engines to "Photon"! This is explained in more detail in the relevant section below.
光子映射焦散线总是启用的!你不需要将主要或次要的 GI 引擎设置为“光子”!下文有关部分将更详细地解释这一点。
We generally recommend using other GI engines than photon mapping when it comes to achieving diffuse GI as they generally tend to be of higher quality in most cases. And, like mentioned above, you can still use Photon Mapping for caustics – even if you don't have it selected as a primary or secondary GI engine.
我们通常推荐使用其他 GI 引擎而不是光子映射,因为它们通常在大多数情况下具有更高的质量。而且,就像上面提到的,你仍然可以使用光子映射为焦散-即使你没有选择它作为一个主要或次要的 GI 引擎。
Benefits of Photon Mapping:
光子映射的好处:
- Provides a very good degree of control 提供了很好的控制程度
- For reasonable numbers of photons, it renders fast 对于合理数量的光子,它可以快速呈现
Drawbacks of Photon Mapping:
光子映射的缺点:
- Photon mapping is an outdated technique 光子映射是一种过时的技术
- Photons have to be stored in GPU memory so too many photons can be prohibitive in terms of memory usage 光子必须存储在 GPU 内存中,因此太多的光子就内存使用量而言是不允许的
- There are a few settings to tweak and some experimentation might be needed to get a clean result 有一些设置需要调整,可能需要一些实验才能得到一个干净的结果
- Processing time and storage may be wasted for photons that will not end up being visible to the camera 处理光子的时间和存储时间可能会被浪费掉,而这些光子最终会被摄像机看不见
Settings
设置
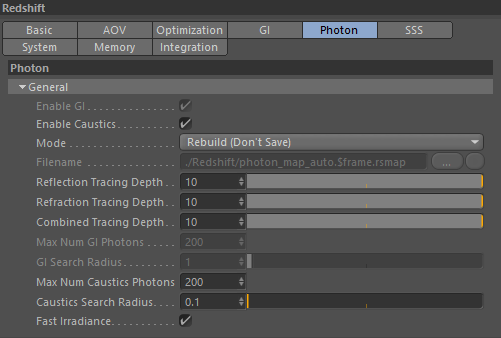
Enable GI / Enable Caustics
启用 GI/Enable Caustics
These are global switches to enable/disable Diffuse GI and Caustics.
这些是启用/禁用漫射消息和焦散的全局开关。
Mode/Filename
模式/文件名
When "Mode" is set to "Rebuild (don't save)", new Photon Mapping data will be generated each frame. The data will not be automatically saved to disk.
当“模式”设置为“重建(不保存)”时,每帧都会生成新的光子映射数据。数据不会自动保存到磁盘。
When "Mode" is set to "Rebuild (prepass only)", new Photon Mapping data will be generated each frame and will save it to the user-specified file. The final rendering pass will be skipped.
当“模式”设置为“重建(仅限前置)”,新的光子映射数据将生成每帧,并将其保存到用户指定的文件。最终的呈现过程将被跳过。
When "Mode" is set to "Rebuild", new Photon Mapping data will be generated each frame. After the Photon Mapping processing stage is complete, the results are written to the user-specified file.
当“模式”设置为“重建”时,每个帧都会生成新的光子映射数据。在 Photon Mapping 处理阶段完成后,结果将被写入用户指定的文件。
Setting "Mode" to "Load" will skip the processing stage and, instead, load the data from the user-specified file.
将“ Mode”设置为“ Load”将跳过处理阶段,而是从用户指定的文件中加载数据。
Because light-emitted photons are independent from the camera settings, fly-through animations can get away with generating the photon map once (on the first frame) and re-using it for all other frames. If, however, photon-emitting lights move or material settings are animated, a new photon map will have to be generated.
由于发光光子是独立于相机的设置,飞行通过动画可以得到的光子图一次(在第一帧) ,并重复使用它的所有其他帧。然而,如果发光灯移动或材料设置是动画的,一个新的光子地图将不得不生成。
Reflection/Refraction/Combined Tracing Depth
反射/折射/复合跟踪深度
These three settings control the number of times that photons may bounce around the geometry. The defaults should work fine for most scenes.
这三种设置控制了光子在几何体周围反弹的次数。对于大多数场景,默认设置应该可以正常工作。
If you are rendering caustics and don't want reflective caustics but only want refractive caustics, you can try limiting the reflection trace depth to zero.
如果你渲染焦散,不想反射焦散,但只想要折射焦散,你可以尝试限制反射跟踪深度为零。
Max Num GI Photons / GI Search Radius / Max Num Caustics Photons / Caustics Search Radius
最大 GI 光子/GI 搜索半径/最大焦散光子/焦散搜索半径
During rendering, the photons generated during the Photon Mapping pass are used to shade the final pixels. To get a smooth result, each final shaded pixel needs to find its closest photons and blur them together.
在渲染过程中,光子映射过程中产生的光子被用来遮蔽最终像素。为了得到一个平滑的结果,每个最终的阴影像素需要找到它最近的光子,并模糊它们在一起。
The "Search Radius" setting controls the distance around each shaded pixel that will be used to find photons. This number is scene-dependent and is in world units. Larger values mean smoother but blurrier results while smaller values mean sharper but, sometimes, splotchy results. This setting is very closely tied to the number of photons shot from the lights. If lights have been configured to shoot many photons, then usually the search radius can be shrunk without artifacts. If too few photons were shot from lights, the search radius has to be large in order to not be splotchy.
“搜索半径”设置控制每个阴影像素周围用于寻找光子的距离。这个数字是场景相关的,是世界单位。更大的值意味着更平滑但更模糊的结果,而更小的值意味着更清晰,但有时,斑点结果。这种设置与从光源射出的光子数量密切相关。如果灯被配置成可以发射许多光子,那么通常搜索半径可以收缩而不会产生伪影。如果从光源射出的光子太少,搜索半径必须足够大才不会出现斑点。
The "Max Num Photons" controls the upper limit of photons that can be stored in the "Search Radius". Larger numbers will allow the photon shooting algorithm store many photons per unit area which means a larger memory requirement and not necessarily an improved image quality! We recommend leaving this setting at the default value.
“最大数量光子”控制光子的上限,可以存储在“搜索半径”。更大的数字将允许光子射击算法每单位面积存储许多光子,这意味着更大的内存需求,并不一定是一个改进的图像质量!我们建议将此设置保留为默认值。
Fast Irradiance
快速辐照度
Searching for photons during final rendering can be time-consuming and might slow the rendering down. "Fast Irradiance" allows blurry effects to use a faster, pre-processed approximation that needs less searching and is, thus, faster. The preprocessing step happens after the photons have been computed and might take a few seconds – but the savings during rendering are worth it, so it is recommended that you leave this option enabled.
在最终渲染期间搜索光子可能会很耗时,而且可能会降低渲染速度。“快速辐照度”允许模糊效果使用一个更快的,预处理的近似值,需要更少的搜索,因此,更快。预处理步骤发生在光子计算完成之后,可能需要几秒钟时间——但是在渲染过程中节省的时间是值得的,因此建议您保留这个选项。
How To Use Photon Mapping For Diffuse GI
如何使用光子映射进行漫射 GI
Like mentioned earlier, Photon Mapping can be used for Diffuse GI and Caustics.
如前所述,光子映射可以用于漫射消化道和焦散线。
To enable Photon Mapping for Diffuse GI you first have to select it as a primary or secondary GI engine. Using Photon Mapping as a primary GI engine is typically not recommended because there are often splotchy interpolation artifacts and darkening near corners. These artifacts, though, are much less important to secondary GI bounces, so Photon Mapping can still work nicely as a secondary GI engine and combined with primary GI engines like the Irradiance Cache or Brute-Force. Having said that, setting Photon Mapping as the primary GI engine has one benefit: it can be useful for debugging photon mapping issues. For example, you can use it to see if the scene has enough photons for some other primary Gi engine (e.g. Irradiance Cache) to work with.
要启用漫射 GI 的光子映射,你首先必须选择它作为一个主要或次要的 GI 引擎。使用光子映射作为一个主要的胃肠道引擎通常是不推荐的,因为往往有斑点插值工件和黑暗附近的角落。然而,这些工件对二级 GI 反弹的重要性要小得多,因此光子映射仍然可以作为二级 GI 引擎很好地工作,并与主要 GI 引擎结合,如 Irradiance Cache 或 Brute-Force。尽管如此,将光子映射设置为主要的 GI 引擎有一个好处: 它可以用于调试光子映射问题。例如,你可以用它来检查场景是否有足够的光子来使用其他一些主要的 Gi 引擎(例如 Irradiance Cache)。
After selecting Photon Mapping in the GI engines, the second order of business is making sure some photons are shot by lights! You do that by going to the light options under the "Photon" section. There separate controls for Caustic and Global Illumination (i.e. Diffuse GI). In this case we care about "Global Illumination".
So how many photons are needed per light? This depends on several things:
在 GI 引擎中选择光子映射之后,第二项工作就是确保一些光子被光线射出!你可以通过“光子”部分的光选项来做到这一点。苛性碱和全局光源有单独的控制(即漫反射 GI)。在这种情况下,我们关心的是“全局光源”。那么每束光需要多少光子呢?这取决于以下几个因素:
- How far away is the light from the geometry 光线距离几何体有多远
- How bright the light is 光线有多亮
- How 'hidden' it is from the geometry 它是如何从几何图形中隐藏起来的
Typically, if a light is far away, very bright or hidden behind other objects, its number of photons has to be increased. Not shooting enough photons means that parts of the geometry will not receive enough of them and the final GI results will be splotchy.
通常情况下,如果一束光线距离很远,非常明亮或者隐藏在其他物体后面,它的光子数量就必须增加。拍摄不足的光子意味着部分几何图形将不能接收到足够的光子,并且最终的 GI 结果会出现斑点。
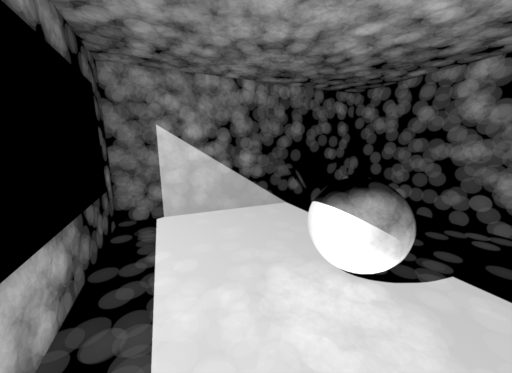
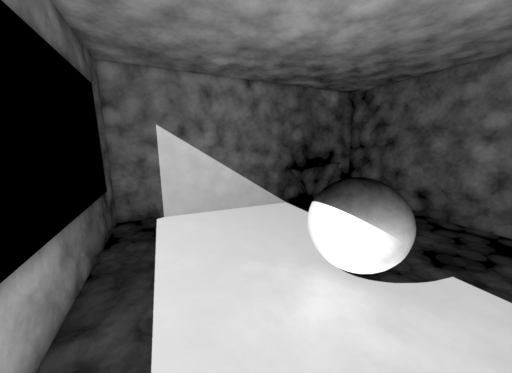
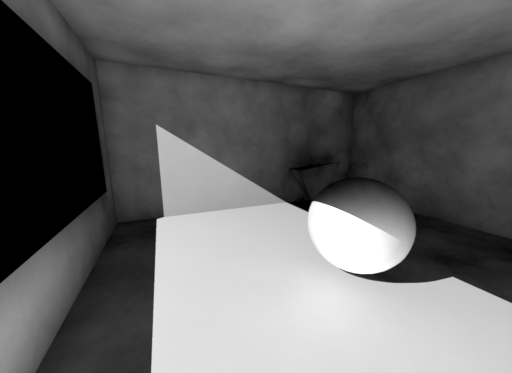
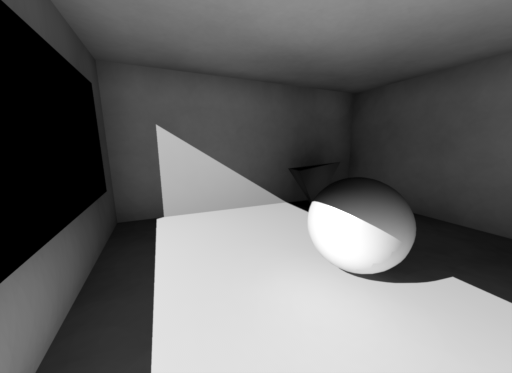
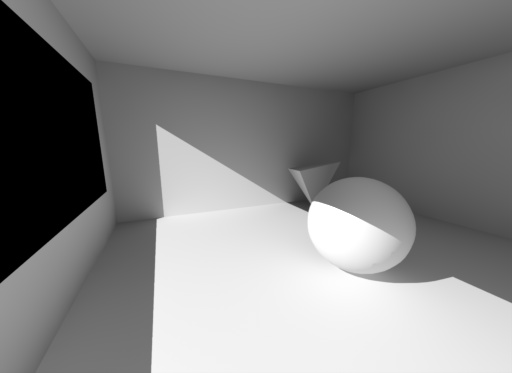
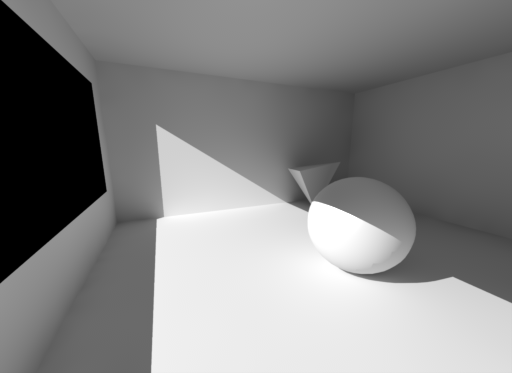
The images below show a simple test scene with a fairly distant point light emitting photons. In these images, photon mapping was selected as the primary GI engine in order to visualize the photon density. To give you an impression of the scene scale, the sphere has a radius of 1.0 world unit. Also, please note that the photon mapping reflection trace depth was set to 1. I.e. the photons are allowed to bounce only once. Setting it to zero would produce no photons.
下面的图片显示了一个简单的测试场景,一个相当远的点发光的光子。在这些图像中,光子映射被选择为主要的胃肠道引擎,以可视化的光子密度。为了给你一个场景尺度的印象,球体的半径为1.0世界单位。另外,请注意光子映射反射跟踪深度被设置为1。也就是说,光子只能反弹一次。将其设置为零将不会产生光子。
Below we show how shooting different numbers of photons from the light and adjusting "Search Radius" affects the final result.
下面我们将展示如何从光线中拍摄不同数量的光子,以及调整“搜索半径”对最终结果的影响。
|
|
|
|
10,000 Photons. Search Radius set to 0.2. The density is extremely low - individual photons can be seen! 10000个光子。搜索半径设置为0.2。密度极低,可以看到单个光子! |
100,000 Photons. Search Radius set to 0.2. An improvement over the last image, but still the results are very splotchy. 100,000个光子。搜索半径设置为0.2。比上一张图片有所改进,但结果仍然非常模糊。 |
|
|
|
|
100,000 Photons. Search Radius was now increased to 0.4. Increasing the search radius blurs the results 100,000光子。搜索半径现在增加到0.4。增加搜索半径会模糊搜索结果 |
100,000 Photons. Search Radius increased again to 0.8. The result is now much smoother. 100,000个光子。搜索半径再次增加到0.8。结果现在更平滑了。 |
The last image is an improvement over the previous images but is still pretty splotchy. It also has other artifacts too. For example, there is darkening in the corners. Also, smaller objects (like the upside-down pyramid behind the sphere) seem to not receive enough lighting and look too dark. These are problems inherent to the traditional photon mapping technique. If we wanted a more accurate result we would have to shoot more photons and shrink the search radius.
最后一张图片比之前的图片有所改进,但仍然有很多斑点。它还有其他的工艺品。例如,有黑暗的角落。此外,较小的物体(如球体后面倒置的金字塔)似乎没有得到足够的照明,看起来太暗。这些都是传统光子映射技术固有的问题。如果我们想要更准确的结果,我们就必须发射更多的光子,并缩小搜索半径。
However, for this particular tutorial, we don't intend to use photon mapping as a primary GI engine but as a secondary GI engine. A thing to remember regarding secondary GI is that it doesn't have to be perfect. When combined with a primary GI engine such as the irradiance cache, it can still produce clean results. Below we show what happens if we use Irradiance Cache as the primary GI engine and Photon Mapping as the secondary GI engine.
然而,对于本教程,我们不打算将光子映射作为一个主要的 GI 引擎,而是作为一个次要的 GI 引擎。关于二级 GI,需要记住的一件事是,它不一定是完美的。当与主 GI 引擎(如辐照度缓存)结合时,仍然可以产生干净的结果。下面我们展示了如果我们使用辐射缓存作为主要的 GI 引擎和光子映射作为辅助 GI 引擎会发生什么。
The photons are now used as the secondary engine and Irradiance cache is used as the primary engine.
现在光子被用作二级引擎,辐照度缓存被用作主引擎。
Why is the image brighter? Remember that, in this example, the photon mapping reflection trace depth was set to 1. This means that the secondary GI already contains 1 bounce of GI. If we weren't using photons for the secondary GI but used Brute-Force instead, we could get an equivalent image by setting "Num GI Bounces" to 1, as shown below:
为什么图像更明亮?记住,在这个例子中,光子映射反射跟踪深度被设置为1。这意味着二级 GI 已经包含了1个 GI 的弹跳。如果我们不使用光子作为二级 GI,而是使用蛮力,我们可以通过将“ Num GI Bounces”设置为1来获得一个等效的图像,如下所示:
Irradiance Cache selected as primary GI engine and Brute-Force selected as secondary GI engine. Num GI Bounces set to 1. The results are very close to the previous image
辐照缓存选择为主要的 GI 引擎和蛮力选择为辅助 GI 引擎。数字 GI 反弹设置为1。结果非常接近前面的图像
There are some differences between the two images. For example the lighting between the wall and floor on the left part of the image is a bit darker with Brute-Force. The same applies to the lighting under the sphere. The main reason photon mapping looks brighter in these places is because we blurred its results by increasing the photon search radius and this cases some lighting to leak over parts of the scenery that should be darker. Using more photons and a smaller search radius could improve the situation. Try to keep in mind, though, that Brute-Force and the Irradiance Point Cloud are both more accurate techniques for secondary GI than photon mapping so, when using Photon Mapping issues like that might sometimes not be easily fixable.
这两幅图像有一些不同之处。例如,照片左边墙壁和地板之间的光线使用 Brute-Force 显得有点暗。同样的道理也适用于球体下的照明。光子映射在这些地方看起来更亮的主要原因是我们通过增加光子搜索半径而模糊了它的结果,这种情况下一些光线会泄露到本应该更暗的部分景色上。使用更多的光子和更小的搜索半径可以改善这种情况。不过请记住,Brute-Force 和 Irradiance Point Cloud 都是比光子映射更精确的次级 GI 技术,因此,当使用光子映射这样的问题时,有时可能不容易解决。
For reasons like these, we recommend that users don't actually use photon mapping for secondary Diffuse GI, but use the Irradiance Point Cloud or Brute Force instead.
由于这些原因,我们建议用户不要实际使用光子映射二级漫反射 GI,而是使用辐射点云或蛮力。
How To Use Photon Mapping For Caustics 如何在焦散线中使用光子映射
While Photon Mapping might not be as great of a choice for secondary Diffuse GI, it works very well for caustics.
虽然光子映射可能不是一个伟大的选择为二级漫射消化道,它工作得很好焦散。
Setting up Photon Mapping for caustics is similar to using it for diffuse GI, except for the following:
为焦散线建立光子映射和为漫射 GI 建立光子映射是相似的,除了以下几点:
- You can get photon caustics without setting Photon Mapping as a primary or secondary GI engine. In other words, photon caustics can be combined with the Irradiance Cache, Brute Force and the Irradiance point cloud, which are better suited for diffuse GI 你可以得到光子焦散线没有设置光子映射作为一个主要或次要的 GI 引擎。换句话说,光子焦散可以结合辐照度缓存,蛮力和辐照度点云,这是更好地适合漫反射 GIanyway 无论如何.
- The object has to be able to cast caustic photons. Please read 该物体必须能够投射焦散光子。请读取this doc 这个医生 for instructions on how to do that. 以获取如何做到这一点的指导
- The object has to be assigned a material that has reflection and/or refraction enabled. If the object is diffuse-only, it won't bounce any caustic photons. 物体必须被分配一种能够反射和/或折射的材料。如果物体是单向扩散的,它不会反弹任何焦散光子
The caustic "Search Radius" is set to 0.1. To get sharp caustics, this setting often has to be fairly small. That also explains why we had to shoot so many photons too. Fewer photons with a larger search radius would have worked too, but the caustics would be blurrier. That might be desirable in some cases.
腐蚀性的“搜索半径”设置为0.1。为了得到尖锐的焦散,这个设置通常必须相当小。这也解释了为什么我们需要发射那么多的光子。更少的光子和更大的搜索半径也可以工作,但焦散将是模糊的。在某些情况下,这可能是可取的。
The caustic "Max Num Photons" was reduced to 30 (from the default 200). Reducing this value forces the renderer to merge photons that are close to each other. This works like follows: if the renderer find more than "Max Num Photons" within "Search Radius", it will keep merging photons together until there are exactly "Max Num Photons" within "Search Radius". Since caustics tends to 'focus' photons in small areas, this can be an important memory optimization: merging photons means fewer photons to be stored in the GPU. And the quality is often not affected. Numbers such as 30-60 typically work well.
苛性的“最大数量光子”减少到30(从默认的200)。降低这个值会迫使渲染器合并彼此相近的光子。工作原理如下: 如果渲染器在“搜索半径”范围内找到超过“ Max Num photon”的光子,它将继续将光子合并在一起,直到在“搜索半径”范围内找到“ Max Num photon”。因为焦散线倾向于将光子聚焦在很小的区域,这是一个重要的内存优化: 合并光子意味着存储在 GPU 中的光子更少。而且质量通常不会受到影响。像30-60这样的数字通常很有效。
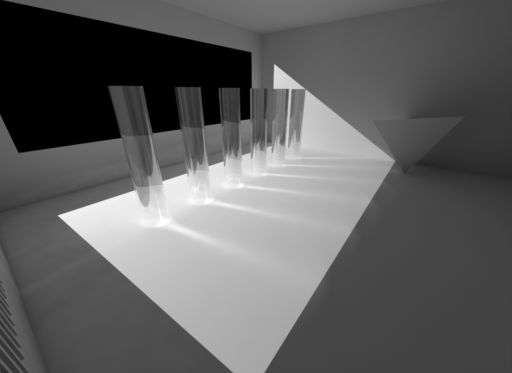
1,000,000 caustic photons. Both reflecting and refracting.
1,000,000焦散光子,既反射又折射。
When photons are shot from the lights, some of them will reflect and some of them will refract. The glass cylinders are both reflective and refractive so the image above does both. The strong line patterns you see behind each cylinder are due to refraction. The slight line patterns you see on the wall and on the left part of the image are mostly due to refraction.
当光子从光源中射出时,一些光子会反射,一些会折射。玻璃柱体既具有反射性又具有折射性,因此上面的图像既具有反射性又具有折射性。你在每个圆柱体后面看到的强烈的线条模式是由折射造成的。你在墙上和图像左侧看到的细微的线条图案主要是由折射造成的。
When you specify a number of photons (1,000,000) in this case, these photons get distributed between reflection and refraction. Sometimes, though, people only care only about reflection or refraction (not both), for aesthetic reasons. Additionally, disabling either means that the entire 1,000,000 photon budget will go entirely to reflection or entirely to refraction – so each one of these will be cleaner than if both were enabled.
在这种情况下,当你指定一定数量的光子(1,000,000)时,这些光子在反射和折射之间得到分布。然而,有时候,出于审美的原因,人们只关心反射或折射(不是两者都关心)。此外,禁用意味着整个100万个光子的预算将完全用于反射或完全用于折射——因此这两者都将比两者都启用时更干净。
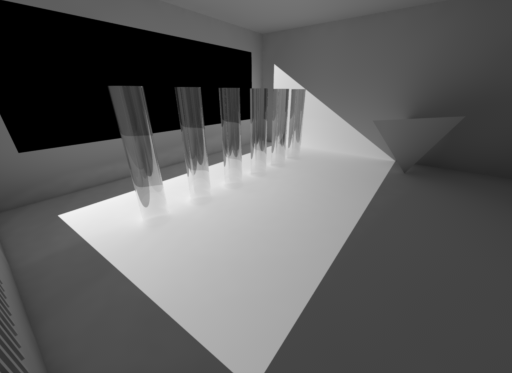
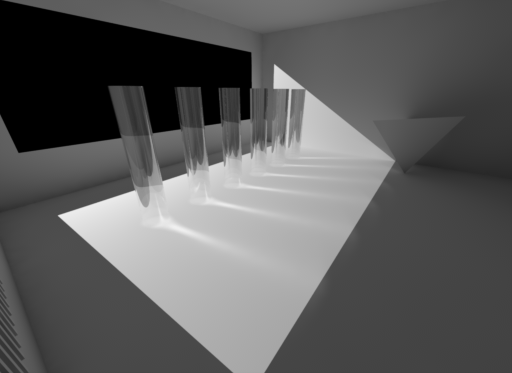
You can force caustics to be refractive or reflective by adjusting the trace depths, as shown in the examples below:
你可以通过调整跟踪深度来强制焦散线折射或反射,如下面的例子所示:
|
|
|
|
Making the photon refraction trace depth 0 means no refractions. Only reflective caustics are generated. 使光子折射迹深0意味着没有折射,只产生反射焦散。 |
On the other hand, making the photon reflection trace depth 0 disables reflections so only refractive caustics are generated 另一方面,使光子反射跟踪深度0禁用反射,因此只产生折射焦散 |

赶快留个言打破零评论!~