linear workflow
The monitors we look at for years are lying to us about light, color and tone. In the past (and even now, even in some cases) we've been putting extra lights or increasing the number of samples to light up dark areas when rendering a scene. We have continued to work for years without care even though the light / dark balance is always strange or wrong. We have not made a sound as to how wrong the distribution of the light is, and in short, that all of our renders appear unnatural. We have repeated the same mistake for years. One day we were confronted with the concept of "Linear Workflow". That's when we figured out the wrong thing. Now what if we tell you that all these efforts we've been doing for years are unnecessary? And what if we say that the only resposible of these unnecessary efforts is Gamma?
Those who know the topic immediately understand what we mean. But let's briefly explain what this is for. We will keep our explanations at a simple level so that they are not confusing. But the subject is actually quite technical. If you want technical explanation, there are very detailed resources on the web.
线性工作流程
我们多年来一直关注的显示器对我们来说是关于光线,颜色和色调的谎言。过去(甚至现在,甚至在某些情况下)我们一直在渲染场景时放置额外的灯光或增加采样数量以照亮黑暗区域。即使明暗平衡总是奇怪或错误,我们仍会继续工作多年而不加照顾。我们还没有发出声音分布错误的声音,简而言之,我们所有的渲染看起来都是不自然的。多年来,我们一直在重复同样的错误。有一天,我们遇到了“线性工作流程”的概念。那是我们找出错误的事情的时候。现在,如果我们告诉您我们多年来所做的所有这些努力是没有必要的,该怎么办?如果我们说这些不必要的努力中唯一可以解决的就是伽玛?
那些知道这个话题的人会立即理解我们的意思。但是,让我们简要解释一下这是干什么的。我们将在简单的水平上进行解释,以免引起混淆。但是这个主题实际上是相当技术性的。如果您需要技术说明,Web上有非常详细的资源。
What is the problem?
If the color, tone and light distribution do not look natural at the output of a render, it is the monitors and Gamma that are responsible. In the ideal world or theory, monitors or other imaging devices are expected to produce a linear output as they translate energy into the image.
问题是什么?
如果颜色,色调和光分布在渲染的输出中看起来不自然,则由显示器和Gamma引起。在理想的世界或理论中,监视器或其他成像设备会在将能量转换为图像时产生线性输出。
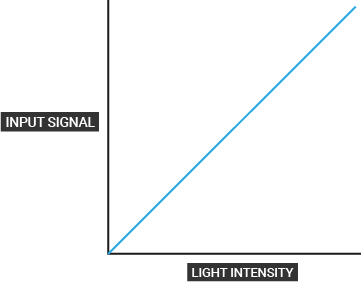
But in the real world things do not happen this way. According to the law of electrical power, the difference between input and output is not linear but it is logarithmic as seen in the graph below.
但是在现实世界中,事情并非以这种方式发生。 根据电力定律,输入和输出之间的差异不是线性的,而是对数,如下图所示。
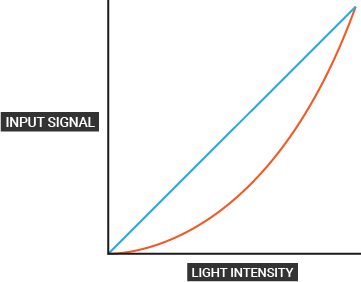
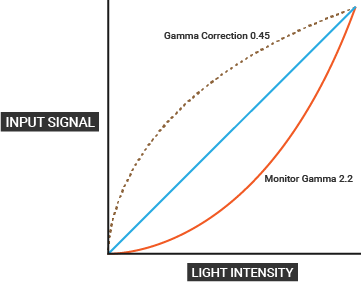
In such a case you will not see any pictures or videos as they are. So black, white and grays are not in their true state; as a result, blacks become darker and lighter colors become brighter. To see them correctly, the device applies a correction. This correction is called "Gamma". Thanks to this gamma curve, the black / white balance is corrected a bit more.
在这种情况下,您将看不到任何图片或视频。 因此,黑色,白色和灰色不是它们的真实状态。 结果,黑色变深,浅色变亮。 为了正确查看它们,设备会进行更正。 该校正称为“伽马”。 由于有了此伽玛曲线,黑/白平衡得到了更多的校正。
What does 3D software have to do with it?
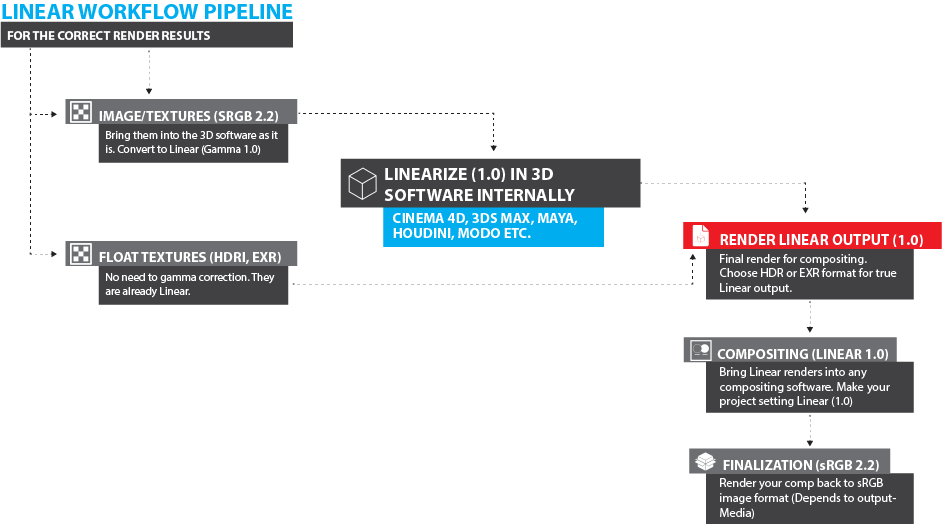
All the pictures you see on the computer screen or all the textures you use for rendering are mostly 8-bit jpg, png-like formats. These are embedded with gamma information, and when you look at the computer screen, gamma correction is automatically applied and appears on the screen. Most monitors have sRGB 2.2. Most 3D software we use today, including Cinema 4D, works as Linear and assumes that the assets you load from the outside are also Linear (Floating Point). However, the texture we use most of the time is 2.2. If gamma correction is not done in 3D software, gamma correction will be made at final render output, so gamma will be made twice in final render image. In this case the result is far from natural and wrong. Lights, shadows, and black / white balance will not seem entirely natural due to gamma.
The right thing to do is to translate and work all the assets in 3D software as Linear. We will explain this in more detail later. In short, as you can see in the graphic below, a workflow is called a "linear workflow".
3D软件与它有什么关系?
您在计算机屏幕上看到的所有图片或用于渲染的所有纹理大多都是8位jpg,png格式。这些都嵌入了伽马信息,当您查看计算机屏幕时,伽马校正将自动应用并出现在屏幕上。大多数显示器具有sRGB 2.2。我们今天使用的大多数3D软件(包括Cinema 4D)都可以用作Linear,并假定您从外部加载的资源也是Linear(浮点)。但是,我们大多数时间使用的纹理是2.2。如果未在3D软件中进行伽玛校正,则将在最终渲染输出中进行伽玛校正,因此将在最终渲染图像中进行两次伽玛校正。在这种情况下,结果远非自然而错误。由于伽玛,光线,阴影和黑/白平衡看起来并不完全自然。
正确的做法是将3D软件中的所有资产转换为Linear并进行处理。我们将在后面详细解释。简而言之,如下图所示,工作流程称为“线性工作流程”。
BENEFITS
Above all, the distribution of light during 3D work is more natural. With low sampling settings you can get better looking renderings. Moreover, during shorter render times. For this reason it may not be necessary to make extra light setup or use more sampling for dark areas in sRGB. Reflections and refractions in this workflow also appear more natural.
On the Compositing side there are more improvements. For example, you are working with a wider color and tone range, so you have more control over the image. Blending Modes (such as screen / overlay / add) get more natural and accurate results. The difference is especially great when it comes to DOF and Blur effect. The brilliance of background bokehs becomes realistic. Also all gradients give much more accurate results. And finally, you can intervene more easily in areas that are extremely glowing and extremely dark.
好处
最重要的是,在3D工作期间光的分布更加自然。使用低采样设置,您可以获得更好的外观效果。此外,在更短的渲染时间内。因此,可能不需要对sRGB中的暗区域进行额外的灯光设置或使用更多采样。此工作流程中的反射和折射也显得更自然。
在合成方面,还有更多改进。例如,您正在使用较宽的颜色和色调范围,因此可以更好地控制图像。混合模式(例如屏幕/叠加/添加)可获得更自然,更准确的结果。当涉及到景深和模糊效果时,差异特别大。背景虚化的光彩变得逼真。同样,所有梯度都可以提供更准确的结果。最后,您可以在极度发光和极暗的区域进行干预。
disadvantages
File sizes. The file sizes are quite large because they contain so much data. In addition to beauty renders, you also need to get Render Passes in Linear, so the size of the entire project can be quite high. But now that the storage problem is solved, this may not seem to be a disadvantage. The real disadvantage is that a serious computer power is required to work in this workflow. As the CPU and RAM usage increases, a good computer is essential for flawless working. Of course, you can also work on a low-configuration computer, but operations are slow.
缺点
文件大小。文件大小非常大,因为它们包含大量数据。除了完美渲染外,您还需要获取线性渲染渲染通道,因此整个项目的尺寸可能会很大。但是现在解决了存储问题,这似乎并不是一个缺点。真正的缺点是,在此工作流程中需要强大的计算机功能。随着CPU和RAM使用量的增加,一台好的计算机对于无懈可击的工作至关重要。当然,您也可以在配置较低的计算机上工作,但是操作速度很慢。
matter of choice
Of course, it is not necessary to work in this workflow. sRGB or Linear is a working tool. They will suit you according to your purpose. If your sRGB outputs are pleasing to you, there is no problem. So you have to make your choice completely according to your purpose. Often it is a professional way to work with Linear in 3D software, ending it in composition software as a linear result and finally outputting to the target platform (computer or movie screen?). It is up to you to. So, working in sRGB does not make you an amateur.
选择问题
当然,不必在此工作流程中工作。 sRGB或线性是一种工作工具。它们将根据您的目的适合您。如果您的sRGB输出令人愉悦,那没有问题。因此,您必须完全根据自己的目的进行选择。通常,这是在3D软件中使用Linear的一种专业方法,将其作为合成结果在合成软件中终止,并最终输出到目标平台(计算机或电影屏幕?)。这取决于您。因此,在sRGB中工作不会使您成为业余爱好者。
linear workflow in OCTANE
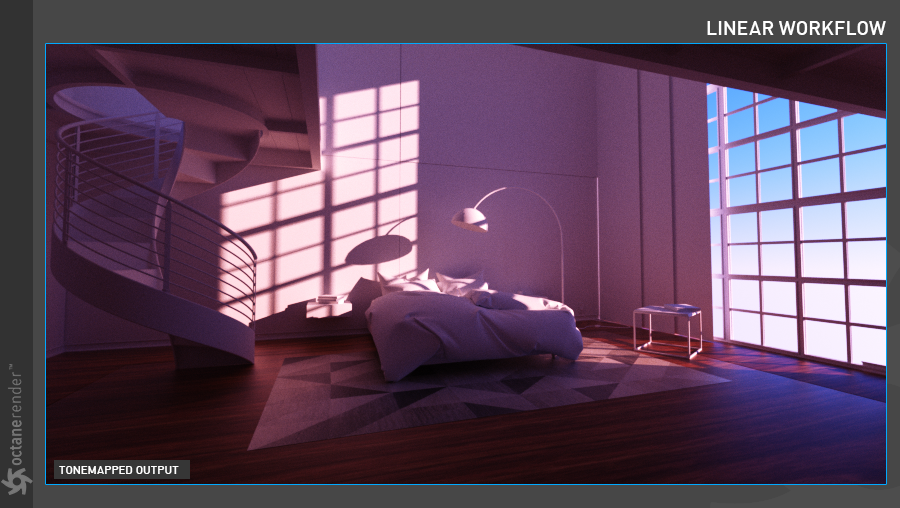
You can work with linear workflow in Octane. Then you can render with render passes, beauty and then finalizing within the composition software. Let's take a look at the following 2 pictures before stepping through all of them:
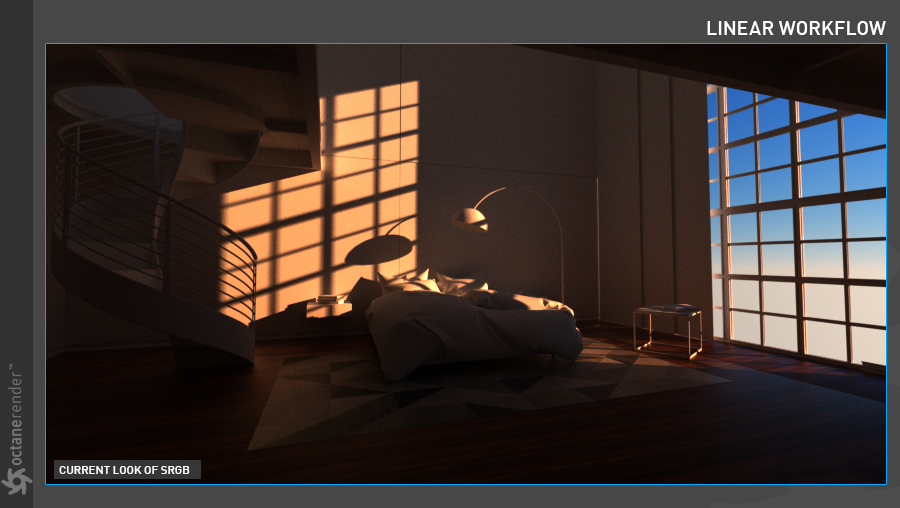
The first image is a render that is the sRGB result. The scene taken from the Cinema 4D's content browser which is a classic indoor scene. Only the floor and the carpet are covered with octane material/texture. Octane Daylight was used as light source. If you select the "Linear" response curve in the Camera Imager, the result will be the opposite. Because our monitors can not show Linear and eventually we are faced with a classic sRGB result. This is the expected image of all 3D renderers not working with Linear workflows (sRGB 2.2) on our monitors.
OCTANE中的线性工作流程
您可以在Octane中使用线性工作流程。然后,您可以使用渲染过程,美感进行渲染,然后在合成软件中完成。在逐步浏览以下两张照片之前,让我们看一下它们:
第一幅图像是sRGB结果的渲染。来自Cinema 4D内容浏览器的场景是经典的室内场景。仅地板和地毯覆盖有Octane材质/纹理。Octane日光用作光源。如果在Camera Imager中选择“线性”响应曲线,则结果将相反。由于我们的显示器无法显示线性,最终我们将面临经典的sRGB结果。这是所有3D渲染器的预期图像,这些渲染器无法在我们的显示器上使用线性工作流程(sRGB 2.2)。
The second picture is rendered using Linear Workflow. The scene is the same. The floor and carpet texture gamma is set to "1" (you can adjust the image gamma in the image texture settings). Render Buffer is set as "Linear". If you open it in Photoshop, After effects or any compositing program that works with linear workflow, you will see an image like this.
使用“线性工作流”渲染第二张图片。 场景是一样的。 地板和地毯的纹理灰度系数设置为“ 1”(您可以在图像纹理设置中调整图像灰度系数)。 渲染缓冲区设置为“线性”。 如果在Photoshop,After Effects或任何适用于线性工作流程的合成程序中打开它,您将看到这样的图像。
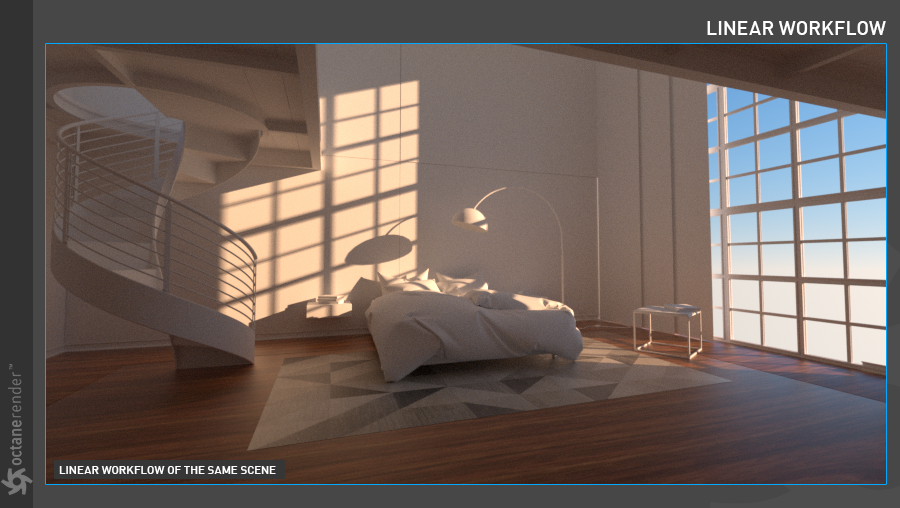
Now the difference between these 2 pictures is totally technical. The first image (sRGB) is technically incorrect and the second image (Linear) is technically correct. Whether the result picture is aesthetically beautiful or ugly depends entirely on your purpose or your artistic point of view. If you remain in the sRGB state in the first image and try to create brightness / darkness balance like in Linear picture, you would have been to do a lot of light setups and also a render setup. These setups would cost extra effort and render time. However, there is no extra setup in the Linear Workflow option. Now the decision is yours. If the Linear workflow result has taken your interest, you can continue reading the rest of the article.
现在,这两张图片之间的区别完全是技术性的。第一张图像(sRGB)在技术上不正确,而第二张图像(Linear)在技术上正确。结果图片在美学上是美丽还是丑陋,完全取决于您的目的或您的艺术观点。如果您在第一张图像中保持sRGB状态,并尝试像线性图片一样创建亮度/暗度平衡,则可能需要进行很多灯光设置以及渲染设置。这些设置将花费额外的精力和渲染时间。但是,“线性工作流”选项中没有任何额外的设置。现在,决定权由您决定。如果您对Linear工作流程的结果感兴趣,则可以继续阅读本文的其余部分。
LINEAR WORKFLOW SETUP WITH OCTANE
Open any scene. If you want, you can also open and use the classic Cinema 4D indoor scene shown in the pictures above. Let's continue with the assumption that you are using this scene and that you have prepared the light / camera setups. In this scene, only the floor and carpet is covered textures for testing purposes. These textures are found on the web and their gamma's are 2.2. You can follow the same path.
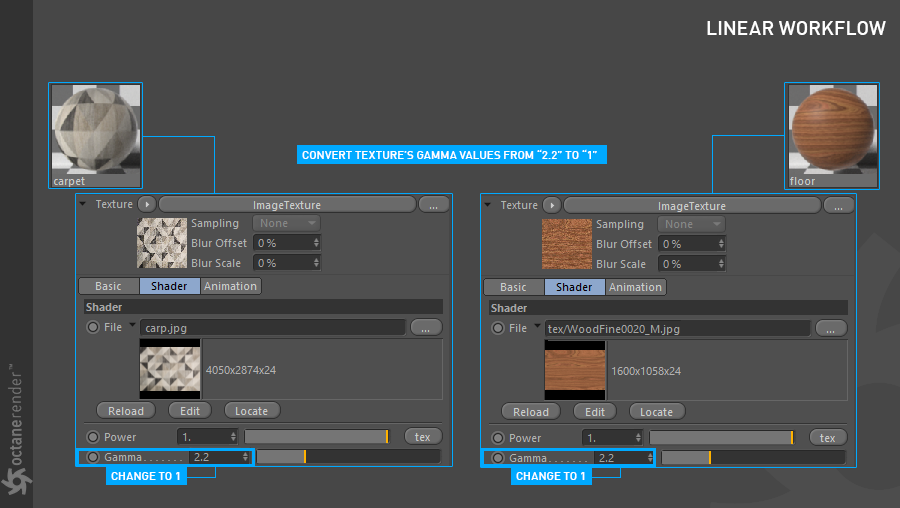
1- First create two separate Octane Glossy materials for the floor and carpet (with a very high rougness like float/0,7-0,75). Define the textures you find on the web as image texture on the diffuse channel of the glossy material (you know how to use the image texture). In the Image texture options, the default Gamma is 2.2. You have to change that so make Gamma "1" for each texture. If you use very high quality and high resolution "EXR" format textures, you do not need to do this setting because the Gamma of EXR or HDR image formats is default 1.
Octane的线性工作流程设置
打开任何场景。如果需要,还可以打开并使用上图所示的经典Cinema 4D室内场景。让我们继续假设您正在使用此场景,并且已经准备好灯光/摄像机设置。在此场景中,仅地板和地毯覆盖有用于测试目的的纹理。这些纹理可以在网上找到,其伽玛值为2.2。您可以遵循相同的路径。
1-首先为地板和地毯创建两种单独的Octane光面材质(具有非常高的粗糙度,例如float / 0.7-0.75)。将您在网上找到的纹理定义为光泽材质的漫反射通道上的图像纹理(您知道如何使用图像纹理)。在图像纹理选项中,默认的Gamma为2.2。您必须进行更改,以便将每个纹理的Gamma设置为“ 1”。如果您使用高质量和高分辨率的“ EXR”格式纹理,则不需要进行此设置,因为EXR或HDR图像格式的Gamma默认为1。
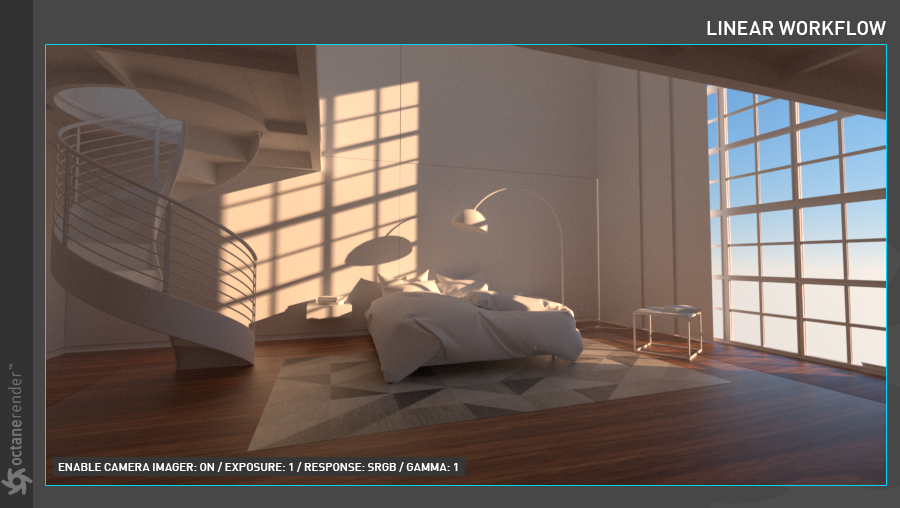
2- Now go to the Octane Camera Imager settings and make the setup as you see in the picture below. The picture you see is the Linear output of LV. Do not confused that you set the Response curve to sRGB. The reason is the monitor we used. Cinema 4D assumed that all operations are Linear until the rendering result in Lv. But the end of the chain, our Monitors, does not have the capacity to display it. So, according to the above diagram, it is necessary to do sRGB again after all this linear workflow is over. This is the result of what you see in LV. If you want to be sure, change response curve back to Linear. That's when the image of LV will be sRGB and the whole picture will be dark. But if you select Render Buffer Type as Linear in the PV render (Picture Viewer), the image will be rendered linearly as original. The only responsibility for this confusing process is the gamma setting of the monitors we use. Now use this setup, because in the following article we will explain the difference between LV and true Linear Workflow in more detail.
2-现在转到“ Octane Camera Imager”设置,如下图所示进行设置。您看到的图片是LV的线性输出。不要混淆将“响应”曲线设置为sRGB。原因是我们使用的监视器。 Cinema 4D假定所有操作都是线性的,直到以Lv渲染结果为止。但是,链的末端,我们的监视器,没有能力显示它。因此,根据上图,在所有这些线性工作流程结束之后,有必要再次执行sRGB。这是您在LV中看到的结果。如果要确定,请将响应曲线更改回线性。那时LV的图像将为sRGB,整个图像将变暗。但是,如果在PV渲染(图片查看器)中将“渲染缓冲区类型”选择为“线性”,则图像将被线性渲染为原始图像。这个令人困惑的过程的唯一责任是我们使用的显示器的伽玛设置。现在使用此设置,因为在下面的文章中,我们将更详细地解释LV和真正的线性工作流之间的区别。
3- Now let's do the Render Setup: Press CTRL + B when you have finished everything. The Render Settings window will be opened. First, go to the Octane Renderer and select "Float (Linear)" from the Render Buffer Type, then set the desired output and save settings as Open EXR 32 bit.
4 - If you want a Render Pass, select the desired pass from the Render Passes section. Prepare a setup as you see in the picture below.
3-现在开始渲染设置:完成所有操作后,按CTRL +B。 将打开“渲染设置”窗口。 首先,转到Octane Renderer,从“ Render Buffer Type”中选择“ Float(Linear)”,然后设置所需的输出并将设置保存为Open EXR 32位。
4-如果需要渲染通道,请从“渲染通道”部分中选择所需的通道。 如下图所示,准备设置。
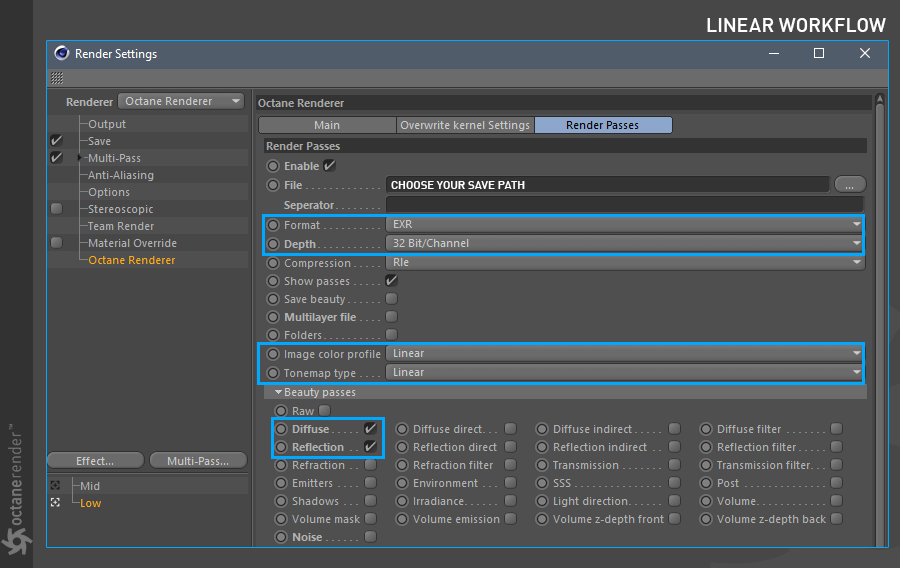
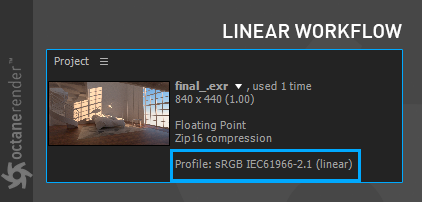
5- And final render. When Beauty and render passes are ready, open After Effects (or other compositing software). Import your Beauty and Render Passes into After Effects. If you check your files infos after importing, you will see that all of them are Linear.
5-和最终渲染。 当美妆和渲染过程准备就绪时,打开After Effects(或其他合成软件)。 将您的完美和渲染通道导入After Effects。 如果在导入后检查文件信息,您会发现它们都是线性的。
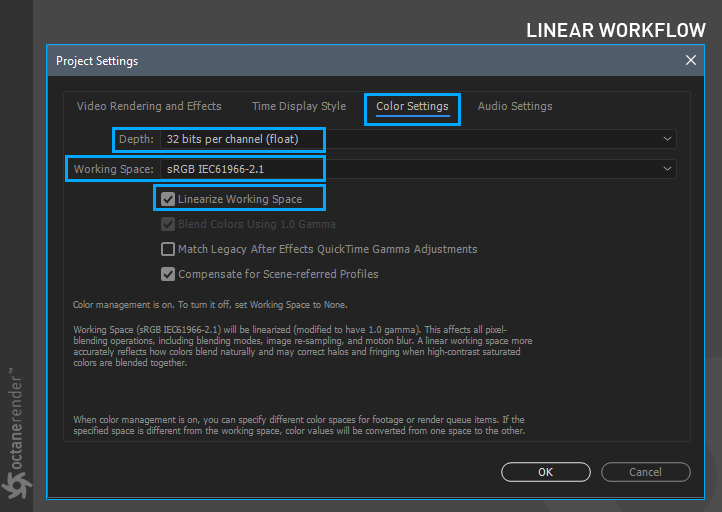
6- Now press the "8 bpc" icon in the Project window. The Project settings window will open. From this window, do the setup you see in the picture below.
6-现在在“项目”窗口中按“ 8 bpc”图标。 “项目设置”窗口将打开。 在此窗口中,进行下图所示的设置。
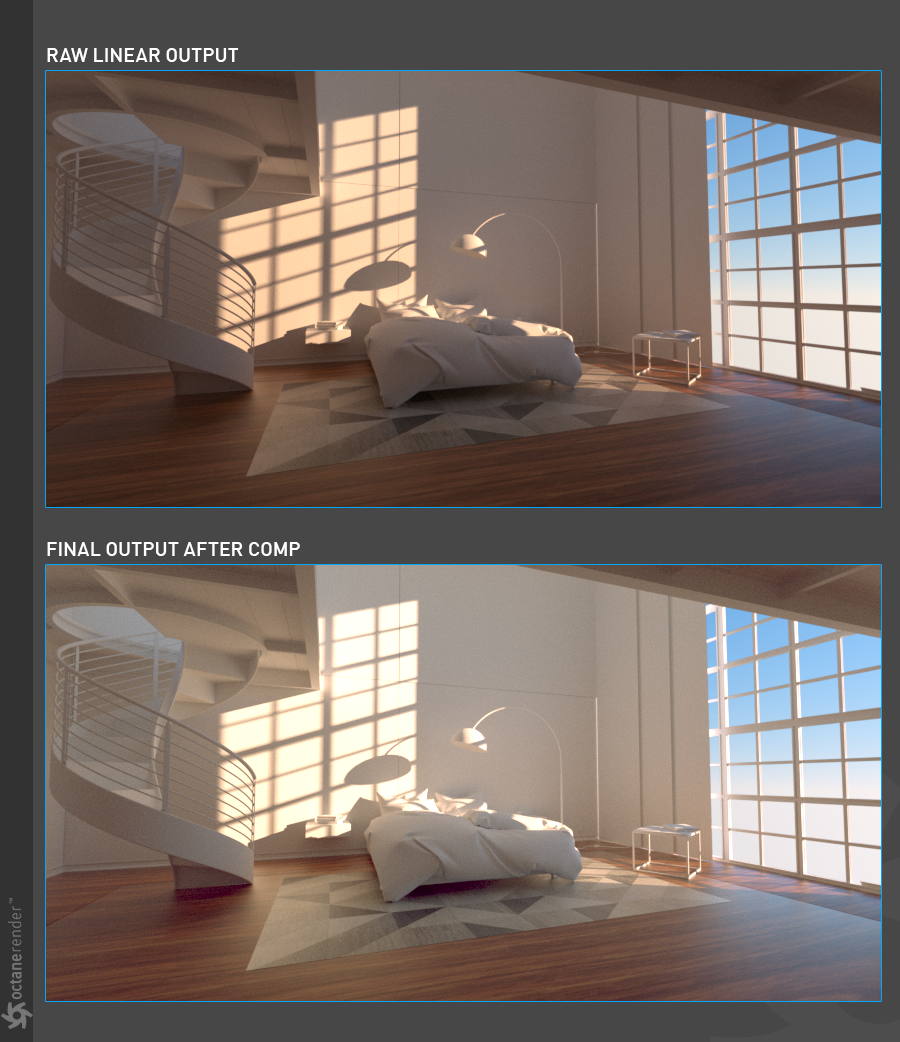
7- Now you are ready to work with fully Linear Workflow. You can enjoy the quality of Linear work using beauty and render Passes. You are now out of the dark and restricted area of sRGB and stepped into the comfortable and beautiful area of Linear Workflow. When you see how good the gradients, colors, tonalities and all other comp operations are, you will get a better understanding of what we are saying "Monitors we look at for years lied about light, color and tone".
In the picture below you can see the final result with raw Linear render. You can get output according to the media to be used when you are done. For example, if you look at the monitor you're using again, you can record classic Jpg or Png.
7-现在您可以使用完全线性的工作流程了。 您可以使用完美和渲染过程来享受线性工作的质量。 现在,您已经脱离了sRGB的黑暗和限制区域,而进入了线性工作流舒适而美丽的区域。 当您看到渐变,颜色,色调和所有其他压缩操作的效果如何时,您将更好地理解我们所说的“我们多年来观察的显示器都对光,颜色和色调撒谎”。
在下面的图片中,您可以看到原始的线性渲染的最终结果。 您可以根据完成操作后使用的媒体获得输出。 例如,如果您再次查看正在使用的监视器,则可以录制经典的Jpg或Png。
I want to see the same result as LV while I'm working in Linear.
Let's make a statement about this request that emerged at various times in the forum. First of all, the render result in LV is always "Tonemapped", whether it has a Camera Imager setting or not, unless you changed the response curve to "sRGB" or "Linear". And this tonemapped is actually quite good. If you are satisfied with this quality, there is no point in working with Linear Workflow anyway. Linear workflow is not a law. It is a matter of choice as we have stated in the beginning.
Let's say you have your final setup in the Camera Imager as shown in the picture below. And you want to get Linear output and work as a linear workflow. Suppose you also get your Render Passes are all linear.
在Linear中工作时,我希望看到与LV相同的结果。
让我们对论坛中多次出现的此请求进行说明。 首先,除非您将响应曲线更改为“ sRGB”或“线性”,否则LV中的渲染结果始终为“色调映射”,无论它是否具有Camera Imager设置。 这个色调映射实际上是非常好的。 如果您对此质量感到满意,则无论如何都无法使用Linear Workflow。 线性工作流不是定律。 正如我们一开始所说的,这是一个选择问题。
假设您已在Camera Imager中完成了最终设置,如下图所示。 您想获得线性输出并作为线性工作流工作。 假设您还获得了所有的渲染通道都是线性的。
Working with Linear Workflow for such a scenario may not be the right thing. Because there is already a picture of response curve applied from Octane Camera. So the picture is quite different from the raw linear output. In this case, when the render passes are linear, they will never match. If you want to work linear, you should never choose any color, exposure, gamma and especially "RESPONSE" from the camera imager. Because all these operations are actually some kind of compositing operations. Once you have a linear output, you will already be doing these operations in compositing software according to your desire and artistic outlook. Linear work is also a working way with the thought of "Color Grade". Here, if you already render in color graded picture and render passes in linear, it will be a little difficult to process in the compositing program. Therefore, if you want to work on a linear workflow, just select the sRGB response curve from the camera imager and Gamma should be always "1".
Finally, do not force yourself to work with Linear. As we mentioned, Tonemap is very good at final outputs and there is a lot to do with the camera imager from Octane. That's why we call the "Mini Compositing tool" for the camera imager and post effects.
在这种情况下使用线性工作流可能不是正确的选择。因为已经有Octane Camera应用的响应曲线图。因此,图片与原始线性输出完全不同。在这种情况下,当渲染通道为线性时,它们将永远不匹配。如果要线性工作,则永远不要从相机成像器中选择任何颜色,曝光度,伽玛值,尤其是“响应”。因为所有这些操作实际上都是某种合成操作。一旦有了线性输出,就已经可以根据自己的需求和艺术外观在合成软件中进行这些操作。线性工作也是“颜色等级”思想的一种工作方式。在这里,如果您已经在彩色渐变图片中进行渲染并且以线性方式进行渲染,则在合成程序中处理起来会有些困难。因此,如果要进行线性工作流,只需从摄像机成像器中选择sRGB响应曲线,并且Gamma值应始终为“ 1”。
最后,不要强迫自己使用Linear。如前所述,Tonemap在最终输出方面非常出色,并且与Octane的相机成像器有很大关系。这就是为什么我们将摄像机成像器和后期效果称为“迷你合成工具”。


赶快留个言打破零评论!~