vertex map
This node is for using Vertex Map for creating texture effects or using restriction for deformation objects. Since this topic is a broad subject, we will explain a few examples of use. To use this node, you need to know how the the Vertex Map works. For this, you can look at the online tutorials or Cinema 4D's help file. You can also go to this link for Maxon online help.
顶点贴图
该节点用于使用“顶点贴图”创建纹理效果或使用变形对象的限制。 由于本主题是一个广泛的主题,因此我们将解释一些使用示例。 要使用此节点,您需要了解“顶点贴图”的工作方式。 为此,您可以查看在线教程或Cinema 4D的帮助文件。 您也可以转到此链接以获得Maxon在线帮助。
HOW TO USE
Below you will see a few examples of using Vertex Map with Octane. You can download and examine all the scenes from link below.
Download scenes from here
如何使用
在下面,您将看到在Octane中使用Vertex Map的一些示例。 您可以从下面的链接下载并检查所有场景。
从这里下载场景
simple usage for texturing
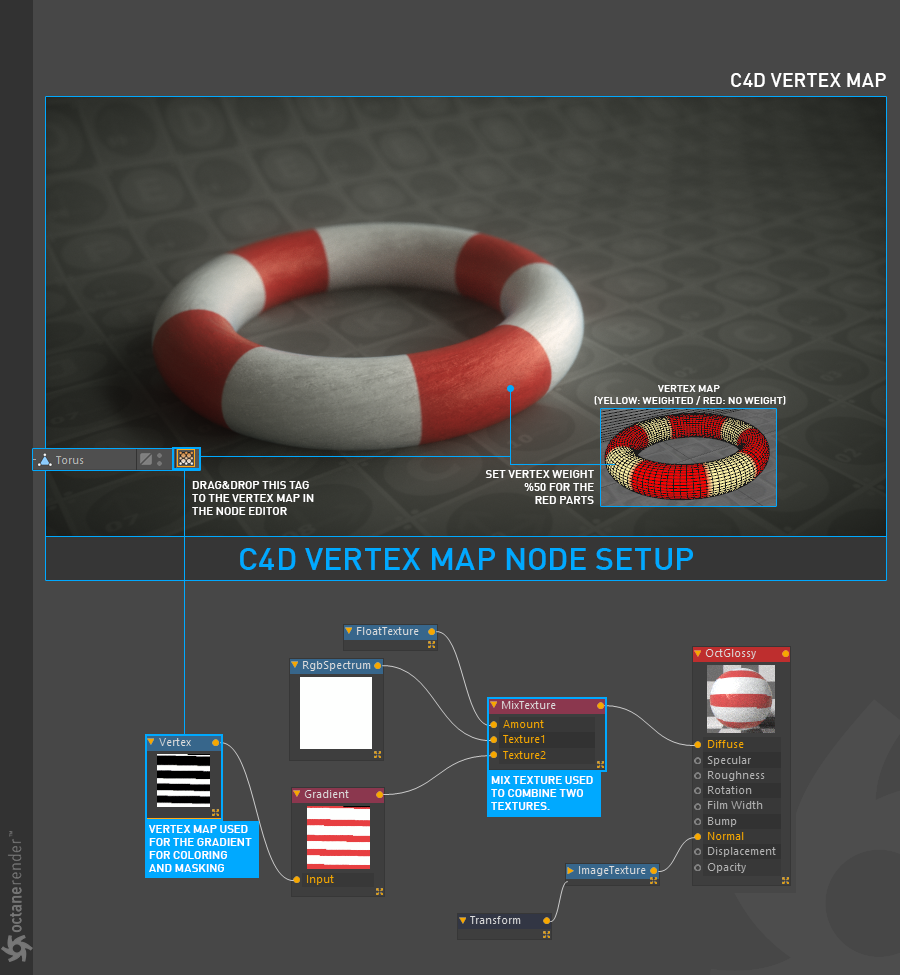
Open the Node editor and prepare the setup as you see in the picture below. In this setup, a vertex map has been prepared for some parts of the Torus object. When the vertex map is created, the vertex tag appears in the object manager. This Tag was assigned to the "vertex map" node in the editor. Then, the desired setup has been prepared using the nodes you already know. What is important in this scene is how to prepare the vertex map. The texture setup is pretty simple as you can see.
构造的简单用法
打开节点编辑器并准备设置,如下图所示。 在此设置中,已经为Torus对象的某些部分准备了一个顶点图。 创建顶点贴图后,顶点标签将出现在对象管理器中。 该标签已分配给编辑器中的“顶点映射”节点。 然后,使用您已经知道的节点准备了所需的设置。 在此场景中重要的是如何准备顶点图。 如您所见,纹理设置非常简单。
usING vertex map on octane scatter object wITH random effector
This example will be more useful if we explain step by step.
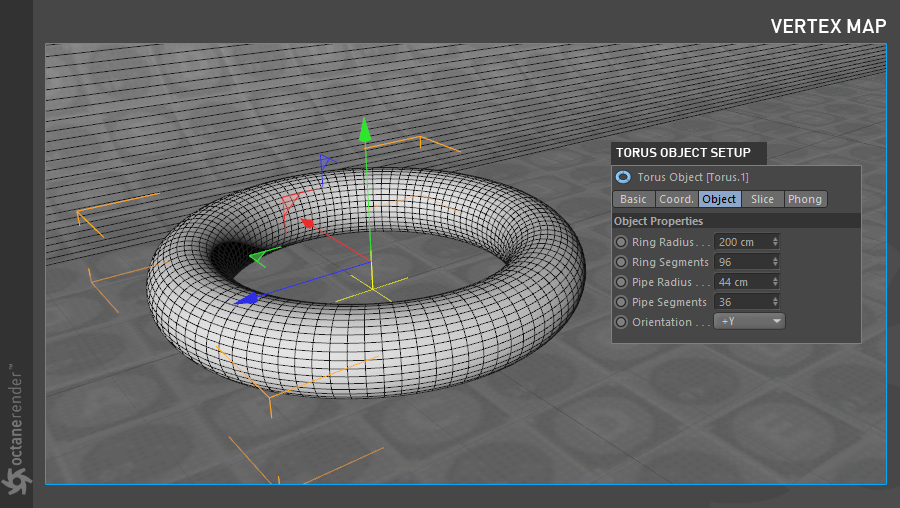
1- Create a "Torus" object and change the options as shown in the picture below.
在具有随机效应器的Octane散射对象上使用顶点贴图
如果我们逐步说明,则此示例将更有用。
1-创建一个“ Torus”对象并更改选项,如下图所示。
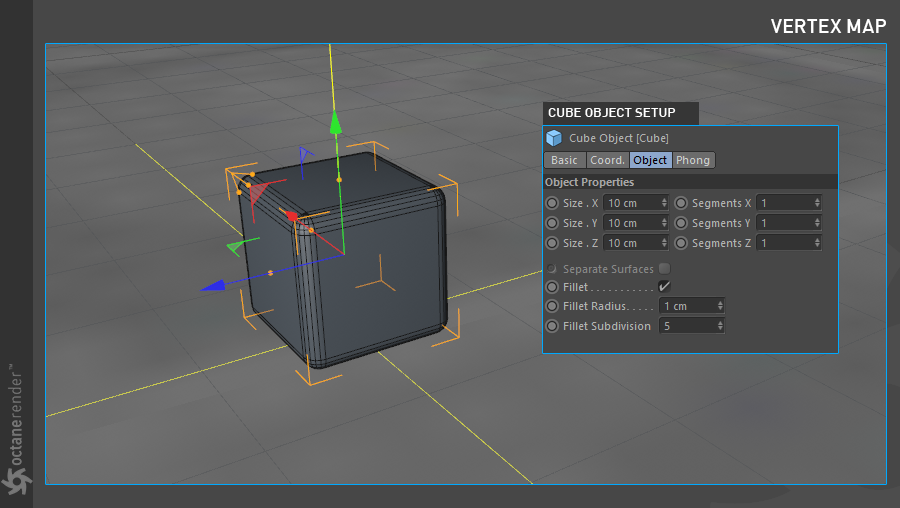
2- Then create a "Cube" object and change the options as shown in the picture below.
2-然后创建一个“多维数据集”对象并更改选项,如下图所示。
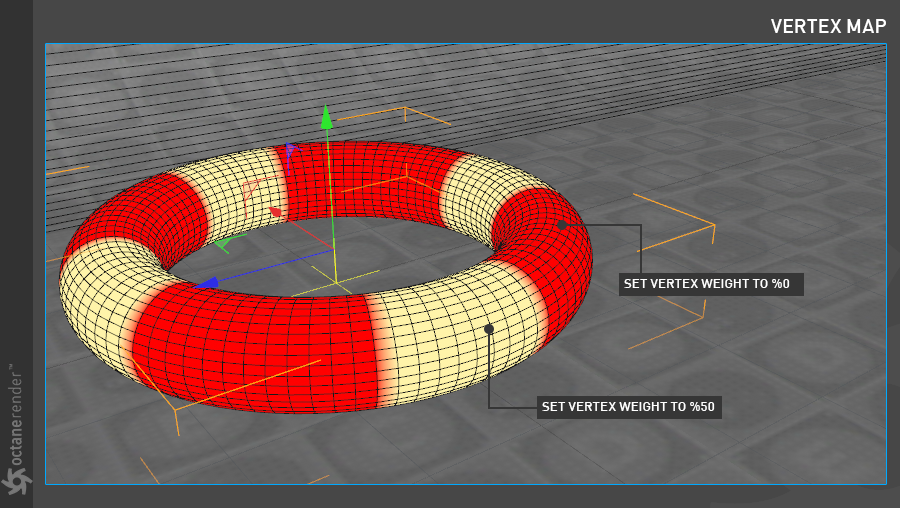
3- Now it's time to create a "Vertex map" for the Torus Object. First, we assume you know how to create Vertex Map. If you do not know, you can look at online tutorials or Cinema 4D's help file. There is enough information about this subject. Once you have this information, try to create a vertex map like in the picture below; or create another vertex map in your own direction. It's completely up to you. When you create the Vertex Map, the Object Manager will have a Vertex Tag next to the Torus Object. We will use this "Tag" in Octane Scatter Object.
3-现在是时候为Torus对象创建“顶点贴图”了。 首先,假设您知道如何创建顶点贴图。 如果您不知道,可以查看在线教程或Cinema 4D的帮助文件。 有关此主题的信息足够。 获得这些信息后,尝试创建一个顶点图,如下图; 或按照自己的方向创建另一个顶点贴图。 这完全取决于您。 创建顶点贴图时,对象管理器将在Torus对象旁边具有一个顶点标签。 我们将在Octane Scatter对象中使用此“标记”。
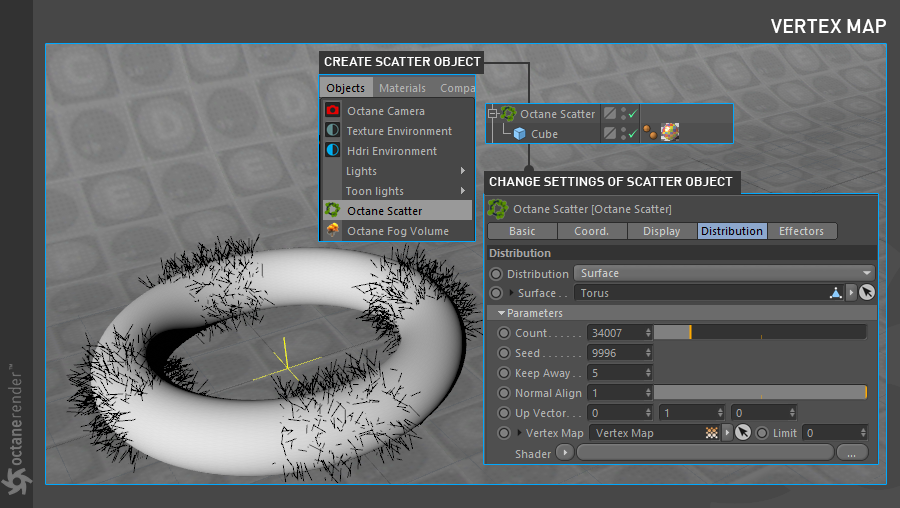
4- Now create a "Scatter Object" from the Octane Live Viewer menu. Make the Cube object a child of the scatter object. Then select Scatter Object and change the settings as you see in the picture below. Now drag and drop the torus object into the surface slot of the Octane Scatter object. You can also drag and drop the Vertex Tag, our main goal, into the "Vertex Map" area. We will not explain the options of the scatter object for now, as we will describe it in detail in the relevant section.
4-现在,从Octane Live Viewer菜单中创建“散布对象”。 使多维数据集对象成为分散对象的子代。 然后选择“散布对象”并更改设置,如下图所示。 现在,将圆环对象拖放到Octane Scatter对象的表面插槽中。 您也可以将我们的主要目标顶点标记拖放到“顶点贴图”区域中。 现在我们将不解释散布对象的选项,因为我们将在相关部分中对其进行详细描述。
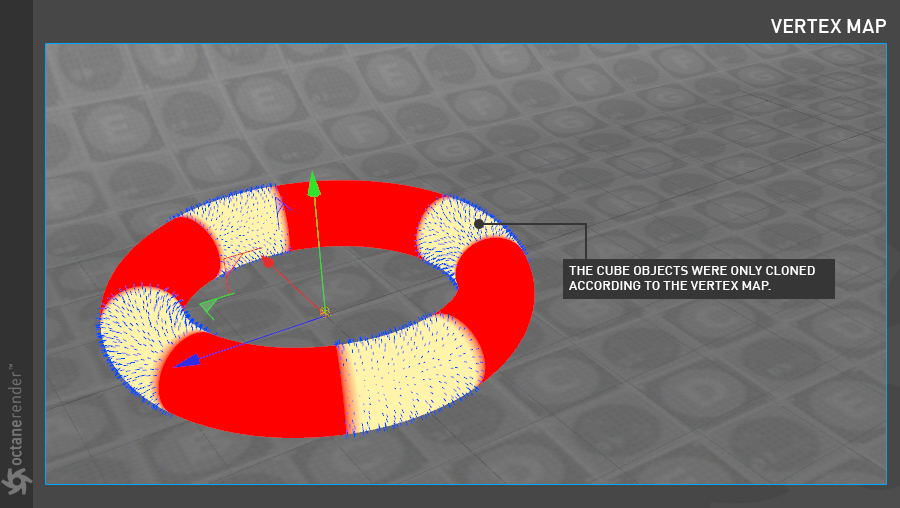
5- Once you have done this, you can see in the image below that the "vertex map tag" you defined. Here is the distribution of clones according to your vertex map. The Scatter object only clone the cube objects in the yellow regions. If you ask "Where are the cubes? I do not see them", this is just a viewport preview of the Scatter object and the line mode was selected as display to work efficiently.
5-完成此操作后,您可以在下图中看到您定义的“顶点映射标签”。 这是根据您的顶点图分布的克隆。 散布对象仅在黄色区域中克隆多维数据集对象。 如果您问“多维数据集在哪里?我看不到它们”,这只是Scatter对象的视口预览,并且选择了行模式作为有效显示的显示。
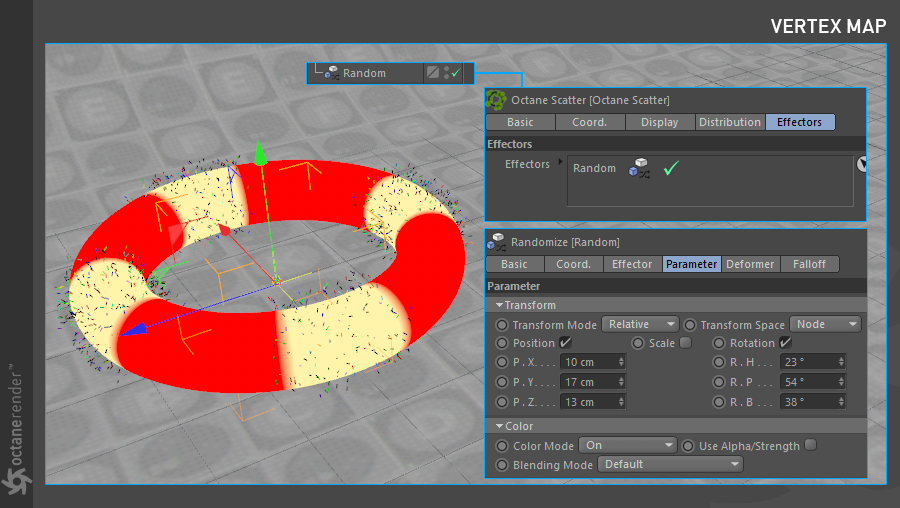
6- Now let's free the cloned objects from their default positions and use the "Random effector" to generate some variation. To do this, create a random effector from the Cinema 4D mograph menu and drag and drop this effector into the "Effectors" section of the Octane Scatter object. This section allows you to define any Effector on the Scatter object. Change the settings you see in the picture below for the random effector.
6-现在,让我们将克隆的对象从默认位置释放出来,并使用“随机效应器”生成一些变化。 为此,请从Cinema 4D mograph菜单中创建一个随机效应器,然后将该效应器拖放到Octane Scatter对象的“ Effectors”部分。 本部分允许您在Scatter对象上定义任何效应器。 更改下图所示的随机效应器的设置。
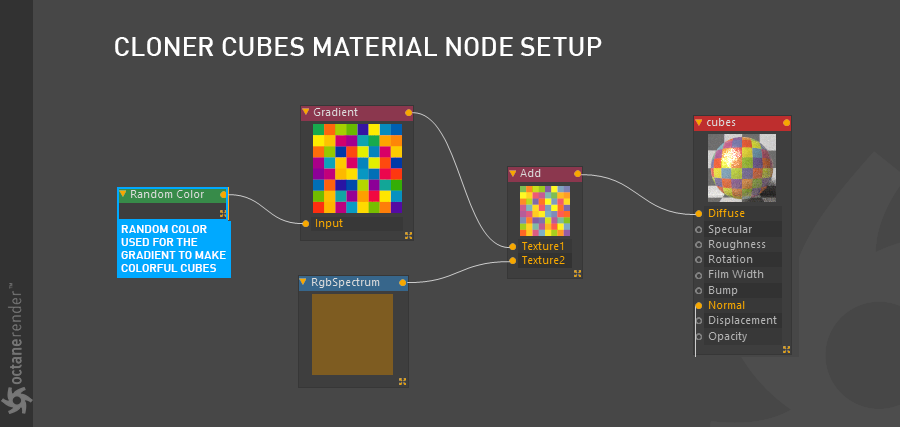
7- Now it's time to create and assign a material to the clone cubes. Open the node editor for this and prepare the setup as you see below. Since we have already explained all the texture nodes in this area, you will not have trouble creating this setup. After completing the setup, assign the material to the cube object.
7-现在是时候创建材质并将其分配给克隆多维数据集了。 为此打开节点编辑器,并准备设置,如下所示。 由于我们已经解释了该区域中的所有纹理节点,因此创建此设置不会有麻烦。 完成设置后,将材质分配给立方体对象。
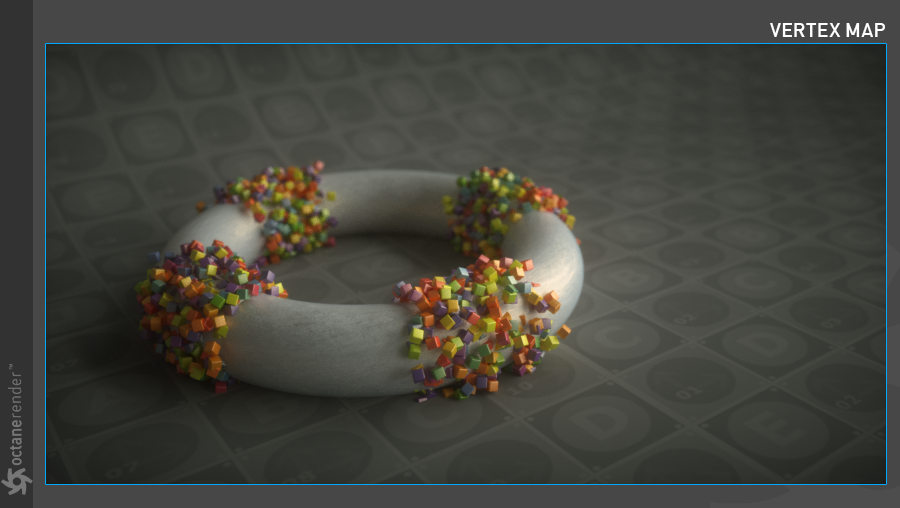
8- Now, you can run Live Viewer. If you've done everything right, you'll get a render like the picture below. Of course other cosmetic factors (Lights, colors, post process etc.) may need to be created according to your own taste. As you can see, with the vertex map we have defined in the octane scatter object, the cubes have only been cloned according to the vertex map. You can easily use this technique in many scenarios.
8-现在,您可以运行Live Viewer。 如果一切正确,您将获得如下图所示的渲染。 当然,可能需要根据您自己的口味创建其他修饰因素(灯光,颜色,后期处理等)。 如您所见,使用我们在Octane分散对象中定义的顶点图,仅根据顶点图克隆了多维数据集。 您可以在许多情况下轻松使用此技术。
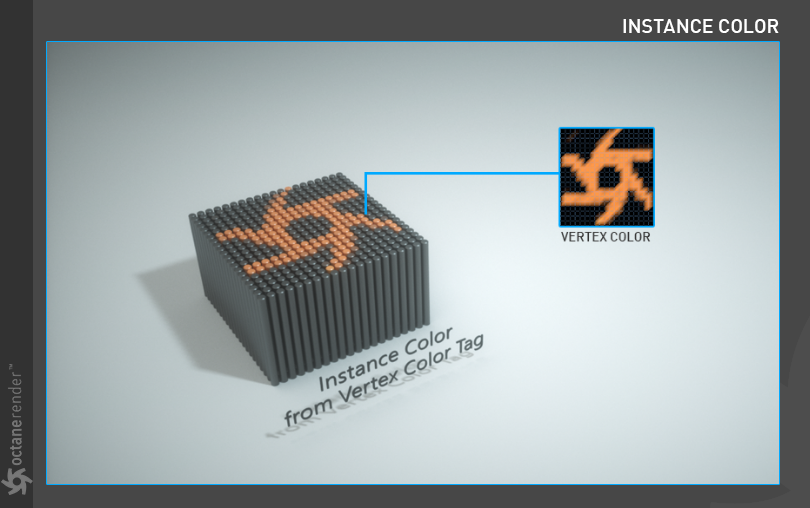
INSTANCE COLOR from vertex color
We have already described this example in the "Instance Color" section. If you want to look again, you can go this link.
顶点颜色的实例颜色
我们已经在“实例颜色”部分中描述了此示例。 如果您想再次查看,可以转到此链接。


赶快留个言打破零评论!~