gradIent
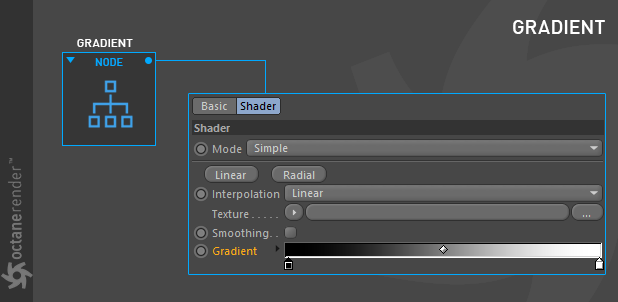
The Gradient texture produces a gradient blend between colors. It accepts an input to determine how the gradient is mapped to the surface. This last sentence is important because this node works differently from the gradient style than the classic gradient style. In Octane gradient, any 2 colors will mix with each other if you do not use the input channel. Just like in the mix shader or cosine mix. To understand how this node works, you can refer to the following example usage.
渐变
渐变纹理在颜色之间产生渐变混合。 它接受输入以确定渐变如何映射到曲面。 最后一句很重要,因为此节点与渐变样式的工作方式不同于经典渐变样式。 在Octane渐变中,如果不使用输入通道,则任何两种颜色都将相互混合。 就像在混合着色器或余弦混合中一样。 要了解此节点的工作方式,可以参考以下示例用法。
HOW TO USE (IN SIMPLE MODE)
Gradient texture works in 2 modes. Simple and Complex. Let's first explain how simple mode works by looking at the following usage examples:
使用方法(在简单模式下)
渐变纹理在2种模式下起作用。 简单和复杂。 首先,通过查看以下用法示例来说明简单模式的工作原理:
Coloring any greyscale procedural texture using gradient
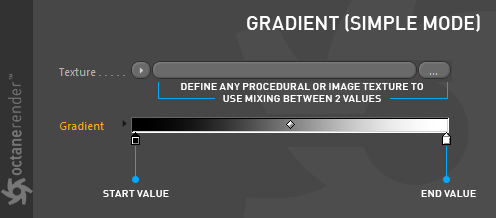
In simple mode, we'll say "value" for each color you assign to the gradient. This value can be any color or image texture. In simple mode you can define a maximum of 2 values, and any color or image texture will be mixed according to the data you define in the input node.
使用渐变为任何灰度程序纹理着色
在简单模式下,我们将为您分配给渐变的每种颜色说“值”。 该值可以是任何颜色或图像纹理。 在简单模式下,您最多可以定义2个值,并且将根据您在输入节点中定义的数据来混合任何颜色或图像纹理。
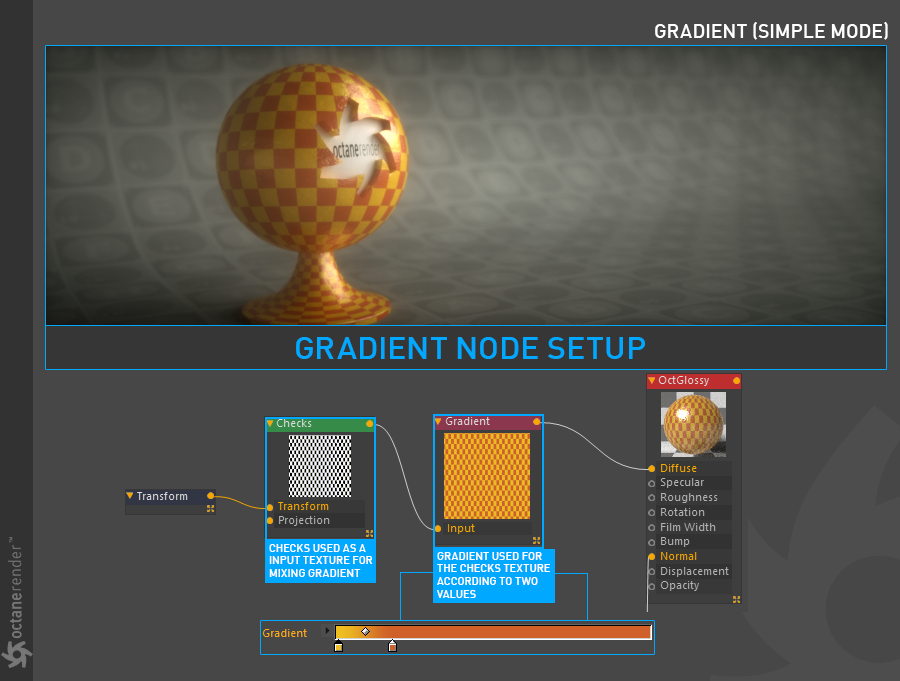
As you can see in the Node setup below, the greyscale checker is used as texture input and the colors are changed by entering two separate values (ie, color) in the gradient.
如您在下面的“节点设置”中所看到的,灰度检查器用作纹理输入,并且通过在渐变中输入两个单独的值(即颜色)来更改颜色。
RE-Coloring ANY Image texture using gradient
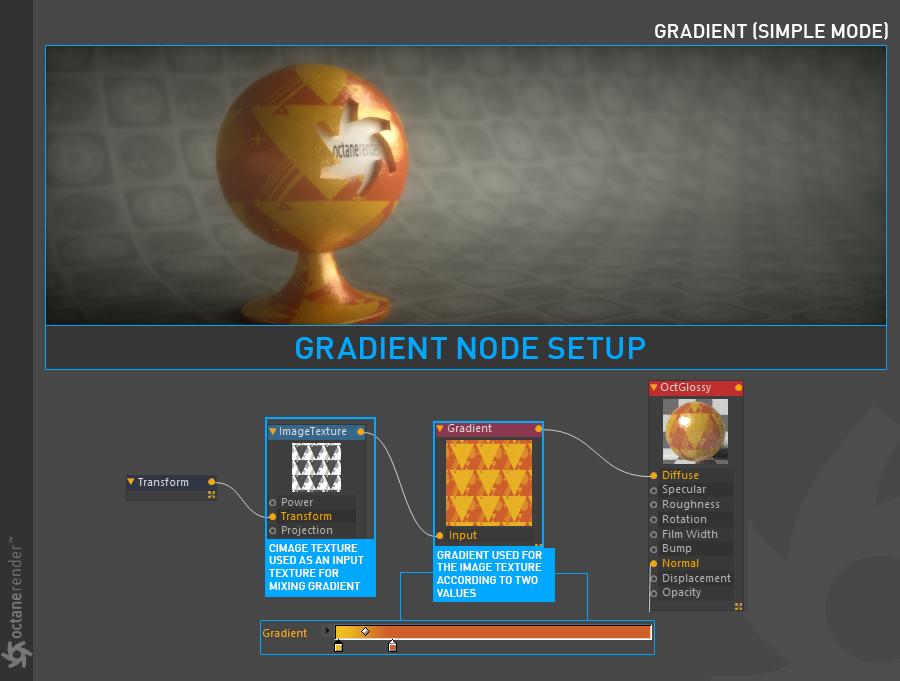
If you simply want to change the colors of the image texture you uploaded, you can also use Gradient. The following setup shows this process.
使用渐变重新着色任何图像纹理
如果您只想更改上传的图像纹理的颜色,则也可以使用“渐变”。 以下设置显示了此过程。
using gradient to get a classIc gradIent look
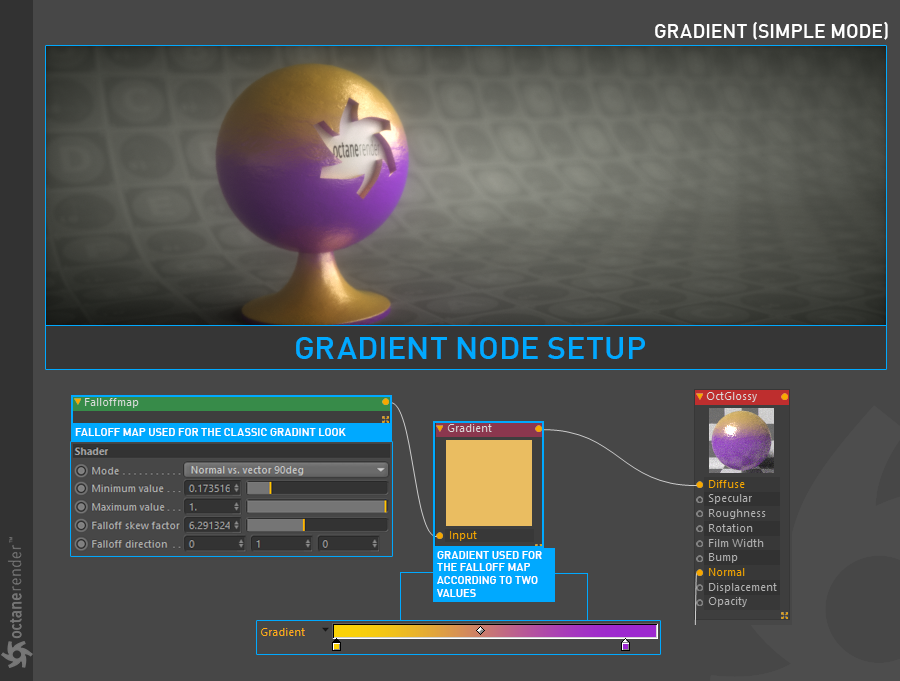
As you can see, the Gradient name may have misled you. While you were expecting a classical gradient function, the Octane gradient actually appeared as a much more powerful tool. But still, if you are asking "How do I make the classic gradient?", the following setup will help you. You can also use native Cinema 4D's "Gradient" for the classic look of any gradient blends.
使用渐变获得经典的渐变外观
如您所见,“渐变”名称可能误导了您。 当您期望经典的梯度函数时,Octane梯度实际上是一种功能更强大的工具。 但是,如果您问“如何制作经典渐变色?”,则以下设置将对您有所帮助。 您还可以使用Cinema 4D的本机“渐变”获得任何渐变混合的经典外观。
using gradient as a mask functIon for dIrt (or ANY OTHER PROCEDURAL TEXTURES)
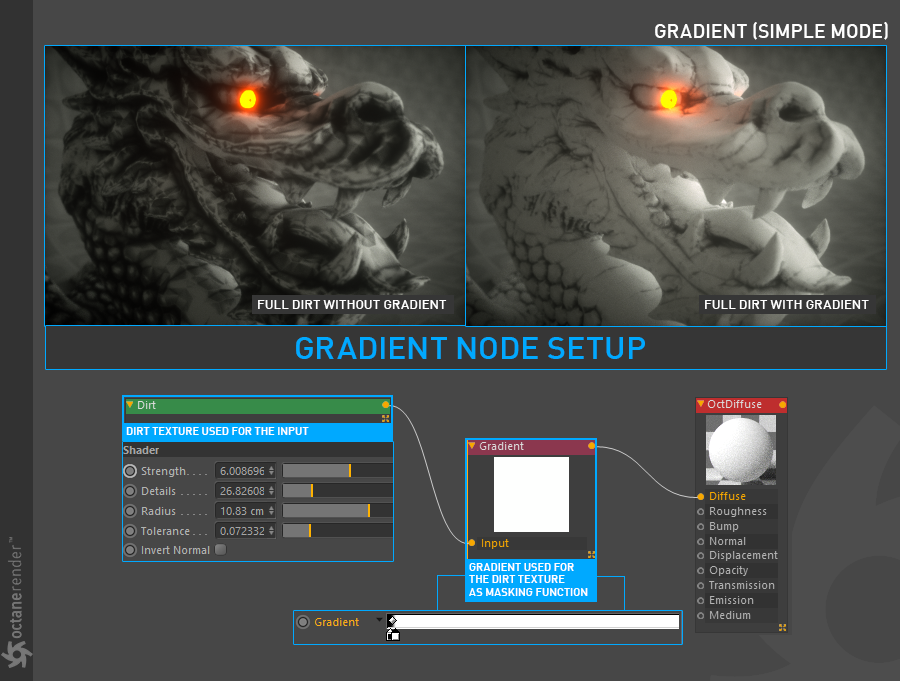
You can also use the Gradient Node as a mask. The default values, black and white (or float values which is 0 and 1), can use as a masking functions. In the following setup the "Dirt Texture" is assigned to the Dragon Object and then using the gradient to make this dirt appear only in the crevices. You can easily use this method in many places and scenarios.
使用渐变作为图形的遮罩功能(或任何其他程序纹理)
您也可以将“渐变节点”用作遮罩。 黑白的默认值(或浮点值为0和1)可以用作遮罩功能。 在以下设置中,将“污垢纹理”分配给了Dragon对象,然后使用渐变使此污垢仅出现在缝隙中。 您可以在许多地方和场景中轻松使用此方法。
HOW TO USE (IN complex MODE)
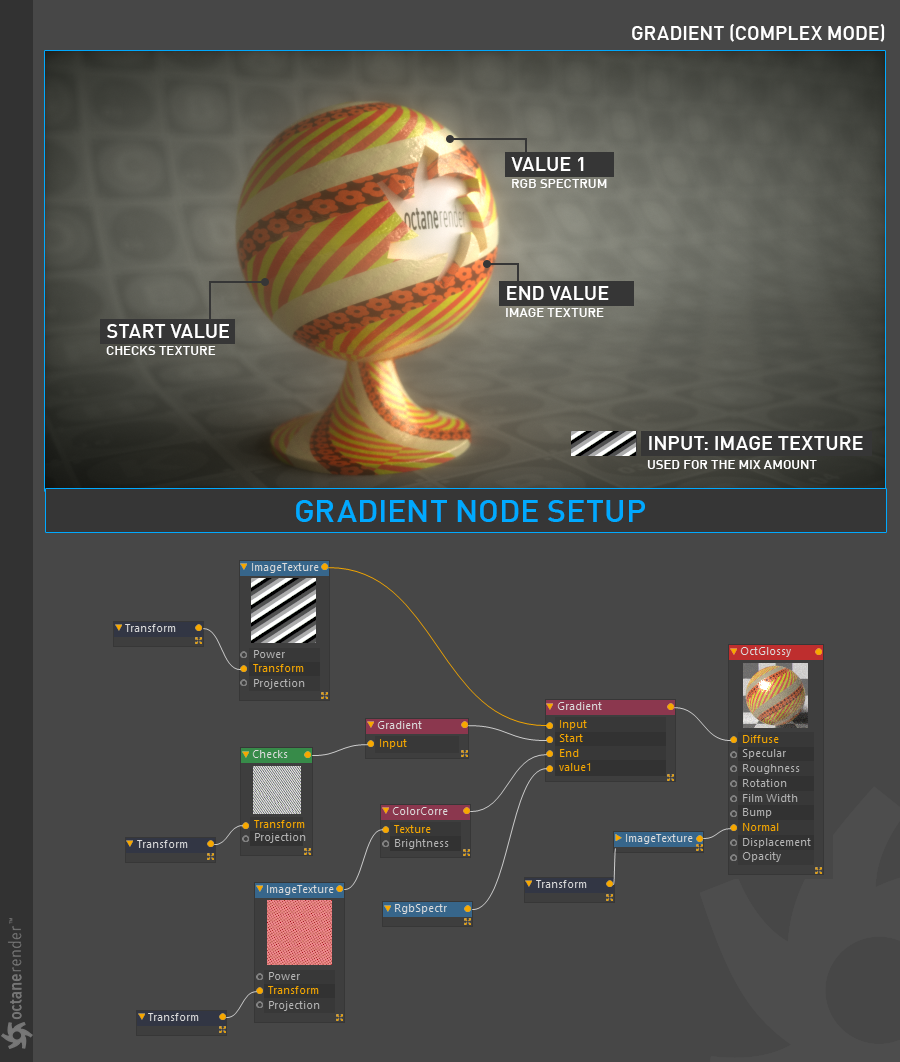
Gradient texture shows its power in complex mode. Instead of 2 values in Simple Mode, you can use many value values in this mode and also it's possible to use any image or procedural texture for each of them. Also there is no 2 texture limit in this mode like in the "Mix Texture". To switch to complex mode, first select "Mode / Complex" from the gradient option and then go to the gradient menu. Now, every color you enter from the color section is "value". In this case you can add "knots" to gradient colors according to the complexity of the material. The following setup is a simple setup. Only 1 "value" is used except the "Start and End" values to get the texture in the picture. Also one image texture used as a input texture and mix factor. As you practice, you will understand much better how gradient works. You can download and examine the sample scene from the link below.
Download the scene from this link
使用方法(在复杂模式下)
渐变纹理在复杂模式下显示其功能。 您可以在此模式下使用多个值值,而不是在简单模式下使用2个值,并且还可以对每个值使用任何图像或程序纹理。 同样,在这种模式下,如“混合纹理”中一样,没有2个纹理限制。 要切换到复杂模式,请先从渐变选项中选择“模式/复杂”,然后转到渐变菜单。 现在,您从颜色部分输入的每种颜色都是“值”。 在这种情况下,您可以根据材质的复杂性在渐变色上添加“结”。 以下设置是一个简单的设置。 除了“开始和结束”值外,仅使用1个“值”来获取图片中的纹理。 还有一个图像纹理用作输入纹理和混合因子。 在练习时,您将更好地理解渐变的工作原理。 您可以从下面的链接下载并检查示例场景。
从此链接下载场景
gradIeNT settIngs
渐变设置
Mode
From here you can select the gradient mode. There are 2 modes: Simple and Complex. Both are explained above.
模式
从这里您可以选择渐变模式。 有2种模式:简单和复杂。 两者都在上面进行了解释。
lInear and radIal optIons
You can select the gradient style from here.
线性和径向选择
您可以从此处选择渐变样式。
InterpolatIon
Select from Constant, Linear or Cubic to determine the rate at which colors blend from one gradient knot to the next.
插值
从“常数”,“线性”或“三次”中选择,以确定颜色从一个渐变结到下一个渐变结的混合速率。
texture (Input)
Input to determine the way the color is mapped to the surface. The importance of this option is explained in the examples above. For an accurate mix, you can define RGB / Alpha / Greyscale procedural or image texture here.
纹理(输入)
输入以确定颜色映射到表面的方式。 上面的示例中说明了此选项的重要性。 为了精确混合,您可以在此处定义RGB / Alpha /灰度程序或图像纹理。
texture (Input)
Makes the mix style smooth.
纹理(输入)
使混合样式平滑。
gradIent FIELD
From here you can add "value" or knots according to your chosen gradient mode. In Simple Mode, only the start and end values are work; if you want to add a third or more knot you need to change the Complex mode for this.
梯度场
在这里,您可以根据所选的渐变模式添加“值”或“结”。 在简单模式下,只有开始和结束值有效; 如果要添加第三个或更多个结,则需要为此更改“复杂”模式。


赶快留个言打破零评论!~